Design Features
Spotlights equipped with LEDs consume less electrical energy. Their maintenance is minimal and low-cost. Their service life is up to 90 thousand hours. They can be installed not only in the room, but also outside. Such devices do not deteriorate due to unfavorable negative conditions. The design of floodlights allows them to emit a lot of light.
You can make a homemade LED spotlight. If any breakdowns occur, they will not be difficult to fix.
The LED spotlight consists of several parts:
- Case boxes;
- Staple;
- Matrices. The diodes are attached to the board and protected from damage by special polymers;
- Drivers.
Features of the device of powerful 1,3,5 W LEDs for floodlights
Visually, you will not be able to tell the difference between powerful 1,3,5 W diodes, unless, of course, you are a “super professional”. The difference can only be determined by the intensity of the light. And then, not always. There may be some pitfalls. If you have a special tool, you can determine how powerful the diode is by comparing the dimensions of the crystal itself. But not everyone has such devices. And in everyday life they are not really needed.
In the photo you can see that the production of these types of diodes is quite complex. And this leads to higher prices for the latter.
By and large, powerful 1,3,5 W diodes are already outdated. If we take into account the use in LED spotlights. To obtain more or less high-quality light characteristics of diodes, you need a large number. And this is far from the best option from a pricing standpoint. I have been observing for a long time how most sellers are trying to “at least” sell their goods somewhere.
But there are also advantages to such LEDs - thermal heating. It is quite easy to handle compared to other types of chips.
Electrical and technical specifications
If you are making a homemade spotlight, first check the features of its electronics. This way you can get the job done efficiently and eliminate the influence of high temperatures on the device.
Solid-state semiconductors respond negatively to temperature changes. This leads to their degradation and reduction of alloying additives.
If the active panel of the device heats up to a critical temperature of +60°C, the intensity of the emitted light will decrease or a complete breakdown will occur. Remember, the higher the power of the LED, the less time it will take to fail because it will overheat.
When you make a device at home, take care to create a high-quality heat removal system. Divide the emitter into a thoughtful number of parts and arrange them correctly. The choice is up to you: parallel or serial. If a simple type of spotlight is being manufactured, only one radiation element can be installed.
Connecting LED strip
Let's move on to the tape itself. Measure the LED strip of the required length according to the dimensions of your aluminum sheet.
In total you will need two segments. Solder them together in parallel.
Then glue it onto an aluminum backing.
Please note that for greater safety in places where contacts are soldered, it is advisable to place paper tape under the tape.
It will act as an insulator and prevent a possible short circuit to the housing.
Technically, the lamp is almost ready. You can apply voltage to it and turn on the toggle switch.
However, it all looks rather unattractive. Additionally, direct light from LEDs without diffusion is not very good for the eyes.
Fastening components
Before you start assembling a powerful spotlight, stock up on parts and components. If you have a car, some of the components will be found at home. The remaining part can be purchased, or borrowed from friends.
To make a lantern with your own hands you will need:
- LED matrix equipped with a driver. Such parts are installed on poles with lamps that have stopped working. All you have to do is replace the lamps that have failed. You can buy a new part at an electrical goods store.
- Frame. It can be made from metal parts and plywood. A halogen flashlight is suitable for the housing. You can find an old one that you use for fishing or hunting, or you can buy a new one.
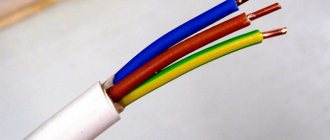
- Wires for connecting parts and connecting the device to the electrical network.
- Foil for reflector. You can purchase this material at your nearest store. Choose tapes with high density.
- Tough glue.
- Sealant.
- Radiator for cooling.
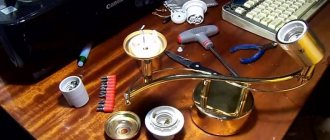
You can see the entire tool here. The tools that are useful for making a flashlight include:
- grinder;
- welding machine;
- a drill equipped with a drill;
- soldering iron;
- solder.
Causes of failure
- Unstable electrical network (voltage drops beyond the operating current);
- short circuit of a phase to the device body or to neutral;
- incorrect connection;
- overvoltage;
- use of overcurrents.
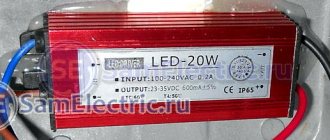
To select an LED driver, it is necessary to comprehensively consider the characteristics of the device:
First, determine the power source. A standard AC voltage network, battery, power supply and much more are used. The main thing is that the input voltage is within the range specified in the device passport. The current must also be suitable for the input network and the connected load.
Manufacturers produce devices with or without housings. The housings effectively protect against moisture, dust and negative environmental influences. However, to integrate the device directly into the lamp, the housing is not a necessary component.
Step by step process
To make a mini anti-aircraft searchlight with your own hands, follow the step-by-step instructions. The assembly technology will be discussed in more detail below.
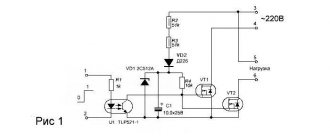
Drawing and diagram
You need to study the LED connection diagram. The power of one radiating element will not be enough. So prepare a few pieces.
Most often, the circuit provides only one circuit, consisting of several or one LED. Most circuits work on the same principle: LEDs are connected to a matrix where a current-limiting resistor is installed. Instead of an electronic current stabilizer, you can use a driver.
Frame
If you choose a case, this can be done in several ways:
- First, select a “box”, and then select all the necessary parts based on its size. Use this option if the dimensions of the spotlight and mounting are more important.
- If the priority is the power of the device and the flow of light, choose the housing last.
There are several methods for selecting a shell for a spotlight:
- Use an old unnecessary spotlight - from a headlight or a long-range flashlight. It can be either halogen or incandescent. Take it apart and get rid of the old filling.
- Shop body. Despite the costs, this method is more advantageous in technical and aesthetic terms. You can also make a spotlight on a tripod with your own hands, so it will be higher.
- Make your own body. To do this, use available materials.
When choosing a case, keep in mind that it must be multifunctional: protect the internals and serve as a radiator to remove heat from the LEDs. If the spotlights will have a power of more than 50 W, choose aluminum structures. They have greater thermal conductivity.
Lamp selection
To select a lamp, use the following parameters:
- Power of the finished device. If the spotlight is less than 30 W, then there is no point in creating a lighting device. Popular options are with a power of 50 W or more. The maximum amount of light is provided by spotlights with a power of 100 W or more.
- Voltage. In order not to look for a power source, set the voltage to 220 V. If desired, you can install LEDs at 12 V to recharge from the car network. You can make a battery-powered spotlight by inserting batteries into it.
When choosing LEDs, consider the following parameters:
- LED voltage;
- operating current.
Collection
- You need to start assembling the spotlight from the matrix. It is formed from LEDs to which a resistor is attached. Assembly is carried out on foil or a canopy. Consider the heat dissipation design in advance.
- You need to form a reflector. To do this, cover the compartment with LEDs with foil.
- When the matrix is ready, it is attached to the body. To do this, use a soldering iron and solder. Don't forget to remove the power cable or install batteries. If everything is calculated correctly, after turning on the device, it will light up brightly.
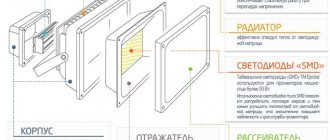
What are modern reflectors like?
Manufacturers are constantly expanding their model range, significantly expanding the possibilities of light tuning. Refractors are available for a wide variety of LEDs and their combinations. Now you don’t have to limit yourself to just one shade.
The devices reflect light in the forward and reverse directions, thereby making the distribution of rays more uniform.
Reflectors can be designed for installation with an acrylic rod, and they will help to neatly hide the LEDs for their most effective use in the rear lamps of automobiles.
Refractors can correct and redirect LED illumination. They are designed to operate at right angles to the diode axis. When selecting a reflector, it is important to take into account all the parameters of the light sources. Case types and designs are constantly being updated, so it’s worth regularly monitoring new products so as not to miss out on the most interesting optics options.
Reflectors significantly improve the properties of the flow produced by LEDs. They are equally needed for tuning car optics and for assembling flashlights and lamps. You can try to make simple models with your own hands, but in some cases it is simply pointless to compete with manufacturers.
Expert opinion
It-Technology, Electrical power and electronics specialist
Ask questions to the “Specialist for modernization of energy generation systems”
Types and types of LED spotlights on different LEDs Connecting the wire from the LED spotlight to the 220 V AC network must be done after de-energizing the installation site and turning off the supply voltage. Ask, I'm in touch!
How to use a spotlight
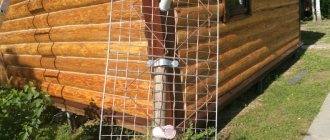
Most often, homemade LED spotlights are used to illuminate the yard, garage or other local areas.
You can use your imagination and make a more advanced model - make a portable device (on a tripod, which was mentioned earlier), which can be used for studio photo or video shooting.
Small spotlights with a power of up to 24 W can be used to illuminate car interiors. You can take them with you on picnics and create additional standard lighting. Before the New Year holidays, you can decorate the building with homemade spotlights.
Knowing how to make a reflector for your home, you understand that it is not difficult. This will require simple materials and tools, and the assembly process will take 2-3 days. If everything is done correctly, you can create original lighting fixtures that will decorate your home area.
Selecting LED strip
So, the length of the fluorescent lamp is 30 cm, power consumption is 8 W. In order for the light to be bright enough to work normally at your desk, you need to choose the right tape.
Firstly, it should be noted that an LED strip is, in fact, a flexible plateau on which LEDs and resistors (current-limiting) are installed. Secondly, pay attention to its technical characteristics, especially regarding the brightness of the diodes. Optimal option: 780-900 Lm/m. Thirdly, adjusting the tape itself to the size of the lamp is not a problem
It is trimmed according to the areas marked on it. You can't cut in other places. Fourthly, there is an adhesive layer on the back of the tape, so it will be easy to attach it to the surface of the lamp.
Place for cutting LED strip
Diagnosis and repair of RGB LED lighting system
Most often, one of the cases of inoperability of the LED lighting system with RGB strips occurs: – the strip does not light up completely; – the ribbon glows in only one or two colors.
If the tape does not glow completely, this may be due to a malfunction of the power supply, controller or remote control. If there is no glow of one or two colors in the strip, the cause may be a failure of the controller or LED strip. It is difficult to describe all possible cases of a malfunction, so I will provide instructions on how to check each of the system devices separately.
Checking the power supply (adapter)
In the event of a complete stoppage of LED lighting, as with any product powered from a household electrical outlet, the first thing you need to do is check the supply voltage to the device. To do this, you need to check whether the plug is inserted into the socket and whether there is voltage in the network.
To check the presence of voltage in the outlet, just insert the plug of a table lamp, cell phone adapter or any other electrical appliance into it. If everything is in order with the voltage supply, then proceed to check the power supply (adapter).
First of all, you need to check the reliability of the connection of the power supply to the controller; it is quite possible that the coaxial plug has jumped out or is not inserted all the way into the controller socket.
Modern DC power supplies differ from each other in the output voltage and load current. If you decide to try to repair the power supply yourself, then it would be a good idea to read the site’s article “How to repair a computer power supply.” By the way, a computer power supply can be successfully used to power LED strips.
Checking the operation of the remote control
Even if the power supply, controller and LED strip are working properly, the strip will not light until the ON button is pressed on the remote control.
Working principle of IR remote control
The control signal from the remote control is an infrared beam modulated by a digital signal. Humans cannot see infrared radiation, but it propagates according to the laws of visible light. Therefore, the remote control must be aimed at the controller sensor and there should be no obstacles in its path.
Checking and replacing the battery in the remote control
It will be impossible to turn on, turn off and control the operating mode of the LED strip if the battery is dead. The remote control is equipped with a CR2025 round coin battery with a voltage of 3 V. A sign of the end of the battery life is a decrease in the distance from which control from the remote control is still possible.
| Parameter | Unit | Magnitude |
| Ambient temperature during operation | WITH | minus 10. +50 |
| Input voltage | V | DC 12 or 24 |
| Input voltage connector type | — | coaxial DC Jack 5.5 mm |
| Output type | — | three channels (RGB) |
| Method of controlling RGB LED strip | — | pulse width modulation (PWM) |
| Load current per channel | A | 2 |
| Common wire for channels | — | positive (anode) |
| Remote control distance from remote control, not less | m | 8 |
| Remote control control method | — | infrared rays IR |
| Remote control power supply | things | 1 CR2025 battery (3V) |
Expert opinion
Viktor Pavlovich Strebizh, lighting and electrical expert
Any questions ask me, I will help!
This article will tell you why you should choose this type of lamp and how to choose the most optimal option. If there is something you don’t understand, write to me!