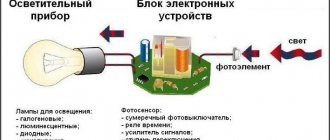
How does an outdoor photo sensor work?
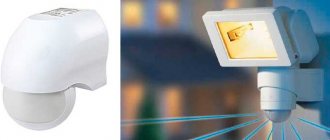
If you install a light sensor to turn on the light above the entrance to the entrance, it will work on the same principle as a regular lamp with a motion sensor. The operation of the lamp is controlled by a sensor that senses changes in the movement of objects in the control zone. Or a photosensitive element that responds to changes in light flux.
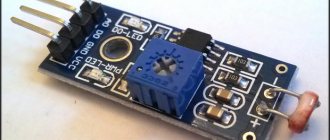
The main element of such a device is a sensitive photocell, which is located on the board and can change its properties.
The photocell is implemented on the basis of a photoresistor. As long as the level of light falling on its surface is sufficient, the power circuit is open. Twilight thickens, and the parameters of the photocell change, causing the circuit to close. The lamp in front of the entrance turns on. In the morning the reverse ceremony takes place. As soon as the light level rises to a predetermined value, the circuit opens and the lamp goes out. This is the basic principle of operation of a photo relay.
If you additionally install a motion detector, the light will turn on exactly at the moment when the sensor detects movement.
The design and principle of operation of the relay for automatically turning on the light
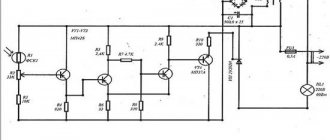
The main element of devices of this type is a photo relay, the contacts of which close when the illumination decreases to a certain level and open when the level of natural light reaches the specified values. The main elements and operating principle of the photo relay are shown in the following figure. Operating principle and design of a photo relay The photo relay consists of several structural elements:
- housing – it contains all the elements of the device and provides mounting holes or other structural devices;
- photocell - a light-sensitive current sensor that supplies pulses to turn control circuits on and off;
- electronic unit - consisting of: a power module, a signal amplification device and an electromechanical relay.
In models intended for switching high-power loads, the electronic unit may include a repeater of electromechanical relay contacts. To prevent false alarms, the design of the device can provide for setting a time delay for actuation, which can be caused by the light of car headlights or other light sources in the dark.
Various electronic devices that are triggered when light rays hit them can be used as a photocell: phototransistor and photothyristor, phototriac or LED. Light sensors vary in design, functionality and technical characteristics
Pros and cons of using an outdoor photo relay
The main advantage of the daylight sensor is tangible energy savings. The undoubted advantages of systems using photocells are:
- The device operates at low currents.
- Instant on/off.
- High performance.
- There are no rubbing mechanical parts, which increases the durability of the device.
- Long period of operation.
But it should be borne in mind that the device is not designed for use in extreme conditions. Therefore, you should carefully monitor its tightness. Ingress of moisture can, if not completely disable the sensor, damage it by causing oxidation of the relay contacts.
A dirty and dusty sensor will also not function properly. The entire device must be kept clean at all times.
Selecting a location
How effective the light sensor will be for turning on the light largely depends on its location. The box can be located inside or outside the house, depending on the purpose of the selected model.
When choosing a location for installing the device, you need to consider:
- Illumination. When choosing a location, you should avoid areas exposed to artificial light. If the area is located in close proximity to windows, streetlights, and is often illuminated by car headlights, it should be abandoned. At the same time, there should be no obstacles to the passage of natural light. Otherwise, the sensor will not work correctly;
- Reliability of fastening. The base on which the device is fixed must be able to support its weight. The fastening itself should not come into contact with components that do not have sufficient strength and reliability;
- Availability. During operation of the device, it may be necessary to monitor the condition. In addition, the selected site should allow for reliable fixation of the device. When choosing a location, preference is most often given to sites located at a height of 1.8–2 m. This height will allow for smooth installation and will not create difficulties during maintenance or cleaning. If the device is placed higher, a ladder will be required for installation and maintenance.
Installation work
The daylight sensor is installed according to the specific manufacturer's recommendations. A detailed algorithm of actions is described in the instructions supplied with the model.
The connection process usually does not cause serious difficulties. Many people install a light sensor in their home with their own hands. To install, you need to carefully inspect the device.
Each model will have three wires at the input: power, neutral, phase. Their colors may differ depending on the manufacturing company, but there will definitely be red, which is where the phase comes out. It is designed to connect the load.
Brown is used for power connection. Some manufacturers make it black. Zero is colored blue or green. The connection of the wires must be made in a special sealed distribution block.
If you plan to connect one device, the distribution block is located in close proximity to the relay. However, before you begin installation work, you should carefully read the recommendations of the manufacturer of the selected model. This will allow you to more accurately determine the location of all elements and the order of their installation.
In order to reduce energy costs, a daylight sensor is most often chosen with a motion sensor. In this case, the red wire is used to connect the motion sensor and the lamp. The remaining two are used to connect phase and zero. The connection procedure is described in more detail in the instructions for each model.
In the most general case, the work is performed in the following sequence:
- The power goes out. The shutdown procedure depends on the location of the work. Every owner must know how to do this in order to turn off the power to a house or apartment in case of an emergency;
- The photo relay is connected to the power wire;
- The ends of the wires are stripped. The length of the stripping should allow easy connection to the terminals;
- A hole is selected in the housing to connect the photo relay. If there is none, it is formed using a tool with a suitable cross-sectional size;
- All housing openings are sealed. This will prevent dirt, dust and moisture from getting inside. As a result, the installed daylight sensor will last much longer and will not create problems during operation;
- The device is connected in accordance with the recommendation src=»https://osensorax.ru/wp-content/uploads/2020/07/13-datchik-sveta-13.jpg» class=»aligncenter» width=»600″ height= "526"[/img]
- Wires are being prepared with which lighting fixtures will be connected to the device. The wires are cut to size, the ends are stripped, and they are connected to the required terminals according to the instructions supplied with the device;
- The photo relay is manually configured;
- The housing cover closes. Electric current is supplied to the device. The sensor is being tested.
During the installation process, the device often has to be moved, choosing a suitable spatial arrangement. In order not to waste time constantly unscrewing and tightening, you should not immediately fix the device “tightly”. This can be done once the final location has been selected.
The connection diagram may differ slightly. Each manufacturer tries to offer its own device that would turn on the light as dusk falls. In order not to encounter obvious difficulties, it is worth familiarizing yourself with the connection procedure before purchasing and assessing the possibility of using it at home. To perform installation work you do not need to have any special skills. However, during the installation process it is necessary to follow safety rules.
Where can I buy
You can purchase lighting control equipment either in a specialized store or online in an online store. In the second case, the budget option for purchasing products on the Aliexpress website deserves special attention. For some video cameras there is an option for shipment from a warehouse in the Russian Federation; they can be received as quickly as possible; to do this, when ordering, select “Delivery from the Russian Federation”:
| Photo relay with automatic on/off | Photosensitive module for Arduino | Automatic control module for light switching |
| Street lamp with built-in light sensor | Adjustable photoresistor switch | Wall switch for lighting control |
Varieties
Based on the type of sensors used, they are divided into several groups:
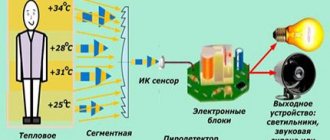
- Infrared. They are triggered by heat in the field of operation of the sensor. Since domestic animals, in addition to humans, are warm-blooded, infrared detectors can also react to them.
- Acoustic. React to noise. If the doors open with a creak, or there are loud footsteps, the sensor will trigger.
- Microwave. Active type sensors. They themselves form waves in the microwave range and track their return back. If there is a difference from a moving object, the electrical circuits are closed/opened.
- Ultrasonic. The operating principle is similar to microwave sensors, but they are rarely used in practice. Pets may react inadequately to ultrasound.
- Combined. Several types of motion detection can be combined in one lighting device. More reliable systems, but also more expensive.
- Astronomical timer. New generation relays. It also controls the operation of lighting devices, but is based on a different control principle. The microcomputer of the astro-timer contains a program with data on the time of movement of the sun in different regions of the planet. In order to set up the device, you need to enter the GPS data of your locality and the current date and time into the device. Based on these key settings, it will automatically determine when it's time to turn on the lights. If false alarms are possible with a photo relay, then the astro timer does not have such errors. It works in any weather.
Typically, an infrared light sensor is used for a street lamp, as it has a number of advantages:
- inexpensive;
- with a large range;
- can be easily adjusted to suit your preferences.
Street or staircase detectors predominantly use either ultrasonic or microwave detectors. Capable of reacting at a sufficiently large distance from the light source. Microwave - can react even if the person is still behind the barrier.
There is also a classification of automatic lighting devices for street lighting according to the type of photo relay design.
- All lamp control elements are located in one housing. This design is more voluminous, but also quite convenient - there are no unnecessary wires. You just need to attach it next to the lamp.
- The “day” sensor itself is mounted outside, and the control relay with the lamp is located in a separate panel inside the room. Thus, all elements of street lighting regulation are thoroughly protected from weather disasters.
The sensitivity of the devices can be adjusted. The regulators are located at the bottom of the case and are signed with “+” and “—” signs.
It is better to work with adjusting the light sensor when it gets dark and when it is installed and connected to the network.
By turning the screw towards the minus sign, the sensor loses its sensitivity. And the relay will start to operate only in complete darkness. And accordingly, by turning towards the plus, the sensitivity increases.
When all the manipulations are completed and the result of the work is positive, the photo relay setup will be completed.
In addition to such adjustable photo relays, there are the same devices, but supplemented with a motion detector. The flashlight will not turn on in the dark until the detector reacts to the movement of a person in its area of influence.
Astronomical timer
Motion sensors.
Hurry up to buy at a discount! This device is inherently different from a photo relay. Automatic switching on of lighting occurs at a specified time. The astro timer is programmed with the times when it gets dark and light in different regions. And he makes adjustments using GPS. You just need to enter the coordinates of its location, the current date and time. Based on the entered data, he selects the appropriate program and works.
This device has a number of advantages over photo relays. The latter can work in cloudy weather or, on the contrary, go out in the middle of the night due to light falling on it. The astronomical timer does not have such a drawback. It can be installed anywhere outdoors or indoors. On it you can shift the lighting on and off by 2-4 hours. Its only drawback is the high price.
Lighting control timer REV-302 with photo relay function
If you are choosing a device to illuminate streets or places where people stay for a short time (gate, toilet, etc.), a photo relay is suitable. But if you don’t want to depend on weather conditions and take care of the photocell, then it’s worth choosing the optimal astro-timer model for certain conditions and needs.
On a note
When choosing a street light detector, it is worth considering some points:
- dimensions of the local area;
- For suburban areas, relays with an adjustment function for triggering are recommended. Such light sensors are easy to configure yourself;
- adjustment will require time and minimal skills;
- a light sensor with a timer will allow you to more accurately adjust the on/off by programming the response time;
- It is better to equip an outdoor photo sensor with a limiter to protect it from light from window and lampposts. You can make such a light visor yourself, for example, from a piece of plastic pipe of a suitable diameter;
- For street lighting, it is better to use LED or fluorescent lamps rather than ordinary incandescent lamps. This way you can save on your electricity bills. In addition, the sensor itself can be selected with a lower throughput, and therefore cheaper;
- Select the installation location according to the attached instructions.
Before purchasing a device, it is important to choose the viewing angle in the horizontal plane. If the lighting area can be approached from any course of movement, relays with a viewing angle from 180° to 360° are needed:
- Wall mounted with a visibility angle of 180°.
- Pole with a 360° visibility angle.
The installation height is also important. The main condition when a photo relay works is that there are no “dead zones”. Household appliances are characterized by a narrow vertical detection zone - from 15° to 20°.
In order for motion sensors to work without breakdowns, you need to know that they are designed for a certain load. Just before purchasing, calculate the total power of the connected lamps that such a device will control.
Photo relay for outdoor work
This is a device with a special built-in photosensor, the task of which is to automatically activate the system for turning on and off the lighting on the street. The device is economically feasible because it operates in an energy-saving mode, turning on only on demand.
For correct operation of the device, it is necessary to carry out installation and configuration without errors. As a result of correct adjustment, the photosensor will turn on only in the dark; during the day it will enter standby mode.
To properly connect a light sensor, you need to know the device and principle of operation, its types, and also decide on a set of tools for connecting it. They will help you get acquainted with simple photo relay devices.
Installation and connection
In order for the photo relay to work correctly, it is necessary to accurately select the installation location. To do this, it is important to comply with some conditions:
- The elements of the photo sensor must be exposed to sunlight.
- Do not place operating lighting fixtures near the sensor at night.
- Protect the photocell from the headlights of passing cars.
- Place the sensor at an accessible height for periodic maintenance.
- Before purchasing, you need to choose what the device will be powered from: 220 V or 12 V.
- Since the relay will operate outdoors, it is better to choose a protection class of at least IP44. But in any case, the higher it is, the better the performance of the device.
- It is necessary to observe the temperature ranges of the sensor operation specified by the manufacturer.
- If you plan to connect not one, but several lamps, the photo relay must have a power reserve. This will help prevent overloading and damage to the device.
If you are going to connect a light sensor with your own hands, then you need to know that there are three wires: phase and zero for turning on the relay, connecting phase for connecting the lamp.
The wires are connected in a sealed outdoor junction box. For one luminaire, the box can be installed next to the relay. If there are several lamps, it is recommended to connect them through a starter.
In the standard version, the switching wires have different colors: one is always red. The other two are blue and black.
- Red connects either lighting devices or a motion detector.
- Blue - connection to the zero phase is in progress.
- Black - the phase is connected.
If the color of the wires is different, it is recommended to carefully study the connection instructions supplied with the sensor.
The light control device for the adjacent area works automatically. But there is a button to switch to manual mode.
We also recommend that you learn how to configure a motion sensor before commissioning for use with a light sensor in order to improve the quality and accuracy of the device.
Specifications
Light sensors for street lighting have technical characteristics that determine the possibility of their operation in certain conditions. For a photo relay, these parameters are:
- Supply voltage. 220 V models are installed in the apartment. If the installed system includes 12–36 V devices, a low-order circuit must be provided. This voltage is necessary to start the contactors of magnetic starters;
- Maximum permissible current. It is important when connecting devices operating from 220 V. In this case, an electric current passes through the contacts of the photo relay, intended to ensure the operation of the light source;
- The temperature at which the device can be operated. Outdoor models must remain operational over a wide temperature range. They must cope with the task in frost and extreme heat;
- Degree of protection. The outdoor device must have sufficient protection against moisture and water;
- Dimensions and weight. They are of fundamental importance when space is limited at the installation site.
Connection diagrams
So, the main function of the light sensor is to supply voltage to street lighting equipment when it starts to get dark and turn it off at dawn. It's like a switch, but controlled by a photosensitive element.
A simple external connection diagram is obtained when the phase is placed in a break with the photo relay and lighting device.
In order for current to flow through the light sensor, a working zero must also be connected to it.
In order to be able to control devices of different power, the photosensor is selected according to the power of the connected load. But here you need to understand how the device works. As the power of the device being switched on increases, the price of such devices also increases.
To circumvent this point, a conventional magnetic starter is included in the circuit. It is designed specifically for network management. And to control the starter, a photosensor with a small connected load is added to the circuit. That is, the sensor no longer turns on the street lights themselves, but supplies a small current to the control magnetic starter. But you can already connect a powerful load to it.
If the photo relay is not enough, then the control functionality can be expanded by adding a timer and motion sensor to the circuit. They are installed in series after the light sensor. What to install first - a motion sensor or a timer does not play a special role in this scheme.
If you don’t plan to install a motion detector or timer, you don’t have to install them without changing the circuit - it will still work.
We recommend reading: step-by-step instructions on how to connect a photo relay.
Known modifications of street lighting sensors
On the modern market there is a large selection of photo sensors, both imported and domestically produced. The variations in choice are very large:
- according to lighting conditions;
- types of lighting;
- according to the power of connected lighting devices;
- advanced features.
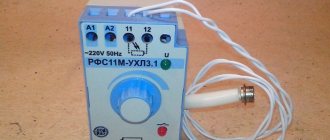
Photo relay FR-601 and FR-602
For domestic needs, single-phase models FR-601 and a more advanced modification FR-602 from the IEK company are in demand. Both are reliable enough for lighting and easy to connect. They are almost identical in functionality, powered by household current with the same voltage and frequency. Power - 0.5 W.
Also with the same protection class IP44, which provides protection from dust and moisture.
Differences in the cross-section of connected wires:
- FR-601 1.5 square;
- FR-602 2.5 mm².
Therefore, there are differences in load current: the first one has 10 A, the second one has 20 A.
Both have built-in photocells with adjustment from 0 to 50 lux in 5 lux intervals.
The main application is outdoor lighting for cottages and private houses when night falls.
High power sensors: photo relay FR-7 and FR-7E
To regulate lighting near the entrance, more powerful modifications are used on city streets. Which are capable of operating from an alternating current network of 220 V and a current of up to 5 amperes.
Such devices include photocells FR-7 and FR-7e.
These models have a number of distinctive features:
- high level of required power;
- low protection class IP40, designed mainly for protection against moisture;
- there is no protection for the construction resistor;
- open type connection terminals.
Operating principle of photo relay
The operating principle of the photo relay is based on the operation of a built-in photocell. Analyzing the power of the light flux on the street, the sensor turns the artificial light on and off. In the daytime, it is an insulator that opens the electrical circuit, and at dusk it is an excellent conductor.
- The design of the device is simple, it easily fits into a small housing with terminals for connecting to the mains.
- The photo sensor is designed to solve many problems, the main one of which is street illumination at night.
- Most devices are equipped with a regulator for setting certain values for the luminous flux that activates the lighting system.
- If the minimum value is set on the regulator, the photo relay will close the circuit late at night, if the maximum value is set at slight twilight, immediately after sunset. The average value will be the most acceptable, but for accurate work, several indicators are adjusted.