Chasing walls for electrical installations in a house is a process where you have to both break and build at the same time.
For a standard two-room apartment, on average, up to 50 meters of grooves are cut. Moreover, for some reason, many are sure that all furrows are made exclusively for wires or plumbing pipes.
In the meantime, this work can be well combined with the manufacture of niches for socket boxes.
Drilling or scoring
Drilling niches for socket boxes is one of the most labor-intensive operations when installing all rough electrical equipment.
Often, to make 3 holes for a recessed block of sockets, it takes no less time than to make all the grooves taken together that go to this niche.
Today there are three main ways to do this work:
- diamond bit + hammer drill
- Impact type drill bit for SDS plus or SDS max rotary hammers
- wall saw with 230mm discs
The simplest, fastest and most efficient in terms of labor costs is the third option. Why this is so can be explained by several reasons.
- maximum versatility
The wall chaser can handle any material, from foam blocks to high-strength reinforced concrete. Accordingly, impact crowns of the SDS plus type are no longer needed here.
Yes, they cope with foam blocks and bricks, but problems already appear with concrete walls. It takes much more time, plus the hammer drill itself is operated in a more severe mode. In fact, at its limits.
If it hits the reinforcement, you simply can’t get enough crowns. It’s only in advertising that they cut it like clockwork.
- delicate attitude to the surface
Let's say you have masonry that was laid just a couple of days ago, then plastered and at first glance everything is dry. But if you hammer it with an SDS max hammer drill, you will see that you will have to call the plasterers again. Or do the work for them yourself.
Even taking into account the fact that the hammer drill has the ability to work “at half strength,” this does not guarantee that microcracks will not appear at the joints between the blocks, which will become even wider over time.
When cutting with a wall saw, the wall material does not resist the disc at all, so such damage does not occur here. Moreover, after cutting out a groove or niche, you can use a regular chisel and carefully gouge out everything you need from the inside.
Again, without using a hammer drill and its blows.
Of course, professionals can make neat holes with a hammer drill in a bare, unplastered concrete wall. However, it is correct to do electrical work after plastering, and not before.
- fittings
The SDS-max hammer drill cannot always pass through and cut through reinforcement. And in this case, don’t even dream about any 60mm recessed socket boxes and installation of wiring without junction boxes.
True, when doing this work, never forget about such a factor as load-bearing walls. To find out whether it is possible to ditch them and, if so, how exactly, read in more detail at the end of the article.
Diamond blades
A very important thing when cutting grooves and sawing out niches is the quality of the diamond blades. You should never save money here and only buy well-known brands.
Even if your wall cutter or wall cutter is not Hilti or DeWalt but some other little-known brand, buy only expensive consumables. On cheaper diamond blades, the first thing that can wear off is not the diamond coating itself, but simply tearing out the seat under the fastening nut.
If buying a wall saw is an unaffordable luxury for you, but in the meantime you already have a hammer drill and don’t need to buy anything else, then work the old fashioned way.
For all the secrets of drilling out socket boxes, and ways to avoid breaking crowns when passing through reinforcement, read the link above.
Cable grooving - tool selection
To groove directly under the wiring, there is no need to engage in handicrafts and gouge out curved and oblique slopes and furrows with a spatula or chisel.
Today, there is already a rich assortment of wall chasers that are relatively affordable in price and quality, as well as cheap attachments for chasing on a regular angle grinder.
You can easily purchase them, even if you need them to renovate just one apartment. With their ridiculous price, you won’t feel any increase in your budget.
The cutting speed at which these attachments work will pleasantly surprise you. And again, with high-quality discs, the material of the walls will not play a dominant role.
When choosing wall chasers and attachments, it is especially worth paying attention to the possibility of sawing corners at 90 degrees. And all this should be done without dust.
Any comfortable gating is impossible without dust removal. Of course, few people will buy a professional construction vacuum cleaner for renovation of one apartment or house.
In this case, take care of at least minimal dust collection devices or convert an ordinary vacuum cleaner to serve the functions of a construction vacuum cleaner.
By the way, the Air Duster nozzle freely throws out all the waste during gating, even without a vacuum cleaner. True, a protective mask in this case will be a mandatory attribute of your work.
It is a mask, not just glasses and a respirator. Our Chinese comrades offer a very high-quality model.
Its price is several times lower than professional masks from ZM, and the build quality is at the same level. Read the reviews.
Reviews
You can find out the latest current price and order a similar mask from here.
Tools for wall chiselling
The method that will be used for do-it-yourself gating will depend on your tools. For this work you can use the following helpers:
- a hammer and chisel is the cheapest way. Its disadvantages outweigh its advantages: it is very long, difficult and the grooves are ultimately uneven;
- the grinder helps to do everything quickly, smoothly and beautifully, but creates a lot of dust;
- an impact drill or hammer drill helps quickly, but the groove is not very smooth, although it looks better than after using a hammer and chisel;
- A pipe cutter is the most convenient and simple tool for work, but expensive. If it is possible to rent from someone, then do not save. Buying a pipe cutter for personal use is not the most profitable investment if you do not carry out repairs every 2-3 years in a new apartment.
You will also need a crown, a level and a stable stand if you plan to drill grooves under the ceiling. The use of a stepladder is not recommended due to its poor stability.
Grilling technique and work order
Let's move on directly to the gating process. The order of work is as follows.
After marking, first use a wall cutter to make holes and niches for the socket boxes, and then the grooves themselves.
The technique for cutting niches is simple. Take the machine and first apply the edge that is closest to the dust extraction to the wall.
After the disk is completely buried, there will be no dust at all. Of course, if you have a vacuum cleaner.
Do not forget that gating is an operation always associated with a great risk to your health. Therefore, the use of minimal personal protective equipment is mandatory. Even if you only need to walk a few centimeters.
After cutting the strips, use a chisel to knock out the resulting squares by hand. In order to do this without a hammer drill and chisel, the cubes must be relatively small in size.
Therefore, in addition to the perimeter of the niche, with a double block of socket boxes, also run the wall cutter disc through the center. And with a triple block or more, several such incisions are made.
But in any case, it is still several times faster than drilling with a crown. It will be the best option only in soft walls - aerated concrete, foam concrete.
The only advice is to use it with a larger diameter than the socket itself. When you plant it on the mortar, you will need a good gap between the socket and the wall. Only in this case will the solution or plaster hold the box well and securely.
And when installing sockets, there will be no problems with them falling out or being pulled out when using even a non-standard plug.
Performing grooving: various tools and surfaces
Now let's look at the question of how to properly tap walls, depending on the tools used (here in more detail about the equipment).
Wear a respirator and goggles while working to protect yourself from dust.
- Chisel using a hammer Recesses are made along the marked edges of the groove for wiring. Then it is placed at an acute angle to the furrow and, using a hammer, the middle of the future cavity for the wiring is knocked out. The resulting groove is far from ideal and has a lot of irregularities. It is very difficult to groove a concrete wall, concrete slab or brick with such tools. Suitable only for soft materials - putty and plaster. However, if they were applied poorly or many years ago, then when using a chisel they may fall out in huge chunks.
- Rotary hammer or impact drill - the fastest and cleanest tools for making wiring grooves, except for the pipe cutter. They are equally easy to make grooves for sockets and electrical cable wiring. There are 2 main methods: using a “shovel” attachment (a destructive and very noisy process that will require a lot of materials to seal the furrow) and using small holes with a regular drill. Holes should be made every 8-15 mm along the intended contour, then these holes are connected using a spatula at an angle of 450. This method produces a more accurate groove.
- To groove the wall for wiring using grinders with diamond blade pretty quick and easy. First, make 2 even cuts along both edges of the marked line, then pull out the excess from the furrow using a chisel or hammer drill, that is, you will not be limited to just one grinder for slitting. In addition, using a grinder you will not be able to prepare cavities for sockets and switches.
- Wall chaser the effect is very similar to using a grinder, but with its help you can make 2 cuts for the furrow at once. An additional advantage is the ability to connect an industrial vacuum cleaner to ensure that the gating is dust-free. The only drawback of this method is the high price of the tools.
Distances, depth, groove width
What nuances should you pay attention to when cutting walls for cables? Firstly, these are the minimum distances and indentations. Here, adhere to the following recommendations and rules:
| Name of the dimension up to the groove | Minimum distance |
| From the corner of the wall | 10cm |
| From the door frame | 10cm |
| From the ceiling | 15-20cm |
| From the floor | 15-20cm |
| From the window slope | 10cm |
| From a gas pipe | 40cm |
- max groove depth - 25mm
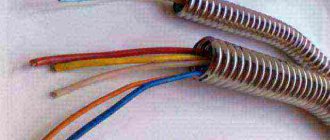
- when installing one cable without corrugation, a width of up to 5 mm is sufficient
- when using corrugation - 20-25mm
Also pay attention to the location of the furrow relative to the socket box. It shouldn't go straight down the middle.
Always orient it closer to the edges. Moreover, left or right also plays a role.
If the future socket or switch is located close to the doorway, then it would be more correct to draw the groove exactly to the far edge from the door. Otherwise, when installing doors, installers will damage the cable with a long dowel when drilling.
When cutting, a laser level is often used. Firstly, it makes work easier and faster. And secondly, the cable will be laid perfectly straight.
In the future, when you drill a screw into the wall for a picture, you will know exactly how many millimeters away from the outlet you have a cable under the plaster.
You won’t need to use all sorts of fancy devices and fancy wall scanners to detect wires under plaster.
The correct cutting direction is top to bottom. You will be less tired, and gravity, on the contrary, will be an assistant when working.
It is enough to attach the wall chaser to the wall, and then high-quality discs and the force of gravity of the earth will do most of the work for you.
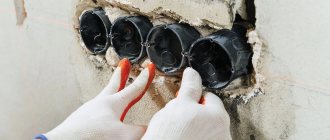
Socket outlets and distribution boxes
The methods for cutting wires are described above, but they need to be slightly modified to prepare holes for distribution boxes, sockets and switches. Let's take a closer look at how they are made:
- Make a small hole with a punch in the center of the intended circle. It should be about 8 mm in diameter.
- Using a crown saw, you outline the outline of the future round hole.
- Using a hammer drill, you need to drill thin holes along the intended contour.
- Use a crown to remove the excess from the hole.
If, when removing the material, you notice fittings in the opening for a socket, junction box or switch, do not remove it under any circumstances, even if it interferes with installing the box. This may damage the building structure. The best solution would be to move the outlet or switch to another location.
Grooving for sockets is as simple as drilling regular furrows.