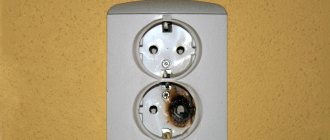
This happens quite often. With great difficulty we hang the carpet on the wall, but we are not happy with the result for long: for some reason the lamp in the room stops burning. Or we drill a hole in the wall to hang a shelf, but sparks fly out from under the drill, a crash is heard, and the apartment plunges into ominous darkness and silence. The reason for the misfortune is simple to the point of disgrace - we were unlucky and damaged the hidden electrical wiring cable . In the case of a carpet, most likely the phase or neutral conductor was broken. And when they were preparing the holes for the shelf, they damaged the insulation of both cores and caused a short circuit (the drill, of course, can be immediately thrown away).
To resolve the situation, the line damage must, of course, be found. In the case of a shelf, this will not be any difficulty - where they fought at the time of the short circuit, there is a damaged area.
It will be more difficult with the carpet, which we successfully hung after punching a dozen holes. Two questions arise. First: “Which wire is damaged - phase or neutral?” And the second: “Which hole exactly did we damage the cable line?”
If, when installing a dowel and a self-tapping screw in a hole, we break the phase wire , then there is a danger of electric shock. Self-tapping screws, metal profiles, metal decorative and interior elements - all of this can be energized if installation is unsuccessful. You can verify the absence/presence of danger using a working and reliable indicator. In addition, we must remember that there can be not one damage, but two or more. The identified danger should be eliminated by first disconnecting the voltage: unscrew the screw, dismantle the metal parts.
Next, we need to decide which part of our apartment electrical wiring has failed as a result of damage. It is extremely rare that after a line is damaged, the light in the entire apartment goes out; usually one lamp or one or more sockets simply stops working.
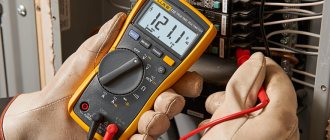
If the socket does not work, then you can check the presence of a “phase” in it using an indicator. There is a “phase” - the neutral conductor is damaged. There is no “phase” - we look for the place where it breaks using devices that respond to changes in the electromagnetic field, for example, an indicator screwdriver with a phase detector.
Just remember that extraneous cable lines running parallel to the test subject can cause interference and distort the instrument readings. Therefore, group circuit breakers that are not related to our tests must be turned off.
If the lamp refuses to work, the input cable of the box, the switch cable, or the lamp cable itself may be damaged. Usually, by the location of the box, you can understand which cable we are dealing with. Damage to the phase conductors of the luminaire wiring is detected when the switch is on.
In any case, the points where the phase conductors are broken are usually quite easy to find.
With a damaged neutral conductor the situation is a little more complicated. It will be necessary to do some preparatory work: turn off the circuit breaker of the affected group, disconnect the damaged neutral wire from the bus and apply a “phase” to it. Further, the damage can be found in the same way as in the case of damage to the phase wire.
A similar method is used to detect damage to the lamp switch cable if it is located after the switch itself. Since both conductors of this cable are phase conductors, it will not be possible to find out anything under voltage in this situation. It will be necessary to turn off the circuit breaker and the switch, and then apply voltage to the phase conductor from the lamp side - then it will be possible to find the break point.
When searching for faults in neutral conductors, it is often unknown which of the wires on the N bus in the distribution board belongs to the damaged line. Then you can disconnect the input neutral conductor from the common bus, open the nearest branch box of the affected group and, having determined the neutral wire, apply a phase to it from the load side. Then everything continues as before.
But finding the damage is only half the battle. As a matter of fact, you don’t have to do this at all, but immediately replace the damaged cable section. A lot depends on the situation. Let's say a damaged wire runs from a junction box to a light fixture, outlet, or switch. Then it makes sense to change the cable completely.
But if the group cable coming from the apartment panel is damaged, replacing the entire cable may seem impractical. After all, the cable can run along the walls of several rooms and have a large length. And in order to replace part of the cable, you will need to install at least one additional branch box, and this already involves clearing part of the groove. The groove will need to be cleared to free the ends of the cable running in the wall and to prepare the hole for the box.
Clearing a groove is a responsible matter and requires caution. This is best done with a hammer and chisel, breaking off small pieces of plaster and being careful not to damage the cable. Of course, the voltage must first be turned off. You should refrain from using power tools, because all it takes is one careless movement and the damage will become even more serious.
It is necessary to clear the groove approximately 15 centimeters from the damage in both directions. Then you need to move the ends to the side and use a hammer drill with a crown to punch a hole for the branch box. We install the box using alabaster, and insert the cable from the groove into it. If the damage has not significantly shortened the length of the cores, or there is some reserve, then you can insert the cable into the box on both sides and connect the cores with standard terminal blocks. That is, it is possible to do without replacing the cable by simply connecting the old cores by color. This is especially useful if the cable is damaged in only one place.
The new part of the cable wiring, if any, is usually mounted in a plastic box (cable duct). The most important thing here is not to overdo it and damage other cables while drilling holes for the dowels. Well, don’t forget to disconnect and plug the old and no longer needed part of the wiring.
Connecting broken wires in the wall
What to do if you interrupt the electrical wiring in the wall? Usually in such a situation a person gets lost, but nothing bad happened; the electrical wiring can be successfully repaired with your own hands using one of the methods below.
When drilling into walls to fasten objects, rarely does anyone think about the fact that electrical wiring is laid in the walls. But even if you remember and mentally trace the possible path of the wires from the junction box to the sockets and switches, there is still no guarantee against the drill getting into the wire.
Electrical wiring is especially often damaged when installing suspended and suspended ceilings. The corners or baguettes holding the ceiling are attached to the wall with self-tapping screws and their fastening line runs exactly at the level of the wires.
According to the requirements of the Electrical Installation Rules (ELR), twisting wires when installing electrical wiring is prohibited. When connecting conductors of hidden wiring in the wall, this rule must absolutely not be violated!
It is best to replace the entire section of broken wire from the junction box to its connection point, but this is not always acceptable.
Since the broken conductors are short, the connection can be made using terminal blocks. But in this case, you will have to install a distribution box for the terminal block, which is labor-intensive and not always convenient.
The proposed technology for connecting broken wires in a wall under plaster has been tested in practice and has shown high reliability. In my apartment for more than 16 years there has been hidden electrical wiring with several similar connections; two pairs of conductors had to be connected when moving the meter, one pair was connected in two places when moving a wall, and two pairs when moving electrical outlets.
When repairing electrical wiring, it is imperative to de-energize it!
Repairs should begin with very careful removal of the plaster in the area of damaged wires. This work is done with a chisel and hammer. As a chisel when laying electrical wiring in the wall, I usually use the rod from a broken screwdriver with a sharpened end of the blade.
This chisel is good for making small grooves in the wall when laying hidden wiring, for example when moving an outlet, or installing an additional one.
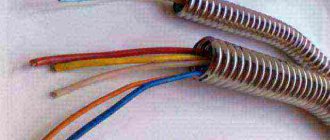
When the wires of the hidden wiring are exposed, it will become clear whether one wire, two or three are broken. What metal are electrical conductors made of, copper or aluminum?
Standards for cable passage through walls
As it should be for a proper electrician, we first turn to the regulatory documents. We begin our search for information with the PUE, the rules for electrical installations. You can download the PUE from the website here.
In PUE edition 7, look at points from 2.1.56 down. Translating the official document into everyday language, we see the following rules for the passage of wires and electrical cables through walls:
- When constructing a passage, it is important to ensure that the electrical wiring is replaceable in case of repair or replacement (PUE, clause 2.1.58).
- If the wiring is done with wires, then the passage of the wires in the wall must be protected by a pipe, duct, or electrical corrugated pipe.
- The wiring is carried out by cable, then the passage of the cable through the walls of dry interior spaces can be arranged in the form of an opening, without a duct or pipe.
- the cable passes through the walls of interior rooms with different humidity or through a wall from the street into the room, for example, introducing power into a house, then the PUE does not have strict recommendations about protecting the cable in the wall passage with a pipe (sleeve). There is an indication of the need to seal the gaps between the cables with non-flammable materials, which can be easily removed during cable replacement work. This is necessary to block the penetration of water and moisture through the passage.
However, in practice, it is better to protect the passage of a cable through the wall of a house from the street with a pipe (sleeve) firmly attached to the wall structure and laid with a slope towards the street.
In the interior of an apartment or house, protect the cable passage through the wall, only mandatory in wooden houses, to enhance fire safety.
What kind of lighting do you prefer?
Built-in Chandelier
Let's summarize the first result
If in practice you need to pass a cable through a wall in an apartment or house, you need:
First: If possible, stop using wires for electrical wiring and carry out work with cables. If this cannot be done, for example, retro wiring with wires on insulators, make a passage in the wall through the sleeve.
Secondly: Make the cable pass through the wall so that it is easy for you to replace it. This criterion will be sufficient for correct passage.
Third: Arrange the passage through the wall wisely. For example, if you are making hidden (non-replaceable) wiring, then there is no reason to use a sleeve for passage. Except in cases where the passage is made between two walls with an air gap.
Fourth: protect all cable passages from the street from moisture penetration. In an apartment, these are power cables for air conditioners; in a house, these are the input of the power cable into the house or the output of the cable to buildings on the site.
Connecting broken copper wires
Connecting a broken copper wire in a wall by soldering ensures reliable contact of the wires no worse than an undamaged one and allows you to close the connection with plaster without installing a junction box.
One of the two copper wires is broken
An autopsy showed that one copper conductor was broken, the second wire was not touched and the insulation around it was not damaged.
To repair, you first need to remove the plaster to the sides of the damaged area 3-5 centimeters to a depth of a centimeter under the damaged area of the wire. This is necessary to create conditions for connecting the wires. Next, you need to disconnect the wires and cut the insulation along the center.
10-15 mm of insulation is removed from the damaged ends of the conductors. If the electrical wiring was made a long time ago, then its insulation becomes very hard and it is difficult to remove it with a knife in cramped conditions without damaging the wire. In this case, it is better to remove the insulation by reflow.
The ends of the copper conductors are coated with a layer of solder using a soldering iron. The conductors must be tinned carefully and on all sides. An insulating tube slightly longer than the bare wires is placed on one of the conductors.
Take a piece of copper wire with a cross-section no less than the cross-section of the broken wire. This piece of wire is also covered with a layer of solder. The length of this insert must ensure an overlap of at least 10 mm over the connected ends of the wires.
The insert is soldered to the connecting ends. Solder should not be skimped. Next, the insulating tube is moved so as to completely cover the joint. If a sealed, moisture-resistant connection is required, then before putting on the tube, the soldered joint must be generously coated with silicone.
If silicone was not used, then to eliminate the possibility of displacement of the insulating tube and to ensure greater tightness of the joint, one layer of insulating tape should be wound. Since a large roll of tape cannot be threaded behind the wires, and a strip of electrical tape from the roll will stick together during insulation, it is better to unwind the required length from the roll and wrap it around any rod, such as a match.
As a result of the work done, a connection was obtained from the broken wire of the hidden electrical wiring, whose technical characteristics are practically not inferior to the neighboring surviving conductor.
Such a connection can be safely covered with plaster and forever forget about the trouble that happened.
Both of the two copper wires are broken
If both wires of the hidden electrical wiring are broken at once, then each of the conductors can be connected using the technology described above. But to achieve maximum quality, it is better to splice them in a slightly different way. One of the broken conductors is spliced as described above, and for the second, the insert is made from a wire on which the insulation is partially left.
With this connection method, direct contact of adjacent wires under the most unfavorable circumstances is completely eliminated.
How to avoid getting caught in wires when drilling walls
To avoid getting caught in a wire when drilling into walls, you need to know at least a little about how exactly the wiring is routed. There are situations when the ceilings in the room are lowered, then the sockets with switches are also made lower.
Therefore, it is better not to drill into the wall behind switches, sockets or a meter, otherwise you may get into the wires with the drill. This is very important to take into account, since it is better to be on the safe side than to redo the electrical wiring later.
In general, during a major renovation, when all the electrical wiring in the house is replaced, it is imperative to make a diagram of exactly how and at what depth the wires go. Also, the wiring layout can be photographed, and then copied and saved on a digital medium. All this will help in the future not to damage the wires if you need to drill into the walls.
Passing a cable through a wall in an apartment or house - theory and practice
Continue drilling. If you haven't warned your neighbors in advance, they're already ringing your doorbell. The sound from your drilling in a panel house will spread throughout the entire entrance.
Expert opinion
It-Technology, Electrical power and electronics specialist
Ask questions to the “Specialist for modernization of energy generation systems”
Why does the socket pop and click? What does this mean and what should be done? on the Nedvio website you can, based on logic and generally accepted standards, determine where the wiring runs, so you can avoid hitting it with a hammer drill. Ask, I'm in touch!
Connecting broken aluminum wires of hidden electrical wiring
It is almost impossible to reliably connect broken aluminum wires by soldering with a soldering iron and low-temperature solder. The only option left is the mechanical method.
One of the two aluminum wires is broken
After opening the wire of the hidden electrical wiring, one broken aluminum wire was discovered.
First you need to remove the insulation from the ends of the wires to a length of about 15 mm. This length of bare ends of the wire is needed in order to make rings with an internal diameter of 4 mm.
An aluminum insert is prepared from a wire with a cross-section equal to or greater than the cross-section of the electrical wiring. The insert can also be made from copper wire, but then it is necessary to follow the rules for connecting aluminum and copper conductors.
Next, the ends of the wires are twisted into rings using pliers.
A prerequisite for obtaining a reliable mechanical connection of aluminum wires is the use of a Grover-type washer. The connection is assembled as follows. A groover is put on the M4 screw, then an ordinary flat washer, rings of connected wires, then a simple washer and a nut.
The screw is screwed into the nut with the maximum possible hand force. All that remains is to cover the connection with electrical tape.
To protect against mechanical damage, the resulting connection should be covered with an insulating tube. You can wrap the top again with one layer of electrical tape.
Using the technology described above, several broken aluminum wires are also connected. You just need more screws and jumpers.
Based on personal experience, I dare to say that connecting aluminum conductors of hidden electrical wiring using the technology described above will ensure its trouble-free operation until the end of its service life, provided that the load current does not exceed the permissible one.
Procedure for eliminating a broken hidden cable
After finding the exact location of the break using one of the above methods, the wire should be connected. To do this, you must first turn off the phase, and then use a hammer to open the cable groove approximately 10 cm to the left and right of the damage site. Then the broken core must be carefully separated from the conductor without disturbing the insulating layer on other cables.
The further procedure is as follows:
- Move the ends of the broken cable apart.
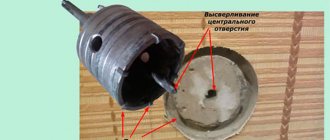
- Using a hammer drill and a special bit, drill a hole in the wall. It must be large enough to accommodate the branch box.
- Insert the box into the hole and secure it there with alabaster, and then place the cables in it.
- Connect and insulate damaged wires.
- Once the damage has been repaired, close the box with the lid.
- Plaster the previously opened section of the groove.
If the damaged cable is located inside a special tube, then it must be carefully pulled out, and a new conductor must be tightened in its place using a pulling device.
The video shows the process of restoring the wire:
After sealing the electrical groove, voltage should not be applied to the restored cable until the plaster is completely dry.
The above process is carried out when repairing a broken phase. Restoring the neutral wire is carried out in almost the same order, with the exception of the initial stage. When repairing a zero, first of all, the damaged cable must be separated from the bus. Then the zero is attached to the phase. Further work is carried out in a similar sequence.
What to do to find a damaged wire
Finding the affected area can be difficult:
- When drilling holes for a lamp, the risk is minimal. It is more difficult for people who decide to hang a carpet on the wall and find out that there is a problem after all the holes have been drilled.
- Using a special indicator, they find the problem. If the wire is phase, the problem is solved as soon as possible. The greatest risk is electric shock. When the wire is found, all metal parts are urgently dismantled and the provoking factor is eliminated.
- A failed socket is checked by an indicator. If there is a phase, the fault touches the conductor. If it is not there, find a place without drilling the wall, using special devices. select those that react to the state of the electromagnetic field. There are indicator screwdrivers with a phase detector.
When checking, group circuit breakers are turned off. Because of them, the readings are deformed and are received inaccurately.
A non-working lamp is checked separately. Damage usually affects the box's input cable, or another type of cable. When turning on the switch, check the integrity of the phase conductors of the wiring.
If the neutral wire is damaged, the search becomes more difficult. Both conductors are phase conductors; if voltage is present, no action is performed.
Voltage is supplied to the phase conductor when the circuit breaker is turned off, with the neutral wire disconnected.
drilled the wiring. what to do?
In general, a friend of mine was drilling a hole in the wall and probably hit the wiring because the plugs were immediately knocked out. Now everything seems to be working (probably I shorted the wires with a drill), but it’s also scary to leave it in this state. I didn’t see the situation myself, perhaps the plugs were knocked out for some other reason (the drill shorted out), but as they say, we will consider the extreme case - the wiring in the wall is damaged
What can you do about it?
If we consider the extreme case, then the case is not entirely pleasant. It is also more unpleasant because the wiring is damaged, but not broken. If you leave it like this, it will fail at any moment. Better to fix it right away. To do this, you need to get to the wiring, cut it off at the point of damage and carefully strip off the ends of 60-70mm. Then you need to make an insert by connecting the ends with a twist - this is the most reliable connection (the twists will be about 50mm) and insulate it very well with PVC tape. Here you need to pay attention to the uniformity of the wires being connected - copper-copper, 1.5 square-1.5 square, etc. Well, all that remains is to properly deepen the groove so that all this equipment will fit and plant it on alabaster. This connection will last no less than the wiring.
Carefully hollow out a recess in the wall - do not damage the wire - and install the junction box. Or start a major overhaul.
avmal wrote: twisting is the most reliable connection
SAver wrote: because the traffic jams were immediately knocked out. Now everything seems to be working (probably I shorted the wires with a drill), but it’s also scary to leave it in this state.
If he took out the wiring and knocked out the short-circuit plugs, then this should be noticeable on the drill. If the wiring is damaged, then definitely install a junction box. It is better to avoid twists - this is the first thing that fails in apartment wiring. And especially not to cover up the joint tightly. By the way, you can immediately think about how to use the unexpected joy in the form of additional wiring - is there a need for an outlet nearby?
Related article: What types of panels are there for wall decoration?
The stupidest thought I've heard today, Slawa, is about twists. Remember once and for all, if the connection cannot be avoided, then the most reliable place in the apartment wiring will be a GOOD twist. If you are confident in the quality of the twist, then there is no need for a junction box, although the PUE says the opposite. The junction box, in this case, serves for access to connections, their inspection and periodic pulling. The twist does not require such maintenance. Although, if such a box will pleasantly complement the interior of the room, then that’s another matter. I doubt it, of course. In any case, the design of the apartment is the owner’s business.
avmal wrote: Remember once and for all, if the connection cannot be avoided, then the most reliable place in the apartment wiring will be a GOOD twist.
I can send you a photo of two aluminum strands heating up well
Please send it - it’s very interesting to look at a PROPERLY made heated twist. I have never seen anything like this in my life.
They are 40 years old Al 2.5 mm2 at 10A are already hot - both phase and zero.
Perhaps we are talking about Insulated Twists (PPE)? Then I will agree with “reliability”.
avmal wrote: The stupidest thought, Slawa, that I have heard today - about twists.
I'm flattered. It's not every day that I get to say the stupidest thought of the day.
avmal wrote: Remember once and for all, if the connection cannot be avoided, then the most reliable place in the apartment wiring will be a GOOD twist.
Yes Yes. I've already heard this somewhere. I remembered that the housing office electrician explained why he didn’t use terminals for connections. Indeed, what idiots they are - they come up with all sorts of terminals, and you carry them. Either it’s with pliers, or the aluminum is from the 19th year. Moreover, smearing a box is the same as hammering a wall, not picking out alabaster - what nonsense. They'll write to the PUE, by God. And if there's an electric shock coming from the wall, there's no point in leaning on it, not on a tram! I twisted it, covered it up, got a fifty-kopeck piece - and hello, what a PUE!
It’s in vain that you, Slawa, are being ironic about the terminal blocks. They were invented not to improve contact, but to simplify installation. At the same time, do not forget that copper and aluminum have fluidity and screw terminal blocks must be periodically tightened. And WAGO is also not a panacea - the spring ages and weakens over time. This is no longer from theory, but from practice. And regarding energized walls, I wrote that it is necessary to insulate VERY WELL, i.e. the insulation must be equivalent to that of the wire. You also probably read about this in PUE, SNiPs, GOSTs, etc. Gouging out a wall is also not a tricky thing, just ask the owner if he needs it. As for aluminum from the 19th year, it just needs to be changed.
Open the wall, remove the broken wire, drill a hole for the box, glue the box, insert wiring into it, make connections, close the box with a lid.
avmal wrote: Remember once and for all, if the connection cannot be avoided, then the most reliable place in the apartment wiring will be a GOOD twist.
“But the men don’t know. » If you strip 7 cm of wires and carefully twist them, will you get a GOOD twist? or are there additional conditions?
From practice: In my apartment, a brick walled up in my apartment caught fire. And she lived for a long time. About 10 years ago. But as soon as they started turning on the microwave and electric kettle, there was a smell of smoke coming from under the plaster. I picked it apart, and around the twist all the insulation was charred. Even as a child, I understood a simple thing - if something does not work and there is a twist on the power cord, then the fault is almost certainly in this twist.
From the theory: The contact area of any two round objects tends to zero. To increase the contact area, you must either solder, or boil, or compress the wire with all sorts of clamps to deform the wire. Due to the weak mechanical strength of the twist, weak movements of the twisted wires are possible (including thermal deformations). Any such movement can lead to the fact that the flattened section of the twisted wire falls on the unflattened one, that is, the contact area will sharply decrease. That's all reliability is.
This happens quite often. With great difficulty we hang the carpet on the wall, but we are not happy with the result for long: for some reason the lamp in the room stops burning. Or we drill a hole in the wall to hang a shelf, but sparks fly out from under the drill, a crash is heard, and the apartment plunges into ominous darkness and silence.
The reason for the misfortune is simple to the point of disgrace - we were unlucky and damaged the hidden electrical wiring cable . In the case of a carpet, most likely the phase or neutral conductor was broken. And when they were preparing the holes for the shelf, they damaged the insulation of both cores and caused a short circuit (the drill, of course, can be immediately thrown away).
Related article: What is the best solution to plaster walls inside a house?
To resolve the situation, the line damage must, of course, be found. In the case of a shelf, this will not be any difficulty - where they fought at the time of the short circuit, there is a damaged area.
It will be more difficult with the carpet, which we successfully hung after punching a dozen holes. Two questions arise. First: “Which wire is damaged - phase or neutral?” And the second: “Which hole exactly did we damage the cable line?”
If, when installing a dowel and a self-tapping screw in a hole, we break the phase wire , then there is a danger of electric shock. Self-tapping screws, metal profiles, metal decorative and interior elements - all of this can be energized if installation is unsuccessful. You can verify the absence/presence of danger using a working and reliable indicator. In addition, we must remember that there can be not one damage, but two or more. The identified danger should be eliminated by first disconnecting the voltage: unscrew the screw, dismantle the metal parts.
Next, we need to decide which part of our apartment electrical wiring has failed as a result of damage. It is extremely rare that after a line is damaged, the light in the entire apartment goes out; usually one lamp or one or more sockets simply stops working.
If the socket does not work, then you can check the presence of a “phase” in it using an indicator. There is a “phase” - the neutral conductor is damaged. There is no “phase” - we look for the place where it breaks using devices that respond to changes in the electromagnetic field, for example, an indicator screwdriver with a phase detector.
Just remember that extraneous cable lines running parallel to the test subject can cause interference and distort the instrument readings. Therefore, group circuit breakers that are not related to our tests must be turned off.
If the lamp refuses to work, the input cable of the box, the switch cable, or the lamp cable itself may be damaged. Usually, by the location of the box, you can understand which cable we are dealing with. Damage to the phase conductors of the luminaire wiring is detected when the switch is on.
In any case, the points where the phase conductors are broken are usually quite easy to find.
With a damaged neutral conductor the situation is a little more complicated. It will be necessary to do some preparatory work: turn off the circuit breaker of the affected group, disconnect the damaged neutral wire from the bus and apply a “phase” to it. Further, the damage can be found in the same way as in the case of damage to the phase wire.
A similar method is used to detect damage to the lamp switch cable if it is located after the switch itself. Since both conductors of this cable are phase conductors, it will not be possible to find out anything under voltage in this situation. It will be necessary to turn off the circuit breaker and the switch, and then apply voltage to the phase conductor from the lamp side - then it will be possible to find the break point.
When searching for faults in neutral conductors, it is often unknown which of the wires on the N bus in the distribution board belongs to the damaged line. Then you can disconnect the input neutral conductor from the common bus, open the nearest branch box of the affected group and, having determined the neutral wire, apply a phase to it from the load side. Then everything continues as before.
But finding the damage is only half the battle. As a matter of fact, you don’t have to do this at all, but immediately replace the damaged cable section. A lot depends on the situation. Let's say a damaged wire runs from a junction box to a light fixture, outlet, or switch. Then it makes sense to change the cable completely.
But if the group cable coming from the apartment panel is damaged, replacing the entire cable may seem impractical. After all, the cable can run along the walls of several rooms and have a large length. And in order to replace part of the cable, you will need to install at least one additional branch box, and this already involves clearing part of the groove. The groove will need to be cleared to free the ends of the cable running in the wall and to prepare the hole for the box.
Clearing a groove is a responsible matter and requires caution. This is best done with a hammer and chisel, breaking off small pieces of plaster and being careful not to damage the cable. Of course, the voltage must first be turned off. You should refrain from using power tools, because all it takes is one careless movement and the damage will become even more serious.
It is necessary to clear the groove approximately 15 centimeters from the damage in both directions. Then you need to move the ends to the side and use a hammer drill with a crown to punch a hole for the branch box. We install the box using alabaster, and insert the cable from the groove into it. If the damage has not significantly shortened the length of the cores, or there is some reserve, then you can insert the cable into the box on both sides and connect the cores with standard terminal blocks. That is, it is possible to do without replacing the cable by simply connecting the old cores by color. This is especially useful if the cable is damaged in only one place.
Related article: How to paint a concrete wall in an apartment
The new part of the cable wiring, if any, is usually mounted in a plastic box (cable duct). The most important thing here is not to overdo it and damage other cables while drilling holes for the dowels. Well, don’t forget to disconnect and plug the old and no longer needed part of the wiring.
We close the newly mounted branch box with a lid, plaster it, level the wall and glue the wallpaper - the work is completed, you can apply voltage.
Conclusion.
Although it is absolutely clear that damage to a hidden wiring cable is not a “tragedy,” when performing repair work, it is still better to first use devices to search for live conductors so as not to create unnecessary problems. Better yet, have a detailed plan for the location of electrical wiring lines with an exact indication of the height of the cables. Still, repairing damage is quite a troublesome and dirty task. And such repairs will not benefit the interior decoration of the premises in any way.
How to correct the situation
Every time the conditions are different. The wire coming from the branch box is completely removed.
The cable from the apartment panel is restored differently. An additional branch box is installed when a piece of wire is dismantled; its ends are freed by creating a curtain. If the wiring is damaged, install a junction box.
It is placed 15 cm on both sides of the damage. Power tools are contraindicated. The cable is wound into alabaster.
If the cable does not need to be replaced, the wires are connected by color. The connections are standard terminal blocks. The ends are connected very well by twisting; electrical tape will do. The connections are not sealed tightly. Using terminals will greatly simplify installation.
The installed piece of cable wiring is successfully mounted in a plastic box. Be careful not to damage other cables.
Be sure to turn off and muffle inactive parts of the wiring. Aluminum has not been replaced for the first decade.
The new box is closed with a lid. Plaster is applied on top. wallpaper is pasted. Then voltage is applied, the structure continues to work for many years.
If you yourself are afraid to do such work, invite a specialist. When installing any wiring, safety requirements are high.
Turning to professionals is the best way to preserve your health and property.
Do you know what to do if you accidentally drill a wire in the wall? Share your experience in the comments.
Make sure this case is for you
Before you start drilling the wall, make sure that this is the most appropriate option for completing the task. So, for example, if you want to drill a hole to hang a picture, then there are a lot of other fasteners that do not require the use of a hammer drill. You also need to evaluate your knowledge and strength. Can you understand electrical communications, can you basically use a hammer drill, are you not afraid of heights (when working from a stepladder), and so on. The risk of getting caught in the cable remains even with precautions, so it is important to be prepared to deal with the consequences. If this doesn't scare you, then move on to the next steps.
Check out the wiring plan
If you get a property with a detailed plan or wiring diagram, then consider yourself lucky. Experienced builders and repairmen not only draw up diagrams, but sometimes also photograph the wiring at the time of its installation in order to avoid complications in the future. Find your room on the plan, find out which wall is which. Find the dimensions and distances from the cable to the corner, ceiling, floor (any landmark to which you can snap).
If the ceiling is suspended (plasterboard, suspended), then it is necessary to take into account how much it “ate” the space, since the wiring was done earlier and was oriented towards the unfinished ceiling. The same applies to the floor. During the repair process to level the floors and connect heating elements (warm floors, laying pipes), the surface level could rise significantly. Taking these conditions into account, measure the distance to the wiring from the reference point. Mark and check if the planned drilling point coincides with the cable installation location.
Familiarize yourself with generally accepted electrical wiring practices
Often there is no wiring plan. In such a situation, you will have to rely on luck and the basic principles of laying wires. Electricians are responsible people and try not to unnecessarily neglect established rules:
1. Everything should be parallel or perpendicular
. No wires thrown diagonally!
2. The wiring is laid at a distance of 15-20 cm from the floor or ceiling.
3. Vertical wiring is laid at a distance of 10 cm from corners and openings.
Measure the distance from the floor, ceiling, corners and openings to the proposed drilling site. If it falls on the cable, then refuse drilling. If not, then follow the next step.
Logically estimate the probability of cable passage at the work site
You can logically guess where the cable is and where the area is safe for drilling. But this will require some electrical knowledge. Junction boxes are located under the ceiling
. They are covered with lids, which, as a rule, are not hidden. A cable runs perpendicularly down from the junction box to the switch. The cable also runs horizontally parallel to the ceiling.
In addition, there are junction boxes for sockets. They are located below at a level of 30 cm from the floor. The cable runs along the same line. Sometimes the wiring is visible. If the builders were too lazy to groove, then the channel in the wall turns out to be shallow and, when sealed, it protrudes like a tubercle above the general plane of the wall. Having combined the knowledge from step No. 3 and your logical conclusions, you can start drilling.
If necessary, purchase a hidden wiring detector
If you often do repairs or decorate walls, then having a hidden wiring detector will make your life much easier. Detectors vary in type:
1. Metal detector
. The principle of its operation is based on searching for metal in the wall. Reacts to all pieces of hardware, including fittings. But it can detect low-current wiring or completely de-energized wiring. The cost starts from 400 rubles.
2. Electromagnetic detector
can only detect working wiring with a voltage of 1 kW or more. Cost from 2,700 rubles. The device indicates the presence of wiring with an audible signal and displays its depth on the display.
You can buy the device in electronics and construction equipment stores or order it online.
Finding a wiring break in a concrete or brick wall
To determine the location of damage in a wall made of brick or a concrete slab, you will need a transistor receiver, which can be used to detect hidden electrical wiring. It must be taken into account that in brick and concrete buildings all cables are directed horizontally and vertically, and are turned exclusively at an angle of 90 degrees. Knowing this, you can't go wrong when planning your cable layout.
The indicator should be placed along the wall above the cable, along its entire length. In this case, along the entire path the device will emit a sound signal, which will disappear the moment it reaches the place where the conductor breaks.
So, we figured out how to find a break in the wiring. If you do not have the necessary equipment or are not sure that you will correctly determine the location of the cable break and be able to repair it yourself, the best way out of the situation would be to invite an electrical installation specialist. Professional electricians have experience in this type of work and have the necessary electrical equipment, which means they will be able to find the fault and fix it within a fairly short time.
The entire diagnostic process is clearly shown in the video:
But if you have a great desire to save money and learn this procedure yourself, then we move on to the next stage - repairing the faulty line.