Drywall is used to level walls and ceilings. It can be attached to the base using adhesive or mounted on a metal frame. This determines how the installation of electrical wiring under the drywall will be carried out. Let's look at how to do this step by step, as well as the nuances of laying wires in a plasterboard ceiling and bathroom.
Features of installing wiring under drywall
The wiring may be accidentally damaged by the profile or self-tapping screws, and therefore a short circuit may occur. To prevent this from happening, the conductor must be laid in a corrugated pipe; moreover, it will not allow the flame to spread in the event of a fire in the wiring behind the sheets of drywall.
Inexperienced electricians may not know how to pull a cable into a corrugated pipe. You can do it like this. A hole is made at the end of the wire. Then a string of corrugated pipe is threaded through it and fixed. Next, you need to tighten the string until the wire of the required length enters the pipe.
When installing wiring under drywall, not only corrugation can be used, but also pipes or special boxes. However, these materials are not very comfortable. Corrugated pipe has such advantages as a small diameter and good flexibility. Therefore, it is recommended to use it.
Wiring protection
Modern cable for electrical networks is made of copper and covered with a special sheath. When installing systems under a plasterboard finish, there is a high probability of damage to the wires, since the gypsum boards are attached directly to the perforated frame with self-tapping screws. Thus, it is important to use protective corrugation to eliminate the possibility of damage to the wire by self-tapping screws.
Corrugated tubes are characterized by increased flexibility, so they do not complicate the installation process, providing reliable protection from mechanical stress. This approach eliminates the risk of short circuits. Additionally, such products increase the waterproofing properties of the wiring, which is important when using the network in the kitchen, bathroom or toilet, and also protect the cable from rodents (in private homes).
Installation of wiring under plasterboard in corrugation
Alternative options are polyvinyl chloride tubing and plastic cable ducts. Their protection is slightly better, but the installation process is significantly more complicated. Unlike corrugation, it is almost impossible to bend ordinary plastic.
How to conduct wiring if the gypsum board is attached to the frame
First you need to make a frame from profiles, but there is no need to attach gypsum boards to it yet. Then you can install the wiring in the drywall.
To carry out the work you will need the following materials:
- Cable of the required section. It is better to lay non-flammable VVGng
- Corrugated pipe of suitable diameter
- Clips for attaching corrugated pipe to the base
- Fasteners for fixing clips to the wall
- Distribution boxes
- Sockets
- Switches
- Socket boxes for drywall
- Terminal blocks for connecting wires
It is also necessary to prepare a hammer drill and a crown with a diameter of 65 mm for making holes for the socket boxes.
Next, install the wiring in the following sequence:
- An electrical wiring diagram is drawn indicating the location of all elements. It should be taken into account whether the cable will be laid along the walls or the ceiling. If you plan to install a suspended or suspended ceiling, then it is more rational to run electrical wiring along it and lower it perpendicular to the floor to switches and sockets. If only the walls are covered with plasterboard, and there will be no structures on the ceiling, then the wiring should be carried out along the walls, 10-15 cm away from the ceiling;
- The diagram is transferred to the walls;
- Distribution boxes are installed in accordance with the electrical diagram. They are fastened using self-tapping screws;
- Next, according to the markings, clips are attached at a distance of 30-40 cm from each other. The clips can be replaced with plastic clamps, which speed up the wiring installation process. But there is a possibility of damage to the corrugation on the sharp edges of the profile;
- A corrugated pipe with a wire in accordance with the diagram is pulled through a frame of metal profiles. Holes are pre-drilled in the profile, matching the diameter of the corrugated pipe, or you can purchase a profile already prepared for installation of wiring;
- Drywall is attached to the metal frame. It is important to remember the location of the cable ends routed for sockets and switches;
- Sockets and switches are installed and connected. In accordance with the diagram, holes are made in the drywall using a drill with a crown installed on it. If calculated correctly, the input wires will be located exactly opposite them. Next, the cable is pulled out through the socket box, and the socket box is inserted into the place prepared for it and fixed using the screws on the sides. Sockets and switches are connected.
Installation of switches and sockets should be carried out after completion of the repair, then the new decorative trims will remain clean.
Laying and fastening of wiring
Plasterboard sheets can be installed on walls or ceilings with or without a frame. Even partitions in the house can be created from them. The second option has recently become less relevant. However, if this is the one chosen, then you should prepare in advance special places where the cable will be laid. You will have to groove the surface of the walls, and then hide the electrical wiring inside the groove.
The situation is similar with the installation of sockets, switches and panels, only you will have to make not grooves, but entire “pits”. To fix the cable on the wall, use special clamps.
The frame method of installing gypsum boards looks different. As in the option discussed above, you can hide the wiring inside the groove, holding it with clamps. However, it is much more convenient to fix the cable on a metal frame to which the drywall is attached.
Fastening the cable to the metal frame with plastic ties
The frame may have pre-drilled holes for plastic ties. If they are not available, they can be done independently using a drill. This option is the most preferable.
How to conduct wiring if the gypsum board is attached with glue
Now let's look at how to make wiring under drywall, which is attached with adhesive. This method requires cutting the wall.
Installation work is carried out in the following sequence:
- The location of all elements is marked on the wall. To avoid distortions, it is recommended to use a level. Turns of wires must be made as smooth as possible;
- Next, according to the markings, the walls are chipped. Using a hammer drill with an installed crown of the required diameter, holes are drilled for sockets and switches. Their depth should be more than 35 mm. Cable laying grooves can be made with the following tools:
- Chisel and hammer. Squeezing out the groove with them is quite labor-intensive
- Drill and chisel. Holes are drilled every 1-2 cm with a drill, then everything else is knocked out with a chisel. This method will not work to make a groove in a brick wall.
- Grinder with a diamond blade. A lot of dust is generated
- Hammer. The grooves turn out crooked
- A wall chaser is a tool for creating grooves
- The wire is pulled through the protective pipe;
- A corrugated pipe with a wire threaded through it is placed in grooves made in the wall. The wiring leading out for connecting sockets and switches must be open;
- The grooves are sealed with putty.
Having completed the installation of electrical wiring, you can begin gluing plasterboard sheets.
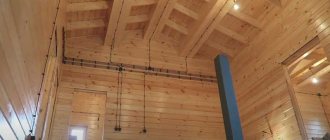
Woodwork
When plasterboard sheets are installed in a wooden house, the wiring technology is greatly simplified. The concept is the same as usual, but instead of a drill, you should use a cutter, which can successfully replace an electric tool. To secure the corrugated hose, use plastic clamps or copper wire, making sure that the wiring does not “move” too freely. The more attachment points (within reasonable limits), the more reliable the configuration.
The same approaches can be used when working with 380 V networks.
In the following video you can clearly see how to lay a cable in a plasterboard wall.
How to carry out wiring if repairs have already been made
Sometimes, after installing drywall, people realize that an additional outlet or switch is needed.
If the ceiling is open and there are no structures on it yet, then installation of electrical wiring in plasterboard is carried out as follows:
- The required hole is made;
- A thread with a heavy nut tied to it is taken and lowered from the ceiling above the future outlet. The nut on the thread should fall to its level;
- Using electrical tape, a cable is attached to the upper end of the rope. Then the rope is pulled from below until the wire appears in the hole.
If the repair is complete, the following steps must be followed to install the wiring:
- A hole for the socket is drilled in the drywall;
- The smallest piece of plasterboard sheet is located and dismantled. An open space is created that will allow you to stretch the corrugated wire;
- If the open space is at the bottom, then the cable is pulled from the hole down, and if at the top, then to the hole. A transverse profile can interfere with the passage of wiring, so a wire or rope suspension is used.
In this way, you can install missing electrical elements when the repair is already completed.
Pulling the cable under already fixed drywall
If the finishing material is fixed to the frame, then in such a situation there is a possibility that only partial dismantling will be sufficient, since most often a solid sheet is not enough to cover the wall to the full height and in addition to it, a trimmed piece is installed, which must first be found, and then unscrew.
You can find the fastening profiles using a metal detector or a powerful magnet, which allows you to find out the different distance between them. In addition, it is possible to identify a fixed workpiece with smaller dimensions by tapping, during which it makes a louder sound.
After removing such sheets, a niche appears that allows you to lay a corrugated pipe with an electrical wire without much difficulty. Next, in the required place in the drywall, you need to make a hole for a socket or switch in accordance with its dimensions and the dismantled part of the finishing material, after which you can begin connecting.
The transverse profile can become an obstacle in the process of pulling the cable, which is why you have to resort to another method, which can also be used initially, eliminating the need to dismantle plasterboard sheets. In this case, actions should be carried out as follows:
- The first step is to take a thread and a nut that has a large weight.
- Next, in the place where you plan to install an additional socket or switch, you need to make a round hole.
- If the ceiling has not yet been sheathed with gypsum board or the tension fabric has not been mounted on it, then you should begin to lower the thread with the attached nut over the new completed circle. As a result, it should drop to the level of the hole made in the wall.
- At the next stage, it is necessary to secure the wire to the upper edge of the thread using electrical tape.
- Next, pull the thread from below until the electrical cable appears outside, after which you need to stop its movement.
The method is quite simple, so there should not be any particular difficulties when performing the work. If the ceiling is already installed, then in order to avoid damage to the finish on the top of the wall, the wire can be routed from below from the area where the floor plinth is located. First you need to make a hole for a socket or switch. Next, in the place through which the cable will be pulled, it is necessary to dismantle the baseboard.
Now, as in the previous case, a thread with a nut must be lowered into the circle made, which must be pulled out from the hole at the bottom, which is chosen for the wire output. Next, you need to attach it to the thread and pull it up. Further steps to install the socket box must be performed in the same way, and finally the input wire must be pulled under the floor plinth to the junction box.
Note! To avoid damaging the new electrical cable during subsequent repairs, remember to add its location in the initial wiring drawing.
After figuring out how to lay a wire under drywall on a wall, you should choose the optimal method of laying it for yourself, acquire the required materials and tools, and then start doing the work yourself, following the sequence of actions and related nuances to eliminate a number of possible mistakes.
Video:
Electrical wiring in a plasterboard ceiling
If only one lamp is planned, then the cable should be laid to the upper edge of the walls. Holes are made in the plasterboard ceiling opposite each other in a straight line. An electrical cable is inserted into one of them and moved to the other. This method allows you to stretch it several meters.
If several lamps will be installed, the work must be carried out before attaching the drywall to the frame. If the sheets are already mounted, they will have to be removed.
Let's look at how to stretch a cable under plasterboard on the ceiling:
- A wiring diagram is drawn, on which all points of distribution of electrical elements are marked. Next, markings are made on the ceiling;
- According to the plan, the cable is attached to the ceiling using clips or perforated metal tape;
- The wires are connected to electrical points through installed socket boxes.
On a plasterboard ceiling, you can install light spotlights that are light in weight and have almost no impact on the suspended structure.
Selecting a cable and protection for it
When carrying out renovation work indoors using plasterboard, in most cases preference is given to its three varieties, which include ordinary, moisture-resistant and fire-resistant sheets. The former are chosen much more often, since compared to other types of material they have a more affordable cost, but it should be borne in mind that their middle is susceptible to decay. For this reason, if a spark occurs, there is a possibility of ignition, during which toxins begin to penetrate into the room. To avoid this, wiring laid under drywall must be insulated with material that prevents possible fire.
A suitable option is to use cables marked “ng”. If the installation of plasterboard sheets is carried out on a frame made of metal profiles, then wires marked “VVGng” can be laid under the finishing material. Modern electrical cables are often made from copper, which is then encased in an insulating sheath.
To avoid damage to it when pulled against a metal frame or self-tapping screws used to secure the profile, the products must be protected with additional insulation. In the presence of such a protective shell, the installation will not be disrupted in any way, but it will eliminate the violation of the integrity of the wiring and the possibility of a short circuit.
In addition, with its help it is possible to protect cables from small rodents, which is especially important in private homes and some other premises
PVC corrugation and special hollow cables made of plastic are often used as such a protective sheath. Both options are characterized by low ease of assembly, and some difficulties arise when laying them when it comes to hard-to-reach places, but in this way it is possible to reduce costs when installing electrical wiring in partitions made of plasterboard.
In situations where the finishing material is located at a distance of less than 15 mm from the wall, a more favorable option is to lay cables with the designation “VVGng-LS”, which are characterized by increased reliability due to the presence of double insulation. In addition, products with this marking can be used when there is a need to install electrical wiring inside wooden houses.
Electrical wiring in the bathroom
A bathroom is a room with a high level of humidity, so wiring on a plasterboard wall must meet the following requirements:
- The distribution box must be located outdoors
- Sockets must be installed at least 65 cm from the water source
- All electrical elements must be of the moisture-proof type
- The line must be grounded
- Separate circuit breaker
- The grounding bus, pipes, drains, electrical appliances, heated towel rails must have a common potential equalization system
- It is recommended to install LED lamps
You should take a three-core copper cable with a cross-section of at least 2.7 mm2, intended for wet rooms. The wiring is installed under the ceiling. The cable runs strictly vertically to the sockets.
Now you know how to lay a cable in a plasterboard wall. It's not difficult to do this yourself. The main thing is to do everything correctly in compliance with all installation rules.
Liked? Share on social media networks!
Installation using plasterboard sheets (abbreviated as gypsum plasterboard, and in common parlance just plasterboard) helps hide wall defects, and is a cheaper method than leveling using other methods.
It is logical that cables, junction boxes, switches and sockets are hidden under drywall (this means special socket boxes - mounting boxes for switches and sockets). The easiest way to install electrical wiring is during the installation of gypsum boards, after installing the profiles, and before laying the drywall sheets.
Electrical wiring under the gypsum board is hidden
First, the cross-section of the cable wires (VVGng, VVGng-LS) of the electrical wiring is calculated based on the load, then the location of household appliances and switches is determined, and accordingly, the wiring branch nodes that will be made in distribution boxes are outlined.
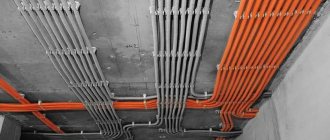
Since electrical wiring and its components - cables, junction boxes, switches and sockets are hidden in plasterboard, such wiring is considered hidden, it must be laid in a corrugated material made of non-flammable material.
installation of cables in corrugations between profiles
Lay the corrugation in the space between the metal profiles and the wall. If the ceiling is also covered with plasterboard sheets, and spotlights are supposed to be installed in it, then it would be more logical to install electrical wiring on the wall under the ceiling, making wiring for lighting, lowering bends down to connect switches and sockets.
installation of wiring under the ceiling for lighting
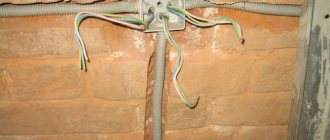
The corrugation with the cable is attached using special clips attached to screws that are screwed into the dowels. The holes for the dowels are drilled using a hammer drill.
Clip fastening for corrugation
Features of installing electrical wiring under gypsum boards
Switches and sockets are placed in drywall at a normal height, so that they are convenient to use.
According to the PUE, access to distribution boxes must be ensured, so you should provide removable panels opposite the boxes, or use distribution boxes that are mounted in a plasterboard sheet using special paws, as well as a socket box designed for plasterboard.
Drywall installation box
Branch boxes must also be made of non-flammable material. In general, this electrical wiring is subject to the same requirements as hidden wiring, with the proviso that switches and sockets can be placed in drywall only by using special socket boxes specifically designed for these purposes.
space for distribution box
Electrical wiring protected by corrugation can be placed in profile structures. At the point where the cable passes through the profile, a hole is made in it, cutting radial lines along which petals are bent, which will protect the corrugation and cable insulation from rubbing against a sharp edge.
The use of corrugation is allowed if the walls (brick or concrete) on one side and the plasterboard on the other do not propagate combustion. For this reason, it is better to use a non-flammable type of drywall. If the walls of a wooden house are covered with plasterboard sheets, then corrugation is not allowed, only metal pipes.
Installing cables under drywall in a wall
Features of installation of a specific socket box
The socket for plasterboard differs from the usual one in that it has special spacers on the back side, with the help of which the cylinder of the socket is pressed against the back side of the plasterboard sheet.
Socket box for plasterboard with screw and spacer for fastening
This cylinder also has an edge on the front side, which rests against the outer surface of the sheet, preventing the socket box from sinking into the hole, which is drilled with a core drill. Thus, the socket box is clamped into the drywall between its two surfaces.
installing multiple sockets in drywall
The fixing tabs do not interfere when placing the socket box in the hole, but they rotate to the desired position after turning the tightening screws. The cable is pulled through a special hole in the back of the cylinder, which is broken out in the right place.
There are also socket boxes designed for a block of sockets; in this case, they are connected using special connectors through which the wires are pulled.
installation of socket boxes in plasterboard
Pulling the socket cable under the installed drywall
It is not necessary to dismantle all the sheets of drywall - you can get by with partial dismantling - not always a standard sheet of drywall stretches from the ceiling to the floor - installation from above or below is carried out using cut pieces, they need to be found and dismantled.
Their fastening profiles are found using a metal detector or a powerful magnet - the distance between them will have a different dimension. You can also tap - a smaller sheet will produce a higher sound.
After dismantling these sheets, a niche is formed in which it will be easy to stretch the corrugation with the cable. The hole for the socket is drilled in the plasterboard in the right place, and depending on where the plasterboard sheets were removed, the cable is lowered from the socket box hole (if a niche is formed at the bottom), or to the hole if partial dismantling is done at the top.
drilling a hole for a socket
The transverse profile can also prevent the cable from being pushed, so use a suspension on a strong thread or wire, tugging on it until it drops to the desired height, where the suspension is intercepted with your fingers.
Horizontal laying of the socket cable under fixed drywall
To lay a horizontal cable for connecting the socket, a special broach in the form of a metal string is pushed under the drywall. For these purposes, a real piano bass string or a specialized broach with a metal tip may be suitable.
This broach is pushed between the profiles and the wall, sometimes scrolling if it rests against the profile, moving towards the opening of the socket box. When the tip of the broach goes around the profile behind which the hole is located, the tip of the string may end up on the floor.
In this case, use a powerful neodymium magnet and look for the tip by moving the magnet in the intended location. The attraction of the magnet and the rustling of the broach will indicate that the magnetic field has captured the tip.
By moving the magnet towards the opening of the socket box, move the end of the broach, located on the back side of the plasterboard sheet. Having reached the hole, the string is intercepted with your fingers, the cable is attached to its other end using electrical tape and pulled through.
example of cable installation under drywall
In this way, you can connect the cable to any electrical outlet or box if the profile is not pressed close to the wall, even if the space is filled with insulation. In this case, the tip is guided with a magnet along the inner surface of the gypsum board and released when it reaches the profile.
The tip of the broach is made slightly curved, which allows it to pass through profile structures when the string rotates.
Electrical wiring in a plasterboard ceiling
The ceiling is covered with special ceiling plasterboard sheets, which are thinner to reduce weight.
Sometimes such sheets are mistakenly or intentionally (for the sake of economy) used for vertical installation. It is forbidden to install sockets in ceiling plasterboard if the wall is mounted from it - such material is thinner and may not withstand the dynamic loads that occur when plugs are plugged into an outlet.
Light spotlights with small dimensions are installed on the plasterboard ceiling, due to which they have virtually no effect on the entire suspended structure.
For these lamps, corresponding holes are drilled in the plasterboard sheets, after which the electrical wiring is installed.
Installation of a ceiling lamp under drywall
Installing wiring above the ceiling
The same string, or broach, together with a magnet helps to stretch the cable. You can pull the wiring from the connection point, or from the extreme hole, inserting a broach into it, throwing it through horizontal profiles towards the next hole, catching the tip with a magnet.
This method is more effective than using a metal ball with a thread - it will not jump over the profile. Using a broach, sequentially pull the wires along with the corrugation through all the holes. After that, the lamps are connected, and they can be installed in the holes by pushing the connected cable into the void of the ceiling.
Similar articles
When carrying out repairs or finishing walls, sheets of plasterboard are increasingly used. If we ignore the small drawback of reducing the size of the room due to the thickness of the material, this method is the most convenient: it is not as labor-intensive as covering the walls with plaster.
If you decide to choose this option for finishing, you need to know how to properly lay electrical wiring under false walls.
There are 3 main methods of installing gypsum boards on the wall, each of them involves different ways of organizing energy supply.
- Gluing sheets to the wall using adhesives. Not much different from simple plaster, but laying the wire into the wall is somewhat easier. But installing socket boxes in drywall in this case is a more difficult task.
- Installing drywall on metal profiles without an insulating gasket. The cable is laid in the space between the base wall and the gypsum board.
- Installation of sheets on profiles, but heat and sound insulation is laid under the drywall. In this case, the cables are laid in a special way, taking into account the selected insulation material.
In cases 2 and 3, installing sockets in drywall is not difficult.
There is another option. It is non-standard, but occurs quite often:
The room is already finished with plasterboard, there is a decorative coating (paint, wallpaper), and there is an electrical network with sockets and switches. And you needed to install several more connection points (220 volt sockets, Ethernet local network, cable for TV). Is it possible to carry out the work without damaging the finishing layer? If you have a diagram for fastening drywall sheets, no problem.
Features of electrical installation work
Before we talk about laying wiring under drywall, let's turn to the PUE, what does it say about this? Paragraph 2.1.4 (Chapter 2.1 PUE) provides definitions of hidden and open wiring:
- Open electrical wiring - laid along the surface of walls, ceilings, along trusses and other construction elements of buildings and structures, along supports, etc...
- Hidden electrical wiring - laid inside the structural elements of buildings and structures (in walls, floors, foundations, ceilings), as well as along ceilings in floor preparation, directly under a removable floor, etc.
For hidden electrical wiring, the following methods of laying wires and cables are used: in pipes, flexible metal hoses, boxes, closed channels and voids in building structures.
In our case, if we are laying a cable along the ceiling or wall, which we will cover with plasterboard, then we will highlight the following from this paragraph: “... laid inside the structural elements of buildings and structures...” and “... voids of building structures...”. From this we conclude that such wiring is hidden.
One of the main points of the PUE that describes the rules for laying wiring under plasterboard is clause 7.1.38:
“7.1.38. Electrical networks laid behind non-passable suspended ceilings and in partitions are considered as hidden electrical wiring and should be carried out:
- behind ceilings and in the voids of partitions made of flammable materials in metal pipes with localization capabilities and in closed boxes;
- behind ceilings and in partitions made of non-combustible materials* - in pipes and ducts made of non-flammable materials, as well as flame retardant cables. At the same time, it must be possible to replace wires and cables.”
Drywall is a non-flammable material, does not spread fire, but does not have localization ability; you can see an example of testing flammability in the following video:
If the rough ceiling is plastered or is a concrete slab, then the wiring can be laid directly along it, and if the ceiling is made of combustible material, such as wood, then laying in solid metal pipes (not metal corrugations or metal hoses, since they do not have localization ability) is mandatory. Either in PVC pipes or openly, provided that the clear distance from the cable with a sheath of combustible materials to the combustible structure is at least 10 mm (PUE 2.1.37.).
As a result, the wiring under the drywall must be laid in corrugated pipes - this method is suitable for all of the above cases and, moreover, the requirements for wiring replacement given in the PUE clause 7.1.37 are met. Use VVGng-LS cable - according to the PUE it is classified as a cable with a sheath made of fireproof or fire-resistant materials. Then, according to Table 2.1.3 of the PUE, it can be laid directly on any surface.
For your information, according to the technical characteristics of the products of most manufacturers of PVC corrugated pipes, they do not support combustion when tested with hot wire up to 650 degrees Celsius.
Connections should be made in junction boxes, but according to PUE clause 2.1.23, connections must be accessible for maintenance and repair. If we cover the walls or ceiling with plasterboard, they will become inaccessible. In this case, connections can be made by welding or crimping. According to GOST 50571.5.52-2011 clause 526.3, it is allowed to make such connections inaccessible for periodic inspection and repair.
A problem that novice electricians may encounter is pulling the cable through the corrugation. We recommend that you immediately watch a video example that provides the simplest technology for pulling a wire through a corrugated pipe:
Electricians' trick
Tools and materials
The list shows all possible accessories. You can reduce their number while ensuring general fire and electrical safety.
- Corrugation for laying cables. Desirable for installation between gypsum boards and the base wall. Can be plastic or metal. The latter is used if the insulation is made of a material that supports combustion.
- Instead of corrugation, you can use a cable box, but this is overkill from a cost point of view.
- Power cable. When laying in corrugation, one layer of insulation is allowed; if the wiring is without corrugation, the insulation must be three layers.
- When installing into a base wall (grooving), double insulation is sufficient.
- Grounding cable to create an additional potential equalization system. Profiles under drywall should be grounded.
- Accessories for fixing the cable (corrugation): clips, plastic bushings for holes in the profile, ties.
- Installation boxes for drywall or regular installation boxes if the gypsum boards are glued to the wall.
- A device for making holes in profiles and drywall - so-called “ballerinas”, or crowns. Of course, a drill.
Features of installing wiring under gypsum boards
There is no universal technique, so we will consider technologies depending on the method of laying sheets. Installation of electrical wiring under drywall begins with drawing up a detailed plan. The proposed locations for laying gypsum boards are marked on the wall, taking into account joints and the possible use of fastening screws. Installation points for sockets and switches should be planned at a distance of at least 20 cm from the edge of the sheet. The same requirements apply to metal profiles. Profile installation lines are also calculated taking into account cable routing.
Then measurements are taken and the plan is transferred to paper. After installing the drywall sheets, you won’t have to look for all the communications at random.
Plasterboard glued to the wall
Since this method is not much different from ordinary plaster, cable laying is done in the same way. Grooves are made in the walls. The laying depth may be less than with plastering, but between the cable sheath and the inside of the gypsum board there must be a layer of putty of at least 5 mm. It is not advisable to lay sheets directly on the wiring. Drywall is less durable compared to plaster, and there is a risk of mechanical damage to the cable.
Next, we choose the method of installing socket boxes in drywall.
- If the box is fixed on a sheet, a recess is made in the base wall with a margin of at least 2 cm in diameter. In this case, there are no difficulties with laying the cable: it is walled up in the groove, the mounting end is laid in a ring at the bottom of the recess as deep as possible. This is done in order not to damage the wire when drilling a hole in the gypsum board.
The hole is made carefully, as soon as the circle is separated from the sheet, the drill stops. The free end of the cable is threaded into the hole in the box, and the socket box is fixed in the drywall.
Important! When gluing drywall to the wall, you need to make sure that in the area where the box is installed there is no mounting adhesive (plaster) within a radius of 20 cm from the center of the hole.
Otherwise, the technological grooves for the installation screws will be bricked up, and you will not be able to screw the box.
- When using conventional mounting boxes (under alabaster), the technology is similar. Only the hole in the gypsum board is drilled in advance, according to the markings. The diameter is 10–15 mm larger than the size of the socket box. The cable is laid as usual, with a margin for connection. Before installing the sheet, drywall adhesive is applied around the recess in the base wall. After installing the gypsum board, the excess plaster is removed, the hole is monolithic, without a gap between the wall and the drywall.
After which the box is placed on the alabaster, as in an ordinary plastered wall.
Drilling holes for boxes with recesses into the base wall after gluing drywall is undesirable. There is a 100% chance that you will damage the prepared cable.
Drywall is mounted on metal profiles without insulation
In this case, the wiring is laid in random order between the drywall and the wall.
Holes are made in the metal profile. The edges must be sanded to prevent damage to the insulation. Then the cable is pulled according to the prepared diagram.
Regardless of whether the cable is laid with three-layer insulation or is corrugated, when pulling through the profile, it is advisable to install bushings in the holes. It can be made from scraps of polypropylene pipe.
Important! The intersection lines of the cable and the profile must be marked on the diagram. Self-tapping screws that are screwed into drywall should not be located closer than 10 cm from the cable.
Otherwise, the screw may get caught in the cable and cause a short circuit. Or, through a screw, a phase may get onto the entire profile frame (another argument in favor of grounding the profile).
For the same reason, electrical wiring under drywall should be located as far away from the drywall as possible.
Installation of sockets in drywall is carried out in the usual way.
The safety measures are simple: before installing the slabs, the wiring should be taken away from the place where the hole is supposed to be drilled. Then it will be easy to find it through the hole under the box.
Another way to lay the cable is to secure it to a load-bearing wall using clips. In this case, you can fix the profile on the wall with technological gaps through which the wire will pass. The likelihood of damage in this case is minimal. Of course, all profile breaks must be marked on the markings so as not to screw screws into the void.
Vertical installation is even simpler: the cable is attached to the profile using clips or nylon ties.
Insulation is laid between the gypsum board and the base wall
The installation technology is the same as in the previous case, but with mandatory compliance with fire safety measures. If mineral wool or other non-combustible material is used as an insulating material, there are no additional requirements. The insulation is simply placed neatly around the cable. If the material is fire hazardous, the cable is laid in a corrugated metal or plastic material that does not support combustion. Installation of bushings is desirable, as in the previous section.
The same rules apply when laying cables behind drywall in a wooden house. The rules for electrical installations also provide for the laying of steel pipes into which the wiring is inserted.
Sandwich: wall - glue - insulation - glue - drywall
When using rigid insulation, which itself is a structural material, a metal profile is not required. In this case, installation of wiring in plasterboard is carried out along the load-bearing wall. The insulation is glued with an air gap, or channels for wiring are cut out in it.
Sheets are glued on top of the insulating material. If the thickness of the sandwich allows, installation of socket boxes in plasterboard is carried out with fastening to a load-bearing wall.
Wire pulling options
Depending on how the gypsum board sheets will be attached to the wall, the installation method is selected. Today, drywall can be attached to a special structure made of profiles, or you can do without a frame by installing the sheets yourself with glue. The second option is used extremely rarely and only if the walls in the house are almost perfectly smooth. Most often, it is customary to attach gypsum board sheets to a specially prepared frame, so instructions for installing electrical wiring under drywall will be provided specifically for this option.
So that you know how to stretch a wire with your own hands if the gypsum board sheets stick to the glue, we will briefly explain the essence of electrical installation work. First, you need to make the grooves yourself for the wiring, then secure the wire in the prepared grooves and plaster all the grooves. When the solution has dried, you can begin attaching the sheets without a frame. Even after briefly familiarizing yourself with this installation option, you can see that in this case it will be much more difficult to install electrical wiring under the drywall.
Laying additional wiring for ready-made gypsum board finishing
How to stretch the wire and install a socket box under the mounted drywall? It all depends on what is between the wall and the sheets.
- If the drywall is glued to the wall, you will have to cut through the finishing surface and make shallow grooves. In this case, it will be necessary to restore the front layer (paint or glue a strip of wallpaper).
- When mounted on a profile, the task is simplified. Of course, you need to know the layout of the metal guides. In order not to spoil the upper part of the wall, the power cable can be routed from below, from under the baseboard. First, a hole is drilled for the socket box. Then, the plumb line determines the location of the cable entry (the plinth in this place is temporarily dismantled). A rope with a plumb line is lowered into the prepared hole, which is pulled out from the lower hole for entering the cable. The wire is attached to a rope and pulled up.
Next is the usual scheme: installing the box in any way. The input cable is pulled under the baseboard to the distribution panel.
- If there is soft insulation between the drywall and the wall, you can use steel wire instead of rope (which remains after installing the corrugation). This method does not work with rigid insulation boards.
Considering the uncontrolled position of the cable under the plasterboard, it is recommended to use corrugation. As a last resort, a wire with three layers of insulation.
After installing additional wiring, be sure to make changes to the current power supply circuit. Otherwise, during repairs you will damage the new cable.
What to do when drywall is already installed
Options for installing electrical wiring in parallel with wall finishing were discussed above. Now let's figure out what to do if the finishing materials are already installed on the walls. First, decide what is between the drywall and the base wall.
The first option is to place drywall on the wall using an adhesive compound. You will need to cut through the finishing surface and then groove the material for the cable installation. After such installation, you will be forced to restore the wall by painting it or wallpapering it.
The second option is simpler. It implies that the sheets of drywall were fixed to a metal profile. However, it is important to know the electrical wiring diagram and where exactly the metal frame is located. If you don't want to damage the front part, try running the wire through the baseboard. Drill a hole for the outlet or switch, then use a regular plumb bob to determine where to insert the cable. Remove part of the plinth, lower the rope along the plumb line, threading it through the hole. Tie a cable to the rope and pull it up. After this, the box is placed using any convenient method, and the cable is pulled to the shield.
Pulling the cable under the installed plasterboard
The third option is when insulation materials were installed between the wall and the gypsum board. To enter the cable, use the steel wire left over after installing the corrugation. If rigid insulating boards are used, then it will not be possible to get out using this method.
Since in any of the above options the cable under the drywall will be located chaotically, it is advisable to install it together with a protective corrugation. An alternative is a wire with three layers of insulation. Finally, be sure to make appropriate changes to the room's electrical circuit.
Electrical installation
Hardware and metal frame slats are potentially dangerous for the materials from which the cable sheath is made. Therefore, wiring under drywall requires protective mechanisms.
Electrical wiring under drywall
For this purpose, pipes, cable and corrugated channels are used. A corrugated tube is a frequently used product that can eliminate the occurrence of a short circuit in the network. Its popularity is due to its high elasticity and small cross-section. To thread the cable into the corrugation with your own hands, first pierce its edge with an awl. Do this carefully, without touching the wires. Then a string of the corrugated channel is threaded into the resulting hole and fixed. Then, by pulling the string, a cable of the required length is inserted.
Correct wiring diagram
This method is applicable when the wiring in your home was done by professionals. According to the rules, electrical cables and wires can only be laid in vertical and horizontal directions. Laying wiring diagonally is prohibited. In this case, the minimum distances from the groove to the ceiling, doors, etc. must be maintained. You can familiarize yourself with these distances in the article How to groove walls for wiring.
Knowing the location of the junction box, you can take it as a reference and virtually laying lines at 90 and 180 degrees, presumably determine the location of the wire. After that, be sure to use the previously given methods to confirm your assumptions.
Installation with adhesive fixation of drywall
Wiring in plasterboard depends on the method of fixing the plasterboard sheets to the base: installed on an adhesive or mounted to a metal frame.
In the first case, in order to lay the cable under the drywall, the walls of the room are grooved for electrical wiring. It’s not difficult to do grooves with your own hands if you have the tools and equipment:
- Chisel and hammer - the groove is knocked out with tools, this is a labor-intensive method, but not expensive;
- Drill and chisel - holes are made in the wall in increments of 1-2 cm, then the jumpers are knocked out with a chisel, not suitable for brick walls;
- A grinder with a diamond blade has the disadvantage of strong dust formation;
- Hammer – the downside is the curvature of the groove;
- A wall chaser is a special tool that provides the greatest efficiency.
Wiring example
Finding wiring with a multimeter
This method is suitable for radio amateurs. There is no need for special testers to search here, but you do need to have a simple Chinese multimeter and a field-effect transistor. The polevik can be one of the following brands: KP103A, KP303 or 2SK241.
Turn on the multimeter to measure resistance (200 kOhm), and connect its probes to the left and middle terminal of the transistor (drain + source).
The right pin is used as an antenna. The operating principle of the device is that when a field-effect transistor enters an electromagnetic field, its internal resistance changes. And the multimeter records just this.
Where the change in resistance is maximum is where the wiring is located.
If you attach an additional antenna (a piece of copper wire) to the third pin, the sensitivity of the device will increase sharply.
Video on searching for wiring with a multimeter:
Installation of wiring under a plasterboard structure
The first stage of electrical work is the implementation of a detailed schematic wiring plan. It determines the exact position of points and nodes: sockets, switches, lamps, blocks and distribution boxes. The finished diagram is transferred to the walls.
If there is not enough experience to carry out the plan yourself, use a standard solution or a specialized computer program.
Calculate the amount of materials needed:
- Terminal blocks for connecting wires;
- Corrugated tube with the cross-section parameters required for the wire;
- Clips for fixing the corrugation;
- Sockets;
- Switches;
- Dowel-nails;
- Non-flammable distribution boxes;
- Socket boxes for working with drywall;
- The wire.
The choice of wire is determined by calculating the cable cross-section. Incorrect calculation is fraught with:
- Higher costs when using thicker material;
- A short circuit in the wiring with a cross-section of insufficient size.
Installation technology
The calculation is performed according to the following parameters:
- By power - cables are produced with different rated power ratings, which they can withstand when operating electrical appliances. The total power of household appliances does not exceed the rated power of the cable. The total total power obtained by addition is multiplied by a correction factor of 0.8. Next, taking into account the material from which the wire cores are made (aluminum or copper), the cross-section is determined using a special table.
- By current strength - to calculate the current load on the electrical wiring, the average power of all electrical appliances will be determined, taking into account the phase pattern of the network (single-phase or three-phase). The resulting value is multiplied by a factor of 1.5.
- By line length - the longer the line, the greater the conductor resistance and current loss. If this value is more than 5%, choose a larger section.
If you do the installation yourself, you will need a drill with a cutter diameter of 60-65 mm.
Installation instructions
So, let's look at how to properly do the wiring behind drywall with your own hands. We will provide all the technology in the form of step-by-step instructions with photo examples to make the material easier to understand.
Step 1 – Preparatory work
First, you need to assemble a structure from profiles, but do not rush to sew up the frame with gypsum board sheets, because this will be done at the very end of the electrical work. At the preparatory work stage, you must determine how the wiring will be installed: on the ceiling or on the walls. If a suspended or suspended ceiling is created in the rooms, it is easier and smarter to run the wires along the ceiling and lower them to the “electrical points” in the right places (strictly vertically). If only the walls are plasterboard, and the ceiling itself remains concrete or wooden, then the wire must be pulled along the walls at a level of 10-15 cm from the ceiling. Taking this nuance into account, you must draw up an electrical wiring diagram on which to mark the exact locations of all points: sockets, switches, junction boxes. After this, you need to transfer the diagram to the walls, as shown in the photo below, and proceed to the calculation of materials and directly to installation.
Materials you will need:
- Wire of suitable cross-section. It is better to use a non-flammable VVGng-LS cable, which is suitable even if you decide to conduct electrical wiring under drywall in a wooden house with your own hands. For information on how to correctly calculate the cable cross-section by power and length, read the corresponding article.
- A corrugated pipe, the cross-section of which is selected according to the cross-section of the selected cable.
- Clips for fastening the corrugation.
- Dowel and nails for mounting the clips themselves.
- Distribution boxes made of non-combustible material.
- Sockets and switches.
- Special socket boxes for drywall.
- WAGO terminal blocks for connecting wires.
As for the tools, you will need a drill with a special cutter for cutting gypsum board sheets. The diameter of the cutter must correspond to the dimensions of the installation box so that the latter sits securely in the grooves.
Step 2 - Installing the Junction Box
The first step is to install distribution boxes in each room based on the electrical diagram. This is not difficult to do, just attach the products to the wall or ceiling using self-tapping screws, as shown in the photo below:
Step 3 – Laying the Electrical Wiring
Once all the materials and tools have been prepared, you can install the wiring under the drywall with your own hands. To do this, you must first attach the clips to the marked walls. The distance between the clips should be from 30 to 40 cm. Instead of clips, you can also use plastic clamps. In this case, the installation of electrical wiring will be faster, but there is a possibility that the corrugation will be damaged by the sharp ends of the metal profile.
All you need to do when installing electrical wiring under drywall with your own hands is to carefully route the cable from the junction boxes to future sockets and switches. This is not difficult to do, the main thing is to remember where exactly the end of the lead-out wire will be located, because The next thing you should do is cover the wall with plasterboard.
Step 4 – Connecting Sockets and Switches
Well, the last stage when laying wiring under gypsum board sheets is the installation and connection of sockets with switches. You need to use a drill with a special attachment to drill holes in the drywall yourself according to the diagram for installing electrical outlets.
Video instructions for installing socket boxes
Installation of distribution box
Installation of electrical wiring begins with the installation of a junction box, which is designed for:
- Simplification of repair and maintenance of the electrical network;
- Connecting new blocks;
- Uniform distribution of electricity.
The range of control boxes is distinguished by types and types:
- Material – metal (more often used in bathhouses of wooden houses) and plastic;
- Installation – hidden and external;
- Shape – circle, square and rectangle;
- Size – a large range of parameters.
Work progress for external (open) installation:
- The power supply is completely turned off;
- Fix the box with dowels;
- Cut off the tips of the seals;
- Connect groups of wires to each other;
- Insulate joints.
Installation example
With a hidden mounting method:
- Perform chipping of the bases;
- Installation of the line to the connection point;
- Sealing the grooves with putty;
- Connect the wires.
Laying wiring
To lay electrical wiring under drywall, fix clips (clamps) on the bases in increments of 35-40 cm. If the metal profile does not have special holes for wiring installation, then drill them yourself. The cable is routed from the distribution blocks. Then the installation of socket boxes, switches and sockets is carried out according to the schematic plan, not forgetting about grounding and neutralizing the network. Installation is carried out:
- Hidden method (inside the base) - before starting work, the power supply is completely turned off. Fixed with dowels and self-tapping screws. First, the cores are stripped of insulation and all contacts are secured. To do this, loosen the central screws, insert the cleaned ends of the wires and clamp them with a screwdriver. To make DIY work easier, use color coding on the wires. Next, the housing is secured in the socket box and a decorative protective panel is installed.
- External method - simplified replacement and repair. For installation, disassemble the socket body and fix the back cover to the base of the surface. Drill holes with a drill, drive in dowels for self-tapping screws and connect the wires. Tighten the contacts, and then proceed to install the front part.
When doing the work yourself, it is recommended to choose specialized socket boxes - for electrical work with drywall. They have a ribbed inner surface for reliable grip during installation.
Installation instructions
So, let's look at the whole process of how to properly wire drywall with your own hands, step by step and in more detail.
Preparation
First you should start assembling the structure from the profiles. As for sewing up the frame with sheets of plasterboard, this should be postponed until the end. Now you need to decide how the wiring will be installed: either on the ceiling or on the walls. There are additional factors in this choice: for example, if the ceiling in the house is suspended or suspended, then it is best to choose the option of wiring along the ceiling. In this case, the wires will have to fall strictly vertically to the electrical points.
If only the walls are made of plasterboard, but the ceiling itself is made of concrete or wood, the wires are pulled along the walls just under the ceiling (at a distance of 10 cm). These points need to be taken into account when designing the layout of electrical points in the room, such as sockets, switches and distribution boxes.
Once the diagram is completed, you can begin moving it onto the walls themselves, as well as begin calculating materials and installation.
Installing a distribution box
In accordance with the drawn up diagram, we install distribution boxes in each room. To do this, you just need to attach the box either to the wall or to the ceiling with self-tapping screws.
Laying out the electrical wiring
Thus we prepared the room. In addition, all materials and tools must also be prepared, and only then will it be necessary to begin installing the electrical wiring. The first step is to fix the clips in the previously marked places on the wall, at a distance of 30-40 centimeters from each other. Plastic clamps can also be used, then installation will proceed at a faster pace, but the corrugation can be damaged by the sharp ends of the metal profile.
Before pulling the corrugated pipe through the profile frame, you will need to drill holes of the required diameter. There are also profiles on sale that already have such holes.
Thus, you will need to run a cable from the junction box to the electrical points, that is, the places where you intend to make sockets and switches. This is a simple matter, you need to mark where the end of the lead-out wire will be located, and then sew up the wall using drywall.
Connecting sockets and switches
When everything is ready, all that remains is to connect the electrical points. To do this, you will need to make holes in the marked places with a drill and mount the socket boxes into the drywall. This is also easy to do.
We cut holes in the bottom through which the wiring will go, pull out the wire and insert the socket box into the groove. Then we tighten the screws until the socket box is securely fastened in the groove. After that, you can safely connect everything to the network and check the results of the work.
One more important nuance should also be noted - if it is not re-installation, but the first installation of wiring, then it should be correctly included in the process of installing the walls themselves. Let us describe the correct sequence of work:
- frame assembly;
- full covering of one side of the partition;
- laying electrical cables in a corrugated pipe according to the description made in this article;
- the voids of the partition are filled with soundproofing material;
- The second side of the partition is covered and the cables are pressed against the sewn sheets so that the screws do not damage them.
With this sequence of work, the screws will not rest against the corrugated pipe and will not damage the cables.
Electrical wiring in the bathroom
Installation of electrical wiring in plasterboard structures for bathrooms has characteristic features. Requirements:
- The distribution box is mounted outside the premises;
- The line is grounded;
- Separate circuit breaker;
- All elements are waterproof;
- Grounding bus, electrical appliances and plumbing are combined into a common potential equation system;
- All sockets are located at a distance of at least 65 cm from the water source;
- It is better to use LED lamps.
Wiring can be external or hidden. Use the cable for work in rooms with high humidity. The wiring is laid under the ceiling base of the plasterboard structure, and run down to the sockets perpendicular to the floor. The cable used is a three-core copper cable with a cross-section of at least 2.7 mm².
Which cable to choose for hidden electrical wiring under gypsum boards
The best option is to use a VVGng type cable (non-flammable) and tighten it into a PVC corrugated pipe. Even better is to use the VVGng-LS cable. It can be laid without corrugation, since it has double overall insulation. This cable has a round shape, so it clings less when pulling and is more convenient to install.
However, for large volumes the difference in price becomes noticeable. Therefore, I mainly use the VVGng cable for electrical installation; it is suitable in most cases; it can be called universal for electrical wiring in the house.
In this article, the electrical cable is laid without corrugation for several reasons.
- The distance for laying the cable in some cases is less than 16 mm (the diameter of the corrugation), and the corrugated pipe simply will not fit through.
- The laid cable is rigidly fixed at both ends, which eliminates its tension and possible damage to the insulation.
- The cable is laid very carefully to prevent mechanical damage to the insulation.