Significant differences between panel houses
Buildings of this type are assembled from large reinforced concrete blocks - panels. At the production stage, channels are cast into them for hidden wiring.
There are several varieties of such buildings, 2 of them are most widespread. The main difference is the design scheme.
Series 1-464
The structural design of the facility is cross-wall. This means that almost all interior walls are load-bearing. Partitions separate only the bathroom (2 pcs.).
This series is recognized by the windows on the interfloor landing in the entrance, repeating the two-leaf apartment windows.
Series 1-335
The structural design is semi-frame and frame (later modifications). Loads are carried by columns and longitudinal walls. All transverse ones are partitions.
The hallmarks of this series are elongated windows on the landing and end walls without balconies.
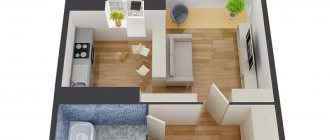
Example of an apartment redevelopment project
Description 1
Back
Forward
An idea of the cost of any work and operations related to the reconstruction and redevelopment of apartments can be obtained from the calculator presented here.
What are the load-bearing walls of a panel house made of?
The panel is a reinforced concrete structure. There are several layers in it.
Outer layer
Protects the reinforcement frame from corrosion. The thickness depends on the location of the panel:
- internal - 15 mm;
- external (enclosing structure) - from 20 to 70 mm depending on climatic conditions.
In the second case, finishing is applied to this layer - tiles, gravel screenings, etc.
Rebar frame
The structure is assembled from longitudinal and transverse rods with a diameter of 12-14 mm, fastened with knitting wire. The frame absorbs tensile forces that concrete is not designed to withstand. The rods are located where such loads are most intense - near the surface of the wall or ceiling immediately behind the outer protective layer.
Destruction of reinforcing bars is unacceptable.
Inner finishing layer
Available on some panels. The thickness is 15 mm, the material is a solution of the same strength grade as in concrete. This layer allows you to do without plastering the panel.
Protective layer of concrete
In the absence of a finishing layer, the frame is followed by concrete 1.5 cm thick. Its function is to protect the reinforcement from corrosion.
How to distinguish between finishing and protective layers
Due to the use of the same solution in both cases, it is impossible to recognize the outer layer.
Therefore, they assume the worst case scenario: the reinforcement is located 1.5-2 cm from the wall surface.
How to make grooves in wood
In principle, you can work with all the tools described above, except for a hammer drill. The main difference is that chisels are used instead of chisels, but the very essence of the work remains the same. First, two parallel cuts are made, and the wood between them is removed with a chisel. But besides these tools there are several more specific ones:
- A circular saw. With a sufficient level of proficiency with this tool, a groove in a wooden wall can be made only with a circular saw - in two or three passes, gradually expanding the cut to the required size.
- Fraser. You can also make a neat groove using a hand router. To do this, you can attach a flat plank to the wall as a guide and, running along it, make a recess, which is then expanded to the required size. (You can read about working with a hand router here.) There is even a special cutter (pictured on the left), but you can also use a regular one to form a groove or side cutter (on the right, but it’s not very convenient to work in this case).
Is it possible to ditch walls and ceilings?
Federal and regional regulations prohibit striking fines in load-bearing structures. The weakening of the section leads to a loss of strength, as a result of which the building or part of it may collapse. To lay the cable along the ceiling, you need to look for another way. There is no point in slotting the crossbars: they are covered with decorative overlays, behind which it is convenient to place the wires.
SNiP 3.05.06-85 contains a clause that allows furrows to be made in load-bearing structures if agreed with the author of the project. In reality, this is almost impossible to do.
Creating grooves in partitions is permitted.
The legislative framework
According to Art. 7.21 of the Code of Administrative Offenses of the Russian Federation, gating of load-bearing structures is classified as illegal redevelopment. The housing inspection will force the violator to do the following:
- Pay a fine of 2.5 thousand rubles.
- Restore the strength of damaged structures (clause 3 of article 29 of the RF Housing Code).
To fulfill the second requirement, it is not enough to fill the fine with mortar. This will not restore the load-bearing capacity of the structure. Special measures will need to be taken in accordance with the strengthening design. Only the author of this building has the right to develop it - this is written in the law. For such a service they can ask for up to 800 thousand rubles.
In case of failure to comply with the instructions of the housing inspection, the apartment, by court decision, may be put up for auction (Clause 5, Article 29 of the Housing Code of the Russian Federation).
Norms and restrictions
For horizontal grooves in partitions, SNiP 3.05.06-85 establishes the following maximum permissible parameters (mm):
- Depth - 25.
- Width - 20.
- Length - 3000 (total).
Vertical furrows are made without restrictions.
Minimum distances from grooves to structural elements (cm):
- Floor slabs (for horizontal channels) - 15.
- Edges of the opening (for vertical) - 10.
- Gas pipelines (for any) - 40.
The device of fines diagonally is prohibited. They are made parallel to the corners of the building.
The groove for the wire in the area from the distribution box to the electrical point can have only 1 turn.
Requirements and standards for grooves
Grilling is not just a certain stage of repair. This is also a process that, if approached incorrectly, can cause unpleasant consequences. Before cutting a wall for wiring, you need to familiarize yourself with certain rules. The first of these is that it is not recommended to horizontally groove if the work will be carried out close to the overlapping slabs. The retreat should be 150 mm. It is also important to know where the gas pipes are located. There should be no vertical furrows near them. The retreat should be 400 mm minimum. You also need to provide a certain distance from windows and corners, which is 150 mm.
In a concrete wall, the groove should be located only vertically or horizontally. Excessive bending should be avoided. In some cases, it is acceptable for the wiring to be located at an angle, but it must run along the wall. This exception is true for the attic floor. One furrow should not be made too long. This value should not be made more than 3 m, while you can go deeper by 25 mm. This figure is also relevant for width. Electrical wiring in a concrete wall should not be located with turns or slopes.
The end point should be rotated at one angle, with the exception of joints with a horizontal surface. It is prohibited to work with load-bearing walls. There should not be horizontal grooves there. This rule must be observed for buildings in any region. Before starting work, you need to ask the management company if this is possible at all. If you have a panel house, this limitation applies to all its walls.
Before you begin work on a concrete wall, you must determine the position of the wiring and know where the terminals are located. Only after this can construction work begin.
How to make channels in wall panels
The correct way, which does not contradict technical standards, is as follows:
- A corrugation with a cable inside is laid along the surface of the structure.
- Build up the wall using plaster or drywall.
As a result, the corrugation will be inside the false wall. The disadvantage of this method is the loss of usable area due to an increase in the wall thickness by at least 2.5 cm.
Wall gating technology in a panel house
The boundaries of the future channel are drawn with a pencil or marker. The optimal width is 2 cm. It is convenient to lay vertical sections along a plumb line.
It is necessary to ensure that the fine does not cross existing electrical lines. If the location of the cables is unknown, they are found using a wiring detector.
Further actions depend on what tool is available.
Hammer
The so-called is fixed in the cartridge. spatula Next, turn on the shock mode and use the hammer drill as a jackhammer, knocking out the solution.
With this method it is difficult to control the depth of the furrow. Therefore, you should proceed with extreme caution and use a limiter. In the absence of such, tape is wrapped around the blade 1 cm from the edge.
Drill and chisel
The work is carried out in the following order:
- A concrete drill is installed in the drill chuck and switched to impact drilling mode.
- A series of holes 1 cm deep are made along the future furrow. You must first install a limiter on the drill.
- Use a chisel or chisel to knock out the solution between the holes.
Hammer and chisel
The most labor-intensive method. The chisel is placed against the wall and, striking the opposite end with a hammer, knocks out the concrete.
Manual work takes a lot of time, but is distinguished by delicacy: the master easily controls the depth of the channel.
Wall chaser
This is the name of a special tool for chiselling walls. It is equipped with 2 discs, the distance between which is adjusted according to the width of the furrow. The immersion depth is also adjustable.
After making the cuts, the remaining material is knocked out using a hammer and chisel. In order to reduce the amount of work, you can move the disks and once again walk the tool along the channel.
The wall chaser allows you to quickly create neat, even furrows. But it is a specialized device that is not advisable to purchase just for once. It is recommended to look for a company or workshop that rents out the device.
Bulgarian
A common alternative to a wall chaser. This device has a wide range of applications, so it can be found in almost any household.
The method of application is the same: with a diamond disc “on stone”, cuts are made at the boundaries of the groove and inside. The remaining concrete is knocked out with a chisel and hammer.
The disadvantage of this method is a large amount of dust.
How to disguise grooves with wiring
Work on laying hidden channels is usually carried out before applying plaster, so that after wiring the communications, the entire surface of the wall can be leveled for applying the finishing coating. But if the wiring is replaced after the rough finishing of the walls, you need to act carefully so that the grooves do not turn a spot repair into a major one.
The smoothest channels are made using a grinder or wall chaser, but if you work only with a hammer drill or chisel, you won’t be able to avoid chips
The simplest option for treating canals is gypsum plaster. It must be applied after the grooves have been cleaned of dust and primed, and all the wires have been installed according to the diagram.
To reduce shrinkage, it is recommended to moisten the wall near the grooves with water. Then you need to prepare a thick solution of gypsum plaster mixture and fill the channel using a spatula/trowel.
Image gallery
Photo from
Step 1: Developing a fine tool
Step 2: Priming the bottom and walls of the groove
Step 3: Fastening the wiring in the prepared grooves
Step 4: Seal the grooves with laid wiring
To prevent the plaster layer from collapsing over time and sagging, you can use a special mesh for reinforcement. Then smooth the mixture perpendicular to the groove (working the vertical groove from bottom to top) and remove excess solution with a smoothing iron.
Grilling in partitions
The maximum depth of the horizontal groove in the septum is limited to 2.5 cm, width - 20 mm, length - 3 m. Vertical grooves are cut without restrictions.
In order to save money and time, it is recommended to make a through hole and install 2 electrical points facing different sides of the partition. This will allow both supply lines to be laid in one hole.
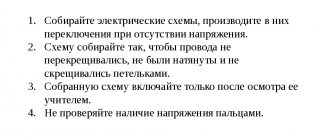
Compliance with safety regulations
When using electromechanical tools, you must comply with a number of safety regulations:
- When working with power tools in rooms with high humidity, be sure to wear rubber gloves and shoes with rubber soles.
- To protect your eyes you need to wear special glasses.
- To prevent cement dust from entering the worker’s lungs, wear a gauze bandage or a respirator.
- When performing this type of work, the room must be well ventilated.
- Do not overheat the tool. From time to time you need to give your power tool a rest.
- During breaks in work, all cement dust is removed with a vacuum cleaner. If powerful dust formation occurs, then the nozzle of the turned on vacuum cleaner is kept next to the channel during gating.
Additional recommendations
In panel houses, it is necessary, whenever possible, to use standard channels made in the panels specifically for laying wires. They tend to place new sites in the following way:
- In the seams between wall panels and floor slabs.
- In electric baseboards.
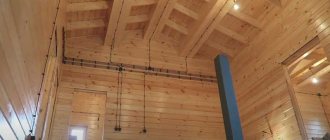
- Behind a suspended ceiling and plasterboard paneling on the walls. The profiles for gypsum boards have special holes for wires.
Behind the suspended ceiling and wall cladding made of gypsum plasterboard, the cable is laid in a corrugation attached to the permanent structures with dowel clamps. Here it is allowed to place lines diagonally.
How to properly groove a wall for wiring and sockets: progress and sequence of work
The stages of work will be as follows:
- Drawing up a plan on paper and drawing contours with markings on the wall.
- Cleaning and preparing the work area.
- Carrying out a work operation.
- The final stage, cleaning.
brick wall
You can easily and quickly make cuts on a brick wall according to the intended lines using a hammer drill or grinder.
Concrete partitions
To perform this action, you will need a hammer drill, a shovel, and also a concrete drill.
Options for how to hammer a concrete wall with a hammer drill without a lot of dust
To avoid the formation of large volumes of dust, you should cover the room with film and humidify the air before starting work. It is also recommended to crush the wall surface according to clearly marked contours.