It is necessary to have socket boxes in the house; they ensure fire safety and reliably fix sockets and wires. The socket box should be installed correctly so as not to encounter problems during further operation; safety should be in the foreground. To carry out independent installation of these parts, you should familiarize yourself with the operating rules. Installation of socket boxes in a concrete wall will be described in the article, their types will also be described in order to have an idea of which one is better to choose.
Are openings for socket boxes in load-bearing walls legal?
Dear craftsmen, please tell me whether it is legal to drill holes for socket boxes (diameter 80 mm and depth 45 mm) in the load-bearing walls of a panel apartment.
The issue arose with the renovation of the new building, they began to drill, and in some walls there was reinforcement at a depth of 1 cm. I’m wondering if there will be any problems with the BTI when accepting the apartment because of the holes for the socket boxes in the walls throughout the apartment. Apartment on the 5th floor of a 20-storey building (series 111). I will answer this: there will be no problems with BTI. It is believed that gating in load-bearing walls is prohibited, but the wording in Moscow standards is very vague, figure it out for yourself: “4. In residential buildings of standard series it is not allowed: 4.2. Installation of grooves in horizontal seams and under internal wall panels, as well as in wall panels and floor slabs for placing electrical wiring and piping." Resolution No. 73-PP dated 8.02.05
Vasilyeva wrote: also in wall panels and floor slabs
Thanks for the info. Laws in our country are like a pole. I couldn’t clearly determine what is what in these definitions!
Do you have a technical passport for the apartment? It should say about gating. There is such a law too. Obliging the owner of the apartment to issue a technical passport for the apartment.
No registration certificate yet. Currently, the developer is carrying out registration of ownership (for a small fee on my part, of course)
If possible, go through a metal detector and identify places where there is no reinforcement. At least such places can be found for socket boxes. That's exactly what I did.
ashkalikov wrote: If possible, go through a metal detector and identify places where there is no reinforcement. At least such places can be found for socket boxes. That's exactly what I did.
ashkalikov wrote: Do you have a technical passport for the apartment? It should say about gating.
Appendix 2 to the resolution of the Moscow Government of January 31, 2006 N 59-PP
Composition and form of the technical passport of a residential premises (apartment)
3.2.4. Electricity of the net. Layout of group power lines, composition, elements and description of the features of the apartment's electrical networks, including fragments of laying group lines in grooves and pipes. Safety precautions when making holes in apartment structures with hidden electrical wiring.
What shouldn’t be written here about gating or at least how to lay hidden wiring?
performance of work or provision of services that does not meet safety requirements (Article 238 of the Criminal Code of the Russian Federation)
eqq wrote: performance of work or provision of services that does not meet safety requirements
Those. Do I understand correctly that questions when organizing hidden wiring can only arise regarding the safety precautions for organizing such wiring?
ashkalikov wrote: Appendix 2 to the resolution of the Moscow Government of January 31, 2006 N 59-PP
We're not talking about what's in the resolution, but what's happening in real life, right? I repeat, there is no such information in the technical passports at the moment and there won’t be any in the “next millennium”, that’s for sure. BTI will NOT be interested in the locations of outlets.
Vasilyeva wrote: BTI will NOT be interested in the locations of sockets
Thank you very much for the detailed explanations! Thank you to all participants for participating in the discussion of the issue!
Vasilyeva wrote: We are not talking about how it is in the resolution, but about what happens in real life, right? I repeat, there is no such information in the technical passports at the moment and there won’t be any in the “next millennium”, that’s for sure.
Vasilyeva wrote: You can familiarize yourself with the contents of the technical passport at this link
Thank you, of course, for the link, but why should I get acquainted with something in theory, if in practice (a registration certificate printed on paper for a specific apartment) is licked in front of me on the table?
Vasilyeva wrote: In 2004, there were no registration certificates for apartments in Moscow yet
With the year when I received the technical passport from the developer, I may have gotten a little excited. But I paid for the technical passport precisely during this period, and mention of it was already in the investment agreement. concluded even earlier.
Horgosh wrote: Thanks for the link, of course, but why should I get acquainted with something?
Well, if you don’t want to, don’t get acquainted. These are, in fact, the technical passports that are now issued for apartments. Your technical passport came from the developer, this, as I already said, is completely different. “Chewing and swallowing” electrical wiring diagrams and the location of sockets in the Moscow housing stock of the BTI is not possible; it does not cope well with the current volumes.
Vasilyeva wrote: Your registration certificate came from the developer, this, as I already said, is completely different.
How is that? What is the difference from a legal point of view?
They probably drilled at a height of 10 cm from the floor. There may be reinforcement there. And problems only arise with the additional load; usually the brand and cross-section of the cable are indicated and marked according to the plan. This is enough.
Horgosh wrote: How is this? What is the difference from a legal point of view?
The difference is that if you go to order a registration certificate from the BTI for this apartment, they will give you exactly the same one as I provided in the link. This is the general form that currently exists in BTI.
Vasilyeva wrote: The difference is that if you go to order a registration certificate from the BTI for this apartment, they will give you exactly the same one as I provided in the link. This is the general form that currently exists in BTI.
I looked at the link. A very strange technical passport: it does not contain even half of what is in mine issued by the developer. Although for me, as an apartment owner, there is practically no useful information in either one. And I absolutely don’t care as a consumer who prepared it.
Speaking about the legal side of the matter, I, first of all, had this in mind. When they started talking about maintaining passports, they said that they would replace the BTI documents necessary for making real estate transactions. How are things going with this now? From this point of view, are these two passports equivalent?
Source
II-18, block house, should the sockets be external? how to lay a weak point?
Masters online: 139 Orders per week: 1,420 Offers per day: 803
Not all load-bearing walls can be tapped. weak current at least 100mm at most. PUE.
It is very rare that it is not possible to pull a cable through a cavity in a void. If it doesn’t go through somewhere, you can try to drill that place and clear it of debris. And trenching the floor and ceiling is not only not recommended, but also prohibited and really dangerous.
Tatyana, in any case, the anchors need to be attached not to the gypsum plasterboard, but to the main ceiling.
Anything is possible! They dug in the monolith and they will do it for you! Nothing is impossible! Don’t even worry!
the wires are placed in the wall and holes must be made and fined if the sockets and switches are inside
Tatyana, it’s right that we first decided to figure it out ourselves. My colleagues spoke well about the installation. My addition on spoliation. For concrete, I do not use a wall chaser, diamond core bits, or a vacuum cleaner. It is very labor-intensive, time-consuming and dusty. O. All threads (and for mounting boxes) are made with a powerful “grinder” with a diamond disc using water (wet cut). One cuts, the other pours water onto the disk
photo on walls for interior
Oleg Yurievich, nothing personal, but a powerful “grinder” and “another pours water on the disk” is a collective farm. And they still pay money for this? Sorry for off.
I completely agree! There is also a good wall chaser and non-impact diamond bits, but gradually they switched to an angle grinder - it’s really faster. Now a 3-room apartment in panel mode in 2 days. And we use a wall chaser and a crown only in foam blocks and bricks.
Source
Is it possible to make sockets in load-bearing walls?
A groove in the wall is a shallow groove in the wall, made in it from the front surface for wiring communications. In this article we will tell you in what cases fines can be performed and with what tool.
Grooving walls for wiring, sewerage or plumbing
Clauses 10.3 and 10.11 of Appendix No. 1 to Government Resolution No. 508 prohibit the installation of fines in load-bearing walls. In other words, fines can only be carried out not in load-bearing walls.
Let's try to explain why.
Horizontal fines in a panel house, brick or monolithic
The load-bearing concrete walls of panel and monolithic houses contain vertical reinforcement that carries the main load. This reinforcement is placed at a distance of 20-30 mm. from the surface of the wall (this is called a protective layer of concrete).
If you make horizontal cuts with a depth of more than 30 mm, then the vertical reinforcement will be guaranteed to be cut and the load-bearing capacity of the wall will be impaired. There is no reinforcement in a brick house, but installing fines in it is also prohibited, because its implementation significantly reduces the load-bearing capacity. Therefore, horizontal grooves in a load-bearing wall are prohibited. Only non-load-bearing walls made of bricks, foam blocks, etc. can be pierced for utility lines.
Fine with cutting of working reinforcement.
Shtraba for wiring
Theoretically, horizontal grooves for electrical wiring can be less than 30mm deep. and they can be performed without cutting the working reinforcement. However, in fact it is very difficult to make such a filigree fine. Firstly, the reinforcement may be a little closer to the surface. Secondly, the fine must be cut very carefully so as not to touch the reinforcement. Builders can easily make mistakes, and then you will have to answer.
It is better to carry out all communications in non-load-bearing walls, in wall boxes, a layer of plaster, and so on. Load-bearing walls are not intended for this.
Wall chipping is a responsibility
If someone saw your fine in a load-bearing wall (a neighbor or a representative of the Management Company), then they can complain to the Housing Inspectorate. An inspector will come out from there, write you a fine for illegal redevelopment in the amount of 2,500 rubles (Article 7.21 of the Code of Administrative Offenses of the Russian Federation) and issue an order to return everything to its original state in accordance with clause 3 of Article 29 of the Housing Code of the Russian Federation. The problem is that simply repairing this fine will not restore its load-bearing capacity.
To do this, you need to specially develop a reinforcement project and implement it. Moreover, such a project should only be carried out by the author of the house project in accordance with clause 1.4.7 of Appendix 3 of Moscow Government Decree No. 508 and the “Temporary Regulations for the approval (examination) of design documentation for redevelopment dated 10.31.05.” The author of the house will refuse to complete such documentation, because gating of load-bearing walls, as we have already said, is prohibited.
On the other hand, if you do not comply with the inspector’s order, he will go to court, and it, in accordance with paragraph 5 of the same article of the RF Housing Code, will put the apartment up for auction. As a result, you have to go out of your way to beg the organization that authored the house project to complete the project with strengthening measures. Since the author of the house is a monopolist, he is free to ask for any amount for it. In practice, it was 500,000 rubles, and even 800,000. Therefore, we strongly recommend not to carry out fines in load-bearing walls.
If you have made a horizontal fine in a load-bearing wall, then it is best to repair it as quickly as possible and not show it to anyone.
Strobe for air conditioner
Despite the fact that the diameter of air conditioner pipes for condensate removal varies from 6 to 16 mm, we do not recommend cutting load-bearing walls. Everything that we described in the previous paragraph applies to this case. Wall stripping for air conditioning can be done in non-load-bearing walls, or pipes can be laid behind the eaves or in the plaster.
Tool for cutting walls for wiring
Now a little about how to make a groove for wiring in a non-load-bearing wall and how to make a groove in concrete. It is best to cut through the grooves using a special tool - a wall chaser. It has two diamond cutters, the distance between which is adjustable. The depth of the groove for the wiring can also be adjusted .
As a result of the operation of this tool, two grooves are obtained, the material between which is then removed using a scarpel or a hammer drill. The result is a good groove with smooth walls. The tool itself is also equipped with a casing to avoid dust and chips during its operation. The groove can also be made simply with a diamond cutter.
It is highly not recommended to make fines with a jackhammer or perforator, as they easily lead to chips, and the surface itself turns out to be uneven. Also, when using a hammer drill, it is difficult to track the depth of the hole.
Grilling walls for a socket box
This type of repair work can be performed even in load-bearing walls (best in the area between two adjacent vertical reinforcement bars). Grooving walls for sockets is done by placing a diamond bit of the required diameter on a hammer drill.
Sealing a scratch in the wall
So, how to fix a hole in the wall ? First, the grout must be treated with a primer for better adhesion of the future plaster. Otherwise, the plaster will lie on the construction dust inside the fine and will not adhere to the surface.
Then the surface of the mortar is moistened so that materials such as foam concrete or brick do not take away too much moisture from the solution. Otherwise, the solution will dry out before it sets and cracks will appear. It is best to use regular gypsum plaster to seal the grooves.
It is applied with movements at an angle of 45 degrees to the groove - then it will well fill all surfaces and walls of the groove.
Grooves in monolithic walls
As we have already said, it is better not to make horizontal fines in load-bearing monolithic walls, as this can lead to damage to the working reinforcement and reduce the load-bearing capacity of the wall. From the point of view of the law, it is prohibited to make vertical fines in such walls.
However, in this case, the working reinforcement will not be cut and the load-bearing capacity of the wall will not decrease. Therefore, horizontal sections of wiring can be made behind a suspended or suspended ceiling, and communications can be lowered down along grooves in load-bearing walls.
To be careful, it is better not to let anyone into the apartment so that they do not see the vertical fines.
Grooving walls for wiring in a panel house
Everything that was said in the previous paragraph about gating is also relevant for panel houses. In fact, this is also a groove in concrete with reinforcement, so we will not repeat it.
Peeling the ceiling in a panel house
The ceiling in panel houses is made of reinforced concrete floor slabs. These slabs have lower working reinforcement with a protective layer of concrete of 30 mm. Therefore, it is strictly prohibited to ditch the ceiling in panel houses, otherwise the working fittings will be affected.
Installation of fines in a brick wall
It is also possible to make vertical grooves in brick walls if no one finds out about it, since its load-bearing capacity will practically not be affected by this. Horizontal fines affect it much more strongly. It all depends on the depth of the hole and the thickness of the wall. Shallow fines up to 100 mm. with a wall width of at least 380 mm. will not greatly affect its load-bearing capacity.
At the end of the article, we will add that the presence of grooves in the walls is not indicated in any way in any document for the apartment, and therefore the installation of grooves does not require any approval.
We hope our article was useful to you.
Read with this article
Installation of socket boxes in the wall - basic mistakes and rules
After completing the work on marking the electrical wiring routes and installation locations for switching equipment, the stage of drilling niches for socket boxes or, as manufacturers correctly call them, round type-setting installation boxes without a lid begins.
In addition to the fastening function, they act as fireproof protection against fire, plus they provide the required level of insulation. Since walls are considered a conductive material, it is impossible to install sockets in them directly without these boxes. But first, you need not to make a mistake with their choice.
How to safely carry out hidden wiring in multi-story buildings according to science
Here we come to the problematic issue:
- on the one hand, it is necessary to hide the wires inside the building structure;
- on the other hand, severe restrictions are imposed on its gating.
At the same time, numerous gurus in Internet projects claim that there is nothing wrong with grooves: they cut them all the time - no building collapses occur. Whether you follow their advice or not is up to you. I will focus on two issues:
- Many craftsmen only groove partitions that are not load-bearing structures. They do not transfer the load from the weight of the building to the foundation and can be removed altogether with the approval of the BTI. There is really nothing illegal in these actions.
- A groove in a supporting structure, even with cut reinforcement, does not create an instant collapse of the building. It affects its strength when unfavorable conditions are created.
Unfortunately, workers not only cut through the outer part of the concrete near the load-bearing wall, but also, without thinking about the consequences, remove pieces of reinforcement that ensure its strength characteristics.
Even in this situation, another rather simple solution suggests itself - the reinforcement can be preserved, and the recess can be slightly shifted to the side. Why don't people want to think?
Just imagine that a groove works the same way as a scratch on glass made with a glass cutter. After all, a master glazier, when cutting glass, does not strive to make the cut too deep. He simply draws an even line of equal thickness along the entire length of the workpiece.
In this situation, the glass remains intact and does not break; it can serve for years, just like a groove on a load-bearing wall. However, what does a glazier do next?
He simply applies a slight force with his hands along the cut, aimed at breaking it in opposite directions. And it is enough: the glass is divided into two parts.
This is how a groove in a load-bearing wall will work: the strength of the concrete is weakened, but not broken.
For a collapse, it is enough to apply some unfavorable factor to the building, for example, a gust of hurricane wind, a small earthquake, construction work in a pit with powerful mechanisms at a short distance, mechanical loads from a sagging foundation...
Think carefully about whether it is worth the risk of creating grooves in the load-bearing structures of the building, take into account all the consequences that can happen to a multi-story building.
However, you have several ways to covertly install wiring in building structures without violating the technical characteristics of the building and SNiP requirements. Let's look at them below.
Laying grooves in a layer of plaster: 2 methods
Please note that any legislation prohibits reducing the factory design strength of the main structural elements, but we are given free space for creativity.
The construction of buildings from stone materials is different in that the surfaces created in them almost always need to be leveled. Special technologies have been developed for this, for example:
- plastering according to standard beacons, requiring increased consumption of plaster mixture;
- economical methods of plastering, reducing material consumption and time to complete the work;
- leveling the walls with sheets of plasterboard.
In this layer, glued to the building structure, nothing prevents us from laying electrical wiring even on load-bearing walls.
There are two options for installing wires:
- Before leveling the surfaces, you can determine their geometry, calculate the locations for laying electrical lines directly along the walls, and then plaster them in any way, even using machine application;
- determine the thickness of the already created plaster and groove it without damaging the main structure of the wall. In principle, this method requires precise measurements and jewelry skills of the craftsman. But it is completely feasible and safe.
What should you pay attention to when cutting a layer of plaster?
Requirements for the location of grooves in any walls are stipulated by the construction rules in SNiP 3.05.06-85. They take into account the sad experience of damage to electrical lines when installing windows, doors, hanging lamps, shelves, and wall furniture.
It is prohibited to lay electrical lines less than 100 mm from door and window openings, or closer than 150 mm to the ceiling slab.
I recommend marking future grooves on the plaster with clearly visible dimensions of the indentations from the main design lines of the building, directing the highways exclusively along the shortest paths horizontally and vertically, completely eliminating the laying of inclined furrows.
Be sure to photograph the markings made and store them in several accessible places. You will need these photographs more than once in the process of refurbishment of the apartment, when rearranging furniture, and drilling work.
Before cutting grooves on the plaster, be sure to check the places where they will be laid using devices for detecting hidden wiring. In their modern design, they are able to see walled up pipelines, metal, and wood. This will prevent accidental damage to water and gas pipelines installed inside building elements.
You cannot cut grooves in an insufficiently hardened plaster layer. It should dry well and adhere firmly to the wall monolith. Otherwise, cracks will appear, which will eventually collapse the leveling solution.
Working with applied plaster mixtures and processing them with mechanical tools requires good skills from the worker and the use of only shockless cutting mechanisms.
What features do tools for gating plaster surfaces have?
By doing grooves in your own apartment, you can create problems for your closest neighbors above, below or to the side. Pay attention to this before you start punching holes and grooves.
The fact is that when delivering powerful blows with a sledgehammer, hammer or hammer drill to any concrete structure, not only does strong noise spread throughout the building, but also strong vibrations are transmitted to all mechanically connected building structures of the house.
The resulting shock loads may cause cracks to appear on the walls of other people's apartments. The neighbors will start looking for the culprit.
Such cases occur en masse. People will complain about you, you will have to react and improve relations with your neighbors. It is better not to create such a situation.
Therefore, try to use impact tools as little as possible, especially hammers and sledgehammers. In soft plaster, you can drill holes for the groove, and then remove the remaining partitions.
Please note that there will be a lot of dust, debris and noise here. It is more efficient and cost-effective to cut grooves on a plastered wall with an ordinary home craftsman’s grinder using a special diamond-coated concrete wheel.
She will have to cut two parallel grooves in turn, and remove the space between them with a hammer drill, which will also cause concern to the neighbors.
In addition, the angle grinder disc during operation creates a continuous cloud of fine cement dust, which instantly spreads throughout all rooms, settles as a layer of dirt on all objects and clothes, penetrating even into the insides of closed cabinets.
Even a respirator, safety glasses and fully open windows with a draft will not save you, as an employee. Everything will be in dust.
If an assistant is nearby and pours a stream of water onto the wall, as gurus on the Internet advise, then the amount of dust will decrease slightly, but the total volume of liquid dirt scattered throughout the room, alas, will not decrease, but will increase.
General and repeated cleaning with washing of all linen is inevitable. A special tool, a wall chaser, eliminates all these troubles. From its engine, like a grinder, two diamond disks rotate at once. They cut grooves strictly to a set depth, which can be adjusted.
Dust from the discs is immediately sucked into the connected hose of the construction vacuum cleaner, rather than scattered in a layer throughout the room. Cleaning will certainly be required, but it won't require any heroic efforts.
Please note that a professional wall chaser works reliably and does not pollute the room only in conjunction with a powerful construction vacuum cleaner. Domestic models intended for routine cleaning cannot be used.
In them, part of the construction dust, which has a good abrasive effect, flies in a continuous stream through a rotating armature with open copper windings and lands on the bearings. As a result, the wire insulated with electrical varnish is damaged (it may break) or the bearing jams.
Urgent repairs will be required, and its cost is slightly less than buying a new vacuum cleaner.
To perform one-time work, I recommend simply renting a wall chaser along with a construction vacuum cleaner. I believe that this is the best option for the average home craftsman.
How to easily lay electrical wiring under the floor and remove it from the walls
You can get rid of problems with grooves on load-bearing walls quite simply if you lay all the electrical wiring in screeds on the floor, and then fill everything with an even layer of mortar.
This method will only require running wires into the walls under the sockets, but it is convenient to place them at a low height of up to 30 cm from the floor. The connection diagram for the switches can also be converted. I talk about this below.
Grilling load-bearing walls
People of the older generation remember the time when the walls and ceilings of homes were “decorated” with twisted braids of external electrical wiring. When constructing modern houses, builders “hide” wires, pipes and other communications in advance in special channels of enclosing structures.
The arrangement of communication channels is taken into account when calculating the load-bearing capacity of building devices. The situation is different with the additional installation of hidden communications in monolithic, panel houses of old buildings.
Is it possible to trench load-bearing walls in such houses? This article will answer this question in detail.
Is it possible to groove walls in a panel house?
If the grooved channel does not expose the reinforcement of the reinforced concrete slab, then there is no need to worry
To prevent the interior of the room from being spoiled by wall communications, they are made hidden. To do this, the walls in the enclosing structures are grooved for wiring and pipes. Is it possible to groove a wall in a panel house for wiring? Of course, this is possible, but only if a number of conditions are met.
The installation of channels in the body of partitions in a monolithic house does not cause problems. This also applies to panel houses. A partition is a structure that bears the load only from its own weight and does not affect the load-bearing capacity of the entire structure.
Another thing is gating load-bearing walls. A significant violation of the integrity of concrete walls will lead to a loss of their load-bearing capacity, and this, in turn, can cause irreparable consequences.
Top layer of concrete in a reinforced concrete slab from 30 to 50 mm
On the Internet you can find many articles on this topic that state in a categorical tone that it is impossible to rave walls in a panel house. You should try to refute such statements.
To understand the essence of the problem, you need to know the design features of reinforced concrete walls. The main load-bearing load is taken by a metal reinforcing frame, “pierced” by a mass of concrete. The top surface layer of concrete plays a protective role. Therefore, if gating walls for wiring does not expose the reinforcement, then monolithic fences will not suffer from this.
The protective layer of concrete is usually from 30 to 50 mm. For a two-core wire, a channel depth of 10 - 15 mm will be sufficient. To lay several cores, you should punch a groove in the load-bearing wall with a depth of 20 - 25 mm. The wider the channel, the more wires can be laid.
The groove must be made in such a way that the load-bearing wall does not have channels with exposed reinforcement.
Location of channels for wiring
All channels must be direct
How to groove panels so that the amount of work and material costs are most optimal? There are two ways to make channels in wall panels. In the first option, a horizontal and vertical groove is punched. In the second case, the channels are located diagonally from the junction box to the sockets and switches.
The diagonal position of the channels significantly saves labor costs and material consumption.
Wall gating technology
There are several ways to pierce a wall:
Hammer and chisel
The channel can be made by tapping the chisel with a hammer
A channel in the plaster layer can be punched using a hammer and chisel.
Plaster is essentially a soft material.
By lightly tapping the hammer on the chisel, a channel of the required width is punched. You can use a chisel as a chisel.
Drill and chisel
Hammer
A tip in the form of a spatula or lance is inserted into the tool. Working in jackhammer mode, the hammer drill knocks out a groove of the required depth and width in the concrete.
Wall chaser
The power tool is equipped with one or two cutting discs. A double-disc wall chaser allows you to cut channels of various widths. The distance between the cutting discs is adjusted manually.
Features of laying wires in the floor slab
Do not install grooves in the ceiling
Some “experts” recommend punching grooves in the ceiling to connect wires to the ceiling lamp.
Let us immediately clarify that this is not necessary.
In panel houses, the floor slabs are hollow-core.
When building houses, builders lay an electrical wire into one of the voids in the floor slab. A hole is made in the center of the ceiling to route the electrical cord from the inside to the outside. When replacing the old wire in the void channel, new wiring is pulled.
Grilling in partitions
Partitions that do not take loads from the structures above can be grooved without any restrictions.
When drilling through, one socket is connected to the wire on one side of the wall, and on the other side - a second one.
This solves the issue of saving electrical wiring consumption. To learn how to properly groove, if you are not an expert, watch this video:
Compliance with safety regulations
Wear rubber gloves and safety glasses when working with the tool.
When using electromechanical tools, you must comply with a number of safety regulations:
Laying wires in grooves
After installing the wire, the groove is filled with solution
Hidden wiring is arranged as follows:
If it is not possible to install channels for electrical wiring, plastic boxes are installed on the walls in which the wiring is laid.
Conclusions about gating of panel houses
It is better to avoid chipping walls that are load-bearing in panel houses, or at least minimize them and use alternative methods of hidden wiring.
If it is impossible to avoid gating of load-bearing walls in a panel house, use gating methods that have minimal dynamic impact on the slabs (cutting and oblique gouging).
And lastly, in the regulatory documents relating to the entire country you will not find a clear ban on gating panel houses. And if we take into account that it is possible to obtain permission to demolish the load-bearing walls of panel houses, then there is no need to talk about a complete ban on gating the walls of a panel house.
©Ehto.ru
More articles
Similar
Installing a socket in a concrete wall, a hole for a socket in concrete
Installing a socket in a concrete wall is a difficult and responsible job that requires maximum attention and certain knowledge. You need to take safety precautions especially seriously.
Installation of sockets, depending on the method of laying the wires, can be external or internal. The external type of installation is almost never used today due to its unaesthetic appearance and reduced level of safety. The external method involves placing the wiring directly on the surface. In some situations, external wiring is disguised in some kind of protective frame.
Preparation stage
Before you begin installing sockets in concrete, you need to decide on the installation location, as well as prepare the tools and materials that will be needed during the work. When installing sockets in residential premises, it is worth remembering two main factors:
When laying electrical wiring, you need to remember some rules:
Before starting work, you need to prepare a workplace, as well as tools that will be useful during installation.
After mastering some rules and preparing the instrument, we proceed to the next step.
Marking
The center of the future outlet is marked as a marking on the concrete plane. If a block consisting of several sockets is mounted, then the center of each element is marked.
To maintain the evenness of the marking axis, it is better to use a ruler or a flat level, and then mark the center point of each socket. In this case, the center of the first rosette is marked and the standard center distance (7.1 cm) is marked from it.
Making holes on a concrete wall
This stage is the most difficult and painstaking, especially if the concrete wall is strong and difficult to drill. There are several ways to drill holes for a socket, depending on the availability of the appropriate tool.
You should not focus too much on the clear round shape of the hole. It’s okay if the installation space is a little square, because the rest of the space will in any case be covered with a special solution for a strong and reliable fixation of the socket box.
It is important to note that when installing a block of several sockets, it is necessary to drill grooves between them to lay the wiring that will connect all the elements.
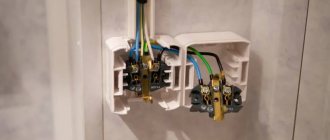
Installation of a socket box
One of the simplest steps is installing socket boxes in concrete. This process is simple, but you need to remember that the upper edges of the plastic socket box must be flush with the surface of the concrete wall. It is unacceptable for it to protrude or fall to some distance.
Before installing the mechanism, you need to prepare the hole. To do this, prepare a gypsum or cement mortar and apply it to the inside of the hole. The layer should not be applied very thick, but only so that the socket box is securely fixed in the hole. All the necessary wiring is threaded into the socket box and brought out. After this, it is mounted into the concrete wall and adjusted flush with the plane.
It is advisable to remove the remains of cement or gypsum mortar that come out of the socket box during installation not immediately, but after partial drying (4-5 minutes) for a more reliable and durable fixation of the structure. We trim the remaining mortar with a spatula, and also cover up all the remaining unevenness and voids between the frame and the wall. The process of complete drying of the solution will take from 1 to 24 hours, depending on the type of solution and its quantity.
Connecting electrical wiring
This procedure is not complicated, because you just need to connect a couple of wires, but the main thing here is not to make mistakes.
The first step is to turn off the electricity in the entire room for safety. We take an indicator screwdriver and touch each wire to make sure that the wires are de-energized and do not pose a threat.
Next, remove approximately 2-3 centimeters of insulating winding from the ends of the wire. After this, the exposed area is bent into a ring, and in the case of a stranded wire, it must be divided into two parts so that it acquires a V-shape. The exposed core of the wire needs to be slightly flattened with pliers to increase the contact area with the terminal.
There are only three terminals on the socket itself: two conductive and one grounding. The wires in all three terminals are clamped with bolts. When using wiring with standard color markings, you need to connect the yellow-green wire to the ground terminal, the blue wire is connected to zero, and the remaining wire to phase. It is quite difficult to confuse the connection sequence, because there are not many options, but still, you need to be careful.
see a couple of storks on the field
The unit is connected using a solid cable or a star. The first option involves moving contacts from one socket directly to the next element. The star method involves laying a wire from each socket to a common point, and then connecting phase to phase, and zero to zero. It is worth noting an important point that the rules for electrical installations strictly prohibit the installation of grounding with a loop. In this way, only phase and neutral can be connected, and grounding must be connected using the star method.
Completion of work
When the wiring is already firmly positioned in the contacts and securely screwed in, the socket itself is inserted into the socket box. The wires are laid so that they are parallel to the back wall, after which the entire structure is pushed into the hole.
Fixation of the internal mechanism is carried out thanks to the spacer legs. In order for them to move apart and fix the entire structure, you need to tighten the bolts located on the front part in a clockwise direction. To loosen the mechanism, the bolts are rotated counterclockwise. If the legs interfere with the installation of the structure, then they can be slightly tightened with a regular rubber band or thread.
The final step is to install the socket face. They come in a wide variety of types, but they all have holes for fastening, located in the center. Just install the outer frame and tighten 1-2 bolts. After all the above steps, turn on the electricity at the site and check that the outlet is working correctly.
Installing sockets in concrete is possible on your own, but to do this you need to have at least basic skills and follow safety precautions.
on this topic
Do-it-yourself installation of socket boxes in a concrete wall
The first step is to drill a hole in the wall; there are two drilling techniques. It is most convenient to use a crown for concrete surfaces with pobedit teeth. Using these teeth, the bit cuts into the surface and creates a circular hole. For conventional crowns, a crown diameter of seventy millimeters is suitable.
The crown is simply put on the electric hammer drill, and it is brought to the created markings and the desired armhole is obtained. After the armhole is cleared of debris.
You need to make the armhole deeper than the socket box, about four millimeters deeper.
You need to make the armhole deeper than the socket box, about four millimeters deeper.
If you don't have a crown, you can use a drill with a Pobedit drill bit. To begin with, a hole is drilled in the center of the marking, then the same small holes are made along the edges of the drawn circle; it is better to make a larger number of them to make knocking out the concrete part much easier. For knocking out, use a hammer with a chisel or a perforator.
If you don't have a crown, you can use a drill with a Pobedit drill bit.
If square boxes are selected, or to simplify the work, you can use a grinder with a diamond disk. They also start from the center, then make holes along the edges of the drawing, the rest is knocked out.
If at this stage the deepening stops and a sharp sound is made, it means that the drill has hit the reinforcement. In this case, it is better to move the location of the socket; you will need to give up only 3-5 centimeters.
If the transfer cannot be done in any way, then you will have to knock out the concrete surface so that the metal becomes visible, then pierce it with a chisel or grinder.
After cleaning the armhole, the box is inserted into it to check the correctness of the resulting armhole. It should fit easily into the recess, leaving a five-millimeter gap behind it.
If square boxes are selected, or to simplify the work, you can use a grinder with a diamond disk.
If the installation is correct, proceed to creating an armhole above or below the armholes for the box, that is, in the direction where the wiring is carried out. This opening is needed to pass the wire through.
From this opening you should lay a groove for the electrical wire.
A hole is made in the box in the designated place using a knife for the wire. The wire is inserted and tried on the wall.
Proceed to preparing the mixture. You can choose a mixture with the main component in the form of gypsum or alabaster.
Pure gypsum remains in liquid form for only 3-5 minutes, so it is prepared in portions.
To avoid constant fiddling with the mixture, it is better to choose a composition that includes 3 parts gypsum and 2 parts plaster. Using a mixer, the composition is mixed with water; if it is prepared in portions, then the remnants of the old frozen part must be removed before mixing a new portion.
A couple of minutes before attaching the socket box, you should wet the armhole, let the water saturate the surface, then cover it with the solution. The solution is also applied to the socket itself (on the back side), but before that a wire is inserted into it. It must be installed so that the edges are flush with the concrete surface and the screws are in a horizontal position.
You can choose a mixture with the main component in the form of gypsum or alabaster.
When using several sockets in one place, you need to connect the holes made using a grinder. To mount the boxes into the wall, they are first joined together using fasteners that are made on them just for this purpose. They need to be installed in the same way as single socket boxes.
The boxes need to be fixed horizontally and evenly; you need to check the location using a level.
When using several sockets in one place, you need to connect the holes made using a grinder.
Is it possible to groove load-bearing walls for wiring?
If you have already laid the floors in your apartment, plastered and painted the ceiling, then you have to use the walls for new wiring. But some of them may turn out to be load-bearing. Is it possible to make a groove in them? We explain why it is better not to do this.
What does the law say?
Moscow Government Decree No. 508-PP dated October 25, 2011 “On the organization of reconstruction and (or) redevelopment of residential and non-residential premises in apartment buildings” in paragraph 11.12 states:
installation of grooves in horizontal seams and under internal wall panels, as well as in wall panels and floor slabs for the placement of electrical wiring and piping (in apartment buildings of standard series).
This wording makes it clear that it is impossible to tap load-bearing walls and floor slabs for wiring. It is possible to lay the cable in grooves made in partitions that do not play a load-bearing role. You can also install routes on the floor or ceiling.
What consequences do you face for violating the law? In Article 29 of the “Housing Code of the Russian Federation” in paragraph 3 everything is clearly stated:
Grooving load-bearing walls is considered as a “redevelopment” or “reconstruction” of a room, so the grooves will have to be sealed (without the cable placed in it) and put everything in proper condition. It is also worth noting that a complaint to the housing inspectorate can easily be filed by a neighbor, whom you will probably “annoy” with your noise.
And if it’s a little, is it possible?
There are opinions that in general it is impossible to groove load-bearing floors, but if you make a small groove that does not affect the reinforcement, then there is nothing wrong with it. Another option is if you already have one groove (it was made by the developer), you can make another one. All wrong.
Load-bearing walls cannot be tapped at all, no matter how deep. If you find an existing groove, it may have already been in the project and therefore is “legitimate”. But this does not give you the right to cut additional grooves.
What can the gating of load-bearing walls lead to?
Such norms were not born out of nowhere. Here are some consequences that may arise when gating load-bearing walls:
Of course, all this may or may not happen. In any case, you shouldn’t hope for “maybe”, but it’s better to do everything wisely. If possible, run the wiring along the floor or ceiling. There is another option for apartments that have already undergone a complete renovation: lay the wire in the baseboard. To do this, you will need a plinth with a special cable channel.
Interesting electrical stuff:
How to make hidden wiring in a monolithic house
We will formulate rules for hidden wiring in monolithic apartment buildings, which will allow us to avoid, as much as possible, violations of standards and construction rules.
Electrical wiring in the house, hidden wiring on the floor in the screed
- Hidden wiring of a monolithic house is done in the floor in pipes or electrical corrugation, followed by covering with a floor screed
Hidden wiring on the floor and in partitions
- Hidden wiring is done on the ceiling, with the possibility of change, in pipes, corrugations, boxes and trays, covered with suspended or suspended ceilings
Electrical wiring in the house, vertical descents from the ceiling
- Descents and ascents (in monolithic walls) of electrical cables to electrical sockets and switches are made in a layer of plaster or covered with structures made of plasterboard or finishing panels
Electrical wiring in the house, gating of walls in the plaster layer
Note: if it is not possible to avoid making scratches in the load-bearing walls of a monolithic house, this is done without affecting the vertical reinforcement in the concrete monolith. The depth of the groove should be minimal, about 30 mm. To make a groove, the method of vertical cutting of concrete with minimal chiselling at an angle is used.
Is wiring in an apartment done in the wall under plaster or not: installation rules and important tips
Key rules for installing electrical wiring. Practical advice for those who live in an apartment or country house. Is it possible to do hidden wiring? A complete description of the process of laying cables under plaster. You will learn about this from the article.
Do-it-yourself wiring under plaster. Practical advice
Installing wiring often causes difficulties for inexperienced DIY enthusiasts.
Especially if it is laid under plaster. This task contains an integrated approach. This will require the skills of both an electrician and an installer.
If you work in order, observing the subtleties of installation and cable routing, then the work will go faster and will not cause any difficulties.
Pros and cons
There are positive and negative aspects to laying cables under plaster. Depending on the installation conditions, some of them can be neglected, while others should be taken into account. Here are the main pros and cons of this installation method:
DIY installation rules
Before you take up the tool, you should understand the basic rules for installing wiring. Without following them, you can damage the walls and material, and in the worst case, cause a fire hazard.
At each stage of work there are special technologies and rules. There are three stages of installation: marking, gating and laying with fastening. Of course, you should start from the first, since marking plays an important role in the process of laying electrical wiring.
Marking on the wall for the cable
It would seem that, armed with a pencil or marker, you can simply draw a diagram on the wall and there is a ready-made marking. In reality, everything turns out to be much more complicated.
First of all, you need to roughly estimate where the network will be located. It is advisable to do this away from the existing wiring or even place a new one in its place. Where the wire will pass, you will have to remove the old wall coverings, including plaster.
The wider the prepared cavity, the more convenient it is to work. It is necessary to mark the cable laying line, as well as the installation locations of switches and sockets.
The best marking option is on a bare wall. In this case, you will not have to avoid obstacles or dismantle anything. Therefore, it is better to think about wiring and markings at the construction stage of the premises.
Strobes
Grooves are special grooves that are intended for laying cables. They look like artificially created recesses in the wall. On average, their depth is from 1 to 3 cm. The wall is grooved after marking has been applied.
There are several ways to lay such grooves. The most accessible of all is the use of a drill with a flap drill. You can also use an ordinary (round) one, but you will have to spend more time with it. The installer drills out a channel for the wire, and then cleans the cavity with improvised means. The method is tedious, but in the absence of special equipment it is quite suitable for implementation.
The best option is to use a wall chaser. Although this is an expensive tool, it gets the job done. The main advantage is the accuracy and precision of the work. Can process walls made of any material, including brick and stone.
It is worth noting that such grooves cannot be laid in load-bearing walls. First of all, it's prohibited. Secondly, a crack may develop in the wall, which will increase the cost of repairs several times. In such cases, it is better to lay the wiring under the plaster without a groove.
Cavities for sockets and switches are made exclusively with a drill, since a wall chaser will be unsuitable for these purposes.
After the cavities are completely prepared and processed, a cable channel is laid in them. It should be laid as tightly as possible so as not to create an air gap. Otherwise, it may cause a fire. You will need fasteners.
Fastening the cable to the wall
Using fasteners, the cable is fixed to the wall in a stationary position. Therefore, it is extremely important to choose a reliable fastener made of durable material.
There are 4 types of hidden fasteners placed under the plaster: