Old panel houses are equipped with electrical networks based on aluminum wires. In modern buildings this material is not used, since the rules require the use of copper wiring. As a result, replacing the wiring in an old-style panel house is an urgent need for homeowners. In this article we will talk about the nuances of electrical wiring in panel buildings and how to replace it.
Features of wiring in a panel house
There are many series of panel houses with different configurations. However, in all such buildings the wall panel acts as a load-bearing element. This circumstance is extremely important for arranging electrical wiring in a panel building. The bottom line is that grooves cannot be created in load-bearing walls, since they significantly weaken the load-bearing structure. Cable laying is possible only through special, factory-created channels.
Wiring in panel structures is located in the ceiling area or in the walls. Often, old wiring in a panel house can be found at the junction of the wall and the ceiling. This location was chosen because there was a small space between the wall and ceiling panels where the cables were laid.
It should be noted that, despite the presence of factory channels in the plates, searching for wires is quite difficult. It often happens that electrical circuits differ even on two adjacent floors with rooms of the same layout.
An example of a diagram for replacing electrics in an apartment
In addition to load-bearing walls in multi-apartment panel buildings, there are also partitions. They are most often made from wood or plasterboard. It is not recommended to use partitions for laying wires, since the thickness of such walls is not suitable for organizing hidden wiring.
Sockets and switches in multi-storey residential buildings are located at a certain level from the floor: for sockets this figure should not exceed 90 centimeters, and for switches - 150-170 centimeters. In old houses, wires were often laid in two lines: to sockets and to lighting fixtures.
In apartments equipped with electric stoves instead of gas stoves, a separate cable was sometimes provided for this device. This scheme is not recommended today. Proper wiring should include separate power wires for consumer groups and a grounding wire.
Installation technology
Before installing sockets, you need to prepare all the necessary tools:
- screwdrivers (flat and Phillips);
- perforator and crown for it 70 mm;
- wall chaser or grinder;
- side cutter or sharp knife for removing cable sheathing;
- building level for installing sockets;
- tape measure and marker;
- hammer and chisel;
- putty knife;
- containers for preparing mortar (alabaster, gypsum, putty).
It is better to carry out noisy, dirty work on wall chiselling on weekdays from 10:00 to 17:00. This way you can minimize possible conflicts with neighbors. If there are small children nearby, you should take a lunch break.
Sockets are installed in one of the following ways: overhead or built-in.
Outdoor installation
Wooden socket boxes for open wiring
To install a socket on a wooden wall, you need to adhere to the following work plan:
- Using a cable channel, an electrical cable is supplied to the area where the future power point is located. It is important to cut its length with some margin for installation.
- You need to attach the socket box to the wall on a special panel using self-tapping screws.
- The cover-panel of the structure is removed and connected to the required terminals of the core of the cable freed from the braid. Here it is worth considering the marking: “L” means phase wire, “N” means neutral.
- Using special lugs, the polymer housing of the socket is screwed onto the installed socket box. To prevent it from pinching the power cable, you need to break out the technical window on the side. The entire structure is fixed with a screw.
All that remains is to cover the wires on the wall with the cable duct cover.
Indoor installation
Grooves are made only vertically and horizontally.
To install a socket in a wall, you first need to prepare a nest for it: groove the walls and form a recess in the partition. Before starting work, markings are applied to the walls if the power point is installed in a new location. Stages of further work:
- Channels for the cable are made strictly along the intended lines. First, cuts are made on both sides, and then the remaining concrete is knocked out with a hammer and chisel.
- The nest for the glass is made using a hammer drill with a crown. The remains of the monolith are knocked out again, while at the same time trying on the element in depth. It should not protrude above the plane of the wall.
- The power cable is pulled along the finished groove and its end is inserted into the technical connectors of the glass, bringing out the end 10-15 cm. This should be enough for connection.
- Using alabaster mortar, the glass is mounted in the socket, controlling the level of its protrusion above the plane of the wall. All gaps around the glass are closed with a building mixture, leveling the surface of the partition. Alabaster dries in 20-30 minutes. Putty and plaster last longer (up to a day, depending on how much solution is used).
- Release the power cable from the braid by 10 cm, and each exposed wire (red/brown, blue/white, yellow/yellow-green) by 1 cm.
- They are connected to the socket terminals according to the phases. To zero - blue or white (depending on the manufacturer). To the phase - red (brown). To grounding - green (yellow-green).
- Insert the socket box into the glass and fix it using sliding legs. It is also important to control the evenness of the element’s level. Otherwise, the power point will be skewed.
- All that remains is to install the outer panel and frame onto the screw.
Inserting a socket into drywall is very simple. It has special clamping clamps. The socket box is inserted into the socket. The plasterboard base is quite fragile, so when working with a hammer drill you should not put too much pressure on it.
Need for replacement
Electrical wiring in a panel house may need to be replaced for the following reasons:
- The old scheme does not provide for the simultaneous use of several types of powerful household appliances.
- The aluminum wires have undergone significant wear.
- There is no ground wire.
- The apartment is undergoing redevelopment and it is necessary to switch to a three-wire or five-wire electricity supply system.
Replacing wiring is an expensive undertaking, but inevitable over time. The premises should not be allowed to be used with old, unreliable electrical wiring, as this is unsafe. So you will still have to spend money. Another thing is that if you have certain knowledge and skills, you can save money if you do the work yourself.
Not only the wires age, but also the insulating material. Over time, the insulation begins to crack, the ends of the wires break and burn. Sockets with switches gradually wear out. Therefore, replacing wiring is usually accompanied by installing new fittings.
Open way
In this case, the wires go over the walls. But, of course, simply attaching them is not enough - it looks ugly and is extremely unsafe: the wires can overheat, there is a high risk of mechanical damage, and this is fraught with short circuits and fire. You can use a special plinth or boxes.
And if in the case of laying wiring in plaster, the plaster itself serves as an insulating material, then with the open method, “camouflage means” are used - cable channels, corrugated hoses, pipes, special skirting boards or baguettes.
Advantages:
- quick access to all wires, which means easy local repairs;
- the ability to change the layout of points;
- sometimes this option becomes part of the design solution.
Flaws:
- Not everyone likes boxes on the walls, and you can’t do without them completely.
Cable routing options
Replacing existing electrical wiring with a new one should begin with drawing up a diagram. Replacement of wiring can be either partial or complete. If all wires are to be replaced, a completely new circuit will be needed. It is better to entrust the drawing up of such a diagram to a professional electrician. At the same time, for correct orientation he will need the old circuit.
As a rule, the largest consumer of electricity in an apartment is the kitchen. For an ordinary room, one socket for 5-7 square meters is enough, but for a modern kitchen for the same area you will need 3 sockets. For an electric stove alone, you need a separate socket with a cable whose cross-section is between 4 and 6 millimeters.
The bathroom is another room with special operating conditions. The main distinguishing feature of the bathroom is high humidity. Therefore, sockets here should only be installed through a distribution transformer.
There are several ways to lay electrical cables: under the plaster, on the floor or under the ceiling, in the ceiling. Below we will look at the features of each option.
Laying wires under plaster
The most affordable way to arrange wiring is to lay electrical cables under the plastered surface of the walls or ceiling. For installation, you will need to create holes on the surface where fasteners will be installed. Then you can lay the wires and apply a layer of plaster on top.
The method allows you to direct several lines to each room. Not only lighting devices, but also air conditioning, heating devices, as well as other types of powerful household appliances can be supplied through their own line.
The disadvantage of this option is that plaster is practically not used in panel buildings. As a result, you will have to incur additional costs of money and time for plastering the surface.
Wiring on the floor or ceiling
The wiring can be arranged on the floor if you plan to make a concrete screed on top. The cables are placed in corrugated pipes, which are then filled with concrete. The wires can also be placed in the suspended ceiling.
The difficulty in implementing this method is that the sockets cannot be placed where the wiring is located (ceiling or floor), but will have to be installed on the walls. As a result, you will have to lay a path for the cable to the sockets. This can be done by gating the walls or hiding the electricity transmission line under the plaster.
Another option is to organize open wiring. Most often, wires are placed in plastic boxes or pipes. In this case, it is necessary to lay the wires in places where the likelihood of accidental mechanical damage is minimized. The advantage of the open type of wiring is that this operation can be carried out even when the apartment has been renovated. However, exposed cables are not very suitable for residential premises from an aesthetic point of view. In addition, this is not the best solution from a security point of view.
The best option for replacing electrical wiring in a panel house is to use old cable channels or seams between panels. In this case, you will most likely have to beat off old cement from the edge of the channel to ensure free laying of the cable.
Note! The cable in the channel must be laid without any fixation.
Apartment electrical network
First of all, let's figure out what an apartment's electrical network is and what it includes? Based on this, we will analyze how to install it correctly, and also consider various installation options that are acceptable for each individual case.
Control distribution board diagram
So:
- Any electrical wiring in a panel or brick house begins with an input panel . It can be located on the landing, as they did in Soviet times, or directly in the apartment. The second option is more convenient both in terms of maintenance and in terms of outside intervention. But unfortunately, it is not always feasible.
- The input panel usually includes an input machine, an electric meter and group machines. If it is not possible to move the electric meter from the landing to the apartment, then it contains an introductory machine and group machines.
- From the input machine, the wires stretch to the distribution boxes . Each group can have from one to several distribution boxes.
Note! When powering powerful electrical receivers, it is possible to supply power directly from the group circuit breaker to the electrical receiver. Typically, such electrical equipment is a variety of heating or heating equipment such as boilers or electric heaters. In this case, installing additional distribution boxes is not advisable due to unnecessary contact connections. And when arranging any electrical network, you need to strive for the smallest number of additional connections.
- In distribution boxes, the power lines of electrical receivers are connected directly to the group wire . These can be sockets, switches, lamps and other electrical equipment.
Features of gating
As mentioned earlier, gating is prohibited in load-bearing panels. However, the ban applies only to horizontal grooves, but vertical grooves are quite acceptable. Despite the possibility of creating vertical grooves, you should not create too deep grooves, as this will weaken the structure. The maximum permissible groove depth should not exceed 10 millimeters. In any case, when creating a groove, the reinforcement cannot be damaged.
The wiring is fixed in the grooves with alabaster mixture or dowel clamps. If dowel clamps are used, you will need to drill holes for their installation. The grooves are made using a hammer drill or a specialized tool - a wall chaser. The latter is more suitable for creating grooves, since it is equipped with a pair of laser circles and a dust removal device.
Note! Grilling must be carried out in compliance with safety precautions. It is recommended to use safety glasses and a respirator.
The holes for socket boxes must correspond to the following dimensions: depth - up to 45 millimeters, diameter - from 75 millimeters and above. The specific dimensions of the hole depend on the dimensions of the socket box.
How to lay wiring in a groove
I know of two acceptable ways to fasten cables in a groove - with alabaster (plaster or plaster) or a dowel clamp. I use dowel clamps myself, it’s not as messy as fiddling with plaster. Although, you will have to use a hammer drill a little more - make holes in the wall with a diameter of 6 mm, where to insert the dowel clamps:
Laying wires in the groove using dowel clamps
Laying wiring after gating. Fastening with dowel clamps
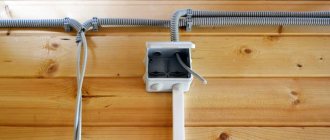
As a result, after installing the boxes we get:
Everything is installed. In the photo in the center there is a switch, below is a socket
But where do these cables go in this case:
Laying the wiring after gating - there will be a junction box in the middle
On the left in the photo the cable goes into the toilet, on the right - the light into the bathroom.
A couple more examples. Three points, one of which is for the antenna socket.
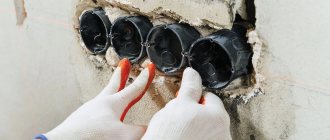
Installed boxes in reinforced concrete panel
Split socket:
Wiring in the ceiling and in the groove
Cable VVG2x1.5 goes to the switch in the corridor:
Strobe down to the switch
Strobe to the socket. First - in the seam between the ceiling and wall panels, then down the groove. The wall is load-bearing, so it is necessary to cut to a minimum depth.
Shield installation
When it comes to a panel house, it makes sense to think about installing a new panel. Often the machines are located in interfloor panels. It is reasonable to leave only the main switch and electric meter there, but place your switchboard in the living room.
The best option for placement in an apartment is a hidden panel design. Such a shield can be hidden in a plasterboard box if there is no suitable niche in the hallway. A security alarm and intercom are often placed next to the panel.
Removing the old socket
When carrying out repairs, it is often necessary to replace old power points with new ones, especially in Khrushchev or Stalin buildings, old-type panel houses. Sometimes such sockets are built into the wall without a socket box. Here the master must act in the following sequence:
- The power is turned off at the distribution panel.
- The socket panel is removed by unscrewing the fasteners.
- Using a screwdriver, the technician disconnects the wires from the terminals and removes the old structure.
- It is important to release part of the power cable in order to freely form a socket for installing a new glass.
- Otherwise, all actions are performed by analogy with installing an internal (built-in) power point.
If the power cable is short, you can lengthen it. All connections are carefully insulated.
Tools and materials
To carry out installation work you will need the following tools:
- a hammer drill with a crown (for creating holes for socket boxes) and drills (for creating holes for installing dowel clamps);
- knife;
- chisel;
- hammer;
- pliers;
- screwdrivers for plus and minus;
- wire cutters;
- roulette;
- soldering iron (power up to 60 W);
- putty knife;
- indicator.
You will also need the following materials:
- copper wire with three cores (cross-section for lighting fixtures - 1.5 square millimeters, for sockets - 2.5 square millimeters);
- socket boxes;
- sockets;
- switches;
- dowel clamps;
- alabaster mixture;
- terminals;
- insulating tape;
- wire (section - 1.5 square millimeters).
Replacing a built-in socket
Before installing a new outlet, remove the old one. But before removing, be sure to turn off the power to the room.
Dismantling
Algorithm of actions:
- turning off the power, preparing tools, putting on protective gloves and glasses;
- checking the absence of current using an indicator screwdriver;
- unscrew the cover of the old electrical outlet;
- the working part is removed, the wires are cut off;
- the socket box is cleaned (if there is one);
- if there is no socket box, a new one is installed and sealed with alabaster;
- electrical wires are pulled out.
Then you need to install a new device.
Installation
How to install a new outlet:
- the wires are stripped 1.5-2 cm;
- conductors are connected to the device;
- electrical wires are bent, a socket box is installed and secured with lamps or screws;
- a decorative frame is installed.
Now you can supply electricity and check the functionality of the outlet.
Instructions for replacing wiring
There are several stages of work.
Blackout
Before replacing the wiring, you need to remove the old wires. To do this, you need to completely turn off the current in the room. After disconnecting, check the presence of current using a multimeter. We also remove furniture from the room (or move it away from the walls). We remove sockets and switches.
We prepare a temporary socket for connecting a hammer drill and any other power tools to it. We connect the socket immediately after the electric meter. We place this fittings on a board. We also equip the board with a 16-amp circuit breaker. After the outlet is prepared, we turn off the power to the room.
Dismantling
We remove the electrical wiring from the distribution boxes. The boxes are distinguished by the presence of round removable plastic lids. Disconnect the wires and carefully remove the old wires from the wall. If necessary, we use a metal detector to search for cables.
In panel buildings, dismantling work often consists of simply removing wires from the distribution box. However, there are exceptions when the wire is located in such a way that its pulling leads to the destruction of the building structure. In this case, you can isolate this area from the system. To do this, old wires are cut as much as possible and carefully insulated.
Channels for wires
After removing the electrical wiring, we prepare the walls for laying a new network. To do this, we make special channels in the wall. To get an even groove, we draw two lines on the wall in advance, spaced a couple of centimeters from each other. It’s good if there are old channels, since in this case gating will not be needed. We also mark the areas where sockets and switches will be installed.
We make the grooves with a hammer drill or grinder to a depth of about 4 centimeters. We use a hammer and chisel to remove small fragments of material.
Distribution boxes
The next stage is the installation of junction boxes. They must be immediately secured in the installation locations. The fixing agent is cement mortar. The cable is laid from the switchboard to the distribution boxes.
Laying wires
To determine whether the wires are laid correctly, use a level. The length of the cable must be in accordance with the length of the grooves. There should not be too many or too few wires.
We connect the wires to each other with terminals. We make twists in such a way as not to mix up the ends of the wires in the phase. All twists are located in junction boxes.
The correct connection is made as follows:
- strip the end of the wire (3-5 centimeters);
- twist the cleaned ends together and shorten them by a centimeter;
- We insulate the wires using electrical tape or a terminal.
Next, you can route the cable from the distribution boxes to the consumers through pre-prepared recesses.
Inserting wires into the electrical panel
When running cables into the electrical panel, you should separate them into separate lines. It is recommended to draw up a distribution scheme in advance. Each line will need its own switch. This scheme is especially good if the house has powerful electrical appliances, since individual lines will better cope with transmitting the required current. Also, the presence of separate lines makes repair work with electrical wiring easier.
The wiring can be placed in corrugated or regular pipes laid in grooves. This will provide a higher level of safety compared to wiring placed under a layer of putty. It will also be easier to replace wiring in the future when removal simply involves pulling the cables out of the pipe through the junction box.
System testing
We pour the solution into the grooves only after we are convinced that the electrical network is working. To do this, we need a multimeter with which we will ring the system. This device allows you to find a short circuit in case of an incorrectly installed connection.
If no defects are found in the system, we cover the grooves with putty and install sockets, switches and lighting fixtures. The temporary outlet is disconnected and new electrical wiring is connected in its place.
So, there is nothing difficult about replacing the wiring in a panel house with your own hands. However, as mentioned earlier, it is recommended to coordinate the diagram with an electrician, and when performing installation work, you should strictly follow the instructions.
Cable extension
Moving an outlet with your own hands by extending the cable
This method is most often used when the need to move an outlet arose after renovations were carried out in the room.
You will need to run the wires through the socket of the old outlet. The cable that will be used should ideally be identical to the old one.
Technology:
- The apartment is cut off from power.
- Using an indicator screwdriver, make sure that there is no current at the terminals.
- Remove the cover from the old outlet and pull the box out of the recess.
- Using a hammer drill, a groove is laid from the socket to the installation site of the new socket.
- Extend the wires by connecting the cores in the standard way. The connection point is isolated. It is recommended to place the cable in a heat-shrinkable tube for greater reliability.
- A distribution box is mounted in the hole where the socket was previously located, and the connected wires are placed in it.
- Install the socket box; further actions are similar to what needs to be done when creating a new line.
Replacement Tools
The tools you will need are a phase indicator, pliers, a screwdriver, a hammer drill, and a knife. Replacing electrical wiring in a Khrushchev house begins with de-energizing the network. Then the old vein is dismantled and a place is prepared for a new route. Installation will be quick and cost-effective if you can use an existing channel. True, it is more difficult to move sockets and switches.
The laying can be carried out from the panel to the rooms and vice versa. The second method allows you to avoid cutting off power to the entire apartment for a long time. The connection of the cores is carried out only in the distribution box: twisting, soldering, welding, terminal blocks. Pure twisting is prohibited for connecting cores. It is usually used as a temporary option. Wires are often twisted together and then finally fixed by welding. To do this, strip the wires by 4-5 cm, bend them in half, twist them with pliers until a tight wiring harness is obtained. Welding will help make the fastening almost permanent. The finished network is checked with a multimeter. If there is no damage, the furrows are sealed with alabaster or putty. After drying, install the electrical accessories.
Installation of wiring in Khrushchev
Scoring of panel slabs
We have already mentioned that it is prohibited to touch load-bearing panel walls, this also applies to gating. But the ban applies to a greater extent to the installation of horizontal grooves. Making grooves for wires vertically is quite acceptable. However, there are still some restrictions; the grooves cannot be made too deep, which can lead to weakening of the structure (a depth of no more than 10 mm is allowed). The most important thing when installing the grooves is not to disturb the metal reinforcement.
No zigzags or inclined lines are allowed; grooves for sockets and switches are made in strictly even verticals.
The minimum distance between gas supply pipes and grooves should be 40 cm. The grooves for electrical wiring should be at least 15 cm away from window and door openings.
To cut grooves you will need a special tool, which costs a lot of money. It would be good if you have the opportunity to rent one from a professional electrician.
You need a grinder and a diamond blade is required for it, only it can cope with such a durable material as concrete. On the wall, you must first mark the route for laying the wire, and then make two parallel slits along these lines at a distance of 2 cm from each other. Now you will need a hammer drill; with its help, the remaining concrete between the cuts is removed.
Of course, the ideal option would be a wall chaser. This tool is essentially similar to a grinder, only it already has diamond discs built inside.
Another main advantage of the wall chaser is that it is equipped with a vacuum cleaner; installation dust does not extend beyond the casing. The only drawback is the price; in this case, even rental will be expensive.
Replacing electrical wiring on the ceiling
We know that wiring is not only placed on the walls, it also runs along the ceiling and supplies current to the lamp. Such wiring also needs to be changed, and here the question arises: how can this process be carried out in a panel house if a suspended ceiling is not used and plaster is not applied?
The solution is to use old channels or seams between the ceiling panels. Let us remind you once again: it is strictly prohibited to ditch the ceilings (ceiling or floor).
Using old channels to replace wiring can be called the most optimal. However, there is a nuance. The edges of the channel are often plastered with cement and will need to be broken up.
The cable should not be secured in the middle. The channel itself can be long and the process of pulling a new wire can be difficult.
Here we can attach the new cable to the old one and, by pulling out the old one, we will tighten the new one. In this case, do not bend the old aluminum wire too much. The fact is that waste aluminum is brittle and breaks quickly.
You can also stretch the wiring using steel wire. The wire is pushed through the entire channel and then a new wire is pulled in. The old wire will still have to be removed.
Actually, these are the methods for installing new wiring, and the choice of one of them depends on your desires and resources. As you can see, each method involves its own option for replacing and installing wiring, and depending on the chosen method, a new wiring diagram is drawn up.
Tools and materials
And so, before changing the wiring in an apartment located in a panel house, you need to take:
- Hammer with a crown and a set of drills for concrete. Using a crown, holes will be made for the socket boxes. Drills should be used for the holes into which the dowel clamps will be inserted.
- Knife.
- Hammer.
- Cold chisel.
- Pliers.
- Side cutters.
- Plus and minus screwdrivers.
- Indicator.
- Roulette.
- Soldering iron (power should not exceed 60 watts).
- Spatula (they will be used to secure mounting boxes and wires).
As for materials, their list consists of:
- three-core copper wire (for lighting, a wire with a cross-section of 1.5 square millimeters, for sockets - 2.5 square millimeters);
- mounting boxes (socket boxes);
- sockets;
- switches;
- dowels-clamps;
- alabaster;
- terminal blocks;
- insulating tapes;
- wire with a cross section of 1.5 millimeters.
Sequence of work
When you have prepared and approved the diagram, stocked up on all the tools and materials, you can begin replacing the wiring. From the very beginning, you need to prepare a special socket to which the hammer drill and other devices will be connected.
This outlet will be connected immediately after the meter. To create it, you need to install a double socket and a circuit breaker on the board (must be rated for 16 amperes). There should be a short cable running from the outlet.
When such an outlet is ready, turn off the electricity supply and connect this outlet. This connection involves disconnecting the cables coming from the meter from the apartment network and connecting it to our outlet.
As a result, the apartment will be de-energized, which is what is needed to safely replace the old wiring. Next, all sockets, switches and lamps are dismantled. After this, you need to find distribution boxes. This can be done either by tapping on the wall, or using a special device.
The next step is to open these boxes, disconnect the aluminum wires and pull them out.
In fact, the dismantling is complete. After this, new wiring is installed using one of the methods that we have already defined above. At the same time, large holes are made for the mounting boxes and the boxes are installed.
Next, the entire system is connected and checked for short circuits. At the end, putty is applied (if necessary), sockets, switches, chandeliers are installed and, after disconnecting the temporary working outlet, new apartment wiring is connected.
While disconnecting the special outlet and connecting the wiring that will replace the old one, the power must be turned off.
How to realize that there is old wiring in the house?
First of all, you need to pay attention to the electrical panel. Typically, this is where the electricity meter is installed. If there are still old Soviet plugs in the panel, then you have old wiring! Everything is obvious here - the wiring in the house is rotten, with aluminum wires
The second, important sign of old electrical wiring is if you are periodically shocked in the most unexpected places. Don't wait until next time - call an electrician immediately! And if possible, be sure to replace all traffic jams with automatic ones. Don't wait until they burn out next time. It is best to entrust the replacement of automatic plugs to a professional - call an electrician for 1 hour, and the job is done! Remember! That untimely replacement can cost you significantly more.
“Fireproof” wooden panel with melting wires
Old traffic jams
What are the dangers of aluminum wiring?
The lifespan of aluminum wires is significantly less than that of copper wires. Aluminum is more susceptible to oxidation and is a less flexible and softer metal (compared to copper alloys). The problem with aluminum is especially pronounced in places of connections and kinks in the wiring. High humidity and poor contact also accelerate oxidation processes. Subsequently, this leads to overheating and burnout of the contact.
Aluminum wiring
This is how current passes through a person
Another disadvantage of the old wiring is the absence of a third, so-called “safe” wire, known as the ground wire. In old five-story buildings, Khrushchev, Stalinist, and panel houses, up to the construction of the early 2000s. — The grounding wire was simply not provided! Therefore, installing sockets with grounding, without replacing all the wires, does not make any practical sense. In special, ridiculous cases, this can even play a cruel joke if the sockets are installed incorrectly! The new rules require all electrical equipment to be grounded and therefore have a safety wire in all electrical wiring. What is the term grounding and why it is needed can be read here.
What is the difference between wiring in houses of the 80s?
Electrical wiring in a panel house of the 80s has its own characteristics, which, if certain safety measures are not followed and ignorance of the intricacies of building houses of that time, can lead to problems. In most apartments in panel houses of that time, the wiring was arranged with certain features: it was located along the floor or under the ceiling.
Wiring was carried out to the living quarters below through the flooring of the neighbor's living space above. If the neighbors below have not carried out major repairs since that time, then when removing the floors, the worn-out wires of these neighbors, which are laid between the apartments, may be revealed and damaged. They will remain active and completely deprive them of light.
To avoid such problems, be sure to follow some rules:
Prepare for the worst - consider that you may inevitably stumble upon live wires. The next step is to very carefully and carefully remove the floor covering so as not to damage the neighboring wires if they are not detected in time. This is fraught with several problems - it can cause an electric shock, or turn off the entire house or just the apartment of the neighbors below. It is impossible to lay a new one immediately after tearing down the old floor, since there are many important works that need to be done before covering
To avoid snagging the wires during this repair, you should cover the floor with linoleum, cover it with construction mixture or pieces of any plywood. This is an important precaution when detecting wiring on the floor. Do not allow any mechanical impact on the cable, since after so many years it is very thin and fragile. It is forbidden to pull wires that go into the floor to prevent the neighbors' lighting fixtures from collapsing.