How to remove keys from a switch
The first thing you should always do is, of course, turn off the electricity and only then start working. You will need the following tools:
- screwdriver - flat and Phillips;
- screwdriver - voltage indicator;
- portable light source.
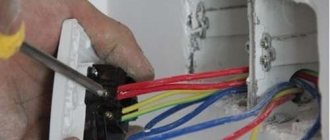
Using a flat-head screwdriver, you need to remove the switch keys, for which we install its tip between the frame and one of the keys, on the top or bottom side.
With a little force and using a screwdriver as a lever, you need to pry up the key and use your fingers to remove it from the grooves. The second key can be removed without the help of a screwdriver.
Using the indicator, they verify that there is no voltage; to do this, be sure to apply a screwdriver to each of the contacts. If the switch is located in a dark place, use a light source to avoid damaging the equipment.
After removing the keys with the switch, you can perform any operations, even under voltage, naturally, observing the necessary precautions. Check the integrity of the contacts and the presence of voltage on them, after which they make a conclusion about the operability of the device
How to remove a light switch from a wall - construction magazine
- At the first stage, you need to carefully study the design of the outlet. If the screw heads are located directly on the socket body, they must be carefully unscrewed with a flathead or Phillips screwdriver.
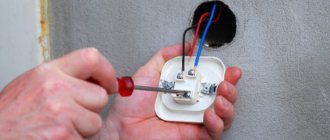
- Sometimes there are no screws on the case. In this case, they are located under the decorative frame covering the outlet. To remove the frame from the socket, you need to carefully pull it out with a screwdriver, after which it will easily move away from the socket body.
- To disassemble the socket, simply remove the decorative frame.
- The socket located on the wall surface can be disassembled after its housing has been deployed.
- After removing all parts of the outlet (body and frame), all cables must be carefully insulated.
Dismantling procedure
Before work, be sure to turn off the power in the house or apartment.
Additionally, it is recommended to turn off electrical equipment and circuit breakers. After this, you need to check the presence of voltage in the electrical network of the apartment or house.
Lighting wires
It is not necessary to dismantle the old wiring as the first step. First, you can install new wires. They can be pulled through the cavity of the slabs. To do this, find a junction box, which may be near the door or in the corner of the room.
Open it, unroll all the twists and determine which wires go to the lighting sources. If they run along the ceiling, new wiring can be attached to them.
If the wires are in the kitchen, the separation may go into the hallway or bathroom, depending on the location of the rooms.
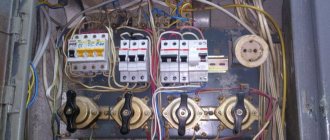
Removing the electrical panel
Before starting work, you need to prepare a kit for dismantling electrical wiring terminals and check whether the electricity in the apartment has been turned off. After this, you can proceed directly to action:
- after a power outage in the bathroom or kitchen, the voltage on the panel is checked separately. To do this, you can take an indicator screwdriver. If you attach it to the upper terminals, then regardless of the location of the machines, it should light up on phase, but not on zero. The indicator on the lower terminals should not light up when the machines are turned off;
- you need to unscrew the clamps on the lower terminals, and then remove the wire strands from them. Similar work needs to be done on plugs, that is, protection devices;
- after that, remove the fasteners that held the electrical panel and the panel itself;
- Carefully inspect the insulation of the wires behind the shield and, if necessary, restore it.
Sockets and switches
Removal of sockets and switches is carried out in the following sequence:
- remove the device;
- remove the installation box;
- Cover the resulting hole with construction mixture. You can use plaster or gypsum;
- After a day you can glue the wallpaper.
If such electrical installation work is carried out on a plasterboard wall, then a piece of similar material needs to be cut out, slightly larger than the hole itself. It needs to be glued to the wall and additionally screwed with self-tapping screws.
Chandeliers and lamps
The process of dismantling chandeliers and lamps is as follows:
- de-energize the device - turn off the circuit breakers and RCDs;
- remove the chandelier from the mounting strip or hook. Before doing this, you need to check again with an indicator screwdriver to see if there is voltage. Disconnect the wires from the chandelier;
- After removing the lamp, the wires must be insulated to avoid electric shock.
Disassembling the electricity meter
Before dismantling the electricity meter, you must obtain permits. Equipment disassembly is done in the following sequence:
- de-energize the meter by turning off the switch. Check for voltage;
- disconnect the wires from the clamps, first remembering their location. For convenience, you can mark them with a marker;
- pull the counter down and then forward to remove it from the bar.
Overhead sockets
Good day and hello! I am glad to welcome you to the website Construction from a to z Yenakievo-Donetsk*! Today in the topic - “Overhead sockets”, we will discuss overhead electrical sockets. From the topic you will learn:
- how do regular electrical sockets* differ from overhead ones?
- where it is mainly used;
- what kinds of overhead sockets there are;
- connection and fastening of overhead socket;
- video - installation and connection of the socket;
How do they differ from others and where are overhead electrical sockets used?
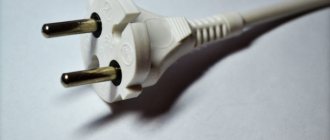
For those who have not seen overhead sockets in person, it is difficult to understand how they differ from ordinary sockets, as they are also called mortise sockets. The fact is that overhead sockets are installed with all its insides and the top box that covers them, on top of the finishing material. But the “mortise” one, its insides: the conductive elements, the base, are installed precisely inside the rough finishing material. The front panel itself is installed on the finishing surface.
What an already screwed overhead socket looks like is perfectly shown in the photo on the right. Whether you agree or not, I don’t know! But I wouldn’t want to see such a “cabinet” on my wall in a house or apartment under any circumstances. But from now on we’ll talk about the purpose of overhead sockets and where they are used
.
Still, it seems to me that you wouldn’t want to have such an ugliness on your wall! Moreover, such an outlet is installed only if the electrical wires are not inside the wall, but run along its surface. A kind of carrier, only stationary.
Overhead sockets are used:
- In places of high humidity;
- In open areas;
Overhead sockets are installed:
- For the bathroom;
- Under the sink;
- On lamp posts;
- Sheds;
- Where it is impossible to make an internal socket;
Used for technical needs and connecting various household appliances outside the home: water pump, Karcher, external home lighting, etc.
What types of overhead sockets are there?
Overhead sockets come in single, double, triple and even four socket types. As I said above, it’s practically a portable device, only stationary and does not have fuses, varistors, etc. built into it.
Fastening and connecting a surface-mounted socket
All types of overhead sockets are attached very easily and simply. To attach it to a wall, ceiling, floor, furniture, pole, its rear panel has two, and sometimes three holes for any construction fasteners*. But usually they are attached to self-tapping screws.
Fastening occurs as follows:
— unscrew two bolts from the front of the panel, by analogy;
— remove the back cover from which you can continue working;
- mount it to the selected surface and screw the front part on top.
If anyone is interested, let's take a little look at the process of attaching to different surfaces.
Remember! Installation takes place only on the rear part, panel, and overhead socket.
Attaching a surface-mounted socket to a plaster wall.
The overhead socket is attached to the plaster wall using a wood screw. A couple of 25 screws will be enough.
Attaching an overhead socket to a plasterboard surface.
Of course, it’s better to find a profile behind the drywall* and screw an overhead socket to it using metal screws. I think a self-tapping screw 3.5 centimeters long will be enough. But if you have to turn to drywall without a profile, then it is better to use “moths”.
How to attach overhead sockets to a concrete wall.
Everything here is generally banal and simple. You will need to take a quick installation, a hammer drill with a number 6 concrete drill and drill a hole. Insert the plug into it, attach the back panel of the surface-mounted socket with its mounting hole to the plug hole and tighten the metal nail for quick installation.
In any case, there is an option to glue the overhead sockets with liquid nails* glue. Holds perfectly on any surface.
The following video shows the connection of overhead sockets. In short, connecting overhead electrical sockets occurs as follows:
If you need to add anything, My respected and dear visitors!
Step-by-step dismantling instructions
Working with electricity requires care and caution
When dismantling and replacing an outlet, it is important to follow safety precautions. In this article we will talk about replacing a socket in a two-wire network
But if you need to replace a grounded outlet, we recommend that you familiarize yourself with this material.
The first thing that needs to be done is to turn off the circuit breaker on the apartment panel that powers the line on which dismantling work is planned to be carried out
In multi-storey buildings, panels with package switches that cut off the supply of electricity to apartments are located on staircase landings. It is necessary to determine on the dashboard the bag that corresponds to the apartment, and then move it to the upper “off” position.
If desired, you can de-energize only one room in which the replacement will take place. But for this you need to clearly know which of the machines is responsible for the corresponding line.
Since when the power goes out you will be temporarily deprived of lighting, when replacing an outlet in a dark room or during the twilight period of the day, you should think about an alternative light source in advance. As a backlight, it is convenient to use a battery-powered flashlight or a lamp connected to another power line.
To ensure that there is no mains voltage, use the single-pole low voltage indicator, available in the form of an indicator screwdriver.
The wires at the connection point are separated into phase and neutral threads. The indicator alternately touches the phase and neutral wires of the socket. If it is energized, the light on the screwdriver will light up. You can safely replace the connection point only if the indicator does not react when the probe comes into contact with the bare ends.
Dismantling the socket is performed in the following sequence:
- Remove the body of the old device. To unscrew the central mounting bolt located on the cover, you will need a Phillips or flat-head screwdriver. Under the removed cover you will see the working mechanism.
- After making sure that there is no voltage in the network, proceed to removing the internal unit of the device. To do this, special spacer tabs are opened on the sides of the working board. In some models, the metal plate of the mechanism is secured with two screws. They need to be unscrewed.
- Having removed the socket from the socket box as far as the wires allow, unscrew the clamping screws that secure the power cables. The current-carrying conductors in the block are sequentially disconnected.
When dismantling a socket for external wiring, keep in mind that there are devices with a mechanism that is separated from the socket box and models whose mechanisms are combined with overhead socket boxes. Both are subject to analysis. Only in the first option, you first need to remove the housing, and only then disconnect the working element, and in models of the second type, only remove the housing.
If, when dismantling the socket for hidden wiring, the screw securing the cover cannot be unscrewed, you can take an extreme measure - with a precise, but not very strong blow of a hammer, split it. The socket itself should be removed very carefully so as not to damage the cables leading to it.
To loosen the spacers, you must first unscrew the corresponding screws, and then use the freed wires to pull the “core” out of the cell in the wall
After dismantling the socket, it is necessary to inspect the insulation of the wires. If the braid is melted or damaged, the wire should be cut back to undamaged insulation. For the future, keep in mind that one of the main reasons for insulation melting is an incorrectly selected fuse rating or circuit breaker, which leads to a malfunction of the protection device.
In old-built houses, situations often arise when, after dismantling the socket, it is discovered that the socket box is missing in the niche, and the “core” itself is attached directly to its walls. You cannot install the socket this way: the device will not be securely fastened. In this case, you will have to install a new plastic socket box.
Soundproofing sockets
In this article we will talk about soundproofing electrical outlets, including noise insulation.
Many people know about almost zero sound insulation in most old-built multi-apartment panel buildings. One of the sources of extraneous sounds in the apartment are electrical points. You can verify this by bringing your ear close to the outlet. The production of reinforced concrete slabs involves the creation of through holes to facilitate the work of electricians. Builders run a couple of power cables to them and connect two hidden sockets in adjacent apartments, sometimes not bothering with even minimal soundproofing.
Residents must independently eliminate the shortcomings characteristic of standard construction. Otherwise, their comfort will be constantly disturbed. And not only noise from neighbors. Through a through channel, the air flow constantly draws tobacco smoke, unpleasant odors, allergens, and microbes into the apartment. This can be done by contacting specialists or on your own. Let's take a closer look at how soundproofing of sockets .
Methods for soundproofing sockets
The problem is solved in one of three ways:
- Moving the built-in socket to another location.
- Replacing a built-in socket with a surface-mounted one.
- Laying soundproofing material under an existing outlet.
The first option is realized by itself when the apartment is being renovated. By zoning and optimizing space, owners move electrical points from standard ones to places more convenient for connecting household appliances.
Built-in, internal or hidden is a socket recessed into the wall. Only the overlay decorative and protective panel remains on the surface. Built-in sockets are used when installing hidden wiring. They look neater, but their installation is labor-intensive. You can move the built-in socket by drilling a new hole next to the old one and punching a groove for the wire.
An overhead or external socket is mounted on top of the wall under exposed wiring. Its body rises by 5 cm, which is not always acceptable in a modern interior.
If repairs are not expected, it is more practical and cheaper to soundproof an existing internal outlet. The operation does not take much time or labor. The socket and box are removed from the socket, soundproofing material is placed in the hole, and everything is returned to its place.
If you have little understanding of electromechanics, do not do the installation work yourself! Call a professional electrician from the housing office or a specialized company.
First you need to remove the socket.
Removing the built-in socket
- Coordinate your intentions with your neighbors. If they are not very careful owners, you can inadvertently knock out their socket, cause a short circuit, and suffer from the voltage of their network.
- Turn off the power supply to the apartment at the distribution board or meter.
- Use an indicator screwdriver or multimeter to check the voltage in the network. Theoretically, it shouldn't exist. But no one guarantees that the builders correctly supplied the power cable to the apartment.
- Remove the trim panel.
- Loosen the two screws holding the adjustable arms.
- Remove the socket mechanism. You will see two or three pairs of wires with the ends clamped into terminals. The power cable usually comes out of the top of the wall.
- Loosen the screws on the terminals and remove the socket block. Insulate the ends.
- An electrical or installation box in the shape of a glass will open in front of you. Old boxes were made of 0.4 mm metal, modern ones are made of plastic. Remove the box.
- Shining a flashlight, you will see the neighbor's outlet box. If you find mortar build-ups, clean them up and remove all debris and dust.
The preparatory work is completed. Let's start soundproofing the hole.
Soundproofing built-in socket
Reinforced concrete slabs for panel houses have a thickness of 12-16 cm. Your legal depth of immersion in the rosette hole is 6-8 cm, 4-5 cm of which will be occupied by the installation box. If your neighbor agrees that you have the right to fill half of it with insulation, you will be given an extra space of 2-8 cm deep.
When it comes to material for soundproofing an outlet, many home craftsmen first think about polyurethane foam. It is strictly forbidden to use it because:
- Blown out on your part, it will penetrate into your neighbors' outlets. This is unlikely to make them happy.
- She's flammable. If the contacts in your or your neighbor's outlet spark, the dry polyurethane foam will burn out. Even the red fireproof foam is rated for temperatures up to +90°C.
- Foam protects well from drafts, but has low soundproofing properties.
There are many other more suitable and less hazardous soundproofing materials commercially available that can be used on electrical points:
- building mixture;
- corrugated cardboard;
- basalt wool;
- basalt cardboard;
- drywall;
- soundproofing membrane.
Soundproofing an outlet using a solution
The density of the mortar is similar to concrete. You can take a handful of the prepared mixture, dilute it in water, and in several steps create a reliable cement bridge between the boxes. But first, you need to install some kind of thin hard lining made of cardboard or plastic into the depth of the hole, otherwise the water will cause a short circuit in the neighbors’ network.
The solution is cheap and effective, but long-term. Even alabaster mortar needs several hours to harden.
Corrugated cardboard is a material that is always at hand in the form of packing boxes. The thickness of three-layer corrugated cardboard is 1.1 – 3.4 mm, five-layer – 5.5 – 7.0 mm. Corrugated cardboard is quite fireproof: its combustion temperature is 258°C. This is the easiest and free solution to the problem.
As a solution for soundproofing an outlet, you can use a cement or gypsum mixture, as well as a mixture of alabaster and water.
- Using a circular knife or scissors, cut 3-4 circles with a diameter 1 mm smaller than the hole in the wall. The total thickness of the cardboard/plastic spacers should be at least 5mm less than the gap between the sockets.
- Insert the circles into the depth of the rosette niche. You can fix them along the edge with silicone high-temperature (up to +300°C) sealant.
- Prepare a solution in a volume of approximately 1/2 cup, coat the washer and the walls of the hole.
- Thread the ends of the wire into the mounting socket.
- Place the glass in the hole.
- After the solution has dried, insert and clamp the ends of the wires into the socket terminals.
- Bend the wires so that the block fits evenly in the box.
- Secure the socket in the socket box with screws and adjust it to the level.
- Install the trim panel.
Soundproofing sockets with basalt wool and basalt cardboard
If you soundproof an outlet using professional materials rather than improvised materials, it is best to use mineral wool. It is used to insulate walls, ceilings, and roofs, and is absolutely safe, because the stone does not burn.
A circle of rigid stone wool slab 50 mm thick is suitable if the gap between the sockets is large. Cut the washer 2-3 mm wider than the hole in the wall. Squeeze it from the sides with your fingers and insert it into the depth of the hole.
If the gap between your and your neighbor's outlet is less than 5 cm, use 5 or 10 mm basalt cardboard. Cut several circles out of it, similar to corrugated cardboard.
Basalt insulation materials are an effective solution. But there is a problem. If no one you know insulates the walls or roof, there is simply nowhere to get a small piece of stone wool. Such small pieces are not commercially available, so you have to buy them in sheets.
Soundproofing sockets with cardboard
In almost every home, after renovation, there are scraps of drywall. They can be used if basalt insulation is not available. It is not flammable, but its sound insulation is worse. From a sheet 10-12 mm thick, cut a circle of slightly smaller diameter and place it in the depth of the rosette niche. You can fix it along the edge with high-temperature sealant, then cover it with a solution.
Precise selection rules for sockets
Replacing an outlet in your home is done for several reasons: due to malfunction, for aesthetic reasons, or as an electrical upgrade. But all these reasons are united by several factors that must be taken into account when choosing a feeding device
Important things to consider:
location of devices. Sockets should not interfere, but should be precisely designed for a specific location. The characteristics of the power source must meet the requirements for each individual room; product brand is not the least important in choosing
It is important that the replacement socket is characterized by quality and durability. Give preference to devices that have been on the electrical market for a long time; operational features
At this stage, it is determined which devices will be used for sockets; color scheme and stylistic solutions. Purchase fixtures tailored to your design; type of electrical wiring. They are divided into hidden and open; for each of these options, there are specially designed devices on the radio engineering market.
When it becomes necessary to install a double socket
In some cases, a 2-socket outlet is a necessary measure, especially for apartments built in the mid-to-late last century. Their peculiarity was an extremely inconvenient arrangement of electrical appliances. In most cases, one of them ended up behind cabinet or upholstered furniture, and the owners had one point at their disposal in the corner of the room. Installing long external pads in such places is neither practical nor aesthetically pleasing. This will lead to the fact that over time a trail of wires will stretch to them that do not fit into the interior. The best solution in such situations is to install double recessed sockets.
The advantages of this solution are the following:
- The products have one body. There is no need to make inserts and jumpers using twists. The cable retains its integrity after installation and connection of the device.
- Common cover for both sockets. This is not only aesthetically pleasing, but also practical. To install covers when installing dual outlets, you will need to widen the holes in the wall to increase the distance between the mounting blocks. In any case, there will be a gap between the outer linings, which will not decorate the wall in any way.
- There is no need to drill a hole for a double socket box. Double designs fit perfectly into standard glasses in the walls. Their mounting blocks correspond to the dimensions of single products.
- Easy to install. Connecting a two-socket outlet is as easy as connecting a device with one input. The caliper and spring-loaded feet ensure precise positioning and strong fixation of the mechanism.
If the cable has a grounding wire, it is recommended to purchase internal double electrical sockets that have the appropriate contact. It is recommended to ground electrical appliances not only for safety reasons. Connecting this wire will allow you to get rid of the background noise and crackling noise produced by the speakers of household appliances.
Carrying out repairs
Once the preparation is complete, it is time to carry out the main activities. The screws are removed and the decorative casing is removed. Next, the contacts are checked. If they look ugly, turn black or change color, then the entire structure is dismantled. The presence of a green color indicates oxidation. What to do in this case? The contacts are cleaned using a knife.
It also happens that the contacts are completely worn out. How to fix an outlet? In this case, a completely new design must be ready. What to do if the contacts are weakened? There are simple manipulations. Need to:
- Remove the cover.
- Pull out the entire structure carefully, without disconnecting or breaking the wires.
- When using a screwdriver, secure the screws.
- The charred wires are removed, and the rest are twisted and insulated with tape.
Next, the parts are installed in their places. When the structure is severely damaged, it is better to replace it immediately. These are simple manipulations, the basis of which is de-energizing the electrical wiring.
How to properly dismantle a socket
So, having examined the main technical characteristics of sockets and their types, you can move on to the main thing, how to remove the socket from the wall. For this you will need:
- The first thing you need to do is turn off the power to the apartment. In this case, you should check several times whether the electrician is actually de-energized. You can use a tester for this.
- Depending on the type of outlet, the decorative cover is removed. It can be secured with screws or latches. One screw is used in household sockets.
- Then the socket supports are unscrewed. If the legs are movable, when the screw is unscrewed, it will be accessible for removal.
- Carefully pull out the entire socket structure and look at how the wires are attached.
Note! If the wiring is old or aluminum, it is important to be careful not to break it. Otherwise, it will be difficult to replace and you will have to reassemble the wires, which will not have a very positive effect on the overall design.
These are all instructions for removing the plug. After this, you can glue wallpaper or install a new socket. If you have experience with sockets, be sure to leave your comments at the end of this article.
General progress of repair work
Checking for no voltage
Important! There is no need to make special efforts to disassemble the case, since usually the cover of a closed switch can be easily removed
Removing the switch housing
Removing the switch cover
If a switch with two buttons is closed, then mark with a felt-tip pen the wire that supplies electricity and is common to both switching modes.
Switch screw location
Removing the mounting screws
Almost every apartment owner is faced with such a problem as a faulty light switch. If such a situation arises, you do not need to immediately call a specialist to your home. Most often, you can fix this problem yourself. A light switch malfunction is most often caused by poor contact between the connecting plates of the electrical wires. To fix it, you just need to clean the contacts and check the tightness of the wires in the switch connectors.
The whole process consists of three stages: preparatory work; disassembling and cleaning contacts; assembling and installing the light switch in its original place.
Preparatory process
At the initial stage of repairing the switch, you need to completely de-energize this section of the electrical network and prepare the necessary devices and tools. To clean the disassembly and strip the contacts, you will need a screwdriver, an electricity indicator and regular sandpaper or a file.
It is important that there is no electricity in the network. This is why you need an indicator
A file is useful for removing plaque from the contacts, and a screwdriver for unscrewing and assembling the entire installation.
Disassembling the switch and cleaning the contacts
First you need to make sure that there is actually no electricity going to the light switch. Then, prying the device button with a screwdriver, remove it from the device. The plastic shell can also be removed with a little force.
The next step is to remove the switch from its mounting location. To remove it from the plastic shell in the wall, you need to loosen two screws. After unscrewing them a little, we pull the device out of the wall. To disconnect the light switch from the wires, loosen the fasteners and pull them out of the clamps.
Having seen blackened and coated contacts, we clean them with a file or special sandpaper. The cleaning process must be continued until plaque and fumes are completely removed.
Assembly and installation of the switch
After completing all the steps to clean the contacts from plaque, you can begin assembling the device. To do this, you need to connect all the wires to their original place and tighten the clamps
It is important to create excellent communication to prevent bad interactions. Having assembled the entire structure, insert the switch into the plastic case
After making it level and even, tighten both fastening screws. If the plastic frame is not put in its original place, you will have to loosen the screws and put it on until the switch is completely installed in the network. Although, if the switch is properly mounted in the wall, this should not be a problem.
At the final stage, insert the power button and start the central electricity monitoring device. Now we check the functionality of the switch. To do this, turn on the light in the room several times. If everything works stably, then calling an electrician will not be necessary.
If the switch has stopped working, then you should look into the root cause of its failure. Today there can be many reasons. You don't necessarily need to call a professional. You can repair the light switch yourself. The causes of failure are usually minor and therefore almost anyone can cope with them.
Sometimes, in order to restore the device's operation, you will need to clean the switch contacts. In this article we have provided detailed information on how to fix a light switch. The reasons for breakage of the switch can be varied, and in this article we will look at them.
How to disassemble a light switch?
- Transforming the aesthetic appearance by replacing outdated models with more modern ones;
- The appearance of an unpleasant burning smell from the switch or its excessive heating;
- The lighting device powered by the switch does not turn on or malfunctions;
Therefore, disassembling the light switch is caused either by some kind of emergency situation or by its obsolescence. Let's consider the procedure for disassembling the switch.
The main step, before disassembling the switch, is to remove the voltage from all current-carrying elements that are involved in the power supply. As with disassembling sockets, the best option for de-energizing is to turn off the input circuit breakers. If your machine breaks two wires at once - both phase and zero, then after turning it off, you can immediately disassemble the switch.
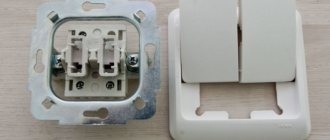
Look at the picture, here is an example of a two-key switch. In a model with large keys that occupy a significant area of the device, you need to lightly press on one side of the key, lock it in the extreme position, and pull it towards you.
Some switch designs even provide a small recess for this purpose, into which it is convenient to place your fingers and then remove the keys from there.
Rice. 6: the key came off easily
If you cannot pull the key with your fingers or the force applied is not enough, you can use a flat tool. To remove the key, pry it from the side with a regular screwdriver.
Rice. 8: switch without keys
In various models, the cover can be fixed using:
Rice. 9. Fastening the cover with bolts
After the decorative cover and key are removed, you can proceed to removing the mechanism body itself.
If there are bolts on the outside of the old cover, disassembly should begin by removing these bolts.
The most common option on new rocker switches is a bolt-on design located at the edges of the housing that secures the entire mechanism into the box. To remove from the body, the bolts at the attachment points are unscrewed one by one.
Expert opinion
Viktor Pavlovich Strebizh, lighting and electrical expert
Any questions ask me, I will help!
However, for our problem, the only thing that matters is the type of fastening: the hidden switch box is recessed into concrete and the outer box is screwed to the wall with screws. If there is something you don’t understand, write to me!
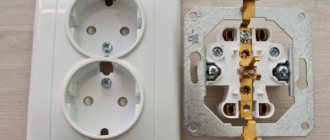
Socket arrangement
Most types of sockets have a similar design. The base is a plastic or ceramic base in which connection terminals and fasteners are located. A front panel is attached to the base of the device, which performs protective and decorative functions.
The electrical part of the sockets consists of metal terminals, which have a shaped spring part on one side for tight contact with the plug pin, and on the other a clamping element for connecting wires. A screw with a spring washer is most often used. There are three metal terminals. Two are located symmetrically for connecting the neutral and phase conductors, and the third is for connecting the grounding.
To secure the socket in the wall, curved legs are used, which move apart and rest against the walls of the socket when the fastening screws are tightened. For reliable fixation, the end of the legs is shaped like a dovetail. Modern sockets are also attached with self-tapping screws to the top of the socket box.
Device installation features
A double socket has one socket box with two separated terminal blocks and one mounting part for wires.
If desired, the installation of an electrical point can be done on your own, without resorting to the services of a specialist.
The use of jumpers is allowed only if it is planned to connect not very powerful devices to the electrical points. When connecting powerful equipment, technicians recommend connecting two outlets in parallel, creating a branch of wires for each point.
But in any case, to prevent emergency situations, the total load on this type of outlet should be no more than 16A.
If it is necessary to install a socket with two different socket boxes, the niches for their installation will need to be pre-drilled with an electric drill, while maintaining the same distance between the holes.
Let's start replacing
When doing the work of installing a new outlet in a room, you first need to check whether there is really no voltage in the electrical network. This step is extremely important as it will affect your safety during the installation process. The absence of voltage is checked using a special sensor.
Unscrew the top plastic frame of the socket with a screwdriver. If such a frame was attached to the surface thanks to latches, pry them off with a screwdriver, and the structure will quite easily be removed from the base of the socket.
Next, you can begin removing the main body of the socket. Usually it is attached to a wall-mounted socket box using self-tapping screws. Sometimes fastening is carried out on the antennae on the sides of the base.
Attention! When removing the main parts of the socket, do not forget that such procedures require concentration, high accuracy, and slow and smooth movements.
Carefully unscrew the housing from the wire contacts. When dismantling the components of the socket, remember the sequence in which the removal was carried out, otherwise you may get confused when you subsequently install a new socket.
Do not damage the wires during dismantling and pay attention to the ground wire. As a rule, it is the third in a row and has a yellow-green tint
Sometimes it may be missing
Make note of where it is attached, as it is extremely important to install it in the right place. Once the inner casing is removed, you can begin installing the new socket parts.
All wiring is connected to the inner housing in the same sequence as it was disconnected during removal. Use special pliers to tighten the contact bolts.
Remember! The contact bolts should not be tightened too tightly, otherwise you may cut the wiring strand.
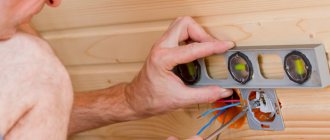
At the next stage, the socket is installed in the socket box, and it is extremely important to follow the parameters and use a level to check how level you are installing it. Once you have ensured that the socket is securely fastened, you can begin installing the protective housing, making sure that the plug guides are correctly fixed
At the last stage of work, turn on the power and check how well the outlet works. A properly installed socket should not dangle, wobble from side to side, or fall out, and there should be no flashes or short circuits when turning on electrical appliances.
As you have seen, there is nothing complicated in the process of replacing an outlet. The main thing is to carry out all procedures in the required sequence and strictly follow electrical safety rules.
Important! A correctly selected and installed socket will not only make it easier for you to use electrical appliances, but will also protect you from unwanted fires or short circuits, and will also fit harmoniously into any style.
If some questions still concern you, or you want to once again familiarize yourself with the sequence of actions, you can watch a video describing each stage of the work:
Installing a surface socket
Need to quickly install an outlet? Easy! At any time convenient for you, the master goes to the site and carries out installation within 30 minutes.
Fast. Qualitatively. Inexpensive. With a guarantee!
The cost of installing a socket is 200 rubles/piece
Electrical sockets can be connected in an open or closed way. Installation of a surface-mounted socket is recommended in wooden houses. Wood is a flammable material, so hidden electrical sockets in wood are unacceptable. Installation and connection of the overhead switch socket is carried out on a metal base, which additionally protects the tree from sudden fire due to a short circuit.
Or external sockets are used when you do not want to spoil the existing renovation, re-glue the wallpaper after gating the walls for built-in electrical sockets.
| Installation of chandeliers | PC. | from 700 |
| Switch installation | PC. | 200 |
| Installing an outlet | PC. | 200 |
| Replacing an internal socket | PC | 347 |
| Installation of lamps | PC. | 300 — 500 |
| Installation of sconces | PC. | 500 |
| Installation of the machine | PC. | 500 |
| Installation of a two-pole circuit breaker | PC. | 500 |
| RCD installation | PC. | 500 |
| Connecting a single-phase meter | PC. | 1000 |
| Connecting a three-phase meter | PC. | 1500 |
| Connecting a washing machine | PC. | 1000 |
| Connecting the water heater | PC. | 1000 |
| Dishwasher connection | PC. | 1000 |
| Connecting a kitchen hood and ventilation | PC. | 1000 |
| Hob installation | PC | from 600 |
| Oven installation | PC | from 600 |
| Installation of a kitchen hood | PC | from 650 |
| Air duct installation | PC | from 450 |
| Installation of a storage water heater | PC | from 1350 |
| Installation of instantaneous water heater | PC | from 1350 |
| Dismantling old equipment | PC | from 250 |
| The exact cost can be found out after a visual inspection of the work site before starting work. |
Installation and connection of a surface-mounted socket
The wall socket box has a beautiful, protruding body. The socket box will be the decor of the room. It can be decorated with carvings, patterns, drawings, and gold inserts. The decorative body is protected from overheating, is not susceptible to temperature changes, and does not change color due to direct sunlight.
https://www.youtube.com/watch?v=wXtmHA3uBVU
The main difference between a wall-mounted electrical outlet and a standard one is that it is mounted directly on the wall, and not inside. Therefore, installation of a surface-mounted switch socket can be carried out even after completion of the interior finishing. It will not spoil the existing repairs in any way.
Before installing overhead sockets on baseboards, bricks and other surfaces, you need to prepare the equipment. To install switches and sockets I use:
- pliers;
- screwdriver;
- pencil;
- knife or cutter;
- drill.
The cable to the wall outlet can run outside the wall or along grooves.
Tips before starting to install electrical points
Before installing the switch on concrete or other floors, you must turn off the power supply. To do this, turn off the machine or unscrew the plugs. Even if the machine is turned off, you need to additionally make sure that there is no current supply to the line using an indicator screwdriver.
Before installing and connecting the switch, you need to draw up a design diagram. The choice of socket depends on the installation location. For the bathroom you need to use special waterproof socket boxes. They differ from standard ones in the presence of a sealed lid that prevents moisture from getting inside.
You can secure the electrical outlet using self-tapping screws or dowels. Holes in concrete or brick can be made with a hammer drill. The depth and diameter of the holes must correspond to the diameter of the screws.
Installation steps for a double surface socket
Electrical installation is carried out in several stages:
- switching off the current;
- removing the cover to gain access to the latches;
- detaching the clamps;
- disassembly of the device;
- fitting the socket box to the installation site and drawing the outline with a pencil;
- marking of fastening points;
- fixing the base on the wall;
- securing the power cable;
- removing the insulating layer from the cable;
- connecting wires;
- fixation in the socket box;
- securing the outer casing;
- test connection to the network.
Installation of a surface-mounted socket on a wall begins with fixing the socket box, which is made of metal or dielectric raw materials. After this, wires and an electrical outlet are pulled to the socket box. A protective insulating cover is installed on the finished system.
To avoid problems with electrical installation of wall sockets, use the services of an electrician.
Leave the electrical work to an electrician. Doing your own wiring can be dangerous if you don't have experience working with electricity. Sudden electric shock or short circuit during use are common occurrences in the absence of experience.
Preparation for dismantling work
Before installing a new outlet, you must decide on its type.
When buying sockets in specialized stores, pay attention to the availability of quality guarantees, certificates or evidence of their safety. The socket consists of several parts, and it is quite possible that you will not need to change all of them
It depends on what caused the outlet to be replaced.
When choosing the appropriate option, focus on several important factors:
the location where you plan to install the outlet
Please note that there are a huge number of their varieties, so make your choice in accordance with the characteristics of the room. For example, the performance of outlets can be affected by the humidity or temperature in the room;
manufacturer's brand and reviews of such products
Analyze how popular the brand is and whether other consumers trust it. Choose sockets only from well-known manufacturers, otherwise you may stumble upon low-quality products;
purpose of the socket. Think in advance what electrical appliances and equipment you will connect to the selected outlet, and what power it should have;
appearance according to the interior of the room in which you plan to install it. Depending on the style of the room, select the required size, shape, texture and color of the outlet.
The choice of outlet also depends on how many electrical appliances you need to connect in this area of the room, how important it is to protect it, and whether there is a need to hide the wiring. Depending on these parameters, you can choose a socket for open or hidden wiring, single or double, with two or three phases, with grounding and many others
Advice: if you are going to change sockets in the children's room, choose options with curtains or other protective devices (plugs, covers, etc.). This way you can protect children from unwanted contact with sources of electricity.
Before you begin directly replacing the socket, you must prepare all the necessary tools. During the installation process, you will not be able to be distracted by searching for them, since at some stages of the work you need to hold the socket or ensure quick fastening of some parts.
To remove the old outlet and install a new one, you will need pliers, a screwdriver, a flashlight, electrical tape, a utility knife and a voltage gauge. Electrical tape may be needed for attaching some components or for working with wiring; a construction knife will be useful in the process of removing socket elements or, if necessary, cutting off some part of the wire (although you can use other tools for this). The flashlight will provide you with ease of operation.
Attention! Don't forget to turn off the electricity in your apartment before you start working on the outlets. If the switchboard is located on the landing, hang a note there asking not to turn on the electricity.
Removing the socket from the wall: safety rules
Dismantling of the socket is carried out in case of wear, breakage, obsolescence and in the process of major repairs. In theory, this event should be carried out by specialists who have education, experience and permission to carry out hazardous work. But if you follow simple instructions and observe safety precautions, you can perform this procedure yourself, saving money and gaining much-needed skills in everyday life.
- The principle of replacing sockets
- Step-by-step dismantling instructions
- Setting up a new connection point
- First you need to remove the frame covering the mechanisms. This is usually done by snapping the frame away from the frame.
- The next step in disassembling the socket will be unscrewing the core. Simply unscrew one or two bolts, depending on the design of the socket, and remove the core.
- Next, we move on to removing the specific mechanical part of the socket. In order to remove the mechanical part, you need to unscrew the two bolts that hold the socket in the box.
- After removing the mechanism, you can disconnect the wires and connect them to a new outlet, replacing the faulty one. If the new outlet also turns out to be inoperative, then you need to look for the cause of your troubles elsewhere.
It is also worth mentioning that your sockets can be disassembled in a different way, because any manufacturer reserves the right to make mechanisms the way he wants. From here, the procedure for parsing and collecting will differ.
Safety precautions for persons who are allowed to work with the tool
The operator - the one for whom all safety measures are undertaken - is subject to appropriate requirements regarding his training, protective equipment and, in fact, rules of conduct during work.
Operator qualification requirements
An employee is allowed to act as an operator:
- at least 18 years of age;
- knowledgeable about the rules for using this equipment;
- having an electrical safety group no lower than class II;
- completed the latest occupational health (occupational health) and safety (safety) training no earlier than 3 months ago;
- able to provide first aid, including self-help;
- passed a medical examination;
- completed an internship.
If we are talking about a specialist who only maintains the tool in working condition, regularly inspecting and testing it, then the electrical safety group of such a worker should not be lower than class III.
Operator equipment requirements
Minimum set of personal protective equipment:
- comfortable workwear made of cotton fabrics - one that does not hinder movement and does not have hanging ends, belts, or protruding pockets that could get into the moving parts of the tool;
- safety glasses or mask;
- head protection if you have long hair (scarf, hairpin);
- Stable shoes with non-slip soles.
Protective measures that are used when certain conditions are met:
- vibration-isolating gloves/anti-noise helmets or headphones – if the vibration/noise level exceeds the norm;
- gloves and shoes based on dielectric materials - if any work is carried out with tools of class I. For classes, see the corresponding chapter.
All protective equipment must have an inspection stamp and a note indicating the date of the next inspection.
Brief overview of characteristics and prices
The domestic electrical goods market offers a wide selection of socket models with two inputs. Products vary in design, technical specifications and prices.
Most popular products:
- Legrand Valena - grounding, screw terminals, 16 A, IP20, 375 RUR;
- Legrand Valena Allure - grounding, spring terminals, protective curtains, 16 A, IP21, 650 rubles;
- Legrand Etika - grounding, screw terminals, 16 A, IP20, 185 RUR;
- Legrand Quteo - grounding, spring terminals, protective curtains, 16 A, IP21, 220 rubles;
- Legrand Quteo - grounding, screw terminals, water protection, 16 A, IP44, 525 rubles;
The product range consists of mechanisms with white and colored covers.
Reasons for the need to replace the old network
Previously, in the construction of housing, aluminum wire of small cross-section with single insulation was used. The lighting and household appliances that existed at that time did not create a large load. Currently, the load is much greater and does not meet the old standards. Aluminum wire has a service life of no more than 30 years. Loss of elasticity leads to flexural fractures. Insulation loses its properties. Operation of aged wiring under heavy loads threatens shutdowns and short circuits. If uncontrolled shutdowns lead to equipment malfunction, a short circuit can lead to a fire.
Is the switch really the cause?
Let's first make sure that the reason for the lack of light is in the switch itself.
Check if there is lighting in other rooms. If not, then look at the input machine, maybe you exceeded the permissible load by turning on the electric kettle, iron and microwave oven at the same time, and it turned off. Go out onto the site, ask your neighbors if they have electricity, perhaps there is no voltage in the entire house.
In the case when the light does not come on in only one room, but in all others there is, the range of possible reasons narrows. Check the integrity of the light bulb and the serviceability of the socket in the lighting fixture. If everything is in order with the lamp, then there is no other choice but to remove the switch and examine its insides.
Repair features
When all the preparatory work is completed, you need to disassemble the light switch and carefully examine it. If the contacts are oxidized, they need to be cleaned. Oxidation can also prevent the passage of electrical current, so if there is severe contamination of the contacts, then most likely that is why the mechanism did not work. After cleaning, you need to connect all the wires, mount the device back into the hole in the wall and secure the frame and keys in place. To check its operation, electricity is supplied.
If the contacts of the switch are melted, this indicates that a short circuit has occurred, as a result of which the mechanism overheated and became deformed. In this case, only replacement will help; such a switch can no longer be repaired. In order for the new device to fit, you need to take the old one with you to the store, then there will be no problems with choosing accessories.
https://youtube.com/watch?v=FP3_fqpoNdQ
How to remove and disassemble a light switch from a wall?
The need for knowledge and practical skills on how to disassemble a light switch arises when major repairs are made in buildings or individual rooms. Sometimes there is a need to replace a faulty light switch.
There are two main types of wall mounting designs, which are fundamentally different:
- short circuit;
- burnout of expensive lighting fixtures, energy-saving, LED or fluorescent lamps;
- burning of insulation in a junction box or wall;
- electric shock.
- Familiarize yourself with the basic rules of safety measures. Before removing the switch, you need to study the design of their fastening and connection. Products for external wiring are fastened with ordinary dowels and self-tapping screws, and the housing is pressed against the wall through the mounting holes. For internal wiring models, fastening technologies are more complex. The design of the case includes a mechanism of sliding strips, which fix the case on two opposite sides in a pre-made hole with a diameter of 67-70 mm.
- Regardless of the type of light switch, for what purpose it has to be disassembled, first of all at the distribution board, the circuit breaker is turned off. This is done for safety reasons to prevent the possibility of electric shock to working people. You need to make sure that the shutdowns are made correctly, click the keys several times, the lighting devices should not work. According to the requirements of the PUE (Electrical Installation Rules), a sign must be hung on the circuit breaker in the switchboard: “Do not turn on people working.” It is advisable to close the cabinet and keep the keys with you so that strangers do not have access to the switches. Having completed these steps, you can begin to disassemble the switch itself.
Expert opinion
Viktor Pavlovich Strebizh, lighting and electrical expert
Any questions ask me, I will help!
It is strictly forbidden to begin work on wallpapering without insulating the contact group in order to avoid electrical injury from electric shock. If there is something you don’t understand, write to me!
Breaking the wall correctly
We have already figured out what tools and supplies we will need. Now we can talk about how to demolish a concrete wall in an apartment.
You need to start with preparatory work, which includes
- Removing wiring. To do this, you need to turn off the electricity at the distribution panel. Then dismantle the switches and sockets and insulate the ends of the wires on adjacent wall structures.
- Floor protection. Ideally, it is better to dismantle the floor covering and build a flooring from wooden boards. These actions are necessary to maintain the integrity of both the floor covering and the concrete base.
- If there is a doorway in the wall that is to be demolished, then it must also be removed before the main work begins. To do this, remove the door itself from its hinges, and then dismantle the door frame. For greater convenience, you can saw the vertical parts of the box in half.
- After this, you need to apply markings. The side of the resulting squares should be no more than 40 centimeters in length.
At this point, the preparatory work is completed, and you can proceed directly to the demolition of the wall.
It is better to start work from the top. The first step is to make holes along the lines. You need to drill every 3-4 centimeters. The diameter of the through holes is 1-1.2 centimeters.
Then you will need to connect the nearby holes by cutting through the concrete structure with a grinder. For this purpose, it is necessary to use a diamond-coated wheel. At this stage it is better to work together. At this time, it is better for your partner to start cleaning with a construction vacuum cleaner. This process requires the use of protective equipment - gloves and goggles.
After one square is completely cut out around the perimeter, you should knock it out as carefully as possible, trying to prevent it from falling. Some walls are best cut on both sides due to their thickness. Now you just need to repeat the last process and demolish the entire structure step by step.
It goes without saying that demolishing a wall is impossible without unnecessary noise and a lot of debris. If you do not have permission to carry out redevelopment, then there is a possibility that neighbors may complain about you to the supervisory authority. Its employees will most likely recognize the repair work as illegal and impose a fine on you. They may also require restoration of the dismantled wall. After such a nuisance, it is almost impossible to obtain official permission to demolish the wall.
Do I need to remove sockets before wallpapering? What should I do if wallpaper glue gets into the socket?
We decided to hang wallpaper ourselves, but we can’t decide on the sockets, whether to remove them or not, what should we do if wallpaper glue suddenly gets into the socket?
Author of the question
djbonko
Answers:
Are you planning to hang wallpaper and doubt your abilities? Advice from experienced specialists will help you avoid mistakes when performing work in difficult places: around switches and sockets.
Gluing wallpaper around sockets and switches is not that difficult
Preparatory work: let's not forget about safety
The easiest way to apply wallpaper around switches and sockets is after partial dismantling of electrical appliances. Before starting this work, turn off the power to the room, and then:
- Unscrew the screws and remove the protective cover of the socket. The contact group in the mounting socket is left in place
- Carefully pry the switch keys with a screwdriver or a small chisel and remove the decorative panel-frame from it
- insulate open screw terminals with wires with masking tape or securely cover them with thick polyethylene, tucking the ends into the technical hole.
Dismantling the switch
When performing any work on electrical wiring, first of all you need to turn off the electricity at the panel, de-energizing the repair site. You should also stock up on a special indicator screwdriver, with which you can check whether everything is turned off.
The procedure for dismantling will be as follows:
First, the keys of the mechanism are removed; without this action, it is almost impossible to see the internal structure. Regardless of how many there are in a particular model, they are attached approximately the same way. To remove them, lightly pry them up with a screwdriver, holding them with your fingers on both sides. Usually there are no particular difficulties with this.
Next you need to remove the frame. In different types of electrical accessories, it can be attached in different ways - with two bolts located inside the product, or with special grooves. In the second case, they can be easily opened with a screwdriver; in the first case, they can be simply unscrewed. Most often, flat screws are used in switch assembly, but sometimes you can also find Phillips screws - you will need an appropriate screwdriver for them.
Socket with switch - features of dismantling this device
- The key is pressed against the wall with your thumb on one edge and is removed if you pull the other one towards you (Fig. a). You should not pick it with a screwdriver or knife, as scratches will remain on the surface. Some keys fit tightly and can be pryed off by the edge with a screwdriver.
- The key is pressed on the sides with your fingers, the fastenings are recessed, and it moves freely.
- If there are connectors on the sides, pry them up with a screwdriver and gently pull them towards you, after which the key comes off.
Useful tips Connection diagrams Principles of operation of devices Main concepts Meters from Energomer Precautions Incandescent lamps Video instructions for the master Testing with a multimeter
How to change a double socket
If an identical double new one is installed in place of the old double socket, then absolutely no problems will arise. All operations are performed in accordance with the previously described algorithm.
But how to change a single socket to a double one - this issue will be a little more difficult. Moreover, you will have to face difficulties that are completely unrelated to electrics, since the mechanism of single and double sockets is completely similar.
Additional, but completely solvable difficulties will consist only of widening the hole in the wall. It should be of such dimensions that a double socket socket can easily fit into it. Moreover, we must not forget that there must be a small gap between the walls of the hole and the socket box, which during installation will be filled with plaster or some kind of fixing solution.
To expand the hole, you will have to use, as described earlier, a chisel and a hammer. Electrician skills and any additional knowledge and skills are not required.
So, now you know how to change the outlet yourself at home. We are sure that after reading this material, you were able to understand that even a person who is not at all experienced in the intricacies of electrician craftsmanship can do this.
How to quickly remove washable wallpaper from a wall
Wallpaper is actively used as a material used in the decoration of apartments, country houses, country houses and even non-residential premises.
But, despite their high quality, like any other materials, over time they require replacement for various reasons, ranging from fading to the point where there is a need to change the boring interior.
All this applies to liquid wallpaper. Removing them from the wall is not as easy as it might seem at first glance, since they must be removed completely, and not in separate pieces, which are most easily separated from the surface of the wall.
Wallpaper removal tools
Removing old wet wallpaper will not require much effort, certain skills and time if you are thoroughly prepared for this work. To do this, you need to ensure that the following tools are available at the work site:
- metal scraper;
- painting knife;
- steel spatula;
- ladder;
- roller with long pile;
- wallpaper remover.
Depending on the material that forms the basis of wet wallpaper, they can be paper, vinyl or non-woven.
How to remove wallpaper
How you can remove washable wallpaper from a wall quickly and efficiently will help you understand the various options for dismantling it.
You can remove the wallpaper by prying up the edge of the canvas with a spatula and then gradually removing the entire strip. In this case, the wallpaper does not need to be moistened or any additional operations are performed, but these types of finishing materials are quite rare.
If wallpaper is glued to a wall with plaster, then its removal must be done especially carefully, since separation of the plaster layer itself may occur.
Work on removing wallpaper from the walls can only be carried out after de-energizing the sockets and switches.
To remove wallpaper from the wall efficiently, you must follow the following sequence:
- First, the surface is thoroughly wetted using a garden sprayer or a sponge.
- After the water has been absorbed, you can begin to remove the wallpaper. If the dismantling process is still difficult, then wetting must be repeated, and so on until the wallpaper can be removed easily.
- Wallpaper should be removed from the seams, trying to separate the entire width of the canvas from the wall, and then remove the rest evenly.
- If the surface has dried out, then you need to additionally moisten it with water so that the water does not drain, but is absorbed. This procedure can be performed several times in small doses.
- When using a scraper during dismantling, you must be careful not to damage the plaster with it.
- Particular attention must be paid when removing wallpaper near sockets and electrical switches.
The listed measures must be carried out when removing wallpaper, regardless of the material from which they are made and the base of the finishing coating is made.
Removing wallpaper with a moisture-resistant coating
If the surface of the wallpaper has a coating that prevents the penetration of water, then preparatory work to facilitate its convenient removal should be carried out in the following sequence:
- Holes are made on the surface of washable wallpaper to allow water to penetrate through them. This operation can be performed either with a simple scraper or using a special roller.
- After wetting such a surface with water, the wallpaper should come off the wall easily.
- If it is still difficult to remove the wallpaper, then you need to apply a steam remover to the problem areas, which can remove the wallpaper.
- If you don’t have one, you can use a regular iron with a steam function.
- There is no need to touch the surface with the iron, since steam is supplied through holes previously made in the finishing coating. For a detailed description of the process, watch this video:
After removal, small areas of wallpaper and grains of glue may remain on the surface. The entire wall must be sanded down with sandpaper or a sanding stone to ensure complete removal of the finishing material.
Removing double-layer wallpaper
If it is necessary to dismantle wallpaper consisting of two layers, they must be removed layer by layer. First, the top layer is removed, and then the bottom layer.
- the top layer is removed using the technology described for moisture-resistant surfaces, with preliminary disturbance of the surface to allow water penetration;
- the bottom paper-based layer is also removed after pre-wetting the surface;
- When dismantling the fabric base, in addition to the measures listed above, it may be necessary to use a grinding wheel or other mechanical action.
How to put wallpaper near sockets and whether you need to remove them
You can carefully stick it near the socket after dismantling it. The wall can be finished without removing the electrical device. Any method requires compliance with safety precautions.
- How to hang wallpaper without removing the socket
- How to remove a rosette for wallpapering
- How to de-energize an apartment
- Removing the socket
- Wallpapering and trimming
- Socket assembly
- Why do sockets not work after wallpapering?
How to hang wallpaper without removing the socket
To avoid removing the mechanism from the box, use the technique of trimming wallpaper:
- Stick the strip up to the protective panel.
- Using a knife, make punctures in the corners of the frame; they will become a guide for the cross-shaped hole.
- After cutting the canvas, press the wallpaper against the wall with a spatula around the perimeter of the outlet.
- Then glue the rest of the strip.
Please note that wet material does not cut well, but tears easily. If you can’t get around the outlet carefully, mask the defect with a decorative frame.
How to remove a rosette for wallpapering
The electrical device that powers household appliances consists of:
- socket box;
- contact block;
- cover secured with a screw.
The mounting tabs, contact and wire terminals are parts of the block.
If dismantling is unavoidable, remove the socket as follows:
- Turn off the power to the apartment.
- Remove the decorative cover.
- Unscrew the fastenings of the mechanism.
Perform the work carefully, keeping safety in mind. Most of the socket elements are made of plastic; improper handling will lead to breakage.
How to de-energize an apartment
At various stages of renovation, it becomes necessary to turn off the power to the room. The apartment is de-energized in the panel.
There are various electricity blocking devices at the entrances:
- manual plugs without buttons;
- machines with buttons;
- switches with toggle switches.
Before removing the outlet, make sure that the disconnect devices have been activated.
Removing the socket
Having de-energized the space, proceed to remove the socket:
- Unscrew the decorative cover screw with a Phillips or flathead screwdriver.
- Loosen the fasteners of the tabs.
- Remove the socket mechanism by pulling it towards you.
- Insulate the wires with electrical tape or construction tape.
The screws of the fastening legs can be unscrewed completely, and the mechanism can be placed in a tight bag.
Wallpapering and trimming
Stick the cut strip of finishing material onto the wall up to the technical hole. Then cut the canvas crosswise with a sharp knife. Tuck the cuts into the hole.
For round switches, the wallpaper is cut in a star shape. Be careful when gluing material with metallic inserts. Do not allow them to come into contact with wiring.
Features of dismantling an old triple or double socket
Dismantling a double or triple socket without any special differences, since this type of sockets has the same number of terminals for connection as a regular one.
All switching is carried out structurally at the very base of the device. The difference may lie in the size of the socket box, but for dismantling and subsequent installation this is not important.
If you follow the recommendations given, working with home electrical wiring does not require special education or experience. The main thing is compliance with safety requirements. You cannot work without turning off the electricity. You need to have the necessary tool (list in the article above), and then you can get the desired result without additional costs.