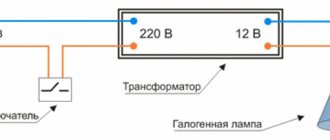
Below is a diagram of the operation of a two-key switch connected from an outlet. According to it, we proceed to connection and installation.
To connect we need: - Phillips screwdriver - Flat screwdriver (indicator) - Assembly knife or insulation stripper - Pliers or side cutters - Level
2. We prepare the wires in the socket boxes - we shorten them, leaving the ends of about 100 mm, remove the protective braiding, and then strip the insulation from the cores, about 10 mm. Then we insert two wires between the boxes, in our case - white and white with a blue stripe.
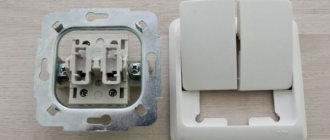
3. We connect the socket mechanism, to do this we place a pair of white wires (phase) in the left block, yellow with a green stripe (ground) in the central one, and white with a blue stripe (zero) in the remaining right pair of wires and tighten the clamping screws.
How to determine which wire is phase, neutral, and which is ground yourself, our detailed instructions will help you - HERE.
4. We install the socket in the seat and secure it using the socket box mounting screws strictly horizontally - level.
5. In the circuit breaker box we connect all the blue wires with a white stripe (zeros) to each other, in this case this is done using a WAGO terminal, after which we carefully place them in the socket box.
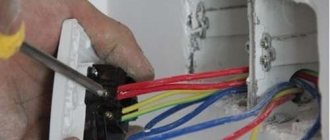
6. Connect the switch mechanism. To do this, we place the white phase wire coming from the socket into the input block of the mechanism, and the remaining two white wires going directly to the lamps into the blocks of the corresponding switch keys, as shown in the image below, and tighten the mounting bolts.
7. We install the switch mechanism in the socket box, close to the previously installed socket mechanism and secure it with mounting screws.
8. Place the frame and press it with the front panel of the socket, then tighten the fastening screw located in the middle. Next, install the mounting panel and switch keys.
What kind of lighting do you prefer?
Built-in Chandelier
9. Installation is complete. We turn on the electricity in the distribution board and test the operation of the switch.
Expert opinion
It-Technology, Electrical power and electronics specialist
Ask questions to the “Specialist for modernization of energy generation systems”
Is it possible to connect an socket to a light switch - Home handyman These devices are grouped into groups, of which there are usually 2 or more, depending on the potential loads that may be placed on the intra-house network. Ask, I'm in touch!
Connecting luminaires to a double switch
A double switch is a device of a special design, in which instead of one changeover contact, two are built in at once.
Additional information: In terms of their design, they are completely identical, but each is used for its own purpose.
Before connecting the double switch, you will need to pay attention to the following detail. In this case, the connection principle and the procedure for carrying out operations remain the same as discussed in the previous section. The only difference is the number of wires connected to the upper terminals. When making connections, the following points must be taken into account:
- The phase wire must be located at the bottom and connected to the double switch from the bottom terminal.
- On the body of a typical device - a double switch - there are two contacts on top.
- A wire from a separate group of illuminators (light bulbs) is connected to each of them.
Once you have managed to connect a two-key switch, you can use it to turn on either one group of illuminators or another. If necessary, by pressing both keys at once, you can light all the lamps at the same time.
How to connect a lamp via a switch
In the description of the work, we will, first of all, focus our attention on the changes that need to be made. We will describe dismantling and installation only once, so as not to repeat it all the time. We hope that you can cope with this without prompting, otherwise we do not advise you to get into the electrical network.
Expert opinion
It-Technology, Electrical power and electronics specialist
Ask questions to the “Specialist for modernization of energy generation systems”
Connection diagram for switches, sockets and lamps » Website for electricians - articles, tips, examples, diagrams This measure can be useful when an old switch is installed that is no longer used, or there are already enough sockets in the room, but there is very little light. Ask, I'm in touch!
How to connect a socket to a lamp with your own hands?
Depending on the type and configuration of the luminaire, the device must first be disassembled. If you are going to connect the outlet to the lamp via a power cord, then in this case you do not need to disassemble anything. It is enough to carefully cut the power cord lengthwise and separate it into two wires, to which you can later connect the lamp to the outlet.
However, there is one nuance here, namely, in which part of the wire you will connect the outlet. If this is done before the switch, the socket will be operational all the time. But if you connect the socket to the lamp after the switch, then accordingly, voltage will be supplied to the socket only when the lamp is running.
If you need to connect a socket to a lamp through its body, then you cannot do without disassembling the lamp. To do this, you must first remove the cover on the lamp, which is most likely its base. Next, depending on how the wires are connected in the lamp, and they can be connected through terminals or simply with screws, two wires are connected to the existing power wires of the lamp.
Next comes the stage of connecting the socket to the lamp with your own hands. To do this, the socket is first disassembled, after which, again, depending on how the wires are connected to it, it is connected.
What is important to consider when connecting a socket to a lamp? There may be two or three connections on an outlet. If there are three, then one of them is allocated to the ground loop and does not need to be connected. The two main connection sockets on the socket are usually located at its edges. Once you disassemble the outlet, you will definitely be able to find them.
If you don’t at all understand the question of how to connect an outlet to a lamp, plus you’re still afraid of electricity or something else, then it’s better to call a neighbor or call an electrician. A smart electrician, even a drunk can connect an outlet to a lamp!
Most options for connecting one device to another will not require complex skills from the master, such as independently laying additional wires or installing grounding in an apartment where there is none. However, in this case, some restrictions are imposed on the operation of the connected sockets: certain types of electrical appliances cannot be connected to the network. To connect the outlet yourself, you need to understand the structure of the apartment's electrical wiring and be able to identify the functions of the wires located in the niche.
Prices for adjustable switches
- First of all, you will need to remove the supply voltage of 220 volts from this line (this is easiest to do using an input or linear machine).
- After this, you need to make sure that it is absent using an indicator screwdriver or a special measuring device - a multimeter (it is switched on in the mode of measuring alternating voltages at a limit of up to 750 volts).
- Then you need to remove the key from the switch by prying it from the side with a thin-bladed screwdriver.
- Next, you need to fix the switch body in a niche prepared in advance in the wall and carefully bring the two wires connected to it out.
- Inside the open base, you need to find two contacts, to one of which (the bottom) the wire suitable from below is connected, and to the second (top) the end that goes directly to the lighting device is connected.
Installation of an apartment or house electrical network
To figure out whether it is possible to wire an outlet from the switch, you need to have a good understanding of the structure of the home electrical network. Understanding its structure determines the possibilities for making modifications.
Main diagram of the apartment electrical network
The path of apartment wiring begins with the input panel, which is powered by a cable coming from the external house electrical network. The panel device is located in the entrance of the house or at the entrance door of the apartment. Inside there is a circuit breaker, which receives power from the cable. In Soviet-built houses in which the electrical network has not been updated for a long time, switches perform the functions of an automatic device. Cables from the panel switch are directed to the electric meter and then to each of the machines serving the group. The groups do not communicate with each other, and their number is determined by how many loads there are in the apartment. They can be distinguished according to criteria such as ease of placement or type of load used. A strict rule is to separate appliances located in living quarters and those located in the kitchen and bathroom into different group connections. From each of the machines, the cables are pulled into distribution boxes (one or more), to which apartment light switches and sockets are connected. This design optimizes maintenance of the electrical network and masks utility networks.
Connecting switches and sockets
To understand how to properly connect an outlet to a switch or to a network, you need to remember the instructions from the Electrical Installation Rules. They establish that the process of connecting an outlet to the electrical network requires three cables with different functions. To simplify the visual determination of the functions of the wires, they should differ from each other in the color of the insulating material (in practice, electricians sometimes ignore this rule).
When connecting the socket, use the following cables:
- Phase, the function of which is to power the serviced outlet, carrying electric current to it. This is the only wire whose insulation color is not regulated by the rules: the main thing is that it differs from the colors of the other two cables.
- Neutral wire with a blue or light blue sheath. Like the phase, it is connected to the power contacts of the socket in the distribution box.
- Grounding, whose role is to protect residents from electric shock when touching the body of an electrical appliance, as well as to prevent short circuit situations. Its insulating material is yellow or green. The wiring is connected to special socket contacts designated for grounding.
It is practiced to combine sockets with each other with a parallel connection to the network or serial. In the first option, each of the combined elements remains independent.
In the case of connecting a switch, only two cables are required, and both of them are phase. One is placed at the input of the connected device and connected to the group line phase. The other is led from the light switch output to the junction box and connected to the phase of the lighting device. The neutral wire of the latter must be brought out into the box, bypassing the switch, to the power cable.
Connecting the illuminator from an outlet
Before connecting lamps with a switch from the nearest outlet, you need to familiarize yourself with the features of this procedure. The order of its execution looks like this:
- First, an indicator screwdriver is taken, with which the phase wire is determined and remembered, from which the wire is subsequently routed to the switch (it can be located either on the right or on the left).
- After this, the dangerous voltage of 220 volts is removed from the line, in which a switch is installed along with sockets, using an automatic machine.
- To be sure of its absence, it is advisable to check it with an indicator screwdriver.
- Before connecting the lamp through the switch from the socket, you need to remove the decorative cover from it, under which there are two contacts.
- A conductor of the required length is connected to one of them (phase) and routed to a single switch.
Connection diagram for a luminaire via a switch in a combined socket-switch unit in one housing:
Useful tips Connection diagrams Principles of operation of devices Main concepts Meters from Energomer Precautions Incandescent lamps Video instructions for the master Testing with a multimeter
Circuit diagram of a switch and power socket through one distribution box.
Previously, elements of the electrical network were installed according to the rules of the Soviet standard. Another two-wire wire is laid from the junction box to the outlet. In a house or apartment, single or double sockets are usually installed under hidden electrical wiring under a two-pin plug. Scheme for connecting the socket to the electrical system Since current standards do not regulate the relative position of the neutral and phase conductors, they can be connected in any order. The scheme for connecting such a device to a common network is extremely simple, and you can handle it yourself.
In addition, devices may have other additions. The switching device should only operate on phase break.
The wires to the power outlet are connected, just like to a switch, through threaded contacts. We work with fittings Replacing burnt ones In this case, the best option is to install a surface-mounted socket in an old socket box, especially since socket blocks are not sold separately, and the old socket box may have become damaged by time.
But the latter are not as popular as the first two options.
If foam plastic or other low-melting combustible material is used as a soundproofing material for the partition, the thickness of the wiring cross-section should be increased by one and a half times.
In the old ones there are only two of them - phase and zero. Wiring for sockets
We recommend: How to fix an electrical wire
Radio communication
We carefully insulate all twists using electrical tape. If you want to expand your circuit by connecting an additional light bulb or, for example, adding a socket, you can use a double or triple switch, here is how to do this.
Do not twist aluminum or copper wires!
This is an extremely unstable compound that quickly oxidizes and can not only fail, but also ignite. To connect such wires, use special terminal blocks. In an electrical store they are presented in a wide range. According to the rules of good manners and for safety reasons, try to use blocks instead of twisting wires everywhere.
If you did everything right, you can be proud of your work. If not... well, finally call an electrician.
I really hope that the article will be useful to you and that everything will work out for you.
Perhaps I forgot to say something important that seems self-evident to me and not at all clear to you. Therefore, I will wait for your comments below and will be happy to answer questions, supplement and correct the article if necessary.
Thank you for your attention!
