Types of electrical outlets
Electrical sockets vary in load capacity, appearance and installation method. There are sockets designed for installation in the wall, on the wall and in the form of a remote unit with a switch. For example, a pilot type extension cord for computers. There are combined options in the form of a block of two sockets, a socket and a switch, a socket and a control unit (timer, thermostat, motion or fire sensor).
There is an IEC standard for plug connectors (plugs and sockets), but each country has had its own standard since time immemorial. The main difference between all standards concerns the shape of the pins, their geometric dimensions and the distance between them. The transition to an international standard is associated with enormous costs, since it will be necessary to replace all installed sockets and plugs in electrical appliances. Whether such a transition will happen in the future is unknown.
IP protection type electrical sockets are unprotected, protected from dust and varying degrees of protection from moisture, up to the possibility of immersion in water.
Installation diagrams and connection methods
Connecting a telephone socket is much simpler than its electrical counterpart. But a process that involves working with, albeit low, but still voltage, requires accuracy and caution.
The connection diagram for a telephone socket is quite simple and involves connecting the two ends of the telephone wire to the corresponding contacts in the socket
When installing a telephone socket, you can use one of two installation methods:
- open - involves installation in an overhead manner;
- closed - in which the telephone line is hidden inside the wall.
When choosing a laying method, they are guided by the design of the walls, the service conditions of the communication line and the pretentiousness of the design of the room itself. Surface-mounted sockets do not look very aesthetically pleasing, but they are ideal for speed of maintenance: in a matter of minutes they can be removed from the support and the integrity of the contacts can be assessed.
The open method can be carried out without mounting it on the wall at all, by placing the device on the floor, and hiding the cable leading to it under the baseboard
To protect exposed wires from mechanical damage, decorative plastic cable channels are used. They are found on sale in the form of wall structures and floor skirting boards. It is convenient to monitor the condition of the wire in them through one- or two-sided snap panels.
For closed installation, KSPV cable is most often used. The single core of this cable is made of copper wire, and the outer sheath is made of polyethylene, painted white.
The telephone line is also laid using the TRP distribution cable. It has a dividing base. The core of this single-pair wire is also made of copper and insulated with polyethylene.
For ease of use and harmonious combination with the design, telephone sockets are not installed separately in the wall, but are included in the socket block
To decorate the connection points and make them less noticeable to prying eyes, the devices are placed behind TV screens and monitors, and are also built behind the façade of wall-mounted furniture.
A separate line should be highlighted for sockets built into the baseboard. The main thing is to choose models whose front panel fits tightly to the surface of the baseboard. Otherwise, over time, it will begin to move away from the base, exposing unsightly seams.
Types and load capacity of electrical outlets
Currently in Russia, sockets are used that meet the requirements of GOST 7396.1-89 (IEC 83-75) type C5 and C6. On the body of each socket there is a marking indicating its technical characteristics - the maximum permissible current and the permissible supply voltage.
Sockets type C5 (Soviet sockets) have two round sockets designed to connect plugs with pins with a diameter of 4 mm and a length of 19 mm, located at a distance of 19 mm and are intended for connecting electrical appliances whose housing does not require grounding, for example, a hair dryer, mixer and are designed for current up to 6 A. Such sockets are intended for installation only in residential premises.
Sockets type C6 (Euro socket), designed for current up to 16 A, have two round sockets for connecting plugs with pins with a diameter of 4 and 4.8 mm and a length of 19 mm, located at a distance of 19 mm. Unlike the C5 socket, it additionally has a strip contact for connecting a yellow-green
colors. The socket is borrowed from the German standard CEE 7/4 and is called Schuko.
Another type of sockets is a block in which a C6 type socket (Euro socket) and one or several key switches for lamps are simultaneously installed. For example, the Viko combination unit (Viko), the appearance of which is shown in the photo below with LED backlighting of the keys.
The Euro socket is connected in such a switch block according to the diagram given in the article “How to connect a chandelier.” According to the same scheme, if necessary, the socket is connected to an ordinary switch.
Classification of electrical outlets
Even such a simple device as an electrical outlet has many types and varieties. In addition to different materials, they can have different shapes and installation methods. There are models that are assembled into blocks of several pieces, equipped with a switch or other types of sockets. Let's talk about all these types of electrical outlets now.
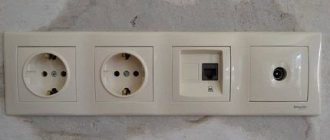
An example of a socket block for a TV. In addition to electrical sockets, sockets are installed for connecting a coaxial (television) cable and twisted pair (Internet cable)
By voltage and current
Electrical sockets are electrical installation products and they have their own technical characteristics: the voltage for which they are intended and the current that they can pass through for a long time. In terms of voltage they can be:
- For single-phase networks with a voltage of 220-240 V. The most common type in our country.
- For three-phase networks 380 V.
- For single-phase networks with a voltage of 100-127 V. These are the standards that are used in Japan and the USA.
Socket and plug for three-phase consumers
In our country, most single-phase sockets are installed for 220 V networks, but they also come in different types: they can pass current of different magnitudes through themselves. Conventional sockets are designed for a current of 10-16 A. To connect high-power household devices (electric stoves, hobs, electric ovens, storage boilers, etc.) you need sockets that can pass a current of 32 A, and sometimes more. For these cases, power electrical sockets are produced. They are large in size, use heat-resistant materials and more powerful contacts.
By installation type
The electrical outlet can be for hidden or open installation. They also say - internal/built-in and external/overhead. A flush-mounted electrical socket (internal) is installed in a hole specially made for it in a wall or other surface. After connection, the front panel is flush with the surface or protrudes just a couple of millimeters.
The internal socket (on the left) is designed for installation in a socket box. Surface-mounted socket (right) does not require a socket box
An electrical outlet for surface mounting (outdoor/surface) is attached to the wall or a special dielectric substrate, which is used if the base is flammable. Installation of such products is simpler, but the appearance is specific. Nowadays they are used mainly in retro wiring. Sometimes overhead sockets can be seen in technical rooms, change houses, and garages. In those rooms where strict requirements for appearance are practically not imposed.
There are also retractable sockets that are successfully used in the kitchen. They can be built into the countertop, the bottom of a wall cabinet, the side of cabinet furniture, and even into the floor. Electrical sockets built into furniture are convenient and functional. You need to turn on a household appliance or device - open/lift the lid, sockets appear. There is no need, the lid is closed.
Sockets slide out when opening the cover
Vertical socket block built into the countertop
IP degree of protection
Electrical sockets also have such a technical characteristic as the degree of protection IP ( International Protection Marking . Translated from English - “international protection codes”). It shows how protected the product is from moisture and dust. Electrical sockets can be designed for different operating conditions; accordingly, they are produced in housings with different degrees of protection. The most common types are:
- with protection class IP 20. For rooms with normal conditions, with heating running in the cold season.
- IP 21, IP22. They can be installed in rooms without heating, or outdoors under canopies.
- IP43, IP44. In rooms with high humidity, near water sources (waterproof sockets).
- IP 54, IP 55. Can be placed outdoors in the open air.
It is unlikely that you will be able to find sockets with a higher degree of protection in ordinary stores, but these also meet all the requirements for an apartment or private house.
The IP degree of protection is indicated in the technical specifications, and the scope of application is indicated in the description
An electrical outlet for outdoor installation may also be equipped with a protective cover that protects the contacts from dust getting inside. Such products can be installed in swimming pools, bathhouses and other rooms with high humidity.
By the number of slots in one housing
A different number of sockets can be placed in one housing. If there are two or more sockets, such products are called socket blocks. They can also have built-in switches or sockets of other types - for connecting the Internet, for example, a USB cable, etc.
The following socket options are often found:
- single;
- double (twin);
- triple.
The most common are single, double and triple sockets
In modern new buildings, they use blocks consisting of several single internal sockets, which are given integrity using a common frame. As a rule, each socket is installed in its own round socket box.
To install socket blocks, universal rectangular socket boxes can be used, which in many cases is more convenient than using round socket boxes.
How much power can an electrical outlet handle?
When connecting high-power electrical appliances to an electrical outlet, the question often arises as to whether the outlet is designed for such power, and how you can check or find out what power this outlet is designed for.
Checking the power of an electrical outlet should be carried out in two stages. At the first stage, by external inspection you can determine the permissible power of the outlet by appearance. Typically, simple Soviet-made sockets with pins with a diameter of 4 mm, type C5, are designed to connect electrical appliances with a power of up to 1.3 kW. If a Euro socket type C6 is installed, then devices with a power of up to 3.5 kW can be connected to it. But the permissible power of the connected device depends not only on the technical characteristics of the outlet.
The socket is connected to the electrical network using wires. Therefore, in the second stage, you need to find out what maximum power these wires can withstand. If the cross-section of the wires is unknown, then you need to open the socket and measure the cross-section of the wire.
| Table of main technical characteristics of electrical outlets | |||
| Socket type | Load current up to, A | Load power up to, kW | Wire cross-section, mm2 |
| C5 | 6 | 1,3 | >1,0 |
| C6 | 16 | 3,5 | >2,7 |
Thus, the power that a particular electrical outlet can withstand depends not only on its technical characteristics, but also on the cross-section of the wires with which the outlet is connected to the electrical network. For example, if a Euro socket C6, which can withstand a load of 3.5 kW, is connected to the electrical network with a wire with a cross-section of 1.0 mm2, then the permissible power that the socket can withstand will be only 1.2 kW. The full load capacity of a Euro socket will be realized with a wire cross-section of 2.7 mm2 or more.
What types of sockets are there according to installation method?
Electrical outlets can be divided into three main categories based on their installation method. The housing design in this case depends on the type of wiring.
Built-in sockets
Built-in products involve installing the block on which the contacts are located in a special box (socket box) hidden in the wall. As a result, only the protective casing of the device, slightly protruding above the surface, is visible. For grounded electrical networks, sockets equipped with additional grounding contacts are used.
Overhead sockets
In cases with external wiring, overhead structures are installed that are fixed to the wall surface. The contact elements are located under the product body, which completely hides the connector.
There are quite original types of surface-mounted electrical sockets, the installation of which involves fixing the device to a baseboard that hides the wiring laid underneath it. In Russia, they are not particularly popular because they do not harmonize with modern interiors at all, and also often break as a result of mechanical stress.
Portable sockets
Portable sockets are often equipped with a cord and plug, which allows them to be used as extension cords. However, there are also models without a cord, connected directly to a cable coming out of the wall. During the installation process, it is necessary to divide the device into two parts by loosening the structural screws, then clean the contacts and insert them into the clamp terminals. Some portable products have a power button and an indicator light to indicate the operating mode.
Arrangement of electrical sockets
As explained above, there are two types of sockets, C5 and C6. Let's take a closer look at what their differences are.
Electrical socket arrangement C5
Despite the huge variety, all sockets are designed in the same way according to the principle of operation and differ only in the shape of the contacts and the material of the body and cover. The design of the C5 socket is very simple. On a ceramic or plastic base, two contacts made of thin brass (thin in order to maintain spring properties) are fixed with adapter iron plates about two millimeters thick by means of screws threaded through the base. Steel plates also serve for threaded connection of wires.
From above, the entire structure is closed with a lid, which serves to protect people from electric shock and prevent the ingress of foreign objects. The cover is screwed to the base using a screw, which is usually located in the center of the socket. The cover has guide holes for easy insertion of the plug when connecting electrical appliances. Depending on the location of the socket installation (in the wall or on the wall), the base is supplemented with the necessary elements for fastening.
The socket shown in the photo above has one significant drawback. Over time, the springing properties of brass, according to Hooke's law, weaken, the pressure deteriorates, and the resistance between the contacts of the socket and the pins of the plug increases. This leads to heating and even worse contact. Eventually the socket fails. Signs of poor contact can be easily detected by touching the pins of the plug with your hand immediately after finishing operation of a powerful electrical appliance, for example, an electric kettle, iron, or hair dryer. Be careful, the pins may be hot enough to cause burns.
The design of the socket below is freed from this drawback. A steel spring is additionally installed in the body, pressing the rectangular brass plate against the thin-walled one. As a result, the spring properties of the contact do not change over time. It is universal and you can insert plugs with pin diameters of both 4 mm (rated for current up to 6 A) and 4.8 mm (rated for current up to 16 A).
And yet, even this electrical socket for impeccable long-term service requires the addition of a spring washer, which is called a Grover and ensures constant contact of the contacting parts over time.
Electrical socket arrangement C6
The C6 type socket is practically no different in design from the C5 socket, with the exception of one, the presence of an additional flat contact for connecting the yellow-green
ground wire colors.
When the plug is inserted into the socket, the pins fall into the sockets of a thin brass plate, and the brass U-shaped plate of the socket is pressed against its side grounding contact on both sides. Thus, grounding is carried out.
The photo also shows how you need to connect the wires to the socket for the case of parallel connection of sockets. If the C5 socket is replaced with a C6 socket in an apartment with electrical wiring in which there is no grounding wire, then the grounding contact of the C6 socket is left unconnected.
Pilot type extension device
A plug with a cord, at the end of which there is a block with sockets and a switch, is often called a Pilot. The pilot is designed in the same way as a regular socket, only the sockets are made of two brass strips in length, depending on the number of sockets. An earth wire strip is placed in the center. In addition, a fuse or automatic fuse is often installed in the Pilot.
Sometimes a simple chain of capacitors and inductors is placed on a printed circuit board to filter impulse noise coming from or coming from electrical appliances. This filter only works if the pilot is connected to ground. If there are only two wires in the wiring and there is no ground, then the filter in the pilot will not work.
Pilots sometimes stop working. The switch is unreliable; I have encountered cases where a key fell out due to wear of its latch; sometimes the key breaks into pieces. I also had to deal with contacts that burned out. In such cases, the switch must be replaced with a new one. To remove the switch from the Pilot body, you must first unsolder the wires from its terminals and then press the latches from the inside. You can temporarily short-circuit the switch terminals (the places where the jumpers are installed are marked in red in the photo) or solder the cord from the plug directly to the brass strips with sockets for the plug pins.
Sometimes a fuse trips or blows. If the fuse in the Pilot is automatic, then you just need to press a button, usually a small black one, and operation will be restored. If a fuse blows, it needs to be replaced or repaired.
Installation instructions
Before installing the socket, a cable with a cross-section of 2.5 mm2 is laid. It should consist of three copper wires, one of which goes to grounding. Stretch it from the electrical panel or distribution box.
Important! All work on the installation and assembly of electrical appliances is carried out with the mains power turned off! Switching off is carried out at the electrical panel, checking the absence of electricity with an indicator screwdriver.
Step-by-step instructions for installing an outlet in a concrete or brick wall begin with turning off the electricity.
- Turn off the power and use an indicator screwdriver to check that there is no voltage at the point where the cable exits the junction box.
- Install a socket box in the selected location. The service life of the socket depends on how you install the socket in the glass. For modern sockets, plastic mounting boxes are used; products are attached to them using expanding antennae. In a metal socket box, the claws are not fixed and over time the socket will become loose and fall out of the glass. Using a chisel or perforator, make a groove along the diameter of the glass in the wall, moisten the recess with water, apply a small 2-3 mm layer of alabaster in a circle, quickly insert and secure the product. First, the installation cable is inserted into the hole in the box.
- Housing fastening. For safety and to remove static voltage from electrical appliances, the outlet must be grounded. Let's look at how to install a grounded outlet. The three-core cable is divided according to the color of the wires into phase, neutral and ground. Typically, white or light brown color determines the phase, yellow-green - grounding, blue - zero. Strip each wire with a knife to remove approximately 10 mm of insulation, and carefully secure it with screws in the product body. There is a screw for grounding in the center, a screw for phase on the left, and zero on the right.
- Using two side screws, we install and fix the housing in the socket box. We check the reliability of the fastening and level it if necessary.
- We secure the protective decorative cover with self-tapping screws.
When using several electrical appliances simultaneously, it is recommended to install a socket block of two or more pieces.
When spreading the legs, the screws are screwed in one at a time to avoid distortion.
The recommended placement height is from 20 to 60 cm from the floor, 10-15 cm above the table, in the bathroom at a distance from the shower to avoid splashes.
If you have no experience in working with the installation of electrical equipment, do not have knowledge and skills, it is better to turn to specialists.
Rules for connecting electrical outlets
In modern sockets and switches, the wires are connected by clamping a straight section of wire exposed from insulation between the screw and the contact pad. This type of connection is not optimal, since the area of contact of the wire with the contact pad of the socket will be determined by the area of the thin line of contact of the wire.
To increase the contact area several times, if the design of the socket allows, you need to twist the end of the wire into a ring and flatten it with a hammer on an anvil.
This is especially true when forming a ring of stranded wire soldered with solder. Instead of a hammer, you can add flatness with a file, grinding off the ring a little at the points of contact with the contacts.
Linear expansion due to temperature changes is not the same for different metals. Aluminum changes its linear dimensions especially strongly, then, in descending order, brass, copper, and iron.
Therefore, without the use of growers, which are shown in the photo, the contact deteriorates over time and it is necessary to periodically tighten the screws to restore it. The Grover does this work for you automatically.
an ideal threaded connection of wires to socket contacts should be made
.
Basic elements of the socket
The design of plug devices is simple. The device includes only 3 main elements:
- body (necessary for protection);
- block (the main element of the device);
- contact (acts as a power source).
The body of the device additionally performs a decorative function. Modern models can be decorated to suit any interior style. The building can be single or double.
When it becomes necessary to install paired sockets, you should take separate models with a plastic core and install them in a common frame. The outer cover of the connector is made of plastic, heat-resistant and unbreakable. Some models may have additional equipment in the form of a button (needed to push out the plug), a curtain, a cover for protection and lighting.
The block is an important element of the device that holds contacts with the cover. The material for its manufacture is carbolite or ceramics. In the first case, the devices will be more durable, but are found mainly in older models. Ceramics are fragile. Therefore, when installing sockets that have a block from it, you should be extremely careful. The block can be used for mounting open and closed installation models, and can be used as a blank that serves as the basis for making an extension cord with your own hands.
The contact acts as a working element. With its help, electricity is supplied to household appliances. The permissible current passing through it is from 10 to 16 A. Using screw terminals, one part of the contact is connected to the conductor, the second to the plug of the electrical appliance. Clamps can also be keyboard ones. The material for making contacts is a metal alloy, which is characterized by a certain degree of elasticity. This allows you to establish a reliable connection between the plug and the contacts of the device.
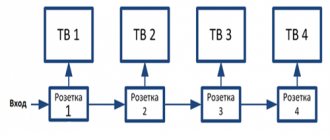
Parallel connection of two or more outlets
Sometimes it is necessary to install another one not far from the mounted outlet, for example, on the other side of the wall in an adjacent room.
In this case, the ends of the new wire are connected parallel to the already suitable wires to the outlet. The phase wire must be connected to the right socket of the socket. You can connect aluminum wires to sockets without restrictions, since the terminals are usually plated with chrome. But if you connect another socket in parallel, then it is necessary to exclude direct contact between the copper and aluminum conductors, or coat the copper wire with solder (tin it). If you are wondering why connecting aluminum wires to copper is not recommended, then read the article “Connection of aluminum wires”.
How to move an outlet to another location on the wall
When installing furniture or for other reasons, sometimes it becomes necessary to move the socket to another location, move it to the side or lower it down. In this case, you have to either replace the entire wire from the junction box to the new installation location or extend the existing wires. It is not advisable to change the wire in a renovated apartment; installing an additional junction box is also not always acceptable. It is best to build up the wires using the technology described in the website article “Connecting broken wires in the wall.”
An example of moving a socket to another location on the wall
When renovating an apartment, I took advantage of the situation and moved one of the sockets from one place on the wall to a more convenient one. Until this time, all hands had not reached.
At a new location on the wall, where it was necessary to move the socket, a metal box was installed and a groove was made for laying an additional wire; since the length of the electrical wiring wire was not enough, it became necessary to extend it.
For the extension, we took an available stranded copper wire with a cross-section of 1 mm2, which is quite enough to connect electrical appliances with a power of up to 1200 watts to an outlet.
At the end of the conductors that will be connected to the socket terminals, rings were formed and tinned with solder. The wire itself, consisting of two separate conductors, for ease of installation and reliability, was threaded into a vinyl chloride tube and laid in a groove made at the seam between the bricks.
To ensure that the wire did not fall out of the groove before covering with plaster, it was secured with two self-tapping screws.
After installing the socket and covering the wire with rotband, it is time to perform the splicing. Since the wires are copper, the most reliable method was chosen, connecting the wires - twisting followed by soldering. The current-carrying wire came from the next room through the wall; at the point where it came out, when drilling the wall, a brick chipped and a small void formed. I decided to hide the connection point of the wires in it. If there was no ready-made recess, you could hollow out a recess in the brick yourself in any convenient place.
Next, the wires are shortened to the required length, the insulation is removed and the conductors are tinned with solder using a soldering iron. Please note that the wires are shortened to different lengths to completely eliminate contact with exposed parts of the wires.
The next step is twisting the wires. Before twisting, wires that are longer must be fitted with insulating tubes. The color in the photo is red. Since the stranded wire is softer, I wound its ends onto single-core electrical wiring wires.
Since the wires are already tinned, to connect them reliably, it is enough to simply heat the junction of the wires with a soldering iron and fill it with tin-lead solder.
Then an insulating tube is stretched over the junction of the wires. If you don’t have a tube at hand, you can simply cover the exposed wires with three layers of insulating tape.
After insulating the connection point, the wires must be tucked into the wall cavity and covered with plaster. But it is better, before applying plaster, to close the cavity with a plate of any material. Thick cardboard, a piece of tin from a tin can and any other material will do. I made a cover from fiberglass in the shape of a hole in the wall.
Next, a small amount of solution is diluted; cement, alabaster, gypsum and any other plaster are suitable. I covered the joint with rotband. Using a spatula, the joint is leveled with the level of the wall surface.
Of course, it was possible to cover the junction of the wires with plaster while leveling the walls, but it is better to complete the work started completely, so that later, when leveling the wall, you do not waste extra time. The rotband solution lasts only 20 minutes and when working with it, every second counts.
The socket was moved to a new location and now nothing prevents us from continuing to repair this section of the wall.
Sockets with additional functions
There are models of sockets in which, in addition to the main components, special electronic or mechanical components are installed, which are assigned certain functions. Different types of electrical outlets may have certain features, which we will look at next.
Sockets with built-in RCD
Designs with built-in RCDs are designed for connecting powerful electrical appliances. They are mainly installed in bathrooms, since with an increased level of humidity in the room, the risk of electric shock increases. Thanks to the protective shutdown device, at the moment of leakage, the built-in relay is activated, promptly opening the input contacts. This not only prevents damage to the electrical appliance, but also prevents harm to human health.
Sockets with curtains
Models with curtains, which in everyday life are often called “child-resistant sockets,” are equipped with special panels that hide the input sockets. In this case, access to the contacts is possible only when the plug enters the holes. Essentially, the purpose of the curtains is to prevent any foreign objects from entering the outlet. This is an ideal option for a children's room.
Sockets with covers
Sockets with covers are mainly used in rooms with high humidity. At the same time, the protective elements prevent not only water but also dust from entering the device. Additional mechanisms are attached using special grips and screws.
Sockets with timer
The model with a timer allows the user to independently set a time period after which the power supply to the device will be stopped. These types of sockets are quite convenient to use when operating heaters that are not equipped with their own automatic shutdown system.
Sockets with electric meter
Designs equipped with a built-in electricity meter make it possible to control the energy consumption of a particular household appliance. The indicator on the case changes its color based on the power of the connected device.
Sockets with plug ejector
A model with a plug ejector is an excellent option for those whose socket is not firmly fixed in the socket box. The presence of an additional mechanism allows you to pull out the plug as carefully as possible without putting much effort.
Illuminated sockets
Illuminated socket designed for use in low visibility conditions. Allows you to quickly find the place where you need to connect this or that electrical device, even in complete darkness.
Sockets with USB output
Products equipped with a USB output. These are modern models of sockets with which you can recharge your mobile phone, camera or other device at any time.
Socket with WiFi module
An electrical outlet with a built-in WiFi module allows you to control appliances used in the house via a smartphone or tablet. Inside such a device there is a remotely controlled microprocessor that is responsible for supplying electricity.