The nature of magnetism
According to one legend, once upon a time there lived a shepherd named Magnes in Greece. And so he was walking one day with his flock of sheep, sat down on a stone and discovered that the end of his staff, made of iron, began to be attracted to this stone. Since then, they began to call this stone magnetite in honor of Magnes. This stone is iron oxide.
If such a stone was placed on a wooden board in the water or hung on a thread, then it would always line up in a certain position. One end of it always pointed to the NORTH, and the other to the SOUTH.
Ancient civilizations used this property of the stone. Therefore, it was a kind of first compass. Then they began to grind such a stone and make various figures out of it. For example, this is what an ancient Chinese compass looked like, the spoon of which was made of the same magnetite. The handle of this spoon always pointed to the SOUTH.
Well, then it came down to practicality and small dimensions. Small arrows were made from magnetite and hung on a thin needle in the middle. This is how the first small-sized compasses began to appear.
Ancient civilizations, of course, did not yet know what north and south were. Therefore, they called one side of the magnetite the North Pole, and the opposite end - the South Pole. The names in English are very easy to remember if anyone has watched the American cartoon "South Park", aka South Park).
Magnetic lines and magnetic flux
Magnetic field lines were experimentally discovered around the magnet. These magnetic lines create what is called a magnetic field .
As you may have noticed in the figure, the concentration of magnetic field lines at the very edges of the magnet is much greater than in its middle. This suggests that the magnetic field is stronger precisely at the edges of the magnet, and in its middle it is practically zero. The direction of magnetic field lines is considered to be from north to south .
It is a mistake to believe that magnetic lines of force begin their movement from the north pole and end their life at the south. This is wrong. Magnetic lines are closed and continuous. In a magnet it will look something like this.
If you bring two opposite poles closer, magnets will attract each other.
If we bring the poles of the same name closer, then their repulsion will occur
So, below are the important properties of magnetic field lines.
- Magnetic lines defy gravity.
- They never intersect with each other.
- Always form closed loops.
- They have a certain direction from north to south.
- The greater the concentration of field lines, the stronger the magnetic field.
- A weak concentration of field lines indicates a weak magnetic field.
Magnetic field lines that form a magnetic field are also called magnetic flux .
So, let's look at two pictures and answer the question, where the magnetic flux density be greater? In picture “a” or in picture “b”?
We see that in figure “a” there are few magnetic lines of force, and in figure “b” their concentration is much greater. From this we can conclude that the magnetic flux density in figure “b” is greater than in figure “a”.
In physics, the magnetic flux formula is written as
Where
F - magnetic flux, Weber
B - magnetic flux density, Tesla
a is the angle between the perpendicular n (more often called the normal) and the plane S, in degrees
S is the area through which the magnetic flux passes, m2
What is 1 Weber? One Weber is a magnetic flux that is created by a field of induction of 1 Tesla through an area of 1 m2 located perpendicular to the direction of the magnetic field.
Magnetic field and its graphical representation
Stones that can attract objects made of iron were named after the island on which they were found - magnets. And their property of being located in space in a certain way formed the basis for the creation of a magnetic compass. Understanding how this device works is necessary for further study of the material.
So, the diagram of the simplest magnetic compass is shown in the figure. It consists of a thin needle on which is placed a small diamond-shaped magnet. This magnet can rotate freely on the needle.
As mentioned earlier, in the absence of external influence, magnets are always oriented in space in a certain way: with one end towards the North Pole of the Earth (by analogy, this end of the stone is called the north pole and is indicated in blue); and the other end towards the South (the south pole of the magnet is indicated in red).
Figure 1(a) – Magnetic needle (top view)
Figure 1(b) – Diagram of a simple compass
In 1820, Hans Christian Oersted gave a lecture in which he demonstrated the generation of heat on a current-carrying conductor: he passed current through a long conductor, as a result of which the conductor heated up. During a break between classes, curious students began to turn the installation on and off and accidentally noticed that when current passed through the conductor, a magnetic needle located nearby began to move. The students shared their observation with Oersted, who was very interested in this phenomenon and began to investigate it. The experiments he conducted were later called Oersted's experiments. They became the first evidence of the connection between electric current and magnetic properties.
Consider the experiment conducted by Oersted. A magnetic needle was placed under a long conductor connected to the circuit (see Figure 2).
Figure 2 – Scheme of the experiment of G.Kh. Oersted
When current begins to flow in the conductor, the magnet rotates to a position perpendicular to the conductor. Its direction depended on where the current was directed. Figure 3 shows a conductor carrying current, the direction of which is indicated by a white arrow. In this case, the magnetic needle was oriented with its blue end to the left.
Figure 3 – Magnetic needle oriented relative to the conductor
If in the installation in Figure 3 the poles of the source are swapped (the current will flow in the opposite direction), the arrow will turn the red end to the left.
That is, the current acts on the needle from the magnet. There is no direct contact between the needle and the conductor (they do not touch each other), which means that the action is carried out using a field*, which was later called magnetic.
It is important to note that the magnetic field:
- affects moving charged particles and substances that have magnetic properties;
- generated by moving charged particles or magnetic substances.
*Reminder: a field is a matter that cannot be seen or felt by the senses, but its effect on some objects can be detected.
Since the field cannot be seen or felt, but must be described and represented, it was decided to depict the magnetic field schematically - in the form of lines.
Magnetic field lines (also known as magnetic lines) are mentally drawn tangential lines towards which magnetic arrows would be oriented (these lines are imaginary; in reality, of course, they do not exist). They are a graphic representation of the magnetic field and are directed in the same direction as the north pole of the magnetic needle.
In Figure 4 you can see the field lines of a rectangular magnet. This type of magnet is often called strip magnet (from the word “strip”).
Figure 4 – Magnetic field lines of a rectangular magnet
Properties of magnetic lines:
- come out from the north pole of the magnet (i.e. start at it);
- enter into the southern one (end on it);
- are either closed or extending to infinity (starting at infinity).
Magnetic field strength
Tension Formula
Have you ever heard the expression: “the tension between them grew and grew.” That is, in essence, tension is something invisible, some kind of restraining force, energy. Almost everything is the same here. Magnetic field strength is also often called magnetic field strength. The magnetic field strength directly depends on the magnetic flux density and is expressed by the formula
Where
H—magnetic field strength, Ampere/meter
B—magnetic flux density, Tesla
μ0 - magnetic constant = 4π × 10-7 Henry/meter or, in human terms, 1.2566 × 10⁻⁶ Henry/meter.
PS.
This formula only works when there is air or vacuum between the turns of the coil. A cooler formula looks like this.
Where
μ is the relative magnetic permeability.
It is different for different substances
Magnetic field strength of a current-carrying conductor
So, we have some kind of conductor through which electric current flows.
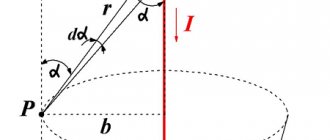
In order to calculate the magnetic field strength at a certain distance from the conductor, provided that the conductor is in air space or in a vacuum, it is enough to use the formula
Where
H—magnetic field strength, Ampere/meter
I - current flowing through the conductor, Ampere
r - distance to the point at which the tension is measured, meter
Gimlet rule and right hand rule
You can remember how the direction of the current in a conductor and the direction of magnetic lines relate, or you can use a simple method - the gimlet rule.
If you screw in a gimlet (screw, corkscrew) with your right hand with the tip in the direction of the current, then your thumb will turn in the direction of the magnetic lines.
You may find another interpretation of this mnemonic rule more convenient to use - the right-hand rule (Figure 6).
If you wrap your right hand around a straight conductor carrying current with your thumb out so that it coincides with the direction of the current, then your four fingers will show the direction of the magnetic lines.
Figure 6. Right-hand rule for a straight current-carrying conductor
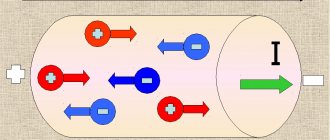
Magnetic field of a current-carrying conductor
It turns out that if an electric current is passed through any conductor, a magnetic field is formed around the conductor.
Here you can recall the famous gimlet rule, but for clarity, I’d rather use the screw rule, since almost everyone has screwed in either a bolt or a self-tapping screw at least once in their life.
We screw it in clockwise - the screw goes down. In our case, it shows the direction of the electric current. The movement of our hands shows the direction of the magnetic field lines. Everything is the same when we start to unscrew the screw. It begins to climb upward, that is, in our case it shows the direction of the electric current, and at this time our hand draws the direction of the magnetic field lines in the air.
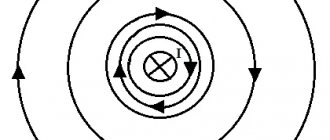
You can also often see in physics textbooks that the direction of electric current away from us is drawn as a circle with a cross, and towards us as a circle with a dot. In this case, we again imagine a self-tapping screw and in our heads we will see the direction of the magnetic field.
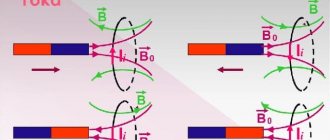
What do you think will happen if we make a wire loop like this? What will change in this case?
Let's look at this case in more detail. Since in this plane both conductors create a magnetic field, then in theory they should repel each other. But if they are well secured, then the fun begins. Let's look at the top view of what it looks like.
As you can see, in the region where the magnetic lines of force are summed up, the magnetic flux goes off scale.
Exercises
Exercise No. 1
Which pole will the magnetic needle turn towards the observer if the current in the conductor is directed from A to B (Figure 7)?
Will the answer change if the arrow is placed above the conductor? Figure 7. Magnetic needle located under the conductor
Using the knowledge gained, we can say that the magnetic needle pole towards us (Figure 8, a).
How did we determine this? If we draw a drawing (Figure 8, b) with point A towards us, then the current will flow from us. So we can, using the ready-made experimental results given above in this lesson, determine the direction of the magnetic field lines. The magnetic needle will turn its north pole in the direction of these lines, i.e. away from us.
Using the right-hand rule, we get the same result: if the thumb points in the direction of the current, then the four fingers point in the direction of the magnetic lines.
Figure 6. Orientation of a magnetic needle in a given direct current magnetic field
If we place the conductor under the magnetic needle, its position will change. It will turn its north pole towards us , because at this point the magnetic lines will also be directed towards us.
Exercise No. 2
There is a direct electrical wire located (walled up) in the wall.
How to find the location of the wire and the direction of the current in it without opening the wall? We can detect such a wire using a magnetic needle on a stand or a regular compass. When moving the compass along the wall (without turning it), you need to monitor the position of the magnetic needle. If it begins to deviate, it means that in this place it is affected by the magnetic field of a conductor with current - our wire is somewhere nearby.
To determine the direction of the current in this wire, let's look at where the north pole of the compass needle points. Its direction will coincide with the direction of the magnetic lines. If it turns to the right, then the current is directed upward, and if it turns to the left, then the current is directed downward.