May 26, 2020
Every person from time to time needs to change the interior or simply move an electrical appliance to another, more suitable place. In such cases, you have to change the location of electrical outlets in the house or move one of them, for example, to another surface. To perform such work, you can, of course, call a specialist to your home, or you can move the socket yourself. This procedure is quite simple - no special skills are required. You just need to carefully study all the stages of the work ahead and carefully follow the instructions, as well as observe safety precautions.
Safety standards come first
Before you start moving sockets in your apartment, you should definitely familiarize yourself with the following safety standards.
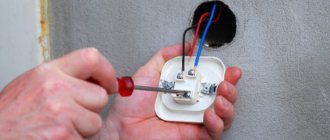
Before starting work, you will need a wiring diagram for the apartment. If there is none, then you can find the old wiring using a non-contact indicator. This procedure is required to dismantle old wires and install new ones carefully, without damage.
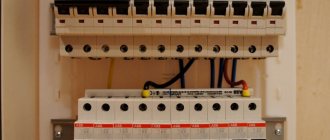
Be sure to turn off the machines in the panel located at the entrance to the apartment, breaking the connection of both the “zero” and the “phase”. If only one wire is disconnected, then use an indicator screwdriver or multimeter to make sure that no current is being supplied.
If complete de-energization of the wiring is not possible, it is imperative to use dielectric gloves for any action and exercise extreme caution to avoid short circuits. In the absence of lighting, a battery-powered flashlight is used.
It is permissible to move the socket with your own hands using a cable with a cross-section of at least 1.5 square meters. mm.
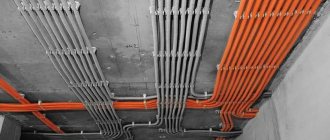
The cable can only be laid vertically and horizontally. If the installation is horizontal, the distance from the ceiling should not be less than 20 cm, and not less than 10 cm from the cornices and beams. If the installation is vertical, the distance from corners, as well as windows and doors, is at least 10 cm.
Sockets are placed at a distance of 0.5-0.8 m from the floor, and 0.5 m from heating radiators, steel pipes and gas appliances.
Connections of cable branches must be made in special housings - boxes. Terminals (clamps) are used for any connections—tightening the wires just like that is strictly prohibited.
A new socket is mounted from 80 cm to one meter, sometimes up to one and a half meters.
Consequences of incorrect installation
Incorrect or poor-quality work at any stage of installation of such devices can lead to undesirable consequences. The most common ones are:
- Unreliable fixation of the working part of the device in the socket box.
- Overheating of contacts, as well as melting or fire of dielectric parts of the case.
- A short circuit occurs when connecting power to an outlet.
- Sparking or breakage (burnout) of electrical contacts.
Sources
- https://StrojDvor.ru/elektrosnabzhenie/perenos-rozetok/
- https://stroypomochnik.ru/perenos-rozetok-v-kvartire-panelnogo-doma-svoimi-rukami-poshagovaya-instruktsiya/
- https://YaElectrik.ru/elektroprovodka/kak-perenesti-rozetku-v-drugoe-mesto
- https://okcomfort.com/elektrika/rozetki/kak-perenesti.html
- https://SamElectric.ru/elektrika/perenos-rozetki-bez-shtrobleniya.html
- https://advsk.ru/sockets-and-switches/new-sockets-in-the-panel-house-how-to-move-the-rosette-in-the-panel-house-with-your-own- hands-the-rules-of-transfer-to-the-opposite-wall-without-slableniya-and-with-it.html
- https://koon.ru/perenos-opticheskoi-rozetki-svoimi-rukami-kak-perenesti/
- https://mr-build.ru/elektrika/perenos-rozetok.html
[collapse]
Similar posts:
- Location of sockets in the kitchen: diagram with dimensions,…
- Triple socket: installation diagram, with and without grounding,…
- Installing sockets in drywall with your own hands:...
- How to connect a phone socket yourself
- Installation height of sockets and switches, placement...
- Replacing electrical wiring in a panel house: rules and methods
How to move an outlet
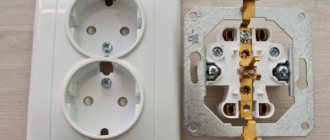
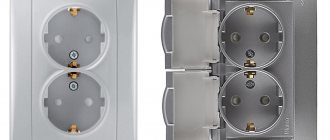
After studying safety standards and drawing up a preliminary diagram, the home master is faced with the question: how to properly move the outlet without disturbing the wall decor? A household socket has a dielectric base inside and a front panel on the outside. Dismantling the old socket begins with the front panel - it must be removed, that is, using a screwdriver, unscrew the screw with which it is attached to the dielectric base. In some types of models, the panel is secured to the inside using latches. In this case, you can pry it off with a knife with a thin blade. The front panel also needs to be removed when wallpapering a wall. In this case, the base of the socket is not removed from the installation box. Once the panel is removed, the dielectric base becomes accessible. Spacer tabs securely fix it in the box. By loosening both screws securing the tabs using a screwdriver, the dielectric base can be removed. Then the socket must be disconnected from the network wiring. The socket should be carefully inspected for damage, and if any is found, replace it with a new one.
Loop creation technology
To create a new electrical connection next to the old outlet, the daisy chain method is used. Using this transfer option, you can get two functioning connectors.
To create a new point in this way, you need auxiliary tools - an indicator screwdriver, a socket box, a sharp knife for stripping wires, a hammer drill with an attachment for cutting a recess in the wall, a wire and a hammer. You will also need a simple flathead screwdriver and pliers.
The daisy chain method is a way to create a new connection next to an old outlet.
To lay the wire, you can knock out a recess in the wall or use overhead panels that are fixed to the surface. The installation process consists of the following stages:
- The socket in the room is de-energized and the location of the new connector is marked.
- An opening for the box is cut in the designated location. To do this, use a hammer drill with a crown.
- Place and secure the cable in the recess, and guide one end into the box through the back wall.
- Securely secure the socket box using gypsum mortar or fixing tabs, which are provided in some models.
- One end of the cable is connected to the old outlet, and the other to the contacts of the new one. All connections are made in parallel - “zero”, “phase”, “grounding”.
- Each core in the block must be reliably insulated. After connection, the connector is fixed in the box and a decorative protective panel is applied.
Socket selection
According to Russian standards, a socket used in everyday life must meet the following criteria:
- mains voltage from 220 to 240 volts;
- current strength from 10 to 16 amperes. For powerful devices, use devices rated at 32 amperes or more, which have more powerful contacts.
If the cable has a grounding conductor, then the socket must also have a grounding contact. A grounding conductor is an indispensable condition when the air in the house is too humid. In addition, when connecting electrical appliances with high power and those associated with the use of water. The wires are attached to the outlet using screws or clamps.
If the fastening is screw, then the wire:
- must have a loop bend;
- have a direct configuration.
In the first case, you need to use pliers to bend the ends of the wires in the form of loops, completely unscrew the screws of the clamps and screw them back when the loops are inserted. This process is quite troublesome, but the socket is connected firmly and reliably. In the second case, everything is much simpler: the end of the core is stripped (the insulation is removed), then the core needs to be tucked into the guide hole and screwed in with a screwdriver. The screwless fastening is connected without hassle: the wire, stripped of insulation, must be inserted into the guide hole of the spring clamp. Automatic terminals guarantee reliable contact and good connection.
Pros and cons of this connection method
There is only one advantage and it is always visible - ease of use, because you no longer have to fiddle with carriers, trip over wires or worry that the tee will loosen the contacts of the socket and fall out of it.
In order to fully evaluate the possible shortcomings, you need to disassemble the device and see what wire is connected to it - most often it is wiring with a cross-section of 1.5 or 2.5 square millimeters. Such a cable will easily support the connection of one household device with a power of about 2 kW and, with some stretch, a couple of such devices. What saves sockets and wires is that several powerful devices are connected to one of them quite rarely - basically it is one device of 1-2 kW and several weaker ones.
Before you install an outlet or several from an existing one, you must take into account that each subsequent one is a connection of wires, which is an additional resistance to electric current. Even if you connect one powerful device, but to the last socket, there is a possibility that the previous contacts will heat up. The nature of electric current is such that it has a vibration effect on the wiring, as a result of which the contacts inevitably weaken over time. According to the rules, all electrical contacts in enterprises must undergo an annual inspection and tightening of bolted connections.
On the other hand, in living rooms the most powerful device is usually an electric heater - if it is not homemade, with contacts made unknown, then two sockets connected in series and their wiring can easily withstand it.
The third question is the kitchen - this is where the most powerful devices are usually assembled in terms of electricity consumption: dishwasher, microwave, electric oven, oven, electric kettle, toaster and others that “eat” from 1.5 kW. “Hanging” them on one wire is strictly not recommended, unless it is the weakest of them, for example, a microwave oven paired with a kettle or toaster.
Conductor shortening method
Sometimes it is possible to use wires from used wiring. Typically, this procedure is relevant when the displacement of the device is close to the distribution box. For a new device, the wall must be drilled using a special drill bit. Having dismantled the used socket, all contents are transferred to a new location. The further workflow is as follows:
- bend the wire and drill a hole in the wall where you plan to place the box;
- run the wire and place the box in the drilled niche;
- Use putty to cover the wall near the box and itself;
- connect wires to the device;
- At the end of the process, close the new device with a lid.
Using this method, the home master has advantages: there is no need to develop a new groove, used materials are used.
Conductor extension method
When a newly installed device is planned far from the former node, a method is used that involves lengthening the conductor. With this method it is possible to use an old box. Sequencing:
- develop a groove on the surface of the wall from the previous point to the new one;
- drill grooves for the socket;
- de-energize the network;
- dismantle a used socket by connecting wires in its box - new and old;
- stretch the cable to the fine;
- insert the conductor into the updated box, and then install it;
- connect the conductors to the updated device and cover with a lid;
- putty the new groove.
To connect conductors, use:
Spring terminals and terminal blocks.
The former are suitable for copper and aluminum conductors, while the latter should not be used for aluminum conductors, which are characterized by increased fragility. The pads are either disposable or reusable.
Insulation clamps.
They come in several colors, which clearly mark the conductors (“phase”, “zero”, “grounded”).
Twisting and soldering.
The most reliable way to weld is with a soldering iron. The cable ends are twisted and immersed in a container of solder. After soldering, electrical tape is wound.
How to use an old socket box
If a used socket box is used as a distribution box when extending wires, it is necessary to ensure that the connection does not come into contact with the putty. The “folk method” is cutting out a plasterboard tab, the size of which corresponds to a “glass”. For fastening, “liquid nails” are used, and covered with a layer of liquid putty on top.
The main mistake made by an inexperienced craftsman is to lay the extended wire in the same old grooves and then cover it with plaster or alabaster. In this case, the availability of the connection is lost, and this leads to delays if a breakdown or failure of a section of the circuit occurs.
Cording of sockets
It is appropriate to talk about this method when it is not intended to connect high-power electrical appliances (refrigerators, electric stoves, microwave ovens, washing machines). This creates a jumper from the old to the new point. In other words, the transfer is done by a common loop. You must remember that you can transfer no more than 3 points. If even one socket is damaged, the entire circuit will fail. A cable is not about moving the socket higher or lower, but about mounting a new point as close as possible to the old one.
An undoubted advantage of looping is its cost-effectiveness. You should buy an outlet and prepare the materials:
- wire with the required cross-section;
- plastic socket box;
- perforator;
- indicator screwdriver;
- pliers;
- hammer;
- a simple screwdriver;
- a device used to remove the braid.
The wire can be laid closed (in a groove) or open (inside the cable channel). To choose the right socket box, you need to know what the wall is made of (concrete, brick, plasterboard). For the first and second, ordinary ones, made of plastic, are chosen, for the latter - those with spacers in the form of legs.
Common mistakes
Many beginners make many mistakes when working with electrical elements. Here is a list of the main ones:
- The wiring is not de-energized. It is strictly forbidden to move the socket while it is live.
- The location of the old wires was not detected. Here a person spoils a large area of the wall surface, which leads to additional costs for its restoration.
- Inaccurate gating of walls in a panel house. The reinforcement inside the slab is damaged, and the load-bearing wall becomes unusable.
- Contact between aluminum and copper wires is allowed.
There are times when attention is not paid to the quality of contacts. A poor connection becomes a potential bottleneck for electrical current flow. A socket is a must-have element in any room. Read our articles on how to replace it yourself, how to arrange one or more outlets in the kitchen, why you need a smart outlet, what grounding is, how to repair or connect three outlets.
How to lay the cable and connect the terminals
The cable is placed in a niche and secured every five centimeters with clamps. The distribution box is opened and the cable conductor is disconnected from the wire of the previous outlet. The former line is being dismantled.
If the old groove is opened, it is filled with putty. Next, the device is immersed in the box and secured with bolts. Voids are not allowed! Otherwise, the socket may subsequently fall out. It is also necessary that the wires fit tightly against each other. Therefore, the twisting method will not work here. It is better to install pads, terminals with springs or caps.
Next, the socket box must be firmly fixed to the surface. For concrete surfaces, putty is used. If the surface is plasterboard or wood, the “glass” is secured with claws with spacers.
Output of a new line - transfer to another location
This option for moving the socket is considered reliable, but more labor-intensive. The output of a new line allows you to move the electrical network connector to the opposite wall in the room. This method is used mainly in panel buildings, where it is quite difficult or simply impossible to reach the laid wires. The current supply to the old wires is stopped and separate new lines are installed.
To move the socket to another location you must:
- Turn off the power supply in the room where the connector will be installed.
- Use a pencil to mark with lines the path where the groove for the electrical wiring will go.
- After this, using a hammer drill along the marked route, make a groove of such depth that the laid wires do not peek out.
- A recess is cut for the new socket. It is made with the same hammer drill with a special attachment. The depth of the cell must be at least five centimeters.
- First, a box is inserted into a niche in the wall to protect the contents of the outlet. It should fit completely into the recesses without protruding above the surface.
- The cable is laid into a groove made on the wall and secured with plastic clamps every seven centimeters.
- In the distribution box, the wires through which the current flowed to the old outlet are disconnected and the unnecessary line is removed along with the connector. If only the socket is dismantled, and the wires remain in the wall, then their ends are carefully insulated.
- The end of the new cable is connected to the wire from which power was supplied using insulating clamps.
- The box is fixed with bolts. It must fit tightly, otherwise during operation it may begin to fall out of the “socket”.
- The wires are connected using spring terminals, terminal blocks and plastic caps.
- The stripped wire strands are connected to a new socket through spring terminals. The grounding, cleaned end of the wire is connected to the terminal located on the connector body.
- The connected unit is installed in the box and secured with screws. A protective panel is placed on top, which has decorative properties. In this way you can move the outlet over long distances.
Tags: , automatic, beat, sconce, view, choice, house, , clamp, replacement, cable, how, , , installation, power, crimping, soldering iron, transfer, connection, wire, project, laying, start-up, , work, size , repair, socket, row, garden, twist, connection, connection wire, resistance, means, ten, current, installation, shield, effect
How to connect a new point from the panel
To carry out this operation, a niche for the socket box is drilled and a groove is selected for laying the conductor. It is possible to run the line directly from the distribution board.
Then proceed as follows:
- the network is de-energized;
- the previous device is removed, including from the wire;
- the insulation is removed from the cable conductors;
- Copper wires are inserted into the niche and connected;
- a socket box is installed;
- the device is connected to the conductors and fixed in the box;
- The niche is closed, the surface is finished.
Advantages:
The wire cross-section can be selected independently, so it is possible to connect high-power devices. This unit is very reliable.
Minus:
significant installation costs.
When laying a new wire, it is necessary to leave some margin at both ends. This will ensure the quality of the connection. Connection is made using terminals with screws or springs. “Phase” is attached to the left clamp, and “zero” to the right. The “ground” is connected to the “whisker” terminal located on top of the housing.
Outdoor installation method
To reduce installation costs and labor, you can choose a surface-mounted outlet and external cable management. The cable is protected by a PVC channel, which can have various types and configurations. The cable duct must be covered with strong insulation (which is grounded) to prevent electric shock. Outdoor installation is good for every connection system, but has disadvantages in terms of aesthetics. Therefore, it is more often used in industrial facilities or as a temporary option.
Having considered how to move an outlet, it is appropriate to conclude that this procedure is simple, but it is necessary to be aware of the degree of responsibility. After all, we are talking about electricity! Any mistake or minor error can lead to a short circuit and fire. No matter how reliable the connection diagrams are, no matter how carefully the safety measures are followed, there is no one hundred percent guarantee. Therefore, the first move of an outlet in an apartment is best done under the supervision of an experienced technician.
Tags:
- electrician
Rate the material:
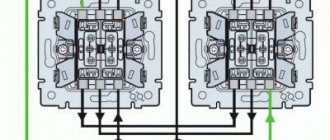
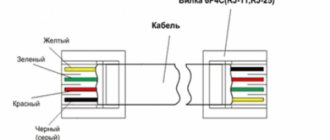
Daisy chain connection
This method allows you to place a new outlet close to the old one. In this case, the connection between them is carried out using horizontally located wires. To do this, they are connected to the connectors of the old and new sockets.
The difficulty with this option is that horizontal wires can intersect with vertical ones, suitable, for example, to a switch. Another problem could be damage at the switching point.
Scheme of using a daisy chain connection Source sovet-ingenera.com