The mirror is one of the most important elements of the bathroom. You can’t do without a shower or a washing machine, but it’s absolutely impossible to wash or shave without a mirror. Today the industry offers us a huge number of mirror options. It can be a free-standing mirror of any shape and size, a mirror with shelves, an entire closet with a mirror - it all depends on the budget and wishes for arranging the bathroom.
However, one cannot help but note the real trend - illuminated mirrors. If ten years ago they were mostly a desire, now they are used everywhere.
Photos of a do-it-yourself illuminated mirror can always be found on the Internet, and shots of girls near the ideal place for makeup provoke you to want exactly the same solution for your home in the city or country house.
Let's figure out how to make a backlight for a mirror? What may be required for these manipulations? At first glance, it seems that this is a difficult and impossible task - the mission is impossible for a person who has nothing to do with construction and repair work. However, it is not as scary and difficult as it might seem at first glance.
A mirror with light is primarily needed by women; it helps to shade foundation and carry out cosmetic procedures at the highest level. A plus is that lighting the mirror noticeably changes the mood of the entire bathroom, making it more cozy and boudoir-like at the same time.
Brief overview of the article
Incandescent lamps
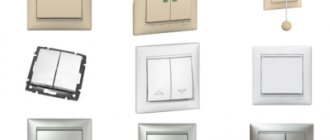
Regular light bulbs. Light can be provided using several ordinary light bulbs of the required light and incandescent type. They are connected in one chain and turned on through a socket and switch.
In this case, it is necessary to provide a convenient placement of the outlet. It should not be noticeable; this is a stage of planning the entire room and the electricity in it.
If the tiles are already laid, it will most likely be quite difficult to make an additional outlet without damaging part of the tiles.
Where to begin?
First of all, you should consider numerous photographs of illuminated mirrors and choose the most attractive option for you. Also take into account whether you can purchase all the necessary materials, whether you have the necessary tools in the house, and whether the upcoming work will exceed your capabilities?
As usual, novice craftsmen are given traditional advice - choose the easiest type of work to perform!
Diode strips
Option for a bathroom with a finished renovation. LED lighting for the mirror does not require complex manipulations.
Backlight types
Today there are three main types of lighting that are most suitable for mirrors:
- halogen lighting;
- neon lighting;
- LED lightening.
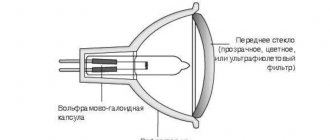
Halogen lamps
In their way of operation, such lamps are in many ways reminiscent of incandescent lamps - their only difference is that they are filled with gas inside. The strengths of halogen lamps are their low energy consumption and reliability, making them suitable for installation in bathrooms.
Halogen lamps are an economical and practical solution for all rooms
Neon lamps
Neon type of lighting has gained popularity due to its high light output. However, when installing such lamps, it is important to keep in mind that you can quickly get tired of the rich and bright light, so you should think about their proper placement in advance. A “softer” option, which is an alternative to neon lighting, is considered to be fluorescent lamps that emit a diffuse and delicate glow.
Neon lamps, due to their power, may not be suitable for every apartment owner
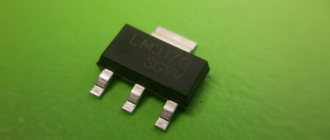
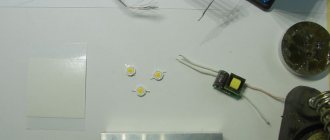
LED bulbs
LED lighting is very often used these days as backlighting in bathrooms, living rooms and hallways due to its versatility. It combines low power consumption and intense glow. Lamps of this type are often located behind a mirror, resulting in a spectacular diffused glow. Of course, this option is far from the cheapest, but its cost is paid off by the length of the “service”.
LED lamps are often installed at the top of the mirror, without affecting its sides
Required Items
What to buy? What materials may be required? We check the sheet of necessary materials, the presence of the necessary materials will help you figure out how to properly make a backlit mirror with your own hands and not spoil the whole idea:
- Components for connecting electricity;
- LED strip - a simple way to use - a structure attached to strong double-sided tape. Speaking of LEDs, when purchasing it is worth checking about the moisture-resistant coating;
- Silicone based sealant.
Note!
- Do-it-yourself wardrobe: a review of ways and methods on how to build a stylish and original wardrobe (video and 145 photos)
Do-it-yourself furniture restoration - removing chips and scratches, restoring surfaces. Instructions with photos and video tips
- DIY ottoman: how to make it at home. The best ideas, master classes. Photo + video review of beautiful ottomans
Network connection
Under normal conditions, you connect the tape yourself to the network via a power supply - the device is plugged into the network, and the tape is connected to the 12 V output. In this case, there may be different connection options. For example, if you need to automatically turn on the mirror lighting when you turn on the general lighting in the bathroom, the power supply is simply connected to the switch.
However, some users find it necessary to start the mirror illumination themselves and not use it constantly. To do this, you need to install a button (microswitch) on the frame (box), which will turn the lamp on and off at the request of the owner.
Tools
As tools, it is worth preparing a soldering iron and a basic set of tools with a stationery knife, pliers and other tools available in every home kit.
Important: when choosing LEDs, keep in mind that the more powerful the diode, the more electricity it will consume. To understand the power of a meter of LED strip, we multiply approximately 5-6 watts by the total length of the strip.
Frame preparation
If the existing frame matches your color, you can immediately begin marking it. You can also pre-paint the frame to your liking.
Count how many lamps are in your garland. Calculate at what distance from each other they will be. Mark the mounting locations for the lamps on the frame.
Which mirror should I use?
There are many mirrors, and their shapes too. Traditionally, the easiest to work with will be a square or rectangular mirror. In this case, the diode strip will need to be attached in straight lines.
If we talk about a round or oval mirror, then it will take a little more time and perseverance to attach the LED strip along a more complex trajectory.
How to glue a mirror?
The formed frame is glued to the mirror using liquid nails.
You should only use glue specifically designed for working with mirrors (glass-metal).
Tytan 930 works well.
Mistake #14
The composition of regular glue or epoxy will eventually pull out the amalgam and dark spots will appear on the front side.
Mistake #15
Liquid nails must dry for at least 72 hours.
After this, a grip point of even 1 cm2 can withstand a weight of up to 30 kg! Despite the fact that a square meter of a mirror with a thickness of 4 mm weighs only 10 kg.
Using gentle hand pressure , glue the frame to the back.
Mistake #16
No need to put large weights on top of the frame or substrate!
There have often been cases when, due to uneven distribution of weight, the canvas was bent, followed by a distortion effect in the mirror.
This is especially critical for large sizes and thickness of mirrors up to 6mm.
Mirror with internal lighting
Another variation of bringing light to the mirror. In this case, the light will be soft and diffuse. The instructions will coincide with the previous version almost completely.
The whole difference is in the location of the LED strip. In this case, we fasten it from the reverse side. The result is the effect of a floating mirror with soft, enveloping light.
Removing amalgam on a mirror without sandblasting
Look for a special gel in stores, such as Satinglass or Zenfi ZF-10S. These may be other brands.
To begin with, you create it in Photoshop or simply manually draw a stencil for the future button. The simpler the design, the easier it will be to cut with a blade.
Transfer the picture to tape and stick it at the bottom of the mirror with an indentation of at least 5 cm. It is better to take colored tape so that the outlines are clearly visible.
Mistake #3
You cannot place a button on the very edge of the mirror.
There will be a frame made of aluminum profile. Miss by a couple of centimeters and you will have to partially cut out this profile.
Otherwise, it will prevent the button from getting into place. The button is not that small!
Also cover the space around the button with protective tape. Only its contours should remain open.
After all the preparatory work, use a PLASTIC spatula to rub the gel over this area and wait a certain time according to the instructions (usually from 15 to 30 minutes).
Mistake #4
Do not smear anything with an iron spatula, otherwise you will leave scratches on the glass.
A plastic spatula can be taken from a set of children's plasticine.
Mistake #5
You cannot work with chemicals without protective rubber gloves and goggles.
This gel is a very aggressive material. After 20-30 minutes, the amalgam is easily removed along with the gel using the same spatula.
As a result, you will get a perfectly transparent outline of the touch button, clearly visible from the mirror side.
The touch switch, which will be hidden behind this button, has a light display. When turned off it lights up red, when turned on it lights up blue.
Very often, such chemicals are used to etch not only the button, but also the frame frame – the light strips.
Many masters prefer to make not a “floating mirror,” but a mirror that will shine, what is called “from the face.”
Floating Mirror
Backlight from the face
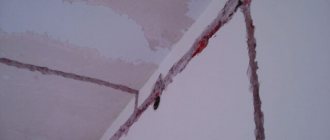
To do this, smooth strips of amalgam are removed along the perimeter, after which they are made translucently matte using stained glass paint or a special paste.
As a result, the LED strip does not shine from the back of the mirror, spreading light to the sides, creating a sort of floating effect, but comes directly from it. Just from these translucent strips.
Here the entire process of etching the mirror layer with subsequent matting of these strips is shown in detail.
Where else can the technology be applied?
- Bedroom mirror;
- Mirror with lighting for dressing table;
- Luminous mirror wall in the bathroom or dressing room;
- Illumination of individual shelves;
- Light cabinet;
- Creating the effect of a design solution in the corridor.
Choosing to work with your own hands may seem like an unreasonable waste of time. But if you study the market for plumbing fixtures and all related products, you can understand that a high-quality illuminated mirror in a store can be quite expensive, and the size or shape is not entirely suitable for your home and the layout in it.
In this case, creating a mirror with your own hands is an excellent alternative that can help you save money and make the desired item the way it was intended in a specific design project.
Note!
- A simple and beautiful DIY bathroom shelf made of MDF, glass, plasterboard: straight and corner options. Photo instructions, tips, video master class
- How to make a computer desk with your own hands from wood or chipboard. Photo/video master class + description of models
- Do-it-yourself folding table: description of types, calculations and selection of tools and materials. Video master class for beginners
Remember about safety precautions and carry out all manipulations with electricity wisely, everything will work out and the illuminated mirror will delight you for many years!
Connection diagram for touch button and LED strip
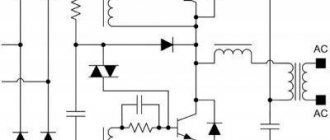
Let's move on to the electrical part. The general connection diagram with the touch button shown below is as follows.
The 220V voltage from the cable laid in the wall first goes to this touch switch (it also has its own power supply).
More details
Next, the wires go to the 220V/12V step-down unit, and the LED strip is connected from it.
If you forget to bring out the cable directly behind the mirror, you will have to pull it to the nearest outlet and connect it through a plug. It doesn't look very nice, but what can you do?
By the way, connoisseurs of perfect cleanliness and fans of the touch button should know that after each press, ugly fingerprints remain in this place.
And there is no escape from them. You will have to constantly keep a cloth next to the mirror and use it after each time you turn the light on and off.
Another option is to install a mechanical button directly on the mirror frame instead of the sensor.
Well, or put a low-voltage non-contact hand wave sensor there, which is used to illuminate the work area in the kitchen.
More details
The backlight connection diagram will change a little.
In this case, you will have to rack your brains about where to put the power wires to the sensor so that they do not obscure the light or interfere with the LED strip.
The main advantage of this connection is that there is no need to remove the amalgam to create a visualization of the button.
The downside is that the power of such a sensor is only 40W. This is a little more than 2.5 m of not the brightest LED strip (SMD 5050/60 14.4 W/m).
All blocks and wires are hidden behind the mirror. To prevent the wires from dangling or hanging down, use self-adhesive pads.
The power supply and button are also glued on the back side.
Mistake #17
Before gluing the sensor to the area where the amalgam has been removed, check its functionality.
The sensor does not respond well to touch over its entire surface. Its sensor is not always centrally located.
It is quite possible that you will have to “play around” a little and move the button up and down, left and right, in order to find the best position.
What should all these devices be glued to - double-sided tape or the same liquid nails? The question is not entirely clear-cut.
The tape may fall off over time, because... The power supply will become hot during operation. Often, a trace of it clearly appears on a foggy bathroom mirror.
However, any blocks are consumables. Alas, they burn much more often than LED strips.
In a few years the block will have to be replaced anyway. If you have firmly glued it to the substrate, then you will not be able to tear off the body without breaking the amalgam.
Therefore, if an old unit burns out and there is free space, it is much easier to put another one next to it without dismantling the burnt one.
If you don’t have enough space and the mirror is small, initially place it on tape.
DIY illuminated mirror photo
How to do it yourself? Step-by-step instruction
It is best to order a blank for a future design from a workshop. Before starting work, you should prepare the necessary tools and components, and also cover the table with a soft cloth to protect the mirror surface from possible scratches.
Making a mirror with light bulbs
The algorithm for creating a makeup mirror with lights around the frame (along the perimeter) is as follows:
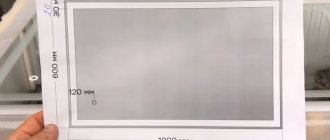
- Assemble the frame - the base into which all the elements will be installed. The average frame width should be 60 mm, which will be quite enough for mounting cartridges.
- Cut off the end parts of the elements at an angle of 45 degrees, and then connect them together using corners, screws and glue.
- Apply decorative overlays to the frame, and then make holes through which the wires will pass.
- Lead the ends of the cable into the drilled holes to connect the cartridges.
- Attach them to the frame using screws and a screwdriver.
- Connect the wires in series and lead them to the switch connected to the plug.
- Install the lamps, and then test the structure for functionality.
If the lighting is fully functioning, glass is installed inside the frame and then secured.
Useful! The makeup mirror can be mounted on a wall or mounted on a dressing table.
Making a mirror with LED strip
You can make such a mirror as follows:
- Transfer the dimensions of the base to the inside of the glass using a pencil and ruler.
- Treat the mirror surface with a degreaser to prepare it for gluing.
- Install aluminum plates on the vertical sides of the structure using glue and a 25 × 25 corner with mirror stripes.
- Place the profile guides next to each other and secure them firmly until the adhesive has completely dried.
- Glue 40 × 40 aluminum corners to the bottom and top sides of the mirror.
- Install the power supply inside the frame.
- Attach the LED strip inside the guides only vertically.
- Assemble the tape into an electrical circuit using connectors.
- Observing polarity, solder the wires.
- On the lower element of the base, install a button responsible for plugging into the socket, connect it to the LED strip and the power supply.
- Place plastic panels on top of the frame guides located on the side.
- Connect the finished structure to the network and check the operation of the LED strip.
Expert opinion
Ivan Zaitsev
Lighting specialist, consultant in the building materials department of a large chain of stores
It is permissible to cut the LED strip only according to the markings applied by the manufacturer.
Having decided to decorate a room with a mirror with built-in lighting, you need to carefully familiarize yourself with all the intricacies of these designs. A well-chosen model will give any room a sophisticated look.
Accommodation options
Built-in mirror lighting around the perimeter
The location of the light sources affects the uniformity of lighting. Lamps for external lighting are placed on the sides of the canvas, top, bottom or along the perimeter of the frame. Installing lamps around the perimeter is used for makeup mirrors, since this arrangement allows you to illuminate all areas of the face in detail.
The illumination of tall mirrors in hallways and corridors is made from six or more sources, evenly distributed along the sides. A smaller number of sources does not provide bright illumination in height.
The built-in lighting is made of LED strips, which are mounted on the back side of the canvas along the perimeter edge. The reflective coating is removed from the LED installation line, and the resulting transparent windows are covered with a matte film.
For decorative lighting equipment, white and colored RGB LED strips are used, which are embedded under a reflective sheet or mounted externally on a frame or glass. 3D designs of two parallel reflectors with an LED strip located along the contour between them are popular.
What's next
Having studied the main advantages and characteristics of LEDs, as well as strips using them, I began to think about what options to implement in my apartment. And there really are many examples. Here are just a few of them.
New feature! Photos are grouped into a gallery - to view the next/previous one, click on the arrow.
However, I was interested in complex projects that span the entire space. And I found this option, although YouTube rather helped me here. How? Yes, it’s very simple - after watching one of the videos, the service suggested that I familiarize myself with similar ones and this is what I saw:
The guys who filmed the video implemented a whole project in which practically only LEDs, lamps based on them, as well as LED strips are used to illuminate the apartment.
From the description it became clear that each room has 3 lighting modes: behind the cornice, lighting of ceiling niches, as well as main lighting of 400 lux.