What do you need to know when replacing a switch?
When replacing a switch with your own hands, you need to know that:
- Voltage in the electrical network poses a danger to humans, so you should not touch exposed, unenergized wires with your bare hands.
- Before starting work, you need to study the instructions for each specific model.
- For those who are replacing electrical appliances themselves for the first time, it is better to take photographs of key points. Even a slight deviation from the algorithm can lead to unpleasant results, such as damage to lighting or wiring due to a short circuit.
Kinds
Let's classify switches according to several criteria:
- according to the method of fastening;
- by number of keys;
- by design;
- according to the design of terminals for fastening the ends of the wiring;
- according to the inclusion principle.
- According to the mounting method, switches are divided into two types: internal and external.
- External switches are used with open wiring, when the wiring runs directly along the walls, and the switch is also attached to the wall. This is very rare in ordinary apartments; it is more typical for wooden houses.
- Internal switches are used when the wiring is hidden under the plaster. In this case, drill a technological hole for the switch, attach a socket box to this hole, to which the switch is already attached.
- Depending on the number of keys, switches are single-key, two-key and three-key.
- Single-key switches are light switches that contain only one electrical circuit and a key. They are the easiest to install, but such switches turn on and off all the light bulbs in the chandelier at once.
- Switches with two keys consist of two electrical circuits. They can be used, for example, if you have a three-arm chandelier. In such a switch, you can divide it so that one button is responsible for one light bulb, and the second for two other light bulbs, so in such a chandelier you can turn on any number of light bulbs, starting from one and ending with all three.
- A three-arm switch has three electrical circuits.
- According to the method of fastening the wires, switches are available with screw fastening and screwless.
- Screw-mounted switches are the most common type of switch. The stripped end of the wire in such switches is fixed with a screw. The advantage of this type of fastening is ease of installation. The disadvantages include the need to periodically tighten the screw, since under the influence of vibrations it slightly unscrews.
- Switches with a screwless or quick-release fastening method are less common. The advantages of this type of fastening include the absence of the need to tighten anything. The disadvantages include the fact that this type of fastening cannot be used for any type of wiring; it is suitable for copper stranded wiring and is not applicable for old aluminum wiring.
- By type of activation, switches can be keys, push-buttons, dimmers, rotary, rope, touch, acoustic, with a remote control.
- Key switches do not need any special introduction. Almost everyone at home has such switches. The process of closing the circuit is carried out mechanically by pressing a key.
- In push-button switches, the closing process, just like in keyboard switches, occurs mechanically, only in a push-button switch the on and off process is carried out by pressing the same button. Very often such switches are found on table lamps.
- Dimmer switches are switches that can not only turn the light on and off, but also regulate its intensity. They are equipped with a rheostat. In addition to the fairly common switches, on the same table lamps with a wheel, there are also dimmer switches with push-button adjustment and even touch adjustment.
- Rotary switches are most often found in rooms with exposed wiring or in rooms with antique or loft designer interiors. They are not as multifunctional as dimmer ones. Switching them on and off is carried out by a rotary mechanism.
- Rope switches are also familiar to many; they are often used in bedside sconces. This type of switch is not fundamentally different from other types of switches. This is a purely decorative type of switch, there is nothing else special about it.
- Touch switches are the most modern of the entire list and have great functionality compared to others. Touch switches can have functions such as: timer, backlight, motion sensors, room temperature and others. Despite the fact that this type of switch is the most expensive, it is also the most in demand. Additionally, you can familiarize yourself with the above-mentioned types of devices - infrared, LED and backlit.
- An acoustic switch is equipped with a sound sensor, which is triggered when exposed to a certain sound signal, most often a clapping sound (we wrote about such a switch here). Unlike touch switches, there are cheaper models that are rarely of good quality.
On the pages of our portal you will find a lot of useful information that will help you determine the breakdown and repair this device yourself, as well as install a pass-through or crossover switch.
Choosing a new switch
When choosing a device, you should pay attention to the following parameters:
- Maximum power. This device parameter is calculated using a simple mathematical formula. This indicator determines the permissible load, and it is especially critical when using conventional incandescent lamps. The total power consumption of the luminaire should not be higher than that indicated on the switch. If only the permissible current in amperes is marked on the case, you can calculate the maximum power by multiplying this value by 250. For example, 6 A × 250 V = 1500 W or 1.5 kW. To reduce energy consumption, it is recommended to use LED lamps.
- Case material. It determines the temperature stability of the device. Large rooms with powerful fixtures will require breakers that can handle heavy loads. The type of housing in which the contacts are placed is important here. It can be made of ceramic or plastic. Ceramic cases are immune to temperature changes; they work properly even if a large current flows in the circuit. For an ordinary apartment in a multi-story building, a breaker with a plastic case is suitable.
- Number of keys on the switch. The number of buttons is selected based on the type of lamp, existing wiring capabilities and connection diagram. In the kitchens of ordinary apartments, appliances with one key are most often used, and in living rooms - with two. Also, two-button devices are used in separate bathrooms.
- Mounting type. For internal switches, the housing is hidden in the wall, and on the surface there is only a cover with a socket. External switches are almost never used in modern apartments. Their distinctive feature is a thick body and open wiring connected to the device (not hidden in the wall). Illuminated switches are most often installed in the corridors at the entrance to the apartment, so as not to look for them in the dark.
Calculator for calculating the parameters of a current-limiting resistor
When installing it yourself in a backlight switch on an LED or neon light bulb, it is necessary to determine the size and power of the current-limiting resistance. The calculation can be done using formulas, but it is much more convenient to calculate the resistor parameters using a special calculator. Just enter the parameters and get the finished result. The calculator can also be useful for selecting a resistor in a factory-made backlit switch in case the resistor fails.
| Online calculator for calculating the rating and power of a current-limiting resistor |
| Power supply voltage U, V: |
| Voltage drop across one LED or neon bulb, V: |
| Number of LED or neon lamps connected in series, pcs: |
| Maximum permissible current through an LED or neon bulb, mA: |
Reference. On an LED the voltage drop is in the range of 1.5-2 V, on a neon bulb it drops 40-80 V. The required minimum current at which the LED is guaranteed to glow is 2 mA, for a neon bulb - 0.1 mA. This data can be used for calculations on a calculator if the parameters of an LED or neon bulb are unknown.
When choosing a resistance, it becomes necessary to determine its value by color marking. will help resolve this issue.
Where to start?
Despite the fact that the process of replacing a switch is not very complicated in its execution, mistakes and incorrect connection of wires in this process can lead to very unpleasant consequences, such as a short circuit, burnt out wiring, failure of lighting fixtures and, worst of all, an electric shock. .
Therefore, before replacing the switch, it is necessary to carefully study the process of connecting wires and observe safety precautions when working with electrical devices. Also, to replace the switch, you need to stock up on the necessary tools and, in fact, the switch itself.
- To select a new switch, you must first determine which switch is needed based on the type of mounting. Here it is enough to know whether your wiring is external or internal.
- Then you should decide what you want to get from the switch and select the required functionality.
- It is necessary to choose the principle of closing the circuit in the switch, whether it will be an expensive and fashionable touch switch or a regular key switch, with or without the ability to adjust the light intensity, with or without the function of illuminating the lamp itself.
- The backlight function should be chosen very carefully, since when using diode bulbs with this switch, the bulbs glow dimly in the dark.
- You also need to decide on the method of fastening the wires, screw or quick-clamp. If you have aluminum wiring, then there are no options, only screw terminals, but if you have copper wiring, then you can try modern quick-release terminals.
- Also, in certain cases, it is necessary to pay attention to the maximum load of the switch and the material from which its base is made. According to the maximum load, there are usually 10 A and 16 A switches. A 10 A switch can handle a maximum of 2.5 kW, that is, 25 100 W bulbs. Plastic or ceramic is usually used to make the switch base. Plastic can withstand 16A, and ceramic can withstand 32A.
- If you choose a switch for a small room with standard lighting, then these indicators are not so important, but if you have a room of more than 100 square meters. meters with powerful lighting, it is worth calculating the load and taking a switch with a ceramic base.
- And the last indicator: moisture protection. This indicator is marked with the letters IP and numbers corresponding to the degree of moisture protection. So, for an ordinary room a switch with IP20 is suitable, for a bathroom with IP44, and for the street it is better to take a switch with IP55.
To replace the switch you will need the following tools::
- Voltage indicator. Necessary for safe work. Before starting work, you must use an indicator to check the absence of current in the wires and protect yourself from electric shock or accidental short circuit.
- Screwdriver Set. Screwdrivers are needed to remove the old switch and then install the new switch.
- Pliers. They will come in handy in case the wire breaks while dismantling the old switch and needs to be cleaned.
- Insulating tape. May be useful if the wire insulation is frayed. It is not necessary to have electrical tape when replacing a switch, but it is best to keep some on hand just in case.
- Flashlight. It will be needed if insufficient sunlight falls on the switch.
Preparing wires for correct installation
Depending on the type of device being connected, preparing the wires may involve various manipulations. If you are installing a chandelier where 2 wires come from each group of lamps, you can connect it according to your preferences.
Modern lamps are often sold with wire sections ready for switching and mounted in a certain way. In this case, to change the options for lamp combinations, you will have to disassemble the base of the chandelier or sconce. If this is of great importance to you, pay attention to the wires at the time of purchase to avoid unpleasant surprises when connecting the device.
There are usually three wires coming out of the installation box. It is necessary that their length does not exceed 10 cm. This is quite enough for comfortable work. If the wires are longer, simply cut them.
What kind of lighting do you prefer?
Built-in Chandelier
Next, you should strip the ends of these wires of insulation by about 1-1.5 cm and connect them to the corresponding terminals of the switch. The phase is connected to the terminal marked “L”, and the remaining wires are connected depending on which switch key you want to use for a specific section of the lamp or a separate device.
If you have a modular type switch, that is, consisting of two separate single-key components, you must provide power to both parts. To do this, make a jumper from a small wire and install it between the two halves of the switch.
Step-by-step instruction
Let's look at how to change the switch.
Preparatory stage
The main thing when working with electricity is safety. If you lack confidence in your own abilities, it is recommended to use the services of a professional electrician.
If you decide to do the work yourself, follow these preparatory steps:
- The lack of light is not caused by problems in the electrical network, but by a burnt-out cartridge. Checking the cartridge.
- Let's see if there is light in other parts of the house (apartment).
- If, based on the results of the check, there are no malfunctions not related to the electrical network, we proceed to dismantling the switch. Before changing the switch, we turn off the power to the apartment. To do this we use a switch. We check the mains voltage with an indicator. We inform family members about the renovation work. No one should use the light while the switch is being replaced.
How to replace a light switch in an apartment with one or two buttons?
- Single-button – work with one light source or group of lamps. When pressed, all lighting elements connected to this switch are turned on at once.
- Devices with two or more buttons - with the help of such devices you can turn on individual lamps on a chandelier. Very convenient, especially if the lamp is equipped with a large number of lamps. In this case, you can turn on only a few lamps so as not to waste a large amount of electrical energy.
Circuits and connections
Next, we will consider in detail the connection diagrams of different types of switches.
One key connection
Before replacing any light switches, we strip off the insulating layer on the wires. We lay five-millimeter sections of wires into the switch terminals. The phase wire (red) is directed to the contact designated as L1. We connect the blue (black) wire to pin L2. We install the switch in a niche. We secure the housing using sliding strips and screws.
We turn on the power supply at the distribution panel and test the system for operability.
Sometimes the light is turned off by moving the key upward. Then we turn the device case over and swap the conductors. We fix the decorative panel and the switch key.
Two-key
The principle of connecting a two-key switch is similar to a single-key switch, except that it has 3 terminals. Here the phase must be connected to terminal L3. And the remaining 2 paired wires are on terminals L1 and L2. Here it is difficult to confuse the phase with the wire that comes from the chandelier, since the phase is a single wire, and a double wire comes from the chandelier.
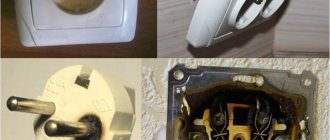
Dismantling
We carry out the work in the following sequence:
- We remove the keys from the switch. We do this with a screwdriver, prying off the keys. We remove the double keys one by one.
- Remove the outer panel of the box with the same screwdriver.
- When the panel is removed, the screws that secure the switch itself become visible. Unscrew the screws.
- We take out the switch from the niche.
- Disconnect the wires. It is important to remember the order in which the wires are connected. It is recommended to take a photo of the working field so as not to get confused later.