What is a dimmer for and how to connect it
Today, many people prefer to install a dimmer instead of a boring standard switch. Devices of this type are different. They have both positive “traits” and negative ones. But before purchasing a dimmer, you will need to understand what it is. After all, few people like to throw their money away.
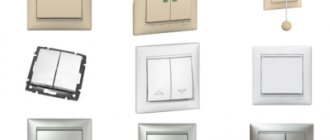
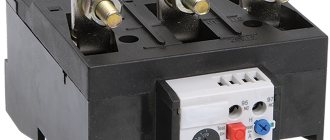
The dimmer is shown in the photo
What it is?
The term dimmer is understood as a control device that, due to its functionality, allows you to control the supply of light or, for example, sound. With the help of this element, it will be possible to add more light if a person starts reading a book, and also, on the contrary, make it quieter if the baby goes to bed. The principle of its operation comes down to the fact that flows can be regulated due to the output voltage.
All dimmers can be divided into the following types:
- Sensory. In this case, you can control the element with a light touch on the touch panel.
- Keyboards. You can turn on the device by pressing a key. You can adjust the lighting supply by holding the key element for more than a few seconds.
- Rotary. In this case, to adjust the light flow, you simply need to turn the knob in one direction or the other.
- Turn-push. Such dimmers allow you to remember the light supply levels and turn on by pressing the handle.
For example, very often this type of regulator is used in radio tape recorders that are installed in vehicles. It serves as a regulator of the light signal level. They are also attached to lighting fixtures and radios. Moreover, it should be noted that low-power or LED lamps are often used with a dimmer.
It is also worth noting that, unlike previously used regulators, the dimmer consumes absolutely no electrical energy. This helps to significantly reduce its costs. But sometimes a person may encounter the fact that the direct regulator begins to hum. There are several reasons for this, and the most common are voltage drops in the system and overheating. Prolonged operation of a device equipped with a dimmer can lead to losses and overheating.
Device
To disassemble a dimmer to detect an actual breakdown, you need to understand its circuit diagram and know what exactly this regulating device consists of.
The diagram shows how the dimmer works
In fact, the dimmer device is incredibly simple. It may vary slightly depending on the brand and manufacturer. Moreover, the difference lies in the quality of components and type of assembly.
The actual dimmer device in the diagram
To disassemble the regulator, you “need” to go to the box in which it was stored. This is where the equipment diagram should be located. To connect, the dimmer is initially disassembled. Pull the button towards you, and then open the lid of the device.
How to connect?
Dimmer connection diagrams
To correctly connect the control device, you must adhere to the following tips:
- It should be mounted in the place where the mounting box was previously. It will replace the switch.
- This type of regulator is installed in a phase wire break. This suggests that after passing into the distribution box, the phase current will go to the dimmer itself, after which it will return to the box. And again to the lighting fixture.
- Experts say that the zero-type conductor must go from the distribution box to the lighting fixture.
This connection option is the most correct. Moreover, it should be noted that you should first use special schemes.
In addition to embedding a dimmer instead of a switch, it can be installed on a cord and in close proximity to an outlet.
Another option for connecting a dimmer in the diagram
Attention! Currently, dimmers are used to regulate the supply of light to halogen and incandescent lamps. They are also suitable for lamps with a low-voltage characteristic (40-500V).
Connection diagrams
The picture shows a dimmer
- Legrand dimmer - this type of drawing can be found in the box that comes with Legrand dimmers.
Legrand dimmer connection diagram
Connection diagram for dimmer with switch
Triac dimmer circuit
Connection diagram for pass-through dimmer
Schneider dimmer in the picture
Video
Watch the video on how to choose a dimmer:
Once upon a time, in distant childhood, everyone used garlands with great pleasure. Especially for this purpose, the most common variable resistance was used, which is designed for use in a circuit diagram operating from a 220V current source. But this device was enough to adjust the light. Here it is important to choose a resistor and then half the battle is done. All that remains is to place it in the case. But this trick is not possible with modern light bulbs; you will have to use one of the options proposed above.
Manufacturers of dimmers: where to buy dimmers for 220V LED lamps
Guided by the opinions of experts, it is better to buy dimmers for LED lamps from reputable manufacturers of electrical installation devices. Leading manufacturers of dimmers for LED lamps: Legrand, Schneider, Makel. They offer a full range of equipment: from household switches to lighting control systems.
Legrand dimmers for LED lamps 220V
All products manufactured by Legrand are developed on the basis of advanced technologies and meet European quality requirements. The main advantage of electrical installation devices from this manufacturer is ease of installation, trouble-free operation and excellent design. All products are certified and meet the requirements of GOST.
The main advantages of Legrand dimmers are modern design, reliability and easy installation.
Before you buy a dimmer for an LED lamp, you should familiarize yourself with the device compatibility data available in a special table. As a rule, lighting equipment sales points have this information. Ideally, having purchased a dimmable LED lamp, it is better to immediately check its compatibility with the purchased dimmer.
Dimmers Schneider Electric
Another world-famous manufacturer is the Schneider Electric company. Dimmers from this manufacturer are presented in several series. The devices have an elegant design and are available in seven color options. The long life of the devices is due to the use of proven and high-quality materials. The dimmers are equipped with protection against short circuit, overload and overheating.
In the production of Schneider Electric dimmers, high-quality and proven materials are used
Thanks to special guides and mounting tabs, the devices are easily and quickly mounted. All products are provided with a manufacturer's warranty for 18 months. Flexible conditions for exchange and return of devices have been developed. The company is constantly working to create new devices with more advanced functions.
The price of a rotary dimmer of the Schneider Unique series TOP color Graphite for halogen lamps and incandescent lamps is 4,200 rubles, the cost of a rotary dimmer of the Schneider Electric Unique series with a power of 400 W in the color Aluminum for halogen lamps is 4,050 rubles.
There are also more budget series of Schneider dimmers, the price of which does not exceed 1,500 rubles. Thus, you can purchase a rotary dimmer of the W59 series with a power of 300 W in the color Matte chrome for hidden installation for 1,400 rubles.
Dimmers installed in the house significantly increase the level of comfort
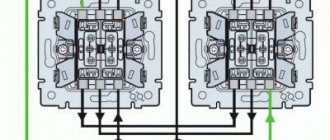
wiring diagram for Legrand pass-through, Legrand Valena and switch in one housing
A dimmer (adjustable switch) is a rheostat-type device that allows you to smoothly change the current and voltage in the range from 0 to 220V Making the design of your apartment not only attractive, but practical and comfortable is the main task of any owner. And various electronic devices today are designed to contribute in every possible way to the realization of these goals. One of the devices that combines an interesting design solution and practicality is a dimmer or dimmer. What advantages does this device have and how to connect it - read below.
Why do you need a pass-through dimmer: the principle of operation of the dimmer
A dimmer is a device that is used to change the brightness of incandescent, halogen, LED and fluorescent lamps, and some types of energy-saving lamps. The operating principle of the dimmer is based on the action of a rheostat. So, when the position of the rheostat lever changes, the amount of resistance in the circuit changes. Consequently, the brightness of the lamp also changes. At the same time, increasing brightness does not require increasing the current load.
The design of the switch with a brightness control is quite simple - it is a smooth adjustment of the switch resistance
The process of adjusting the brightness of lighting occurs through the rational use of electricity.
That is why a dimmer can significantly save energy consumption. Thus, it has been experimentally proven that the device can reduce energy consumption by half! What can the device be used for?
So, you can use a dimmer if necessary:
- Illuminate the corridor with the stairs at night;
- Leave soft light (which will not interfere with rest) for household members returning home late;
- Reduce the brightness of lighting when watching television programs;
- Create a more intimate environment.
A pass-through dimmer is necessary if you need to control the brightness of the lighting from different points. Its installation may be necessary in long corridors, in which the switch is usually installed only at one end.
Pass-through dimmer: connection diagram, variations
Modern light controllers consist of symmetrical semiconductors - thyristors and triacs. Such semiconductors allow current to pass in both directions. At the same time, smooth regulation of the voltage supplied to the lamp is ensured by “phase cut-off”.
To connect a dimmer, just follow a few simple steps. The main thing is to connect it to the network correctly
A simple rotary dimmer has two terminals, and the lighting power supply circuit is switched on open, like a regular switch.
In this case, from the distribution box the phase goes to the dimmer, and the zero and grounding go to the lamp. This is the fastest and simplest regulator connection diagram. This way you can connect any rotary dimmer (for example, Verkel). But what if you need to install a pass-through switch in your home?
There are several schemes for connecting a pass-through dimmer:
- Consistent. To implement this scheme, it is necessary to install two dimmers on one light source. In this case, as in the standard circuit, zero should go from the distribution box to the lighting devices, and the phase wire should go to the break, to one dimmer. In addition, the two dimmers must be connected to each other by a phase jumper. For lighting fixtures, the phase must come from the second dimmer. This connection will be convenient in large rooms and corridors.
- Parallel. For such a circuit you will also need to connect two dimmers. In this case, the devices will play the role of switches and be dependent on each other. The main inconvenience of such a connection is that when one dimmer operates 100%, it will be impossible to control the brightness of the lighting using the second.
Device
In addition to the housing, circuit and terminal block, the dimmer has only controls, the latter come in several types:
- mechanical regulator. This is a potentiometer with a rotating wheel. These dimmers are the cheapest. Disadvantage: the light is turned off by setting the dimmer's output voltage to "zero", so each time the lamp is turned on, its brightness has to be adjusted again;
- mechanical regulator + key. A slightly more functional model: the power is turned off with a key, so that the regulator settings are not lost;
- buttons or slider. These are already electronic dimmers. Many have additional functions - operation of the lamp on a timer, imitation of presence (the light turns on and off as if the owners of the house), various light control modes;
- touch keys;
- remote control. There are varieties: infrared or radio frequency remote control, voice control (clap, voice command) and control via Wi-Fi. You can integrate the device into a smart home system or control it from a smartphone.
By design, dimmers are divided into:
- modular. They are installed in an electrical panel on a DIN rail and are equipped with external adjustment elements. Mainly used to control outdoor lighting;
- monoblock. They are designed in the same way as built-in switches for hidden wiring and can be installed instead of them;
- for installation in an installation box with a switch;
- rosette
The latter are equipped with a power cord and are used to connect table lamps, sconces and other lamps plugged into an outlet.
Dimmer Basics
A standard dimmer is connected like an ordinary switch, i.e. into an open circuit in the power supply of the lighting device. The dimensions of the regulator in question and the fasteners for installing it in a niche also coincide with similar parameters of a simple switch. Consequently, anyone who has an idea of how to connect traditional light switches can handle installing a dimmer. The only important point: the terminals to the load and phase must be connected strictly in accordance with the diagram provided by the manufacturer.
Dimmer Basics
Dimmer
Dimmer
All dimmers presented today can be divided into 2 large classes: rotary (also known as rotary) and push-button (electronic).
Dimmer
Table. Some types of dimmers
| Types of dimmers | Explanations |
| Dimmer for incandescent lamps and halogen lamps with a voltage level of 220 V | In this case, it is the magnitude of the applied voltage that determines the intensity of the lamp filament. |
| Dimmer designed for low-voltage halogen lamps powered via a transformer | Responsible for converting the output voltage of the dimmer to the desired value. If the lamps are designed for a voltage of 12-24 V, then an electronic transformer is needed that provides soft control of the current source. |
| LED dimmer (LED dimmer) and dimmer for fluorescent lamps. | The task of a dimmer for LEDs is to quickly produce the specified results and smoothly regulate the strength of the light flow. |
| Touch dimmer | The main difference between the touch device (viko dimmer) is the ability to regulate the light output by barely perceptible touching a certain area of the button. Can be equipped with an infrared receiver for remote control. |
| Rotary dimmer | Assumes easy rotation of the rotary element. |
| Push dimmer | Involves multiple key presses |
| Single dimmer | Can be used both for one lamp and for a number of light sources combined into a common group. |
| Group dimmer | For regulating several light sources at once. |
Rotary regulators are the most widely used. Control of lighting intensity with such devices is performed by simply turning the knob in the desired direction. Push-button dimmers are more convenient and flexible in terms of controlling light brightness. Additionally, electronic dimmers allow you to connect buttons in parallel and control lighting from several different places. In practice, the number of such places is limited to 3-5. In this case, the length of the wire should not exceed 10 m.
Dimmer Basics
There is also a group of devices on the market that allow you to control the brightness of lighting remotely using a remote control. However, such dimmers are an order of magnitude more expensive than the analogues discussed above.
The most popular, as already noted, are rotary type dimmers. These are the ones we will look at in this guide.
Video - Simple LED lamp and dimmer
What options for using Legrand dimmers exist?
- Single . Such a dimmer can “work” with one lamp or be used for several light sources that are combined into one group. For example, according to the appropriate settings from the remote control, the selected group of lamps begins to change the lighting brightness mode. Dimmers that control the centers can combine from 2 to 6 zones into one circuit. Such a dimmer with one remote control can produce light zoning for an entire home (apartment or house).
- Group . Effective accent lighting is created against the background of the main lighting in the interior. This way you can highlight that detail of the room that is worthy of attention. For example, you can highlight a painting or a chic vase of flowers with soft lighting, or, conversely, brightly illuminate a group of furniture, which will make it possible to present the decor more beautifully and advantageously.
Operating principle
A dimmer is a device for regulating power; as a rule, they are used to control the brightness of light sources, and are divided according to the type of adjustment into mechanical, touch, and remote.
Their operating principle for incandescent and halogen lamps is based on the principle of voltage regulation. LED lamps are regulated using controlled current sources and PWM controllers.
A pass-through switch is a switch that allows you to control the inclusion of electricity in one place from different places. Thus, the main purpose of the pass-through device is to control lighting fixtures from different places in the room.
Learn from this video how to choose the right dimmer:
Also widely used, as the most economical, are circuits containing a dimmer and a regular switch. Such circuits are easy to install and can be installed independently.
Sequential
There is no difficulty in installing two dimmers in different places that will control one light source. To connect them in series, it is necessary that three conductors come from each regulator to the junction box.
Both devices are connected to each other using jumpers through the first and second contacts, the phase comes to the third contact of the first device, the wire from the third contact of the second device is connected to the lamp.
Parallel
The peculiarity of parallel connection of two regulators is that they depend on each other. Connected in parallel, they act as switches rather than switches. Therefore, the disadvantage of this connection scheme is that each regulator controls only its part of the half-cycle.
This means that if one dimmer is set to 100%, the second one will not be able to control the brightness of the lighting.
With a regular switch
A simple and economical scheme, can be used, for example, in the bedroom. A dimmer can be installed near the bed, allowing you to adjust the lighting level, and a switch can be located at the entrance to the room. You can also use pass-through switches with the dimmer without any problems. This scheme can be used, for example, in long corridors.
A switch or pass-through switches are connected between the phase and the regulator, in the same way as usual.
The disadvantage of these schemes is that with a simple connection the light will only turn on at the set power.
This is not always convenient, besides, if the dimmer is turned off, the pass-through switches will not control turning on the light.
Connection diagram for a pass-through switch with a dimmer:
Some types of controls work like switches, such as rotary controls that switch when you press the turn signal.
What series of Legrand dimmers are offered to consumers?
Legrand Valena . Type: rotary, push-button Power: 300W, 400W, 600W, 1000W Colors: white, ivory, aluminum Price from 1519 rubles.
Legrand Celiane . Type: push-button, touch Power: 300W, 400W, 600W Colors: white, ivory, titanium, graphite Price from 2790 rubles.
Legrand Galea Life . Type: push-button, rotary Power: 400W, 600W, 1000W Colors: white, aluminum, mother-of-pearl, dark bronze, titanium Price from 1697 rubles.
Legrand Cariva . Type: push-button, rotary Power: 300W, 500W Colors: white, ivory Price from 1329 rubles.
Legrand Mosaic . Type: push-button Power: 400W, 1000W Colors: white, aluminum Price from 1990 rubles.
Installation features
If you have a pre-prepared groove and connected wiring, the connection is not difficult. It is similar to installing a conventional switch. First you need to turn off the electricity in the apartment. Then the mounting box is attached. The cores of the corresponding wiring are connected to the corresponding terminals, and the housing is inserted into the cell.
To secure the clamps, you need to unscrew the clamping screws on the side. Then the decorative edging is installed, the nut is tightened and the wheel is installed.