Example video showing the operation of a voltage relay
Special devices - voltage control relays - help solve the problem of voltage surges in networks. The principle of operation of such relays is quite simple, there is an “electronic unit” that monitors that the voltage is within the limits specified by the settings and if there are deviations, it signals the release (power section), which turns off the network. All household voltage control relays turn on automatically after a certain time. For ordinary consumers, a delay of a few seconds is sufficient, but for refrigerators and air conditioners with compressors a delay of several minutes is needed.
Voltage control relays are available in single-phase and three-phase types. Single-phase voltage relays disconnect one phase, while three-phase voltage relays disconnect all three phases at the same time. When using a three-phase connection at home, single-phase voltage relays should be used so that voltage fluctuations on one phase do not lead to the shutdown of other phases. Three-phase ones are used to protect motors and other three-phase consumers.
I divide surge protection devices into three types: UZM-51M from Meander, Zubr from Electronics and all the others. I am not imposing anything on anyone - this is my personal opinion.
Voltage relay Zubr (Rbuz)
This device is designed to protect against voltage surges (zero burnout). BISON is produced in Donetsk.
I will note the features of this voltage relay.
Voltage indication on the device – shows the voltage value in real time. This is quite convenient and necessary for assessing the voltage situation in the network. The reading error is low, the difference relative to the Fluke 87 high-precision multimeter is only 1-2 Volts.
Zubr voltage relays are produced for various rated currents: 25, 32, 40, 50 and 63A. The device, with a rated current of 63A, can withstand a current of 80A for 10 minutes.
The upper voltage value is set from 220 to 280 V in steps of 1 Volt, the lower - from 120 to 210 V. The restart time is from 3 to 600 seconds, in steps of 3 seconds.
I set the Zubr relay, the maximum (upper) voltage value is 250 Volts, and the lower value is 190 Volts.
Devices with the index t in the name, for example Zubr D63t, have thermal protection against internal overheating. Those. when the temperature of the device itself increases to 80 degrees (for example, due to heating of the contacts), it turns off.
Zubr relays occupy 3 modules or 53 mm on a DIN rail and are only single-phase.
The passport and the Zubr connection diagrams provided do not say about current limitations, but in the old documentation it was previously indicated that no more than 0.75 of the nominal.
Main characteristics
Each TR has individual technical characteristics (TX). The relay must be selected according to the load characteristics and application conditions when operating an electric motor or other electrical consumer:
- Value of In.
- Adjustment range of I actuation.
- Voltage.
- Additional control of TR operation.
- Power.
- Trigger limit.
- Sensitivity to phase imbalance.
- Trip class.
The rated current value is the value of I for which the TR is designed. Selected according to the value of In of the consumer to which it is directly connected. In addition, you need to choose with a margin of Inr and be guided by the following formula: Inr = 1.5 * Ind, where Inr – In TR, which should be 1.5 times greater than the rated motor current (Ind).
The adjustment limit of I operation is one of the important parameters of the thermal protection device. The designation of this parameter is the range of adjustment of the value of In. Voltage – the value of the power voltage for which the relay contacts are designed; If the permissible value is exceeded, the device will fail.
Some types of relays are equipped with separate contacts to control the operation of the device and the consumer. Power is one of the main parameters of the TP, which determines the output power of the connected consumer or group of consumers.
The operation limit or operation threshold is a coefficient depending on the rated current. Basically, its value is in the range from 1.1 to 1.5.
Sensitivity to phase imbalance (phase asymmetry) shows the percentage ratio of the phase with imbalance to the phase through which the rated current of the required value flows.
Trip class is a parameter representing the average response time of the TP depending on the multiple of the setting current.
The main characteristic by which you need to select a TR is the dependence of the response time on the load current.
Advantages and disadvantages of the device
One of the advantages of the relay is its large range of settings
The advantages of electronic products are manifested in their high reliability and functionality. Disadvantages include the limited intervals for which the relay can be configured during programming, as well as the high cost in comparison with electromagnetic samples.
The main advantages of e/m devices are:
- relatively low cost combined with a wide range of settings - the ability to set daily intervals;
- simplicity of design compared to electronic models;
- no need to program and adjust time relay settings to turn on lights or power equipment.
The disadvantages of these devices include a limited service life, as well as some difficulties with installation and use in DC circuits.
Types and classification
Time relay ADECS ADC-0420-40
Based on the installation method, known types of time relays are divided into the following types:
- block type devices;
- switches built into an electronic circuit;
- modular devices.
Samples of the first type are installed directly into switched circuits, and their power buses are connected directly to phase and zero. Sometimes a junction box is used for this.
Built-in relays do not require separate power supply, since they are part of more complex electronic circuits.
Time relay (on delay)
Modular devices are mounted on a DIN rail in a distribution cabinet and connected to the zero and phase buses located here.
According to the principle of their operation, time relays have the following designs:
- electromagnetic type;
- pneumatic and mechanical devices;
- electronic relays.
In everyday life, electronic and electromagnetic devices are most often used, which is explained by their efficiency and accessibility.
Operation timing diagram
We are slowly getting to the point. Now the algorithm of operation of the device will be described in detail.
Timing diagram based on previous article:
Diagram of operation of the Star-Delta relay
What has changed compared to the time relay circuit? Added a pause between “Star” and “Triangle”, 75 or 150 ms.
The same diagram in the instructions for the relay:
Operation diagram from the instructions for the Star-Delta relay
The diagrams show conditionally the power supply and the activation of internal relays (Star and Triangle outputs). Relays have two discrete states - “on” and “off”. It is strange that in the third graph, during the pause, the “Triangle” relay is turned on “a little bit”. What could this mean?
The same diagram is shown on the side of the device:
Relay side with diagram and circuit
So, according to the diagram, when power is applied to the relay (U), the common contactor KM1 and the “Star” contactor KM2 (inverted “Y”) are started simultaneously.
This lasts for a time set by the user. Next, after this time has elapsed, the KM2 contactor turns off and a pause of 75 or 150 ms occurs, the duration of which can also be selected. During a pause, voltage is supplied to the motor through the common contactor KM1, but no current flows, because the chain is broken. Due to the inertia of the engine, the pause does not have any effect on the rotation speed.
After the end of the pause, the KM3 contactor is turned on, and the engine is switched to “Triangle”, easily reaching the nominal mode.
Universal single-channel cyclic timer
Another option: Universal single-channel cyclic timer.
Scheme:
Device capabilities: - timer cycle duration adjustable during firmware up to 4 billion seconds (4-byte variable). - two actions per cycle (turn on and off the load), set using three buttons. - ability to turn on/off the load bypassing the timer. - discrete counting 1 second. - average current consumption without load is 11 microamps (approximately 2 years of operation from CR2032). - stroke correction (rough). - 2.1 volt low power reset (BOD) is disabled, because consumes 120 µA.
Operating principle: the timer repeats the recorded actions (on/off) with a certain period (cycle) set by the user in the EEPROM memory when flashing the controller. Example task: you need to turn on the load at 21:00 and turn it off at 7:00 and do this every three days. Solution: flash the timer with a “3 day” cycle and start it. The first time we approach the timer at 21:00, hold down the PROG button and, without releasing it, press the ON button, the LED will light up for 0.5 seconds and the output will turn on. The second time we approach the timer at 7:00, hold down the PROG button and, without releasing it, press the OFF button, the LED will light up for 0.5 seconds and the output will turn off. That's it, the timer is programmed and will perform these actions every three days at the same time. If the load needs to be turned on or off bypassing the timer, you must press the ON or OFF button without the PROG button, the program will not fail and the next time the load will turn on/off at the previously set time. You can check the operation of the timer by pressing the PROG button, the LED will flash once a second .
Description of testing with different capacitors in the previous article.
To make device setup easier, a calculator (EEPROM code generator) was also written. It can be used to create a HEX file to replace part of the code in the firmware file.
Update 02/29/2016 Configurator 04/16/2016 Forum
ucprog.ucoz.ru
Instruments with mechanical scale
One of the devices that has a mechanical scale is a household timer. It works from a regular outlet. Such a device allows you to control home appliances within a certain time range. It contains a “socket” relay, which is limited by the daily operating cycle.
To use the daily timer, you need to configure it:
- Raise all the elements that are located along the disc circumference.
- Omit all elements that are responsible for setting the time.
- Scroll the disk and set it to the current time period.
For example, if the elements are omitted on the scale marked 9 and 14, then the load will be activated at 9 a.m. and will be turned off at 2 p.m. You can create up to 48 device activations per day.
To do this, you need to activate the button located on the side of the case. If you start it, the timer will start in urgent mode, even if it was turned on.
How to make a time relay: two best ways
Thanks to a time relay, you can seriously save money. For example, it can be installed in a closet, corridor or entrance; with one click you can turn on the light, and after a certain period of time it will turn off automatically. This time will be enough for you to find an item in the pantry or simply go through an area in the corridor. In this article we will tell you how to make a time relay with your own hands, consider step-by-step instructions and the simplest connection diagrams.
How to make a time relay - the easiest option
We understand that the bulk of our readers are amateurs. Therefore, we decided not to go into complex technical terms that can be confusing. Especially for our subscribers, we found this video, after watching which you can understand how to make a homemade timer to turn off the electricity.
We would like to draw your attention to the fact that you should not have any difficulties, because the instructions are extremely simple to understand. To make a time relay we need the following materials:
To make a time relay we need the following materials:
The time relay connection diagram looks like this:
The capacitor here is C1. The delay time of such a relay is 10 minutes. If we talk about other characteristics of the kit, it boasts 1000 uF/16 Volts. The time is adjusted using a standard resistor R1. The device is controlled using contacts; there is no need to make a special board for it; it can be assembled as shown in the breadboard.
Assembling a time relay based on the NE 555 timer
The second time relay circuit is also elementary. But, to assemble it, we need a NE 555 timer. This timer is designed to turn on and off various devices. Its diagram looks like this.
The main component of this device is a microcircuit; it is used in the construction of the most popular electrical devices and timers. The microcircuit allows you to control the load using a special electromechanical relay. Therefore, you can configure it to turn the light off and on.
Controlling this timer is quite simple; on the body you will find two buttons:
To start the time, you must press the “start” button. If you need to return to the original state, then press “stop”
Note that the time interval is controlled by resistor R1 and capacitor C1. The time after which a lamp or other lighting device will go out depends on their nominal value.
You can set the time from two seconds to three minutes. So you can easily find the best shutdown time. This model requires constant power from a 12 Volt source.
You can learn more about it by watching this video.
We recommend reading: how to install a headlight strip.
dekormyhome.ru
How does the 555 chip work?
Before moving on to the example of a relay device, let's consider the structure of the microcircuit.
All further descriptions will be made for the NE555 series chip manufactured by Texas Instruments. As can be seen from the figure, the basis is an RS flip-flop with an inverse output, controlled by outputs from comparators. The positive input of the upper comparator is called THRESHOLD, the negative input of the lower one is called TRIGGER. Other comparator inputs are connected to a supply voltage divider consisting of three 5 kOhm resistors.
As you most likely know, an RS flip-flop can be in a steady state (it has a memory effect of 1 bit) either in a logical “0” or in a logical “1”. How it works:
- The arrival of a positive pulse at input R (RESET) sets the output to logical “1” (namely “1”, not “0”, since the trigger is inverse - this is indicated by the circle at the trigger output);
- The arrival of a positive pulse at input S (SET) sets the output to logical “0”.
Three 5 kOhm resistors divide the supply voltage by 3, which leads to the fact that the reference voltage of the upper comparator (the “–” input of the comparator, also known as the CONTROL VOLTAGE input of the microcircuit) is 2/3 Vcc. The reference voltage of the lower one is 1/3 Vcc.
With this in mind, it is possible to create tables of states of the microcircuit regarding the TRIGGER, THRESHOLD inputs and OUT output
Note that the OUT output is the inverted signal from the RS flip-flop
| THRESHOLD < 2/3 Vcc | THRESHOLD > 2/3 Vcc | |
| TRIGGER < 1/3 Vcc | OUT = log "1" | undefined state OUT |
| TRIGGER > 1/3 Vcc | OUT remains unchanged | OUT = log "0" |
In our case, to create a time relay, the following trick is used: the TRIGGER and THRESHOLD inputs are combined together and a signal is supplied to them from the RC chain. The state table in this case will look like this:
| OUT | |
| THRESHOLD, TRIGGER < 1/3 Vcc | OUT = log "1" |
| 1/3 Vcc < THRESHOLD, TRIGGER < 2/3 Vcc | OUT remains unchanged |
| THRESHOLD, TRIGGER > 2/3 Vcc | OUT = log "0" |
The NE555 connection diagram for this case is as follows:
After power is applied, the capacitor begins to charge, which leads to a gradual increase in the voltage across the capacitor from 0V onwards. In turn, the voltage at the TRIGGER and THRESHOLD inputs will, on the contrary, decrease, starting from Vcc+. As can be seen from the state table, there is a logical “0” at the OUT output after Vcc+ is applied, and the OUT output switches to a logical “1” when the voltage at the indicated TRIGGER and THRESHOLD inputs drops below 1/3 Vcc.
The important fact is that the relay delay time, that is, the time interval between applying power and charging the capacitor until the OUT output switches to logic “1,” can be calculated using a very simple formula:
T = 1.1 * R * C
Next, we present a drawing of a variant of the microcircuit in a DIP package and show the location of the chip pins:
It is also worth mentioning that in addition to the 555 series, the 556 series is produced in a package with 14 pins. The 556 series contains two 555 timers.
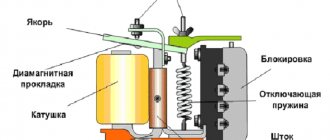
Relay Coil Disconnection
When the relay coil is turned off, it is also possible to achieve a slow decline in the magnetic flux in the magnetic circuit (Fig. 2 b). For this, various dampers are used. A damper is a thick sleeve made of copper or aluminum, which is mounted on a common core with a retractor coil. This sleeve creates a secondary circuit. When the main magnetic flux disappears when the RP is opened, a current is induced in the sleeve, which, according to Lenz’s rule, tends to maintain the main flux. The greater the mass of the damper, the longer the relay time delay. The aluminum base of the relay also plays the role of a damper. Various relay delay ranges (0.3-5.5 sec) are achieved through the use of additional removable dampers.
It should be borne in mind that the RE-500 type relay is designed for direct current, and it is connected to the control circuit of AC motors through rectifiers.
What is the difference between ABB automation and products from other brands?
Such radios have some advantages over devices produced by other companies, including:
- Easy to install and use. Thanks to the circuit diagrams printed on the PV housing, the user does not have a question about how to connect an ABB time relay. Cycle settings are quite simple, regardless of whether the device is digital or analogue. The dial, like the screen, is clearly readable in any lighting.
- Such time relays can be turned off forcibly. This action is necessary when urgent inspection or maintenance of the device is required. In this case, the preset cycle programs are not lost. Speaking of certification, it can be noted that all devices undergo mandatory testing according to EN 60730-1 and EN 60730-2-7 standards.
- ABB time relays are quite compact. When mounted on a DIN rail, such a device takes up only 2 modular spaces. But, despite the small dimensions, the manufacturer was able to achieve a fairly small minimum time step, which is only 15 minutes.
- Some models provide the use of their own rechargeable battery, which will prevent programs from getting lost, providing autonomous power in case of an unexpected power outage.
Multifunction devices
Multifunctional time relays produced by the domestic industry are distinguished by an expanded range of options, which means the following capabilities:
- The products are able to work according to the schedule specified by the program for a year, month or week.
- They can serve from one to 4 switched channels.
- Equipped with six input control modules.
It makes no sense to copy multifunctional devices yourself. They should be considered as samples for an in-depth study of the capabilities of modern time relay models.
Advantages of a time relay
Time relay saves energy
Analog and digital time relays are very convenient for controlling executive circuits of various household and industrial devices.
The on and off relay has a number of positive factors:
- optimizes the operation of household electrical and pumping appliances;
- saving energy resources when connecting a smart home system;
- switching of production equipment, mechanisms and other devices;
- settings allow you to select a mode that is convenient for an individual user;
- it is possible to set cyclic shutdown and on;
- A sound signal notifies you when the device is triggered.
Purpose
The time relay is designed to form standardized time delays during the operation of any devices. Such logical elements allow you to build a certain sequence in switching and operating devices. Thanks to the delayed supply of voltage, the signals issued from the time relay are automatically controlled.
Time relays are installed in protection circuits as an intermediate element to ensure selectivity, build stages, scenario transitions, etc.
Time relay circuit | Electrician in the house
Time relay circuit
Time relay circuit
Let's consider the simplest circuit of a 220 volt time relay. This time relay circuit can be used for various needs. For example, with the indicated elements, for a photographic enlarger or for temporary lighting of a staircase or landing.
The diagram shows:
- D1-D4 - diode bridge KTs 405A or any diodes with a maximum permissible forward rectified current (Iv.max) not lower than 1A and a maximum permissible reverse voltage (Urev.max) not lower than 300 V.
- D5 - diode KD 105B or any diode with Iv.max not less than 0.3A and Uob.max not lower than 300V.
- VS1 - thyristor KU 202N or KU 202K(L,M), VT151, 2U202M(N).
- R1 - MLT resistor - 0.5, 4.3 mOhm.
- R2 - MLT resistor - 0.5, 220 Ohm.
- R3 - MLT resistor - 0.5, 1.5 kOhm.
- C1 - capacitor 0.5 µF, 400 V.
- L1 - incandescent lamp(s) with a power of no more than 200 W.
- S1 - switch or button.
Time relay circuit operation
When contacts S1 are closed, capacitor C1 begins to charge, “+” is applied to the control electrode of the thyristor, the thyristor opens, the circuit begins to consume a large current and lamp L1, connected in series with the circuit, lights up. The lamp also acts as a current limiter through the circuit, so the circuit will not work with energy-saving lamps. When capacitor C1 is fully charged, current stops flowing through it, the thyristor closes, and lamp L1 goes out. When contacts S1 open, the capacitor discharges through resistor R1 and the time relay returns to its original state.
Finalization of the time relay circuit
With the specified parameters of the circuit elements, the burning time of L1 will be 5-7 seconds. To change the relay response time, you need to replace capacitor C1 with a capacitor of a different capacity. Accordingly, as the capacity increases, the operating time of the time relay increases. You can put two or more capacitors in parallel and connect or disconnect them with switches, in this case you will get a stepwise adjustment of the time relay operation time. To smoothly adjust the time, you need to add a variable resistor R4. You can combine both adjustment methods to obtain a relay with almost any response duration.
Modified time relay circuit
Changes in the scheme:
- C2 is an additional capacitor, you can take the same one as C1.
- S2 - switch (toggle switch) connecting capacitor C2 (increasing the operating time of the time relay).
- R4 is a variable resistor, you can take SP-1, 1.0-1.5 kOhm, or a similar value.
During prototyping, with the component ratings indicated on the diagrams, the light bulb (60W) lit up for about 5 seconds. By adding in parallel a capacitor C2 with a capacity of 1 μF and a resistor R4 of 1.0 kOhm, it became possible to regulate the burning time of the light bulb from 10 to 20 seconds (using R4).
Another time relay circuit can be taken from the article “Automatic air freshener”; such a circuit can be used for almost any device.
Be careful when setting up and operating the device; circuit parts are under dangerous voltage.
PS Many thanks to Mr. Yakovlev V.M. for your help.
It will be interesting to read:
Useful devices, Electronic devices, DIY electrical circuits, electronics, electrical circuit
elektricvdome.ru
The simplest 12V timer at home
The simplest solution is a 12 volt time relay. Such a relay can be powered from a standard 12v power supply, of which there are many sold in various stores.
The figure below shows a diagram of a device for turning on and automatically turning off a lighting network, assembled on one integrated counter of the K561IE16 type.
Drawing. A variant of a 12v relay circuit that turns on the load for 3 minutes when power is applied.
This circuit is interesting in that the flashing LED VD1 acts as a clock pulse generator. Its flicker frequency is 1.4 Hz. If you cannot find an LED of this particular brand, you can use a similar one.
Let's consider the initial state of operation, at the moment of supplying 12v power. At the initial moment of time, capacitor C1 is fully charged through resistor R2. Log.1 appears at pin No. 11, making this element zeroed.
The transistor connected to the output of the integrated meter opens and supplies 12V voltage to the relay coil, through the power contacts of which the load switching circuit is closed.
The further principle of operation of the circuit, operating at a voltage of 12V, is to read the pulses coming from the VD1 indicator with a frequency of 1.4 Hz to pin No. 10 of the DD1 counter. With each decrease in the level of the incoming signal, there is, so to speak, an increment in the value of the counting element.
When the 256th pulse arrives (this equals 183 seconds or 3 minutes), a log appears on pin No. 12. 1. This signal is a command to close transistor VT1 and interrupt the load connection circuit through the relay contact system.
At the same time, logic 1 from pin No. 12 is supplied through diode VD2 to clock leg C of element DD1. This signal blocks the possibility of receiving clock pulses in the future; the timer will no longer operate, until the 12V power supply is reset.
The initial parameters for the operation timer are set in different ways by connecting the transistor VT1 and the diode VD3 indicated in the diagram.
By slightly transforming such a device, you can make a circuit that has the opposite principle of operation. The KT814A transistor should be changed to another type - KT815A, the emitter should be connected to the common wire, the collector to the first contact of the relay. The second relay contact should be connected to a 12V supply voltage.
Drawing. A variant of a 12v relay circuit that turns on the load 3 minutes after power is applied.
Now, after power is applied, the relay will be turned off, and the control pulse that opens the relay in the form of logic 1 output 12 of element DD1 will open the transistor and supply 12V voltage to the coil. After which, the load will be connected to the electrical network through the power contacts.
This version of the timer, operating from a voltage of 12V, will keep the load disconnected for a period of 3 minutes, and then connect it.
When making the circuit, do not forget to place a capacitor with a capacity of 0.1 μF, designated C3 in the circuit and a voltage of 50V, as close as possible to the supply terminals of the microcircuit, otherwise the counter will often fail and the relay dwell time will sometimes be less than it should be.
In particular, this is programming the exposure time. By using, for example, a DIP switch as shown in the figure, you can connect some contacts of the switches to the outputs of the counter DD1, and combine the second contacts together and connect them to the connection point of the elements VD2 and R3.
Thus, using microswitches you can program the relay delay time.
Connecting the connection point of elements VD2 and R3 to different outputs of DD1 will change the dwell time as follows:
| Counter leg number | Counter digit number | Exposure time |
| 7 | 3 | 6 sec |
| 5 | 4 | 11 sec |
| 4 | 5 | 23 sec |
| 6 | 6 | 45 sec |
| 13 | 7 | 1.5 min |
| 12 | 8 | 3 min |
| 14 | 9 | 6 min 6 sec |
| 15 | 10 | 12 min 11 sec |
| 1 | 11 | 24 min 22 sec |
| 2 | 12 | 48 min 46 sec |
| 3 | 13 | 1 hour 37 min 32 sec |
Why is a time relay needed?
The purpose of a time relay varies depending on its functionality and technical features. Thus, an electromagnetic relay, which allows a one-second delay in switching on, is used in electrical control panels for starting high-power electric motors.
Housewives use a completely different type of relay to turn off household electrical appliances at the required time interval.
You can control the lighting on/off throughout the whole week by programming an electronic timer. A number of devices used in working with street lighting, through the execution of a program, are able to monitor fluctuations in the level of natural light throughout the day.
A cyclic time relay makes it possible to ventilate the interior space at set time intervals. And by adding sensors to the system that measure temperature and humidity, you can organize comfortable maintenance of objects such as a greenhouse or greenhouse.
Convenience of homemade products
There are practically no situations where users are forced to make a temporary relay with their own hands due to the lack of a suitable device for sale for their needs.
All kinds of timers, or rather modules, installation kits, if we consider this issue close to home-made products, can be purchased on Internet sites. For example, the price of the NE555 analogue assemblies we describe ranges from 1 to 3 dollars. Is it worth the bother? In addition, you can choose a device with a wide range, with multiple channels, multi-function and with a display; for low-current power supply 5, 12, 24 V, etc., as well as 220 Volt.
It is advisable to do homemade products if you have the necessary spare parts on hand, the user has skills in working with electronics, and even when you do not want to order and wait for a form when they are not available in radio parts stores in the area. In addition, crafts are often created based on interests, in order to increase experience and knowledge in this area.
Operating algorithms, functional diagrams, symbols
Functional diagram of a two-channel time relay
Modern programmable devices provide a complex operating algorithm, including time pauses and cyclically repeating intervals. There are the following operating schemes for time relays:
- simple switch-on delay;
- after power is applied, the load is connected, but after a time specified by the program, the voltage is removed from it;
- the same as in the previous case, but the shutdown occurs with some delay.
Another scheme assumes a more complex cyclic mode of operation of the device. To understand it, you should clarify the procedure for turning on and off the load. It looks like this:
- After supply, the food arrives as intended only after a certain period of time.
- The line remains connected to the network for a predefined interval.
- There is a shutdown and a pause equal to its duration when power is applied.
- The load is reconnected for the same time as the first time.
- The sequence of these actions continues until the supply voltage is completely removed.
When studying the algorithms for operating a time relay and the features of its application, you will need to become familiar with one of the most important characteristics of the device, presented in the form of a functional diagram.
Trigger diagrams
Time relay operation diagrams
This characteristic refers to graphic diagrams that describe the state of the time relay at different times. When you get acquainted with them, the entire switching process is presented in a visual form.
The cyclic nature of the processes observed when devices operate according to a complex algorithm is especially clearly distinguishable in the diagrams. The time intervals indicated on them are usually set by the user himself. On the other hand, there are known examples of devices in which the moments of disconnecting and connecting the load cannot be adjusted. As a fixed parameter, they are usually indicated in the product passport. Most often, these are special-purpose timing devices installed in the protective circuits of industrial installations.
Contact designations on diagrams
Graphic designation of contacts
When choosing a time relay, it is important to learn to understand not only the functional diagrams of operation, but also the layout of its working contacts. Among them, the following types of contact groups stand out:
- one of them is always open in the non-working position;
- the other group of contacts is in a closed state under normal conditions;
- the third variety has a neutral position.
To understand the nature of relay operation in the diagrams, they are indicated by special icons in the form of semi-ovals, straight line segments and truncated parallels.
Scope of application
In the process of development of human civilization, people have always tried to make their lives easier and came up with various useful devices. After the popularization of electrical equipment among the population, the need arose to invent a timer that would turn off the device after a certain time. That is, you can turn on the unit and go about your business, after which the timer will automatically turn it off at the specified or programmed time. For these purposes, a time relay was created. The 12 V device is characterized by ease of manufacture, so making it yourself will not be difficult.
As an example, we can cite relays from an old washing machine, which were popular during the years of the Soviet Union. In the classic version, they had a mechanical round handle with divisions. After turning it in a certain direction, the countdown began, and the machine stopped when the timer inside the relay reached zero.
Time relays also exist in modern electrical engineering:
- microwave ovens or other similar equipment;
- automatic watering systems;
- fans for air injection or exhaust;
- automatic lighting control systems.
This is easier and more economical for the manufacturer, since there is no need to install two elements that perform the same function if one control unit can provide all tasks.
All models (both factory-made and home-made) according to the type of element located at the output are divided into:
- relay;
- triac;
- thyristor.
In the first option, the entire load is connected and passes through a “dry contact”. It is the most reliable among its analogues. For self-production, you can also use a microcontroller. But it is not advisable to do this, since ordinary homemade time relays are made for simple tasks. Therefore, using microcontrollers is a waste of money. In this case, it is better to use simple circuits using capacitors and transistors.
Connection diagram for a starter with a 220 V coil
In any magnetic starter connection diagram there are two circuits. One power line through which power is supplied. The second is a signal one. This circuit controls the operation of the device. They need to be considered separately - it’s easier to understand the logic.
At the top of the magnetic starter housing there are contacts to which the power for this device is connected. The usual designation is A1 and A2. If the coil is 220 V, 220 V is supplied here. It makes no difference where to connect “zero” and “phase”. But more often the “phase” is supplied to A2, since here this output is usually duplicated in the lower part of the case and quite often it is more convenient to connect here.
Connecting power to the magnetic starter
Below on the case there are several contacts labeled L1, L2, L3. The power supply for the load is connected here
Its type is not important (constant or alternating), it is important that the rating is not higher than 220 V. Thus, through a starter with a 220 V coil, you can supply voltage from a battery, wind generator, etc.
It is removed from contacts T1, T2, T3.
Purpose of magnetic starter sockets
The simplest scheme
If you connect a power cord (control circuit) to pins A1 - A2, apply 12 V voltage from the battery to L1 and L3, and lighting devices (power circuit) to pins T1 and T3, we get a lighting circuit operating on 12 V. This is only one of the options for using a magnetic starter.
But more often, these devices are used to supply power to electric motors. In this case, 220 V is also connected to L1 and L3 (and the same 220 V is removed from T1 and T3).
The simplest diagram for connecting a magnetic starter - without buttons
The disadvantage of this scheme is obvious: to turn the power off and on, you will have to manipulate the plug - remove/insert it into the socket. The situation can be improved if you install an automatic machine in front of the starter and turn on/off the power supply to the control circuit with its help. The second option is to add buttons to the control circuit - Start and Stop.
Diagram with “Start” and “Stop” buttons
When connected via buttons, only the control circuit changes. The strength remains unchanged. The entire connection diagram of the magnetic starter changes slightly.
The buttons can be in a separate case, or in one. In the second version, the device is called a “push-button post”. Each button has two inputs and two outputs. The “start” button has normally open contacts (power is supplied when it is pressed), the “stop” button has normally closed contacts (the circuit breaks when pressed).
Connection diagram of a magnetic starter with “start” and “stop” buttons
Buttons are built in front of the magnetic starter in series. First - “start”, then - “stop”. Obviously, with such a connection scheme for a magnetic starter, the load will only work while the “start” button is held down. As soon as she is released, the food will disappear. Actually, in this version the “stop” button is superfluous. This is not the mode that is required in most cases. It is necessary that after releasing the start button, power continues to flow until the circuit is broken by pressing the stop button.
Connection diagram of a magnetic starter with a self-recharging circuit - after closing the contact shunting the “Start” button, the coil becomes self-feeding
This operating algorithm is implemented using auxiliary contacts of the starter NO13 and NO14. They are connected in parallel with the start button. In this case, everything works as it should: after releasing the “start” button, power flows through the auxiliary contacts. Stop the load operation by pressing “stop”, the circuit returns to the operating state.
How to read labels
Relay marking using the example of CHINT Electric NJS3 series
When choosing a marking code, manufacturers tried to simplify its perception as much as possible. Only the most necessary data is indicated on the relay body:
- company manufacturer;
- device model;
- rated voltage (usually 220 Volts).
When marking, the type of current on which a given brand of device operates is sometimes indicated: direct or alternating.
Data on the maximum permissible current load may be provided on the housing. For most time relay samples, the input and output contacts are also marked on it with separate designations of “zero” and “phase”. Among the well-known manufacturers of these products, Russian ones stand out, as well as Rele-Avtomatika and Novatek-Electro.
Configuring electronic-mechanical analog relays
Industrial automation systems, as well as various household modules, are often equipped with electromechanical devices, the design of which allows for adjustment using potentiometers.
Electromechanical type of time counting device with parameter adjustment by potentiometers. There are various configurations of such devices, which makes it possible to use them in circuits of varying complexity.
On the front panel of the housing of such devices there is a potentiometer rod (or several rods) designed for rotation with a screwdriver blade. A marked scale of installation values is applied around the circumference of the rod(s).
The slot on the rod for the screwdriver blade is a kind of pointer that changes its position when the rod rotates. By placing this pointer opposite certain values of the marked scale, the desired parameter can be adjusted.
Multichannel device of electronic-mechanical type. Adjustment is easy and simple by rotating the potentiometers with a screwdriver. The front panel also has LED status indication
Devices of this type (for example, NTE8) are widely used in control circuits for ventilation systems, heating modules, and artificial lighting devices.
Operating principle and applications
Electromagnetic time relay consumes little electricity
The simplest example to understand the principle of operation of a relay is a mechanical or electronic alarm clock set for a certain time. To obtain a full-fledged timer, an actuator is added to it, which performs the desired function - supplying power to a chandelier or fan, for example. The operating procedure of such a relay is:
- As soon as the time interval set on the timer (clock) has expired, the control signal is sent to the relay coil.
- Immediately after this, its working contacts open or close the supply circuit.
- As a result, the device connected to it turns off or turns on.
In real devices, a similar operating mode is implemented taking into account a predetermined time delay.
Timers of various types are widely used to control the operation of industrial installations, as well as when turning household appliances on and off. Commonly used switched household loads are:
- lighting fixtures of any class;
- various samples of climate control equipment;
- ventilation systems and similar devices.
Before you make a timer for turning electrical appliances on and off with your own hands, you will need to familiarize yourself with the types of these devices.