Intercoms are one of the types of access control systems.
Older people may have seen intercoms for the first time in foreign films of the 70s. The characters in the paintings approached the entrances of houses, selected a button with the name of the person they needed, pressed it, and talked with the resident. With his permission, the front door opened and people entered the building. In the 90s, foreign wonders turned into a familiar attribute of our lives. First, apartment buildings, and then private households began to be equipped with intercom systems. The use of intercoms has increased the level of security for citizens. In this material we will try to introduce the reader to the structure of intercoms, the principle of operation and the purpose of its main components.
Purpose of the intercom
As mentioned at the beginning of this material, intercoms are used to restrict access of unwanted persons to a certain area. In the case of multi-user systems, these are the entrances of multi-apartment residential buildings. Single-user (low-user) systems usually restrict access to private households.
In order to enter the territory “protected” by the intercom, a person must go through an identification procedure. Identification can be done using:
- voice recognition during negotiations over a voice communication device (in recent years, video intercom systems have made it possible to identify people visually);
- using an individual electronic key;
- by typing the secret code on the numeric keypad.
In the first case, the decision to grant access is made by the user of the intercom system. In other cases, the identification procedure is performed by a microprocessor device.
Application
Intercoms are installed where control of visitors, entry/exit or internal communication between subscribers is needed. The device is also installed for ease of use of doors.
The entrance of any building - residential, industrial, single-family, multi-apartment, office, administrative - can be equipped with an intercom. The same applies to separate or internal (in the lobby of the building) security points, separate apartments or blocks in the house.
For increased security, intercom systems with two-level protection are installed. The first perimeter is an entrance intercom that controls the entrance to the entrance; the second circuit is an individual or group device on the doors of an apartment or a closed hall.
Application limitations depend on the capabilities of electrical equipment and communication channels. Where it is not possible to use WI-FI or GSM communication, IP telephony means use simple wired devices. Accordingly, in buildings where it is difficult to install a cable, wireless IP intercoms are recommended (although they often work simultaneously through a twisted pair cable).
Main components of intercom systems
Multi-user intercom systems consist of several main units. A typical intercom circuit consists of:
- call block;
- power supply;
- electric lock;
- switching unit;
- subscriber voice handsets.
The figure shows a block diagram of an intercom of an apartment building with a coordinate switch.
Below we will take a detailed look at the structure of all elements of the intercom system.
Electric lock
In modern multi-user intercom systems, two types of electric locks are used:
- electromechanical;
- electromagnetic.
In electromechanical locks, the bolt (bolt) of the locking device is held in the “closed” state when power is applied to the coil of the built-in electromagnet. When the tension is removed, the bolt comes out of the locking plate under the action of the return spring.
Electromagnetic locks lock doors using a magnetic field.
A powerful electromagnet coil mounted on part of an open magnetic circuit is built into the door frame. The second part of the magnetic circuit is mounted on the door. At the moment when the door comes close to the door frame, the halves of the magnetic circuit are attracted to each other under the influence of a magnetic field. When the magnetic circuit “shorts”, the door is kept locked. To overcome the resistance of an electromagnet requires an effort that an ordinary person is unable to create without additional means.
From the above description of the locks of multi-user systems, it is clear that when the supply voltage disappears, they automatically open . This arrangement of locks makes intercom systems vulnerable, but it is dictated by fire safety requirements.
As for the locks of individual intercoms, they are opened using an electromagnet when the supply voltage is applied. The connection diagram for the electromechanical lock is shown in the figure.
In order for entrance doors with electric locks to be able to lock automatically, they are equipped with door closers.
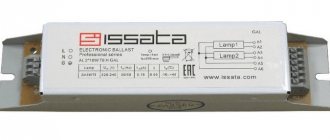
power unit
Intercom power supplies produce power supply voltages for all elements of intercom systems. There are no special requirements for power supplies other than reliability. To increase the reliability of the operation of intercoms, power supplies can be supplemented with uninterruptible power supplies. The use of uninterruptible systems will allow the intercom to continue operating during power outages.
Call block
The call block is the “brain” of the intercom system. Typically a calling block consists of:
- numeric keypad;
- a display reflecting the numbers typed on the keyboard;
- elements of duplex public address system (speaker, microphone);
- electronic key code reader;
- buttons for opening the door from inside the room.
Depending on the type of intercom system and the algorithm of its operation, when typing a combination of numbers on the numeric keypad, you can enter an access code or call a subscriber of one of the apartments. If there is a display, it will display the entered digital sequence.
It should be noted that the use of a secret code in modern intercoms is practically not used.
The latest intercom systems are opened using individual electronic keys (chips). The key chips store a unique code that is read by a special reader. The read code is analyzed by the call block microcontroller. If the entered code matches the code “hardwired” into the call block, the microcontroller will issue a signal to open the door.
In addition to the identification function using a key, the call block performs the function of controlling the switching of voice communication devices. When dialing an apartment number, the speaker and microphone are turned on, and control signals are generated for the switching unit. The switching unit transmits the call signal to the subscriber handset. If the handset is picked up, the caller has the opportunity to conduct a conversation with people in the apartment. Intercoms provide duplex (two-way) voice communication between the calling device and the subscriber device.
If the “open” button is pressed on the subscriber side, the permission signal will be sent to the call block through the switch. The microprocessor system will turn off the power to the lock electromagnet and the front door will open. The door will also open when you press the open button from inside the room.
Switching block
Using the switching unit, a telephone connection is made between the call unit and the subscriber unit. Modern intercom systems mainly use coordinate-type switching units. The device operates according to the following algorithm. The switching unit receives from the conversation unit a sequence of control signals encoding the number of the apartment receiving device (handset).
Depending on the apartment number, two wires are selected that connect the subscriber device to the speaking part of the calling device. Without going into details, we can say that with the coordinate switching method, only 20 wires are required to connect 99 apartment tubes.
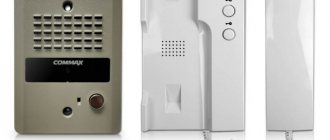
Apartment intercom device (handset)
An apartment intercom handset is not much different from the handsets of conventional telephones. With its help, you can carry on a conversation with the person who called the apartment and open the front door.
A microphone with a transistor amplifier is built into the handset body, a speaker which, depending on the position of the handset, serves as a telephone captcha or a call buzzer. An LED is installed on the device body to indicate the presence of a line.
Opening the door from the subscriber's apartment occurs as follows. When you press the “open” button on the housing of the apartment intercom, the resistance of the telephone line changes. A change in line resistance is perceived by the microprocessor device as an “open” signal.
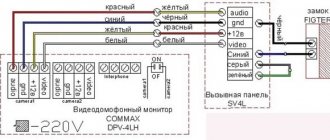
Schematic diagram of the intercom handset
When connecting speaking handsets, polarity must be observed.
Types of pipes
There are 2 main types of intercom handsets on the market:
- Analog.
- Digital.
Analog
To connect the equipment, you need a coordinate matrix switch that works like a telephone exchange. This device processes data from the outdoor unit and sends it directly to the handset installed inside the apartment after entering the number.
Installing an analog handset for an intercom is more difficult than the digital version, since the operating principle of the device requires additional cabling from the switch to subscribers.
Such tools create duplex communication, have control of the conversation volume and call signal, and can also remotely control the locking mechanism.
Types of intercom code keys and the principle of their operation
Intercom code keys can be divided into two types: contact and contactless. The first intercoms used simple analog keys with two contacts. A resistor of a certain value was soldered inside such a key. When such a key was applied to the reader, a fixed current was passed through it, and the microprocessor system measured the voltage drop across the resistor.
If the fall fell within the specified parameters, the door opened. Such a key could be made not only by an intercom service company, but also by any person with basic knowledge of electrical engineering. Therefore, analog keys were quickly replaced by chips that transmit serial binary code . For such keys, the number of possible combinations is determined by the number of transmitted binary digits.
Contact-type digital keys can be made based on chips from different companies. One of the most common are Dallas Touch Memory from the same manufacturer. Depending on the microchip model, the keys have different amounts of memory and allow you to obtain a different number of numerical combinations.
Recently, many intercoms have been equipped with contactless reading devices. In this case, the exchange between the access key and the intercom is carried out over a radio channel. The devices communicate with each other at frequencies of several tens or hundreds of kilohertz. The range of such “radio equipment” does not exceed several centimeters. Therefore, the possibility of intercepting radio traffic is unlikely.
Installation
You can install the outdoor unit in a private house at the gate or next to a support pole. It is not practical to install the device in a gate; constantly moving doors can quickly break the cables:
- For the block you need to create a niche , wall up the installation box into it, attach the block to it, but first lay the cables.
- Installing a security camera and electronic lock is a little more complicated. You need to fit extra wires into the niche. The video camera is connected to the unit inside the intercom.
- Mounting the unit inside is even easier. No need to install hidden settings. Choose a place indoors, hang the device on nails, you can additionally attach a battery if necessary. A thin 12 V cable will be sufficient when installing the unit inside.
Description of the installation process:
- Decide on the height of the device; in terms of height, it should be comfortable and accessible for all residents of the entrance, in particular children.
- Measure the distance from the floor, the gap should be 20 - 25 cm.
- Using a marker, draw a line horizontally and vertically draw a rectangle measuring a couple cm larger than the internal dimensions of the door.
- Check the evenness of the markings using a level.
- Draw a rectangle around the perimeter; you will need to hollow out the outer tier of the recess.
- Make sure that the electrical wiring is located next to the niche of the device being inserted so that its outer panel can be connected to the cable.
- Look at what material the walls of the house are made of. There will be no problems with brickwork; other materials or a thin wall may burst or crack when hollowed out.
- Hollow out a rectangle inside using a hammer drill; a depth of half a brick will be sufficient.
- Cut out the tier from the outside around the perimeter by approximately 12 - 14 mm.
- For wiring, use the gating method, making a channel.
- Bring the resulting channel to the niche inside, and hollow out a small square for the socket from the back.
- Cut a channel for the electrical wiring; this can be done without any problems with an electric wall chaser.
- Connect the power supply to the outlet niche and insulate the exposed wires.
- Mount a box for the outlet, which will then need to be plastered.
- Bring the ends of the cables out and seal the channels.
- After drying, you can go over it with putty, leaving uneven areas on the top tier.
- After the putty has dried, prime the entire surface from the inside and paint it in two layers.
- Install the outlet after the paint has dried, connect it to the wiring, and do not touch the cables that come out of the wall.
- Cut a piece of drywall to the size of the outer tier of the niche. Place it on the glue, having first screwed a couple of pieces of aluminum profiles to the niche.
- Mount the profiles vertically, keeping the distance between them the width of your palm.
- Coat the niche tier well with glue from the outside, attach a sheet of plaster, press firmly.
- At the level of the center of the profiles vertically, make cuts, having previously marked their axes, bring the cuts to the edges of the niche at the top and bottom, connect the cuts lengthwise, you should get a hatch.
- Screw the intercom clamp to a separate fragment and cut a small hole for the cable in the center of the mounting frame.
- Place the hatch on the profiles using screws, and also secure the shield.
- The shield glued to the niche can be puttied.
- For external finishing, unscrew the device lock.
- Sand the surface after it has dried, put the fastener in place, unscrew the hatch, after which it can be installed in its original place.
- Conduct a test installation of the intercom, hang it on the mount, and check its positioning along the horizons.
- Remove the intercom, cover the area with wallpaper, or finish it at your discretion.
- Open the slots around the hatch to install the lock.
Schematic diagram of connecting an intercom in an apartment building for the VIZIT-ML-400 intercom
Most common models
In our country, equipment for intercom systems is supplied by several large companies. Among them we can highlight such manufacturers as Metakom LLC, the VIZIN group of companies (Visit). Both companies offer comprehensive solutions for organizing remote access control systems (ACS). Both companies present a wide range of intercom equipment.
Based on the proposed elements, you can create low-user and multi-user intercom systems of any configuration. The company's products are distinguished by a high level of quality and engineering. The equipment can operate in difficult weather conditions of our country. Anti-vandal design ensures high durability of products.
Exploitation
Before using in difficult climatic conditions, it is necessary to check whether the equipment can withstand severe frosts or heat (some intercoms do not work at -30 and +50 ° C).
Care should be taken to ensure that the doors can be mechanically opened/locked in the event of a breakdown of the intercom. The door closer needs to be checked regularly and its operation adjusted. The same applies to locks and button panels; they are used very often, so failure, breakdowns, and abrasion are common occurrences.
A multifunctional telephone can serve as an internal intercom. Doors are opened in three ways: from the monitor, by code, by key (card, magnetic key). Call panels are programmed with a special programmer or from a computer.
Precautionary measures
Electrical power is supplied to the device, so when disassembling or installing it, adhere to the rules for working with electrical equipment.
To avoid possible strong electrostatic discharges, the voltage of the external unit and electric lock should not exceed 24 V.
The internal unit is fixed in such a place in the room to protect the user from criminal behavior of the visitor, for example, shooting through the door.
The external unit is installed with an overlay, insert into the door, frame, or wall near the door. The ends of screws and screws are drilled out. The block is mounted at such a distance from the floor that the visitor’s face can be seen (1.5–1.7 m from the floor).
The equipment is installed in special mounting cabinets in hard-to-reach places, cables are installed in metal hoses and boxes. The camera and display are protected with impact-resistant glass, and the infrared illumination is hidden under a nameplate.
The ID reader (Touch memory or cards) must not have open holes. When entering the code, you should make sure that there are no mechanical damage, traces of mechanical intervention, foreign devices, or objects on the panel. Periodically check that the lock plates and mechanisms are securely fastened.
Malfunctions
Failures of various kinds for no reason (in calls, indications). If checking the wires for short circuits and lags does not help, this is a breakdown of the processor or microcontrollers. There is only one way out - a repair service point for replacement or flashing.
Monitor fails, silent ringing. Possible reason: the cables are lagging, they are disconnected and reconnected or replaced.
The equipment does not open the lock, does not respond to the key, and does not give signals. The reason is in the power circuits, cables, they need to be checked - perhaps there is poor contact or the power supply has failed.
The doors close too slowly - adjust the closer.
The calling panel, as a rule, rarely breaks down, since it is regularly checked by the service company. If your neighbors have an intercom and yours is malfunctioning, the reason is most likely in the subscriber panel inside the apartment.