Which intercom to choose
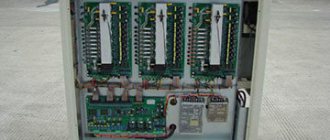
There are many companies on the Russian market that manufacture devices for intercoms. High production technologies allow us to produce improved models every year. What kind of intercom system there will be in the house is up to the owners to decide.
When choosing an intercom, you should pay attention to the switching system. Based on this parameter, coordinate and digital intercoms are distinguished. Their difference lies in the wire through which the connection to the apartments is made.
When installing a digital intercom, one line is laid to connect the switch with all apartments. The coordinate system is designed in such a way that each apartment will have a separate wire connecting it to the switch.
Today, digital intercoms are considered more reliable in operation. But their price is three times higher than the price of coordinate ones.
Another characteristic worth paying attention to is the type of connection. There are audio and video intercoms. The difference between them is the presence of a display on which you can see who is calling. The video intercom provides high security; thanks to it, no strangers will be able to get inside the entrance. But the cost of such devices is high. Apartment owners for the most part give preference to audio intercoms.
Who pays for intercom service
From the moment of installation, the intercom acquires the status of common property and belongs to all apartment owners in the building. According to current legislation, the residents themselves pay for the maintenance and upkeep of the property. After the intercom appears at the entrance, a new receipt will appear in your mailbox.
The obligation to pay amounts for the maintenance of this device is also assigned to those owners who did not install tubes in their apartments.
Previously, people did not think that someone could enter their entrance and cause damage to the property located in it. In Soviet times, there were wooden entrance doors, and flowers in pots bloomed on the staircase landings.
Perhaps the reason for the vandalism of the entrances was the dashing 90s, when the morality of the people wanted better. That’s when they began to come up with and install various means of protection from ill-wishers. At first these were combination locks installed by housing and communal services, then they were replaced by intercoms. Let's see what else they will invent to protect common property.
Installation of an outdoor call panel
To properly mount this element of the device, you need:
Choose the right place for it. It must be a wall or a pillar. The distance from the ground is not less than 1.6 m.- For overhead models, you need to mark the locations of future fasteners. And for built-in ones, draw lines and make marks about the location of the built-in box.
- Drill the surface, taking into account the thickness of the built-in device, as well as the thickness of the corrugated pipe.
- Install the built-in box into the resulting recess and fix it there with cement.
- The corrugated pipe will need to be placed in the groove and pressed there using nails.
- Next, the scratch, previously moistened with water, is sealed with cement (nails must be removed as finishing progresses).
- Excess mixture must be removed, the surface leveled and allowed to dry.
- The wires must be cut to the required length and connected to the device, strictly following the diagram that comes with any intercom.
Types of modern intercoms and their features
An audio or video intercom is used to reliably identify visitors. The latter is often installed in private cottages and is created for additional visual control of the space in front of the front door.
- As for city apartments in multi-storey buildings, they are often equipped with an audio option, the design of which includes the following elements:
- A handset that is equipped with buttons for accepting a call and opening an entrance electromagnetic or electromechanical lock. The device is installed by a company that provides intercom installation and maintenance services. If such devices were not installed in some apartments when installing the entrance, there is the possibility of installing them yourself. You can also use the services of a specialist service company.
- A call panel equipped with a numeric dial field that allows the visitor to signal the intercom by pressing the required code, usually the apartment number. In addition, there is a reading device on the panel, with which you can use a special key to open the electromagnetic lock that blocks the entrance doors.
- Locking device with power supply. The most common type of lock today is electromagnetic. Until recently, electromechanical latches equipped with sliding mechanisms were ubiquitous. Such devices are often present in the entrances of apartment buildings even now. To operate a remotely controlled unit, you must use a DC voltage of 12 or 24 V.
- Switch. This device is designed to transmit a signal from the call panel to the subscriber handset of a specific apartment.
Depending on the type of signal processing, digital and analog intercoms are distinguished. For digital and analog models, various types of receiving devices are used. Before purchasing such a device, you should definitely find out what type is installed in the entrance.
There are two types of intercoms that can be successfully used both in a private house and in an apartment building: digital and coordinate matrix. Both types show high reliability, but their connection is somewhat different.
Digital
- The operation of this device is as follows:
- The alarm call is transmitted by a two-wire line system.
- It determines the number of the desired apartment.
- In this option, jumpers are used that transmit a signal to a specific subscriber over a twisted mesh.
The handset in each apartment has microcircuits. You can connect either the entire entrance or just one floor to such a controller.
To connect devices of this type, only a cable with two cores is used, through which an encrypted signal is transmitted. The handset installed in the apartment, the number of which was dialed on the call panel, responds to the signal.
To set the correspondence between the dialed code and the handset, special jumpers are used - jumpers - which bridge the required contacts in the answering machine. To correctly program the operation of the handset, jumpers are placed between the numbered terminals so that the sum of the numbers equals the apartment number.
The advantages of such intercoms include ease of installation and connection of new subscribers. The main disadvantage of such equipment is the influence of each tube on the operation of the entire system. When replacing a device due to its breakdown, as well as when connecting new subscribers, the correct installation of jumpers is extremely important.
If there is an error in connecting the digital handset or a short circuit in the lead wires, the system may malfunction.
Currently, to partially eliminate this drawback, floor controllers are used, which allow the fault to be localized within one level.
Another disadvantage of digital intercoms is their relative high cost, which does not allow these devices to become widespread.
Analog
A feature of these intercoms is the relative ease of installation. A commutator is connected to the coordinate communication device. It is this element that switches the call to a specific handset.
This device is connected to each apartment using two cables. Their numbers are not repeated. Communication is established by transmitting a signal to a switch. The modulator then processes the received signal and connects to the desired cable. Next, thanks to the relay, a connection with the apartment occurs.
The most commonly used connection is a parallel connection. This makes the job much easier if you decide to install the intercom yourself. The main thing is to remember the polarity of the calling panel, handsets in apartments and the electric lock.
If you make the connection incorrectly, the operation of not only a specific branch, but also the system as a whole will be disrupted.
Analog installations use a coordinate matrix connection and operate on the principle of a telephone exchange. An additional element of such a system is a switch, which processes and analyzes the signal, as well as redirecting it to a specific subscriber.
To connect the intercom handset to the switch, two buses are used. The contacts of the first of them (D0–D9) correspond to tens, and the second (E0–E9) to ones.
- Thus, to connect an intercom to an apartment whose number, for example, is 74, you need:
- connect the conductor from the positive terminal of the subscriber handset to the contact corresponding to number 7 on the tens bus;
- the conductor adjacent to the negative terminal is to the contact corresponding to number 4 on the units bus.
In the considered connection option, a device was used that was designed to serve up to 100 subscribers. There are models that can work with a large number of numbers, but their principle of operation is no different from that discussed above.
If the numbers of apartments located in the entrance do not allow connection, the installer reprograms the control panel with the numbers shifted by a certain number (for example, 84 must be subtracted from each). In this case, some difficulty arises when connecting, since without consulting the specialist who installed the intercom in the entrance, it is difficult to find out the amount of displacement.
- The sequence of actions will be as follows:
- At the first stage of work, the location of the intercom handset is selected, then it is fixed to the wall using quick installation.
- Next, the installation location of the switch is determined (for analog intercoms). On each floor they are installed in a distribution box for low-current circuits. All of them are connected in parallel, which greatly simplifies the installation process. In the general case, just one switch per entrance is sufficient, but when using such a scheme, you have to stretch wires from the apartments on the upper floors to the installation site of the device.
- After removing the protective cover of the switch, the terminals corresponding to tens and ones are determined, then the connection is made so that the sum of the numbers of these contacts shows the serial number of the apartment.
- The wires are connected to the tube. It is extremely important to observe polarity. The positive terminal is connected to the contact of the commutator corresponding to tens, the negative terminal to ones.
If the polarity is not observed when connecting the coordinate matrix system device, the operation of the devices of the entire entrance may be disrupted.
Connection
Step-by-step instructions on how to independently connect the Eltis, Cyfral (Digital) video intercom with the z 5r controller:
- You can connect a key reader (touch memory) or a buzzer, a button that will be used to open an electromechanical lock, a backlight, the lock itself and a power supply to this controller;
- The buzzer and door sensor are optional parts, while the operation of the entire system depends on the door open button and power supply. If necessary, a screen can also be installed; optical control can be carried out through the monitor;
- To connect the board, a terminal block is most often used, the contacts of which will connect the necessary network wires;
- Afterwards, simply connect all the necessary wires to the apartment tube and check the correct polarity.
Domestic intercom models are also very popular, in particular the KS-2006. To connect them, schemes with two switches, one connection module, for several subscribers, etc. can be used.
What to do if the Factorial or Eltis intercom is disconnected from the power supply:
- Twisted pair wires are most often installed in the apartment panel. To find it, you need to open the panel where the Urmet, Digital, Factorial, etc. intercom cable was connected to the entrance or door lock;
Photo - marking of wires when connecting - Then determine which wires are responsible for tens and which are responsible for units. This can be done by looking at similar cables on adjacent connections;
- Be sure to pay attention to the polarity;
- When connecting a cottage intercom, it will be enough to simply connect the cables of the switch and the unlocking lock in polarity.
Prices for repairs or installation of intercom systems may vary depending on the city and the specific company. On average, the price of connecting an intercom varies between 200–500 rubles (the price is indicated only for the work, without the price list for the wires used). For example, connecting the MVK-325 UKP calling panel in Moscow and St. Petersburg will cost 500 rubles.
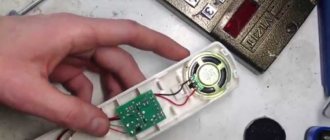
Handset design
The residential subscriber device consists of two parts. This is a handset and panel that is usually mounted on the wall next to the front door. The handset can be installed anywhere, you just need to lay the wire around the apartment. Inside the handset there is a microphone, a speaker and a small board with discrete elements. The panel has a handset release lever, and the handset itself has a door open button.
The electronic lock button can also be located on the wall panel. In modern models, the lever is replaced by a reed switch, and there is a small magnet on the tube itself. Some models may have a handset switch. On the back of the panel there are two screws marked “+” and “–”. A two-wire line is connected to them.
The wires should be connected to the intercom handset with correct polarity, otherwise the intercom system will not be able to be used - it will not work.
- All access intercoms installed in the entrances of apartment buildings are divided into two groups:
- coordinate;
- digital.
Based on the types of intercoms, apartment handsets also have slight differences. In coordinate intercoms, a switch installed in the entrance is responsible for the apartment number, and in digital devices, a special chip, which is located on a board inside the handset.
Electrical protection and wiring parameters
How to install an intercom? Intercom installation
Note! In order to carry the intercom-closing device into the apartment and not accidentally damage the wire, it is placed in a special corrugated tube.
Any system operates from the electrical network, which is protected by a fuse (10 A) or a circuit breaker (16 A). If such protection is not available, install a protective device (30 mA).
It is required to correctly calculate the distance from the apartment tube to the external panel. Leave 20-25 cm of wire as a reserve.
Installing an intercom in an apartment
Sooner or later, each of us will face the problem of connecting the tube.
- There may be a number of reasons for this:
- Installation of equipment independently in connection with the installation of a protection system.
- Connection of the handset due to a breakdown of the previously installed intercom device.
If you still have to do this work yourself, then first of all you should purchase completely new equipment. In this case, you should take into account the fact that the handset must fully comply with the installed intercom system.
Today, buying a handset for an intercom is not difficult, and you can safely purchase it yourself. Thanks to the many modern companies engaged in this production, there is a wide range of products that are publicly available and suitable for any type of intercom.
It is strongly recommended to purchase goods only from authorized dealers, who guarantee the quality of the goods and provide a guarantee for a long service life. The device must meet all the specified quality conditions, since only high-quality intercom handsets can ensure uninterrupted and reliable operation of the security system. Otherwise, re-installation will not take long.
Installation of handsets for digital intercoms
Digital intercom systems are mainly used in apartment buildings. Installing a handset of this type has its own specifics, namely: this addressing scheme requires a two-core cable to which the subscriber handset is attached. Here you should pay attention to the polarity.
Each intercom handset has its own microcircuit, which is programmed with jumpers or jumpers for each apartment number. In this regard, in order to find out your apartment number, you will have to carefully disassemble the handset and carefully examine the existing microcircuit. Near each jumper there is a special digital panel on which the numbers are in ascending order.
Here the apartment code is made up of numbers related to closed jumpers. A disassembled old handset can serve as an example from which you can transfer the code to a new device. Thus, installing a new intercom handset will not be difficult.
Installation of a handset on a coordinate matrix intercom
Connecting the intercom handset to this type yourself is not difficult. Here, all the work consists of transmitting a signal to a special switch, which, when a call is received, processes it and, due to the presence of special keys, sends the call signal to the required subscriber device. Installing a handset for such an intercom will force the owner not only to work hard, but also to show ingenuity.
During installation, the whole problem lies in the cable, which is divided into many wires related to each individual apartment in the entrance. It should also be taken into account here that tens keys generally do not exceed seven, including zero. Thus, the total number of users can be more than eighty.
Do-it-yourself installation of an intercom handset consists of finding the required bus of tens, as well as units. It is very easy to deal with dozens - they are located on the panel of the required floor. All that is required is to find the wire to which the wires related to each apartment in the entrance are connected. This way you will select the cable you need.
To select the correct unit bus, you need to go up to the floor with the apartment number that matches the last digit of your apartment, and again find the cable on the panel. A plus is connected to the tens bus, and a minus to the units bus. This is where all the difficulties end.
Installing the device is not difficult. Then we just connect the handset. To do this, we carry out the entire procedure described, paying attention to the polarity. If all existing rules are followed, we can say that the installation is complete.
Precautions when installing the machine
When installing any equipment, you should be extremely careful. To work you may need the following tools:
- wire cutters;
- screwdrivers;
- pliers;
- electric drill, etc.
The listed tools can cause serious injury. Therefore, it is necessary to follow safety rules when handling them.
Since the intercom operates on electricity, you need to turn off the power to the entrance during installation - switch the switch or circuit breaker. Only after these steps connect the device.
It is forbidden to install the power supply in a place where it is constantly humid or outdoors.
If a resident of an apartment building is not limited in funds, he can be recommended higher quality (expensive) equipment. When choosing a device, it is very important to pay attention to the presence of a license.
It is also necessary to follow the installation sequence:
- Find a suitable location for the equipment. Mount the audio intercom in a place so that the signal can be heard throughout the apartment. If a video intercom is selected, then it is necessary to install the camera so that the visitor can be clearly seen.
- Before connecting the device, lay out the cable. Do not damage the entrance walls - fix the wire using special devices.
- Excess sections of the cable must be removed, the ends stripped and attached to the connecting terminals.
Installation and connection of an intercom with an electromagnetic lock
Electromagnetic locks differ in the method of landing on the door leaf.
- There are schemes:
- installation in a cutout with overlays of durable parts of the body on the surface of the sash;
- installation in the inner cavity of the door with the mandatory removal of the magnetic pad flush with the surface.
The first installation option requires less carpentry skills, but can be challenging when working with a metal door. The second one is more accurate and will require professional skills to create a recess in a wooden door. To fix the lock, hand tools, self-tapping screws and another type of detachable connection are used. Welding the locking mechanism to the door is highly discouraged.
It is recommended to place the connection wire either at the end of the sash, or so that it is hidden by the cash strips. You can also run the route inside the overhead cable channel.
Installation of calling panel
Where exactly to place the intercom calling panel depends on the wishes of the owner. In this case, you should be guided by basic common sense: to press the call button or place a face in the capture area of the video camera, you do not need to require any special actions from the visitor.
The calling panel is placed so that all its parts (except the front) are closed to prevent accidental or intentional damage and protected from moisture. To connect, it is worth laying the cables in advance. Their connection is carried out according to the instructions for the device.
- Typical color markings look like this:
- red cable or terminal – for internal buzzer;
- brown – to control the lock;
- red – for positive power cable;
- green – to internal light signal;
- yellow connects to the manual release button (from inside the security zone);
- orange connects to the door close sensor (if used);
- white – to the key contact device.
The black wire is a single marking of the common contact for all devices in the system; it is connected to the minus power line. If it is impossible to lay the cable structure in advance in a fence, soil, or metal structures, it is recommended to place it in a metal or corrugated pipe; durable aluminum cable channels are also suitable.
The diagram of the intercom calling panel is always given in the technical data sheet; the purpose and marking of the terminal comb or branch contact lines of the device are also indicated there.
Connection diagram for an intercom with an electromechanical lock
An electromagnetic lock brought from a store may have a different number of contacts.
- In general, if the manufacturer uses standardized markings, the colors of the terminals or taps correspond to:
- green – main manager, release;
- black – neutral wire for condition monitoring;
- blue, yellow – transmit a signal of the locking or unlocking state, respectively.
The intercom does not use a detailed monitoring system; it controls only unlocking. Therefore, the lock is connected with only two contacts: in the standard case, green (to the control point of the calling panel) and red (to the positive terminal of the power supply of the appropriate voltage). All necessary technical data are always provided by the manufacturer in the product passport.
Types of locks
The intercom connection diagram assumes a lock. The mechanical option is excluded in this case, since the device must disable the lock remotely or using an identifier. There are 2 options: electromechanical or electromagnetic.
Electromechanical
This model includes an electrical circuit and a lock. Opens the lock with a regular key and under the influence of electric current. More often found in country houses. The models are easier to install and cheaper.
There are 2 types of locks .
- Invoice – mounted on the inside of the door or gate. Its package also includes a cylinder with keys and a mate. The lock itself usually has a button that also allows you to open it.
- Mortise - mounted in the door leaf, opened with a key or impulse. It does not have an opening button. The mortise version has higher water resistance.
To operate such a lock, electric current is needed only at the moment when the door needs to be opened from the intercom or controller. If there is no current, the door can be locked with a key or a button. Moreover, when the current is turned off, the leaf is automatically locked.
Electromagnetic
It is a magnet that attracts the door and prevents it from opening. This option is intended for heavy doors , and therefore magnets with a holding force of up to 500 kg and above are used for the lock.
Such a lock cannot be opened with a master key ; it does not require either a cylinder or a key. However, the model only works in the presence of current. When the power goes out, the magnet stops holding the door and the door opens.
It is recommended to complement the electromagnetic lock with an electromechanical one, since the latter will block the door when the current is turned off, or choose a model with its own battery.
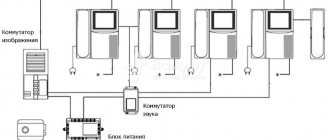
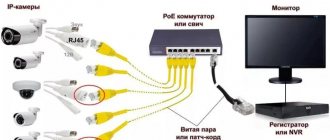
How to connect a video intercom to an entrance intercom
To coordinate the video intercom with the entrance intercom, special elements are used - MSC/MSK interface modules. These devices are used to coordinate a video intercom with a digital/coordinate entrance intercom. The adapter is capable of supporting video intercoms from various manufacturers; the manufacturer promises high-quality work with CTV, Commax and Kocom. There are restrictions described in the instructions for the device.
Connecting to a digital entrance intercom
Installation of the MSC adapter is quite simple. You connect the wires that previously went to the intercom handset. Also connect the four wires from the video intercom to the adapter.
The calling panel is connected directly to the adapter, just like the camera. For this purpose, the device has appropriate outputs.
- The MSC module provides all the basic functions of working with an intercom:
- Organization of two-way audio communication with the visitor.
- Opening the lock by command from a video intercom.
The connection diagram looks like this:
We connect to the coordinated entrance intercom
The MSC module is needed to work with a coordinated entrance intercom. Connection and operation are similar to the MSC adapter described above.
The connection diagram using MSC looks like this:
What is the indication of guests on intercoms?
- Audio intercoms are a kind of radio that has two-way communication. That is, the visitor is identified by the owner of the apartment by voice, through the handset for the entrance intercom;
Audio intercom connection diagram - Video intercoms - they not only perform the function of opening the entrance door and two-way audio communication, but also provide video surveillance of the entire space adjacent to the entrance. A distinctive feature of these intercoms are special eyes in which miniature video cameras are mounted. Guests are monitored using these cameras. The camera is veiled under a peephole.
An intercom with a camera allows you to view the area from the side, in front, or into the stairwell. A special feature of the device is covert filming from inside the building. Particularly prestigious intercoms can provide audio and video surveillance; they have a control panel with a perceptive and particularly sensitive screen. Can record and save events and faces of visitors in the amount of 16 pcs.
Some manufacturers have gone further - through an intercom screen they began to use identification using a mobile or TV.
This is done manually or automatically: the signal arrives at the device and the intercom role is activated, and after the conversation is completed, it switches to standard mode. Wireless types of intercoms have such properties. The above aspects affect the price and popularity of blocks. Ordinary audio intercoms, unlike video intercoms or the most elite modifications, have a low selling price.
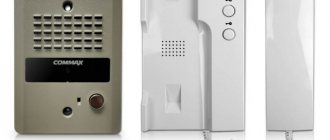
Commax intercom: installation instructions, connection diagram
Commax intercoms differ in screen diagonal, type of connection, control method, etc. Some models can divide the screen into four parts. This is convenient if you need to view images from four cameras simultaneously. The user can choose a color or black and white intercom, with a hands-free function and other types of modifications.
If we talk about the device’s memory, then, as a rule, it is enough to take up to 128 frames. Some Commax intercom models can record short videos. Recording begins after the user presses a key, so there is no need to confuse a video intercom with video surveillance.
A more comfortable solution is the ability to connect a cordless handset. Thus, the signal passes not only to the intercom, but also to the handset itself, which is very convenient if the apartment is large and the call cannot always be heard. The presence of such a handset allows you to use it not only as a means of communication with the intercom system, but also as a telephone, for which it is enough to connect to the telecom operator’s network.
Connection diagram
The Commax intercom connection diagram includes several elements. These include: calling panels, controller, electric lock, 12 V power supply and video cameras. The connection principle is quite simple.
The user may not install a video camera, but instead mount an additional call panel. This is relevant for protecting large areas with two gates. In most cases, instead of a second shooting, a camera is mounted. Thus, it is easier for the user to decide whether to open the door or not.
The calling panel and camera are connected to the controller using four wires: audio, video, power and common. A DC voltage of 12 V is supplied to the input of the calling panel and to the input of the video camera. This is a transformed value obtained as a result of conversion by the power supply of a household alternating voltage of 220 V.
The system provides for the use of two electric locks, but the user can leave only one or exclude them from the circuit altogether. If you decide not to install locks, then the wires must be insulated and hidden under the panel.
In the case when a video camera is used instead of a second calling panel, the sound is transported through one channel, and only the image through the second. Most often, a video camera is installed immediately in front of the entrance to the apartment, and a calling panel is installed in front of the entrance to a long corridor, after passing which the visitor enters the lens frame.
In some cases, two intercoms are connected. This is convenient if the house is large and one post is not enough, then one, for example, is installed on the first floor, and the other on the second.
Connection
The Commax intercom is connected using colored wires. Typically these are red, blue, yellow and white wires. It is important to maintain the order of connections, as incorrect connections can cause equipment failure. In some cases, repair is not possible; the user has to purchase the equipment again.
- The blue wire is common; the power potential is measured against it.
- Red – audio signal.
- Yellow is the positive bus of the main power supply of the equipment.
- White – video signal.
When connecting the equipment, it is necessary to ensure that the device is not exposed to direct sunlight. Excessive heat is the main cause of failure. It is better to place the elements at a height of one and a half meters; if there are children in the family, they will not be able to reach them.
If connecting wires are laid close to high-voltage lines, then it is necessary to use a coaxial cable, which is protected by a metal pipe. This is the only way that magnetic fields will not create interference currents - and this can become one of the reasons for a false signal. The pipe, in turn, will reliably protect the connecting wires from external influences.
It is necessary to monitor the integrity of the wiring, as a violation of the insulation leads to a short circuit, which can cause a fire. After all elements are connected, the correct connection is checked again. It is important that the conductors are securely fixed and the order of the wires is not disturbed.
When connecting the monitor and camera, you must make sure that the monitor is not connected to the network. Power is supplied only when the power cord is connected to an outlet. At the end, the specialist turns on the devices and performs a control check of the functionality of all elements.
Useful tips for installing an intercom yourself
Of course, a simpler solution for installing an intercom in a private or apartment building is to contact specialized companies. But if the installation is carried out independently, then you should adhere to simple rules that will help ensure long-term and high-quality operation of the intercom system:
- for external devices (cameras, panels), it is better to provide anti-vandal protection, as well as visors that will protect the devices from aggressive environmental influences (precipitation, ultraviolet radiation, icing);
- install external devices only on fixed elements of door and gate openings to protect connections from constant vibrations and shocks;
- It is better to completely clamp the fasteners and recess the wiring after fully setting up the system and testing its operation for 24 hours;
- use the shortest possible length of electrical cables;
- It is better to purchase a power supply for the intercom separately, with a power reserve;
- All installation work should be carried out with the power turned off.
Intercom device, operating principle
Types of intercoms:
- digital - a two-wire line transmitting a signal. Apartment numbers (addressing of the call) are fixed by jumpers in the subscribers' handsets, which are all connected to one line stretched along the riser (cable channel in the shaft) of the house with taps for each room. The tubes are connected in parallel. The system is much easier to repair and install, since there are fewer wires: it is easier to detect the break point, and so on. But it is more difficult to repair if the electronic board is faulty. Minus: a break in the main line will lead to a malfunction of all subscriber handsets;
- coordinate (coordinate matrix, analog). Popular for apartment buildings (MCD). The signal is transmitted by a switch, from which a loop of wires goes to the objects. For each apartment there are separate cores, the system cable is multi-core (the number of wires depends on the number of objects served). A more reliable system, but more difficult to repair, especially when replacing wires.