Types of intercoms and general connection diagrams
A modern intercom is a device not only for a conversation between the owner of a home and his guest. Smart communicators provide the opportunity to examine the visitor, ask him questions and get answers to them, and remotely open the lock on the entrance doors. The complete list and level of service depends on the specific modification of the device.
Apartment intercom
In general, the connection diagram for an intercom for an apartment building is as follows:
The figure shows that in the multi-user version of the intercom system there are additional switches that direct the signal to the required apartment. In addition, the wiring is carried out using a multi-core cable, the number of conductors in which corresponds to the number of connected subscribers. Audio and video signals go through separate wires, and this further complicates the connection of all elements. More advanced systems use multiplexing systems or a digital communication format, which requires quite high qualifications from installers.
A multi-user system is quite expensive and is usually purchased for collective use by pooling. Specialists who know well how to connect a video intercom to each apartment are invited to install it.
Individual use intercom
The speaker system in individual cottages and private houses is built completely differently. Since only one family owns such a house, only one set consisting of indoor and outdoor speakerphones is enough to organize communication. Many modern units allow you to connect an additional handset or a second terminal for placement on the second floor, in the garage or other desired location according to the needs of the home owners.
Unlike a multi-user system, installing an intercom in a private house is not very difficult and can be done by any electrician or other person with electrical installation skills. How to connect an intercom of a specific model is always explained in detail in the manufacturer’s instructions, and such work usually does not cause any particular difficulties.
The figure shows all the elements of a simple speaker system for a private home. It clearly shows how to install an intercom in a private house. The system includes:
- home speakerphone (1);
- power supply (2);
- external calling button-speaker (3);
- electromechanical or magnetic lock (4);
- communication cable.
Depending on the specific conditions and brand of device, this scheme may be based on different configurations. Let's look at the main components.
What type of lock do you prefer?
The electromechanical version of the lock is a modification of a simple lock in which the retractable latch can be opened either by a key or by an electromagnet. In the simplest versions, the electromagnet is placed separately from the lock and connected to it by mechanical traction.
- the gate or entrance doors will be locked even during a power outage;
- If it breaks, the lock can be replaced with a regular one of similar design.
Disadvantage - like any mechanism, such a lock requires constant attention, lubrication and adjustment. Considering its external use, the service life of such a lock is much shorter than an electromagnetic one.
An electromagnetic lock is a magnet with a very high pullout force. It is installed on the fixed part, and on the door itself there is a magnetic plate that is attracted to an electromagnet. The tearing force of such a lock is 200-300 kg. When you try to open such a door, the handle will most likely come off, but the lock will still firmly hold the door leaf.
A very strong argument in favor of the electromagnetic system is its mechanical strength and stability. Since there are no moving parts of the mechanism, the lock can work forever, and it practically does not require attention to itself.
The main disadvantage is that if the power goes out, the door becomes unlocked. Therefore, electromagnetic locks are installed on gates and gates, but not on the front door.
Communicators
External and internal communicators can have only audio or simultaneously audio and visual communication channels. The external speaker button usually houses a speaker, microphone and camera. The internal speaker also has a screen on which you can see the guest’s face.
Connecting a video intercom to additional external video cameras significantly increases the visibility and control of the situation behind the front door. There is a special button on the internal speaker to open the doors. A number of products provide the ability to connect additional handsets, alarms and trigger alarms.
Parts of an intercom system
Depending on the principle of power supply, the type and number of system components, it is customary to distinguish the order, as well as the required method of installing the video intercom. There is a certain order in the location of the blocks, which makes it possible to use the equipment as comfortably as possible.
Call panel
The first step when installing an intercom with your own hands is to install the call panel. Without this block, the access system is completely meaningless. There are different types of call panels:
- panel with only a call key; it is impossible to control the lock from the panel;
- call panel and built-in key reader;
- panel with a video camera.
As a rule, the call panel is installed at a height of 1.5 meters from the ground. This arrangement of the device makes it possible for persons to use the panel freely, regardless of height. Among other things, if there is a camera on the panel, it is easier to identify the guest from it.
power unit
Unfortunately, there is no most complete answer to the question: how to connect a video intercom. The fact is that in modern systems there are 3 types of power distribution:
- connection via 1 cable, with a built-in converter in the intercom or on the internal monitor;
- power supply with an external unit, which is installed in the house;
- installation of a separate power supply to which the call panel is connected, as well as an electromagnetic or electromechanical lock.
However, some types of power lines have certain restrictions. For example, if a video intercom is connected via twisted pair, then the length of the route should not exceed 100 meters.
Lock
As for the system lock, it is selected based on the required functionality. As a rule, electromechanical locks are most often used in apartments. Even if the power is turned off, the lock will still remain closed. The best type of lock is one that can be opened manually with a key without power.
If you take an electromagnetic lock, it will open automatically when the power is turned off. For public institutions, such a lock is an ideal solution, which cannot be said about apartments.
Even if the owner prefers an electromagnetic lock in the apartment, care must be taken to additionally install an uninterruptible power supply in case of a power outage in the main network.
Screen (main panel of the video intercom)
All modern intercoms are equipped with flat, convenient monitors. Older models are equipped with lamp-backlit screens, while modern ones have LED monitors. Among other things, there are models that can be connected to a DVR. For this purpose, analogue or digital signal transmission interfaces are provided.
The monitor, like other parts of the video intercom, is installed according to the recommendations provided by the manufacturer. It was previously said that the monitor can serve as a head power distributor
Therefore, special attention should be paid to the installation of this part of the system.
On sale you can find video intercoms not only with a built-in camera. There are models in which the web camera is chosen by the owner himself. This connection diagram for a video intercom allows you to expand the functionality of the device.
Cable production
Expensive models of video intercoms come with a set of wires. This eliminates the problem associated with selecting conductors. In general, video intercoms are equipped with three types of lines:
- multi-core cable - makes it possible to distribute power between different components of the device. Some types of cables can be laid directly in the ground, through the air - without additional protection;
- coaxial cable – allows you to transmit audio and video. With such a conductor, the line length can be significant;
- twisted pair – used when transmitting signals from digital devices. For these purposes, a regular cable that is allowed to be laid in the open air is suitable.
Please note that cable connections, regardless of its type, must be made in strict accordance with the device manufacturer’s recommendations. This work does not require any special skills.
To figure out what kind of conductor is needed to connect a video intercom, the cables are specially marked using colors: the cores are marked in different colors, and the terminals of the system nodes have terminal combs that help make an accurate connection.
Soldering is not used to connect cables. However, to protect the conductor from moisture and other influences, it is best to use a copper cable.
Design
There are various intercom models available in the market. The simplest are analog systems. The advantage of this solution is the relatively low installation cost. However, due to the large number of cables, they are especially recommended for installation in single-family houses, where there is usually one uniphone (earphone).
Their disadvantage is low comfort of use and interruption of operation when the phone is not installed correctly. This is why most interested in the idea of logging into a phone decide on a digital system. It consists of a central unit and microphones equipped with decoders that display the access code that opens the gate or door.
The digital system can be connected to the telephone system and monitoring. There are also mixed systems - analog-digital, in which uniphones are connected to a digital intercom. The door can be opened using a code or code card.
Radio controlled systems
The most convenient are radio-controlled systems. Their big advantage is the ability to open the door using a special remote control from any part of the house, the range is 400 m, and it is possible to use several headphones to control the entrance.
Videophone is a special version of intercoms, additionally equipped with a camera. Apart from listening, a person can also monitor the caller. The camera is located in a cassette board, and a special monitor is installed in the uniphone. After pressing the button on the door station, the camera automatically turns on. An additional feature of the videophone is the ability to record images away from home.
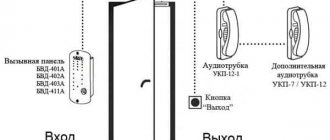
Basic elements
video intercom calling panel
uniphone - telephone - it looks like a telephone, but does not have a dial; uniphone allows you to contact the person at the door or gate; has a button to open the electric lock;
intercom - it is installed outside the house at the entrance or fence; has the buttons or business cards needed to call the right person; There is a loudspeaker and microphone inside the cassette; you can insert the cassette by placing it in the wall or on the wall; it is usually made of aluminum, steel or brass;
power supply for the input telephone - it connects all elements of the system; supply voltage 12 V;
cassette with an electronic system - the amplifier is responsible for the appropriate voice volume, the acoustic generator activates the electromagnetic lock when the call button is pressed;
electric lock (electric drive) – placed in the door frame or gate;
wires – connecting elements of the intercom; ducts must be properly insulated and have an appropriate cross-section; telemechanical or telecommunications cables are most suitable for this purpose.
Installation
Required Tools
To get started you will need the following set of tools:
- drill
- set of drills
- Screwdriver Set
- pliers
- assembly knife
- multimeter
- calipers
- Bokarevs
- hammer
- round pliers
- chisel
- crimping pliers
Assembly
Before starting assembly (if necessary):
- Make a trench between the door station installation and the house.
- Place the cable cover.
- Accurately measure the required length of cables connecting the uniphone to the door station.
- Pull the wires through the cover, leaving an additional 20 cm without the cover (including the entire length, not just the underground part).
Video intercom connection diagram
To ensure optimal operation of the device, do not connect electrical wires between the door station and the uniphone.
If the cable is already installed, check the number of wires before purchasing the intercom.
Station installation
Order of connecting contacts
- Specify the location of the door station cassette on a pole or on a wall. The cassette must be installed at a height of 1.60 m above the ground.
- Mounting models: Mark the location of the dowels, drill holes and place pins in them.
- Wall models: Mark the location of the hole and draw the outline of the cassette recessed into the wall.
- Cut the hole for the cassette (mounted model) using a chisel and the entire length of the cable cover.
- Place the cassette in the hole and attach it to the mortar.
- Place the cable cover into the forged groove and support it with several nails (be careful not to puncture the cover).
- Wet the furrow with water and fill it with the solution, removing the nails as you work.
- Remove excess solution and leave dry.
- Locate the wiring locations on the cassette board.
- Cut the wires to the required length and connect them according to the wiring diagram.
Camera installation and cable routing
Connecting to an entrance intercom
- Indicate the location of the uniphone on the wall. The uniphone must be installed at a height of 1.50 m above the floor.
- Mark grooves on the wall to create a cable cover connecting the cassette to the transformer.
- Cut a groove in the wall with a chisel, adjust it to the thickness of the cover.
- Place the screen with the cable in the furrow, and plaster or apply mortar.
- Mark the location of the dowels securing the uniphone or its base to the wall, drill holes and place pins in them.
- Screw the uniphone base to the wall.
- Cut the wires to the required length and connect them according to the wiring diagram.
- Attach the receiver and housing to the base.
Intercom connection diagram
Audio intercom wiring diagram
Any intercom is an intercom, a call panel, video and audio equipment, an electronic or electromechanical lock, a switch. Let's look at how each of the elements listed above works:
- The digital handset must be in the apartment so that the owner can receive signals and open the door. The standard connection requires a mandatory connection to the lock.
- The call panel is used to dial an apartment number or call a private house. This is a device with dialing buttons, it can be equipped with a decoder that reads the code from electronic keys or special cards, it can have a backlight or a visual apartment number identifier. The latter is rarely used in residential access control systems; more often it is installed in security systems of industrial buildings.
- An electronic or electromechanical intercom lock is used to monitor the status of the entrance door or gate of a private house. More often it is installed with an electromagnetic lock and a digital intercom. A magnetic lock can be easily opened from the street, but professionals say that it is more reliable than an electromechanical lock with metal bolts driven by an electric motor.
- The switch module transmits the call signal from the panel to the subscriber.
How to install and connect an intercom
Device with electromagnetic lock
Electromagnetic locks are attached to the door in different ways:
- Into the prepared niche (cutout), while strong elements of the body are placed on the door leaf. This solution does not require carpentry experience, but with a steel door it may be difficult, as the skills of a welder and mechanic will be required.
- Into the inner cavity of a wooden or metal door. The contact magnetic pad must be brought to the same level as the surface of the door leaf.
The second option requires high installation accuracy, but requires professional carpentry experience - it is recommended to cut the groove for the lock carefully and strictly to size. The lock is secured with hardware. It is prohibited to weld its body to the door - the device will have to be repaired, changed or adjusted for higher accuracy of the location of the crossbars.
The cable for supplying voltage to the lock should be attached either to the end of the door leaf or under the door frame trim. In the same way, the electric main is laid inside the overhead cable channel.
Access control device without a lock
An intercom without a lock is a common connection method in private homes, so even an amateur can install such a circuit. To install the outdoor and indoor units, a cable consisting of four cores or two two-core wires is laid to the switch. Two wires are used to supply power voltage, the remaining two are used to supply audio and video signals.
How the intercom will be connected depends on the choice of the owner of the house. If it is more convenient to go outside and open the gate, installation without an electromechanical or magnetic lock is possible. But a more convenient option is equipment with a lock, which will be controlled via a button on the intercom.
Connecting a video intercom without a lock
You can also not mount video equipment, but install an additional calling panel instead of a camera. This solution is used when protecting large areas where there are several gates or gates. Sometimes a surveillance video camera is installed instead of a second call panel, which allows the owner to quickly decide whether to open the gate or leave it locked.
Main components of intercom systems
Multi-user intercom systems consist of several main units. A typical intercom circuit consists of:
- call block;
- power supply;
- electric lock;
- switching unit;
- subscriber voice handsets.
The figure shows a block diagram of an intercom of an apartment building with a coordinate switch.
Below we will take a detailed look at the structure of all elements of the intercom system.
Electric lock
In modern multi-user intercom systems, two types of electric locks are used:
In electromechanical locks, the bolt (bolt) of the locking device is held in the “closed” state when power is applied to the coil of the built-in electromagnet. When the tension is removed, the bolt comes out of the locking plate under the action of the return spring.
A powerful electromagnet coil mounted on part of an open magnetic circuit is built into the door frame. The second part of the magnetic circuit is mounted on the door. At the moment when the door comes close to the door frame, the halves of the magnetic circuit are attracted to each other under the influence of a magnetic field. When the magnetic circuit “shorts”, the door is kept locked. To overcome the resistance of an electromagnet requires an effort that an ordinary person is unable to create without additional means.
From the above description of the locks of multi-user systems, it is clear that when the supply voltage disappears, they automatically open . This arrangement of locks makes intercom systems vulnerable, but it is dictated by fire safety requirements.
As for the locks of individual intercoms, they are opened using an electromagnet when the supply voltage is applied. The connection diagram for the electromechanical lock is shown in the figure.
In order for entrance doors with electric locks to be able to lock automatically, they are equipped with door closers.
power unit
Intercom power supplies produce power supply voltages for all elements of intercom systems. There are no special requirements for power supplies other than reliability. To increase the reliability of the operation of intercoms, power supplies can be supplemented with uninterruptible power supplies. The use of uninterruptible systems will allow the intercom to continue operating during power outages.
Call block
The call block is the “brain” of the intercom system. Typically a calling block consists of:
- numeric keypad;
- a display reflecting the numbers typed on the keyboard;
- elements of duplex public address system (speaker, microphone);
- electronic key code reader;
- buttons for opening the door from inside the room.
Depending on the type of intercom system and the algorithm of its operation, when typing a combination of numbers on the numeric keypad, you can enter an access code or call a subscriber of one of the apartments. If there is a display, it will display the entered digital sequence.
The latest intercom systems are opened using individual electronic keys (chips). The key chips store a unique code that is read by a special reader. The read code is analyzed by the call block microcontroller. If the entered code matches the code “hardwired” into the call block, the microcontroller will issue a signal to open the door.
In addition to the identification function using a key, the call block performs the function of controlling the switching of voice communication devices. When dialing an apartment number, the speaker and microphone are turned on, and control signals are generated for the switching unit. The switching unit transmits the call signal to the subscriber handset. If the handset is picked up, the caller has the opportunity to conduct a conversation with people in the apartment. Intercoms provide duplex (two-way) voice communication between the calling device and the subscriber device.
If the “open” button is pressed on the subscriber side, the permission signal will be sent to the call block through the switch. The microprocessor system will turn off the power to the lock electromagnet and the front door will open. The door will also open when you press the open button from inside the room.
Switching block
Using the switching unit, a telephone connection is made between the call unit and the subscriber unit. Modern intercom systems mainly use coordinate-type switching units. The device operates according to the following algorithm. The switching unit receives from the conversation unit a sequence of control signals encoding the number of the apartment receiving device (handset).
Depending on the apartment number, two wires are selected that connect the subscriber device to the speaking part of the calling device. Without going into details, we can say that with the coordinate switching method, only 20 wires are required to connect 99 apartment tubes.
Apartment intercom device (handset)
An apartment intercom handset is not much different from the handsets of conventional telephones. With its help, you can carry on a conversation with the person who called the apartment and open the front door.
A microphone with a transistor amplifier is built into the handset body, a speaker which, depending on the position of the handset, serves as a telephone captcha or a call buzzer. An LED is installed on the device body to indicate the presence of a line.
Opening the door from the subscriber's apartment occurs as follows. When you press the “open” button on the housing of the apartment intercom, the resistance of the telephone line changes. A change in line resistance is perceived by the microprocessor device as an “open” signal.
Schematic diagram of the intercom handset
Components of an intercom
This device consists of several main elements that allow you to contact subscribers and control access to the entrance.
External panel. A key reader is installed on this panel. This device works as follows: when a key is applied, the code is read and compared in the microcontroller base. If there are matches, the door opens. The panel is equipped with buttons with numbers from 0 to 9 and two functional ones, usually * and #. This mini-keyboard allows you to access the entrance or use the service menu. In the service menu, you can include a specific key in the microcontroller base, turn on and off service by the system for certain apartments. All actions of the reader and buttons are reflected on the screen of the external panel.
External intercom panel
- Inner panel. Depending on the cost of the system, audio or video intercoms can be installed. The cameras do not have to be built into the external panel; they can be used separately. For example, a camera is added to the general simple system directly next to the apartment itself. Having called the owner from the street and gaining access to the entrance, the guest will have to pass another barrier - a video intercom into the apartment. An intercom configured in this way allows you to control people who have entered the entrance in an incomprehensible way.
- Switch. This part serves as a kind of information distributor from the external panel to the tubes. Depending on which apartment number was entered by the guest, the switchboard sends a ringing signal to the corresponding subscriber. The operation of the switch depends on the type and connection scheme of the handsets.
Switch
- Entrance exit button. Allows you to open the door from the inside of the entrance. Usually this element is more convenient when it is backlit.
- Lock. An intercom connection with an electromagnetic and electromechanical lock is used. An intercom with an electric lock is more reliable.
The intercom comes with its own lock.
How to connect a video intercom to an entrance intercom
To coordinate the video intercom with the entrance intercom, special elements are used - MSC/MSK interface modules. These devices are used to coordinate a video intercom with a digital/coordinate entrance intercom. The adapter is capable of supporting video intercoms from various manufacturers; the manufacturer promises high-quality work with CTV, Commax and Kocom. There are restrictions described in the instructions for the device.
Connecting to a digital entrance intercom
Installation of the MSC adapter is quite simple. You connect the wires that previously went to the intercom handset. Also connect the four wires from the video intercom to the adapter.
The calling panel is connected directly to the adapter, just like the camera. For this purpose, the device has appropriate outputs.
- The MSC module provides all the basic functions of working with an intercom:
- Organization of two-way audio communication with the visitor.
- Opening the lock by command from a video intercom.
The connection diagram looks like this:
We connect to the coordinated entrance intercom
The MSC module is needed to work with a coordinated entrance intercom. Connection and operation are similar to the MSC adapter described above.
The connection diagram using MSC looks like this:
Video intercom installation
To install a video intercom you will need:
- socket;
- monitor;
- cable with a cross section of 0.22x4 mm;
- bracket;
- a pair of technical boxes – 2.5x1.6 cm and 1x1.6 cm;
- electronic lock;
- liquid Nails;
- cambric;
- 12 V power supply;
- call panel (with a camera and, if possible, vandal-proof).
The sequence of actions should be as follows.
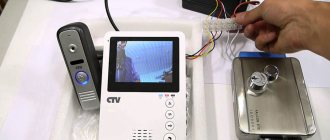
Connecting a video intercom
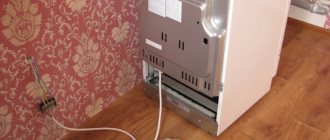
Step 1. First, determine the location for the monitor. Due to the fact that power will be supplied to the monitor, it is advisable to mount it on the wall near the electrical panel.
Step 2. The cable is pulled to the door.
Step 3. At a pre-selected location, attach a bracket for mounting the monitor to the wall. For convenience, the monitor is installed at eye level.
Video intercom installation
Step 4. The panel is removed from the panel, after which the socket is attached with liquid nails and the cables are connected: one to the phase through the machine, the second to the zero bus.
Video intercom installation diagram
Step 5. To lay the wires in the hall, a 1x1.6 cm box is attached, then the wires from the power supply and video surveillance are pulled.
The video monitor (1) is installed indoors and displays the image transmitted by the camera on the calling panel
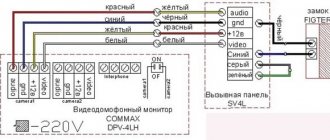
Step 6. The monitor is hung up and the wires are connected to it (according to the instructions):
- white for video;
- green for monitor (general);
- yellow for sound;
- red for +12 W.
In most cases, such monitors are equipped with spring contacts: they are pressed, the cable is inserted and released - the contact is clamped. All wires are pre-stripped.
If the instructions do not contain a detailed diagram, you can always find it on the Internet.
Calling panel (2) – installed outside, next to the entrance door (gate)
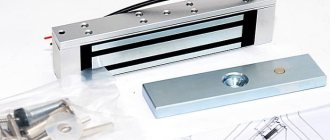
Step 7. Next comes the installation of the lock. It is advisable to choose an electromagnetic one, since it can function even without electricity. The lock will be opened from the inside using a mechanical button, and from the outside using an electromagnetic key.
Electromechanical lock (5) is installed on the door
The lock is installed on the non-opening side of the door leaf, the lock is installed on the opening side, but in such a way that the chamber is one and a half meters from the floor (maximum 1.6 m). To mount the camera, holes are made in the door, then screws marked “MB” are used. The holes are closed with decorative plugs.
The electromagnetic lock (4) is installed on the door frame, and a metal plate is installed on the door. Locks are classified by holding strength from 100 to 450 kg
Step 8. Then a closer is installed to adjust the speed of closing the door. Using the adjusting screws, the closing speed is set, after which the closer is closed with a lid.
The controller (3) is designed to control the electromagnetic lock. Electronic key codes are stored in its memory
Step 9. Controllers are installed. Usually they come in a pair - one controls the lock, the second controls the Touch Memory reader (for opening with an electromagnetic key). The last option allows you to install similar videophones in apartment buildings, but with a preliminary reading of all entrance keys.
Exit button (6) is installed to open the door from the inside
The power source (necessarily stabilized) is connected to an energy-saving lamp and mounted under the ceiling.
The electronic key reader is designed to read the code from the electronic key and gives a command to the controller to open the electromagnetic lock
Step 10. All wires are connected (using the good old “twisting” method) and insulated with heat-shrinkable cambric.
Keys for video intercom
Types of intercoms and features of their design
If previously almost every door had a peephole and a bell installed, now they are being replaced with such modern equipment as an intercom.
There is a large selection of devices that differ in technical parameters and other features.
Intercoms are classified according to the following criteria:
- Number of connected subscribers:
- multi-subscriber intercoms are installed in hallways, at the entrances to offices and other buildings;
- individual - designed for installation in an apartment or house.
- Type of communication. According to this parameter, the equipment is divided into:
- audio intercoms - using such devices you can only talk to the visitor;
Video intercoms allow you not only to talk with the visitor, but also to see him on the monitor screen.
- Monitor type. This parameter applies only to video intercoms. The screen can be:
- black and white;
- color.
- Installation method. According to the type of installation, intercoms can be:
- mortise or built into the wall, while its depth should be about 4–10 cm;
wall-mounted, such models are mounted on the wall.
In addition, video intercoms differ in screen size. If the cheapest models have a screen size of only 3.5”, then for expensive models it is 10”, but it can be larger. There is also a difference in the number of video cameras. An intercom can have one or several video cameras, which allows you to get a wide overview and a higher quality picture. The equipment can also be wired or wireless, in which the external and internal units are connected only by a radio signal.
Device Features
Audio and video intercoms differ in type of device, but in other respects they are almost the same.
Audio intercoms
Such equipment is budget-friendly, so it is usually installed in the entrances of apartment buildings. The cost of an audio intercom is low, since it has a limited set of functions:
- notifying the owner of the house about the arrival of a visitor;
- negotiations with the visitor;
- unlocking the electric lock.
The budget audio intercom includes:
- Street block, which consists of:
- call buttons;
- microphone;
- loudspeaker.
- The indoor unit consists of:
- telephone handset;
- base, which has a place to attach the handset and a lock release button;
- power supply.
If we talk about the advantages of such devices, they will be low cost, simplicity of design and ease of use. The main disadvantage is that you cannot see the visitor, which reduces the security level of the system.
Video intercoms
An intercom with a video system is modern equipment that has many additional functions that increase the security of the security system.
The video intercom has the following device:
- external panel - consists of a call button, video camera, intercom;
- internal panel - includes a monitor, a button for opening the lock, and an intercom.
Features of choice
To choose the right intercom, you need to pay attention to the following parameters:
- The calling panel must be made of durable material and reliably protected from damage. In addition, the calling panel installed outdoors must have a high level of moisture protection, no less than IP66. Panels that do not have mechanical switches are more reliable, but touch devices are more often damaged by vandals;
- type of video camera installed. If there is no constant lighting at night, then there is no point in buying an intercom with a color camera. In this case, the black and white camera will transmit a higher quality image;
- monitor, when choosing it you need to take into account the parameters of the video camera you are using. If the camera produces 0.5 Mpx, then you should not purchase a device with a high-resolution screen for it;
- video signal output. It is very convenient when it is possible to output a video signal to a TV or computer;
- presence of a built-in motion sensor. It allows you to turn on the camera to record when a visitor approaches;
- temperature range in which the intercom can operate. Keep in mind that the outdoor unit is usually installed in unheated rooms or outdoors, so it must withstand both high and low temperatures;
- compatibility with other devices. If the intercom is connected to a multi-subscriber system, it must be compatible with the existing equipment.
Which intercom to choose
There are many companies on the Russian market that manufacture devices for intercoms. High production technologies allow us to produce improved models every year. What kind of intercom system there will be in the house is up to the owners to decide.
When choosing an intercom, you should pay attention to the switching system. Based on this parameter, coordinate and digital intercoms are distinguished. Their difference lies in the wire through which the connection to the apartments is made.
When installing a digital intercom, one line is laid to connect the switch with all apartments. The coordinate system is designed in such a way that each apartment will have a separate wire connecting it to the switch.
Today, digital intercoms are considered more reliable in operation. But their price is three times higher than the price of coordinate ones.
Another characteristic worth paying attention to is the type of connection. There are audio and video intercoms. The difference between them is the presence of a display on which you can see who is calling. The video intercom provides high security; thanks to it, no strangers will be able to get inside the entrance. But the cost of such devices is high. Apartment owners for the most part give preference to audio intercoms.
Who pays for intercom service
From the moment of installation, the intercom acquires the status of common property and belongs to all apartment owners in the building. According to current legislation, the residents themselves pay for the maintenance and upkeep of the property. After the intercom appears at the entrance, a new receipt will appear in your mailbox.
The obligation to pay amounts for the maintenance of this device is also assigned to those owners who did not install tubes in their apartments.
Previously, people did not think that someone could enter their entrance and cause damage to the property located in it. In Soviet times, there were wooden entrance doors, and flowers in pots bloomed on the staircase landings.
Perhaps the reason for the vandalism of the entrances was the dashing 90s, when the morality of the people wanted better. That’s when they began to come up with and install various means of protection from ill-wishers. At first these were combination locks installed by housing and communal services, then they were replaced by intercoms. Let's see what else they will invent to protect common property.
Electrical protection and wiring
We continue to talk about how to connect the intercom handset yourself. The connection itself is only possible to an electrical network protected by a 16 A circuit breaker or a 10 A fuse. To ensure the safety of residents, a 30 mA residual current device is also installed.
Two types of power supply are used for the intercom device:
- The transformer is located separately from the intercom, connected both to it and to the network.
- The tube is integrated with a transformer and is connected to an outlet using a power cable.
One of the important topics regarding how to connect an entrance intercom yourself is wiring. Make sure that it fits only in corrugated pipes. Therefore, you need to accurately measure the distance from the outer panel to the speaking tube in order to lay the pipes to the required length. The free ends of the wires should protrude approximately 20 cm from them.
Types of intercom code keys and the principle of their operation
Intercom code keys can be divided into two types: contact and contactless. The first intercoms used simple analog keys with two contacts. A resistor of a certain value was soldered inside such a key. When such a key was applied to the reader, a fixed current was passed through it, and the microprocessor system measured the voltage drop across the resistor.
If the fall fell within the specified parameters, the door opened. Such a key could be made not only by an intercom service company, but also by any person with basic knowledge of electrical engineering. Therefore, analog keys were quickly replaced by chips that transmit serial binary code. For such keys, the number of possible combinations is determined by the number of transmitted binary digits.
Contact-type digital keys can be made based on chips from different companies. One of the most common are Dallas Touch Memory chips from the same manufacturer. Depending on the microchip model, the keys have different amounts of memory and allow you to obtain a different number of numerical combinations.
Recently, many intercoms have been equipped with contactless reading devices. In this case, the exchange between the access key and the intercom is carried out over a radio channel. The devices communicate with each other at frequencies of several tens or hundreds of kilohertz. The range of such “radio equipment” does not exceed several centimeters. Therefore, the possibility of intercepting radio traffic is unlikely.