Types of ovens
Before connecting the oven, you need to find out its power.
Correct connection of an electric oven is possible if the user has figured out the type of model purchased in advance. It is often sold complete with the hob, and sometimes separately. Based on this criterion, products are divided into dependent and independent samples. According to the instructions, the first of them must be connected to a power source along with the panel, which significantly complicates the upcoming work. As a rule, these two products are located next to each other and have a common control panel.
The devices are connected to each other by a separate cable, ensuring their joint switching during operation.
Independent ovens are completely autonomous devices, the connection of which to a source of electricity is not conditioned by anything. In this regard, the area of their installation within the kitchen can be chosen at your discretion, which should be attributed to the advantages of models without a stove.
Installing a hob: sequence and rules
Installation of standard hobs must be carried out in accordance with the following rules and recommendations:
- The hob must be mounted on a horizontal, flat surface; ignoring this requirement may lead to deformation of the metal parts of the device and disruption of the functioning of the ceramic surface.
- Screw short screws to the standard holes, which are located on the sides;
- To install the panel in the kitchen set as smoothly as possible, you need to lightly press the center of the device to level the horizontal surface with a laser level;
- After complete installation, secure with fasteners. The centering plate bolts must remain accessible;
- If the hob is installed without following the instructions in the operating instructions, this may affect the performance of this appliance.
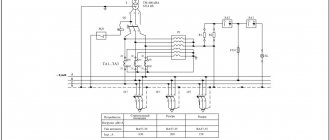
Connection options for one of the models
Selecting a location
Before installing the electric oven, you will need to carry out a number of preparatory operations.
- First of all, you should decide on the place where you intend to install the product. Its choice depends on the requirements of building codes, as well as on the type of oven purchased (open or built-in model).
- It is necessary to select the area for placing the connecting block or socket (if included in the kit).
- You should also evaluate the possibility of installing the hood in the location chosen for the cabinet.
These factors are important because they indirectly affect how you connect to the electrical network.
Depending on the location, the length of the power cable laid to it and the installation area of the socket with a grounding contact will be selected.
Oven power
Energy consumption classes of ovens
Before connecting an electric oven with your own hands, you should know that according to the level of energy consumption, these products are divided into several classes, designated by the letters A, B and C. In accordance with this classification principle, all models belong to different groups according to efficiency. This breakdown is directly related to the power rating of the oven, regardless of its size and design (whether it is a built-in model or not).
Economical products belonging to classes “A+” and “A++” (corresponding to electrical power up to 0.6 kW) are characterized by minimum consumption. The typical value for most models ranges from 1 to 4 kW. Based on these indicators, it is possible to calculate the electrical parameters of the supply line supplied to them, including the cross-section of the working cable cores and the setting of the circuit breaker.
For the average consumer, this classification is interesting from the point of view of the speed of cooking in the oven. There is a direct connection between the power of the unit and the cooking speed. For optimal heating, experts advise choosing models with a power of no more than 2.5-3 kW. This guarantees fast cooking at operating temperatures of about 220 degrees, sufficient for high-quality heat treatment.
Power calculation
Power calculations are carried out according to electrical wiring design recommendations based on basic tables from PUE 7 (electrical installation rules, ed. 7). Here is this table in a beautiful form.
An electric cable with 4 mm copper conductors works normally (does not overheat) if the maximum power of the operating devices does not exceed:
- A 6 mm² copper cable holds power: 7.4 kW with hidden wiring and 11 kW laid in a box or openly.
- A 4 mm² copper cable holds power: 5.9 kW with hidden wiring and 9 kW laid openly.
- Aluminum cable 4 mm² holds power: 4.6 kW and 7 kW respectively.
- Aluminum cable 6 mm² holds power: 8.5 kW and 5.7 kW.
Important! It is these calculations that should be the condition for choosing the power of the hob and oven.
If there was no choice of appliances based on power, and suppose they were given to you, then to properly connect the hob and oven you need to lay two separate electrical cables from the switchboard to the installation location of the appliances, selecting the cable sections according to the same table, only on the contrary, according to power we look at the cross section.
Expert opinion
It-Technology, Electrical power and electronics specialist
Ask questions to the “Specialist for modernization of energy generation systems”
A simple way to install an electric oven The disadvantage of this method is that it is necessary to think through everything in advance at the stage of installing the electrical wiring and connect the power wire to the socket for the oven and the output for the hob. Ask, I'm in touch!
Features of connecting the built-in oven to the mains
Before connecting the oven to electricity, it is important to know that you can connect it to the household electrical network directly (through a special socket). If the kit includes a special socket with grounding, you can connect to the line using it.
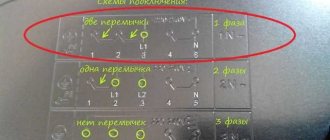
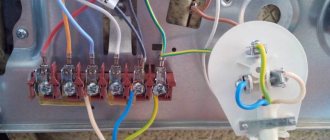
For installation, you will need the diagram provided in the instructions supplied with the product. In it, all contacts are color-coded, according to which it becomes clear where the phase wire should be connected and where the neutral wire should be connected. There are also jumpers indicated that allow you to form the necessary power supply circuits of 220 or 380 Volts.
Selecting a power cable and circuit breaker
To understand how ovens are connected to a 220V outlet, you first need to understand the issue of connecting the power supply to it. When studying its scheme, it is important to consider the following points:
- To supply power to the oven, you will need a separate line with a machine with a rated operating current of at least 32 Amps.
- The cross-section of the wires being laid is selected so that it does not overheat at maximum load (at least 4 square millimeters).
- To power the oven you will need a three-wire cable with a grounding bus.
- When laying it, the requirements of the PUE are taken into account, which indicate the permissible distances from building elements and other communications.
The requirements of the PUE must be followed, even if the apartment has two-wire wiring. This will allow you not to have to update the oven power line in the future (when installing a new electrical network).
After solving the issues with the wiring, it is important to figure out how best to connect the oven - using a socket or using a block. The choice of inclusion option depends on many factors, as well as the preferences of the owner. On the one hand, a block mounted on the wall and covered with a lid provides more reliable contact than the most powerful socket. However, in terms of ease of connecting the wiring and disconnecting it from the network, it is clearly inferior to a socket connection, in which you just need to remove the plug.
The use of the block is justified if there is a separate automatic device that turns the oven off manually.
Another case when you can’t do without a block is if the purchased oven model is designed for three-phase power. This option is more suitable for owners of private houses, in which it is possible to connect a three-phase power cable only through terminal contacts.
Testing
Before finally installing the oven on the workplace, it is recommended to test it for functionality. To do this, turn on the machine that supplies power to it and use a tester to check the voltage at the block or terminals of the socket. The device should show a value of 220 Volts or a little more, which immediately disappears after turning off the machine. After testing is completed, you can safely turn on the oven and then try to cook something in it.
How to connect an oven and hob
If you bought a separate built-in oven, then you just need to carefully review the electrical characteristics of the cabinet and install an outlet to connect it. If the power consumed by the cabinet is about 3-3.5 kW, then the maximum current consumption (required current) will be about 16 amperes. With higher power, you need to count on a current consumption of about 32 amperes. The socket for the cabinet (Euro standard) must be designed for exactly this current. If your kitchen has old wiring, then to connect the oven to it you should draw a new electrical wiring line with a copper wire with a cross-section of at least 2.5 mm2 at 16 ampere and 4.0 mm2 at 32 ampere.
Modern built-in appliances have a Euro plug (Euro standard plug)
Ovens require less current (measured in amperes), if you have old wiring in your house and circuit breakers in the distribution panel in the entrance (special room, electrical room, just next to the electric meter, etc.) - then in order to avoid tripping turning off the machine - you should install 3-wire new wiring (“ground”, “zero”, “phase”) - in such cases you need to invite an electrician from the power supply - in order to avoid breakdowns of their equipment. If you have no problems with wiring and your house (apartment) is relatively new, then you probably have Euro sockets at home. In the kitchen, these sockets are designed according to GOST for electric heating appliances (kettles, boilers, ovens, etc.) The oven should be supplied with a Euro-plug (cord with a plug at the end), most often it is already connected (Hansa, LG, Samsung, etc.). Directly enough - without any extension cords or network filters, plug the plug into the socket and warm up the cabinet at 180 degrees for 30 minutes - first remove all plastic parts and metal baking sheets, packaging items (tape, paper, cardboard, polystyrene foam). The factory paint and polish will fade - at first it all smells unpleasant. If you don’t see any problems with electricity or the oven, you did everything right!
Hobs must be connected to a special grounded socket with current strength (32-40A), wire cross-section (3 copper or aluminum conductors) of at least 4 mm². In modern apartments these standards are observed, the only difference is that there are: three-wire wire or three-pin socket (single-phase connection) four-wire wire or four-pin socket (two-phase connection)
If there is just a wire coming from your hob without a plug, then look at the number of wires. If there are 3 wires in the wall, and the hob has four, this means that your stove needs a 2-phase connection, but your apartment has a single-phase one. Do this: 2 wires from the hob, black and brown, this is the phase; they should be twisted or connected together and connected to the phase (usually a white, brown or black wire from the wall), the yellow-green wire is “ground”, blue is “zero” "
It is difficult to check if the wires from the wall are all the same color; you can easily distinguish only the phase using an indicator screwdriver or a tester. Always disassemble the socket under the stove, because... The wires may not match, so assemble the plug and socket according to their location. They must definitely match! “Phase” to “phase”, “zero to zero” and “ground” to “ground”! Be careful: sometimes houses have 380 V outlets, but hobs only require 220 V!
Detailed tips for more experienced or electricians:
The oven should be connected to the electrical panel through a separate circuit breaker for 25 amperes with a 16 ampere outlet and 40 amperes for a 32 ampere outlet. To ground the oven body, in an apartment with a three-wire wiring, you should use a separate grounding conductor (in green-yellow insulation), which is connected to a separate grounding terminal of the socket. The power cable (cord) of the oven already contains a grounding bus with a contact attached to the oven body (as well as connected to the plug).
If there is no grounding bus in your apartment electrical wiring (two-wire wiring), you need to organize a separate grounding line leading to the access power cabinet.
You can connect the hob yourself, there is nothing complicated about it. All you need to do with one end of the cable included with your purchase is to shape it into a plug, which serves to connect the panel to the network. If the network in your apartment is two-wire, then only two wires should be connected to the plug, phase and neutral, the third wire (grounding) can be left free (isolated). With a 3-wire network, the third wire is connected to the special (grounding) pin of the plug. In order to determine which wire is phase, which is neutral, and which is grounding, you must first understand the other end of this cable, which is used to connect to the panel terminal block. The instructions include a diagram for connecting the power supply to the stove. The first 3 terminals with jumpers are the phase contact (L1), we connect the “phase” (brown) wire to it. The next 2 jumper terminals are neutral (N). We connect the blue wire here (without “phase”). The purpose of the sixth terminal (PE) is immediately clear - it is a protective ground contact. We connect the grounding green - yellow wire to it - with a 2-wire network we leave this wire free on the side of the plug (options are given for single-phase - 1N, 2-phase - 2N and 3-phase - 3N connections). The electrical power consumed by the hob can be about 3 kW, and the product is equipped with a 16-amp Euro plug. We will also install the socket under the surface for a calculated maximum current of 16 A. Naturally, the socket must be of the “Euro” design. If your stove is designed for high power, you should select a design current of 32 amperes and install an outlet designed for this current. The most effective option for connecting a hob is to directly connect the supply cable to its terminal block. In this case, you can do without a plug or socket, and therefore increase the reliability of the circuit due to the elimination of unnecessary contacts (since contacts are the weakest point in electrical circuits). In this case, turning the hob on and off can be done directly from the control panel. If the wiring in your kitchen is old, then you need to install a new electrical wiring line specifically for the hob. The line is mounted with copper wire with a cross-section of at least 2.5 mm2 for low power and 4.0 mm2 for high power. Such a line is connected to a separate circuit breaker
for 25 amperes or 40 amperes, respectively. Information on the maximum permissible current for various cross-sections (diameters) of conductors (approximate data):
For copper (aluminum) 1.5 mm2 is a diameter of 1.4 mm, max. current - 19 (15) A; 2.5mm2 is a diameter of 1.8mm, max. current - 27 (24) A; 4.0mm2 is 2.2mm diameter, max. current - 36 (32) A; 6.0 mm2 is a diameter of 2.8 mm, maximum current 46 (39) A.
Instructions for connecting the hob (surface) and built-in oven
1. Before connecting the oven and hob, carefully read the technical specifications and main design features. 2. There are two types of hobs: - connected, which is controlled by handles placed on the electric oven, - unconnected, which is equipped with a separate power supply and its own controls. 3. Analyze the kitchen power supply; its power should be enough to connect appliances and be autonomous. If the electrical network parameters do not match the required ones, then an additional cable will be required. 4. When installing electrical wiring for an electric oven and hob, use consumables taking into account that the oven is designed (on average) to consume 2-3 kW of electricity, and the hob will consume up to 7 kW. Therefore, to ensure complete safety during subsequent operation of the devices, lay an electrical wire with a cross-section of at least 4 mm for the hob and 1-2.5 mm for the oven. 5. Be sure to ground the devices, which will guarantee safe, stable and uninterrupted operation. 6. As a rule, the hob, unlike an electric oven, is designed for a 1-2-3-phase connection to the electrical network, which is due to the high energy consumption of the panel. Therefore, carefully study the passport data before installing both devices, since the features of the electrical supply depend on their class. EXAMPLE: If your hob has a cable with four wires (cores), and a 3-core wire is sticking out of the wall or there is a 3-pin socket, then this means that your stove requires a 2-phase connection, but you have the apartment is single-phase. The black and brown wires are the phase; they should be twisted together and connected to the phase (usually a white or black wire from the wall), the rest yellow-green is “ground”, blue is “zero” 7. Connect the unconnected panel and the oven to different pre-wires installed sockets.
Useful tips
1. The hob and oven are built-in appliances. The quiet location is determined in advance when ordering kitchen furniture. 2. If necessary, devices can be installed in an existing set. To do this, a hole is cut in the countertop corresponding to the area of the hob, and the oven is placed in a cabinet with the doors and back wall removed. In this case, an unconnected oven can be located either under the hob or in any other convenient place. This article is for informational purposes only for the trademarks Electrolux, Zanussi, Bosch, AEG, Hansa, Gorenje, Hotpoint-Ariston AEG, Samsung and does not serve as instructions for use.
Operational safety
Connecting an RCD for an oven
For safe operation of an oven that has been built into kitchen furniture or placed separately, it will be necessary to protect the user from accidental contact with dangerous potential on its body. For this purpose, switching products are equipped with a special terminal that has an electrical connection to the protective grounding system.
Some experts recommend including a residual current device in the power circuit that is triggered by the slightest leakage current. The protection option with an RCD makes sense in cases where a two-wire power cable is installed in the apartment, that is, there is no reliable and complete grounding in it.