Intercom design
An intercom is a device that allows someone to enter a room, or vice versa, to deny entry, without direct contact with him.
The device has gained particular popularity literally in the last decade; previously, combination locks were most often used to protect front doors. Photo - system design
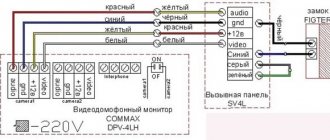
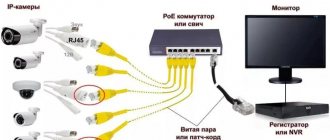
As an additional security feature, the call can also be supplemented with the ability to connect a video intercom (Kenwei KW-4HPTN, Kocom KCV-A374SD). In this case, all data is transmitted using the camera to a special TV or computer. Unlike an audio intercom, a video system is more reliable in use, because in addition to making a call, visitors are also visually monitored.
Photo – video intercom wire connection diagram
What is an intercom handset?
The intercom handset is one of the components of the intercom system of the security system, which provides communication between the owner and those wishing to enter the premises. If the external communication element is a calling panel located outside, then the handset is a home appliance that is installed inside the protected premises. Such a tube can be installed either independently or by calling a special team.
In most cases, the handset provides communication immediately upon picking it up, without the need to press any combinations. Installation of the tube usually falls on the shoulders of professionals.
In the photo you see an image of an audio intercom tube
Each type of protective equipment requires a specific tube, since different devices require a certain number of wires to be laid.
If you are using a digital intercom, then in this case you will need one cable that is laid from the digital panel. Using its individual branches, it connects to each individual apartment. If a coordinate matrix type intercom is installed in the house, then the installation involves laying wires equal to the number of apartments in the entrance.
What device does the telephone handset have?
An intercom for home use has a standard set: microphone, speaker and control panel. Equipping the intercom handset allows subscribers to communicate without pressing and holding special buttons or a combination of them.
Installing the handset allows you to start a conversation just by lifting it. The handset stand with special fasteners makes it possible to install the intercom in a convenient place. There are models equipped not only with a door opening button, but also with sound control and a light indicator.
Intercom handsets can be classified according to two criteria: by type of addressing and type of communication.
The type of addressing depends on the number of wires installed connecting the intercom on the door and the handset in the apartment:
- Coordinate matrix (analog) intercom. In this case, the number of cables connected to the device panel is equal to the number of apartments in the entrance.
- Digital device. In this case, the connection of the intercom tubes passes through wire lines extending from a single cable.
Based on the type of communication, intercoms are divided into two types:
Read more: Panoramic windows: in a private house and apartment, pros and cons
- Audio - communication between subscribers is carried out through the transmission of sound signals.
- Video allows you not only to hear, but also to see the subscriber due to the installed video camera on the call panel and the monitor on the intercom in the apartment. This type of intercoms, in turn, is divided into monochrome (black and white) and color models.
There are also two more types of device handsets: wireless and IP handsets. allows you to avoid laying cables in the apartment, thereby eliminating the need to hammer into the walls. Installing such a tube is much cheaper and simpler - you only need a 220 Volt outlet and a little time to connect.
A wireless intercom will allow you to move the handset to any part of the apartment and use it without being in just one room. A variant of the wireless model is a radio intercom. It differs in the presence of a base and the need to lay wires.
The IP intercom uses the current local network to communicate. Such a network is laid at the stage of laying the foundation and is most often used in the construction of luxury housing. Such intercoms are integrated with other digital equipment into the Smart Home system. This makes it possible to control door locks remotely - from a tablet, computer or phone.
The price of an intercom handset depends on the model and its purpose. The most common audio models cost on average from 150 to 800 rubles, video intercoms - from 4,000 rubles for a simple model and more than 10,000 rubles for a color screen, built-in memory and hands free function.
Analog or digital? The most important criterion when choosing an intercom handset is the type of device that is used in the house or entrance.
You can find out which device is used with the help of a specialist or yourself by opening the old subscriber device in the apartment (handset). You just have to look to see if there are apartment coding jumpers on the board, then it’s a digital intercom, otherwise it’s analog.
Audio or video intercom? Installing a video device will allow you not only to hear the visitor’s voice, but also to see it. This will provide a higher degree of security. The memory block in the intercom will allow you to save photos or videos of visitors who came in the absence of the owners.
However, in apartment buildings, due to cost savings, they most often install an audio intercom, and then there is no choice. For private housing, the best choice would be a video intercom.
How to choose the right intercom handset for your apartment - video
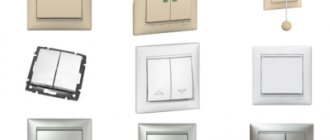
Read more: Connection diagram for a two-key switch
Installation stages
The design of the intercom handset is quite simple, but its connection and installation in the case of an analog device will require some knowledge and skills.
- On the ground floor or in the basement there is a switchboard with a switch that ensures the operation of the intercom and analog and digital video surveillance. It needs to be opened. The device is connected by several cables: tens and ones buses.
- Identify the tens bus among the wires. It can be determined by connecting to the cable several apartments with the same number ten on a given floor.
- Define the unit bus. You can find it by examining the wires on the floor where there is an apartment with the same number of units in the room.
- All that remains is to connect the intercom handset with wires leading directly to the apartment. In this case, it is necessary to observe the polarity of the wires: the tens bus is connected to the plus, and the units bus is connected to the minus.
The digital handset is connected directly in the apartment. You need to disassemble the old device, see how the microcircuit is programmed with jumpers (jumpers) for the apartment number. Play this encoding on a new intercom handset. Go downstairs and check the intercom.
In principle, the connection of the tube is complete and all that remains is to install it in the right place in the apartment. If you wish, you can not carry out all the work yourself, but call a specialist to install intercoms.
An experienced specialist will be able to connect quickly and efficiently, give practical advice and establish uninterrupted communication between the device. Installing an intercom handset in an apartment and connecting it to a specialist will cost approximately 1,200 rubles for an audio intercom and 3,500 rubles for a video intercom.
Let us consider this case in detail. The operation of such a system is carried out by transmitting a signal to a switch, which, having processed the incoming call, uses keys to connect the desired subscriber device. Installation often requires the owner not only a lot of time, but also ingenuity.
Read more: Walls to be painted (73 photos): the order of preparation work, how to properly prepare for repairs, leveling the walls with your own hands
After all, from the switch to the handsets in apartments there is a multi-core cable, which is divided into wires of tens and ones. The tens keys of a standard device do not exceed seven, including 0. Thus, the number of connected subscribers cannot be more than 80. In order to install the intercom handset, it is necessary to find the tens and ones buses.
The first one is found quite easily - in the panel on your floor you find a wire to which as many cables are connected as there are apartments with the same first or first digits in the number located on the landing. To find the units bus, go up to the floor where there is an apartment with a number that matches your last digit, and again look at the cables in the panel.
After reading this article, you learned not only how to replace the intercom handset. Now, if necessary, you can quickly, without material losses, bring the device into working condition, because you know all the secrets.
In modern entrances, special conversational devices are most often installed as access devices. They allow you to protect your safety and the safety of your property. Connecting the intercom Vizit (Visit), Falcon Eye, Commax (Commax) and Metacom is most often carried out by special service companies, but this can be done with your own hands.
All equipment, including the intercom handset, is connected using one of two options:
- Coordinate-matrix method. In this case, the number of wires extending from the main panel coincides with the number of apartments it serves;
- Digital way. Here a single main wire is used, from which a specific line extends to each apartment.
In the photo you see an image of an audio intercom handset.
What type of intercom is the same type of handset. This should be taken into account when repairing or purchasing a new replacement part. You can find out this information from the contractor's company or by asking your neighbors.
As an example, we can consider the Digital KS (coordinate communication) model, designed for connection to the coordinate-matrix communication line of an intercom. The standard package includes a speaker, microphone and circuit board, and mounting screws and dowels are also included.
Features of the Digital model:
- Subscriber call (sound/LED);
- Call volume adjustment;
- Ability to turn off the call signal;
- Duplex connection of the handset with the input panel;
- Opening the door remotely.
The intercom tube diagram will help you connect the equipment correctly.
Diagram of the intercom tube
In order to understand the system with KS, the user also needs a detailed connection diagram for the CCD-2094, which provides two-way duplex communication. Tip: before connecting the intercom, it is important to remember safety precautions in the presence of high voltage!
The input block of the Cyfral intercom device is installed on a solid base; the fastenings must be hidden to prevent access by unauthorized persons. Next, a switch is mounted in the panel of the first floor (sometimes the second), although this is not always done due to constant failures caused by induced current.
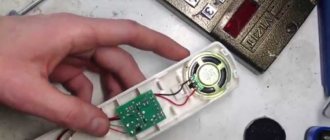
The handset itself becomes the main element for the full operation of the intercom. It is installed exclusively inside apartments or houses. With the help of it, a person decides to open the room to whoever is calling or not. If we consider the basic configuration, it is the same in any version. There are differences and they depend directly on the system manufacturer. Let's look at what's in the tube:
- Speaker for conversation;
- Microphone for conducting conversations with the subscriber;
- Wires performing a connecting role;
- Electrical board.
Intercom handset
If you use the device for a long time, sooner or later the tube will break. The best option is to replace the broken tool. But often such a replacement is costly. Therefore, you should initially try to fix the problem. The moment the intercom stops working fully, the owner of the premises faces a lot of inconvenience.
Since at this moment he is no longer able to fully monitor the building and the door in this case opens without difficulty. When the device is installed on the entrance, and use is difficult in one apartment, then most likely the problem is in the installed handset. To deal with the problem, you should consider the types of breakdowns:
- The intercom does not work because the door open button does not work;
- Poor audibility on one side;
- A break in the cable;
- Recession of the tongue.
How to connect all device components?
Sooner or later, each of us will face the problem of connecting the tube. There may be a number of reasons for this:
- Installation of equipment independently in connection with the installation of a protection system;
- Connection of the handset due to a breakdown of the previously installed intercom device.
If you still have to do this work yourself, then first of all you should purchase completely new equipment. In this case, you should take into account the fact that the handset must fully comply with the installed intercom system.
You can learn more about installing an intercom after watching this video:
The device must meet all the specified quality conditions, since only high-quality intercom handsets can ensure uninterrupted and reliable operation of the security system. Otherwise, re-installation will not take long.
Installation of handsets for digital intercoms
Digital intercom systems are mainly used in apartment buildings. Installing a handset of this type has its own specifics, namely: this addressing scheme requires a two-core cable to which the subscriber handset is attached
Here you should pay attention to the polarity
Tube connection plan
The installation of the intercom handset in this case has its own microcircuit, which is programmed with jumpers or jumpers for each apartment number. In this regard, in order to find out your apartment number, you will have to carefully disassemble the handset and carefully examine the existing microcircuit. Near each jumper there is a special digital panel on which the numbers are in ascending order. Here the apartment code is made up of numbers related to closed jumpers.
A disassembled old handset can serve as an example from which you can transfer the code to a new device. Thus, installing a new tube will not be difficult.
Installation of the device on a coordinate matrix type intercom
Connecting the intercom handset to this type yourself is not difficult. Here, all the work consists of transmitting a signal to a special switch, which, when a call is received, processes it and, due to the presence of special keys, sends the call signal to the required subscriber device.
Installing a handset for such an intercom will force the owner not only to work hard, but also to develop quick ingenuity. During installation, the whole problem lies in the cable, which is divided into many wires related to each individual apartment in the entrance. It should also be taken into account here that tens keys generally do not exceed seven, including zero. Thus, the total number of users can be more than eighty.
Intercom installation diagram
Do-it-yourself installation of an intercom handset consists of finding the required bus of tens, as well as units. It is very easy to deal with dozens - they are located on the panel of the required floor. All that is required is to find the wire to which the wires related to each apartment in the entrance are connected. This way you will select the cable you need.
To select the correct unit bus, you need to go up to the floor with the apartment number that matches the last digit of your apartment, and again find the cable on the panel. A plus is connected to the tens bus, and a minus to the units bus. This is where all the difficulties end. Installing the device is not difficult.
Then we just connect the handset
To do this, we carry out the entire procedure described, paying attention to the polarity. If all existing rules are followed, we can say that the installation is complete
You can find out interesting information about intercoms by watching this video:
When connecting an intercom, people often wonder: what to do if you connected the device yourself, but it doesn’t work? The answer is simple: you should reconsider the device assembly diagram, and also pay attention to the polarity, since it is with polarity that the most problems arise. If you doubt the correctness of the work done, call a special specialist to your home
Such masters usually provide their services in all companies involved in the sale and installation of intercoms
If you doubt the correctness of the work done, call a special specialist to your home. Such masters usually provide their services to all companies involved in the sale and installation of intercoms.
Connection
Step-by-step instructions on how to independently connect the Eltis, Cyfral (Digital) video intercom with the z 5r controller:
- You can connect a key reader (touch memory) or a buzzer, a button that will be used to open an electromechanical lock, a backlight, the lock itself and a power supply to this controller;
- The buzzer and door sensor are optional parts, while the operation of the entire system depends on the door open button and power supply. If necessary, a screen can also be installed; optical control can be carried out through the monitor;
- To connect the board, a terminal block is most often used, the contacts of which will connect the necessary network wires;
- Afterwards, simply connect all the necessary wires to the apartment tube and check the correct polarity.
Domestic intercom models are also very popular, in particular the KS-2006. To connect them, schemes with two switches, one connection module, for several subscribers, etc. can be used.
Prices for repairs or installation of intercom systems may vary depending on the city and the specific company. On average, the price of connecting an intercom varies between 200–500 rubles (the price is indicated only for the work, without the price list for the wires used). For example, connecting the MVK-325 UKP calling panel in Moscow and St. Petersburg will cost 500 rubles.
The presence of an intercom has long been an indispensable condition for ensuring the comfort of a modern apartment. The main purpose of these devices is to enable homeowners to accept calls from visitors and open doors remotely. Intercoms turned out to be much more convenient than outdated combination locks. Let's find out how to connect the apartment intercom handset yourself.
The sequence of actions will be as follows:
- At the first stage of work, the location of the intercom handset is selected, then it is fixed to the wall using quick installation.
- Next, the installation location of the switch is determined (for analog intercoms). On each floor they are installed in a distribution box for low-current circuits. All of them are connected in parallel, which greatly simplifies the installation process. In the general case, just one switch per entrance is sufficient, but when using such a scheme, you have to stretch wires from the apartments on the upper floors to the installation site of the device.
- After removing the protective cover of the switch, the terminals corresponding to tens and ones are determined, then the connection is made so that the sum of the numbers of these contacts shows the serial number of the apartment.
- The wires are connected to the tube. It is extremely important to observe polarity. The positive terminal is connected to the contact of the commutator corresponding to tens, the negative terminal to ones.
Thus, installing an intercom handset is not particularly difficult. However, before you begin to do such work yourself, it is important to determine the type and brand of device used, as well as the location of the switch and the subscriber connection diagram.
A device such as an intercom is becoming increasingly common. They are installed in a private house or in the entrance to several apartments. The device becomes convenient to use. But after prolonged use, like any other mechanism, it may malfunction. There are many reasons for this, and often, if a breakdown occurs, the device no longer opens the apartment door.
If we consider equipment that is installed to work in several apartments, then their operating principle is the same. There is an option that the owner of the premises opens the door after he sees his guest via the built-in video surveillance. But this option is not popular for apartments, but rather for private houses.
But whatever the device, it has a certain configuration:
- Device for making a call;
- Telephone handset;
- CCTV;
- Screen for displaying images.
Apartment intercom Device with video surveillance
Installing the Internal Device
If you don’t always have to install an external device (this can be done by the company that supervises the intercom at your entrance), then installing the handset, if you want to take matters into your own hands, will have to be done by you. Here is an approximate algorithm of actions:
- The approximate recommended location of the tube is 1.5 m from the floor.
- Next, you need to determine on the wall where to lay the corrugated pipes from the external access element. If the transformer is built into the tube, then there is only one path, if not, then two - to the intercom and, in fact, to the transformer.
- Again, you make fines with a chisel along the thickness of the corrugated pipe.
- The next step is to place the pipe in the groove and further cement it or putty it.
- Mark the exact location of the tube, drill holes for the dowels that will hold it.
- Attach the handset stand.
- From the corrugated pipe, connect the necessary wires to the tube.
- Install the intercom on the mounting brackets and secure it with screws.
- The transformer (if it is not built-in) is installed in a protected place (for example, a distribution panel) and connected to the general system with wires strictly according to the diagram. It can only be connected to a network protected by a fuse!
Digital intercom systems
To connect devices of this type, only a cable with two cores is used, through which an encrypted signal is transmitted. The handset installed in the apartment, the number of which was dialed on the call panel, responds to the signal. To set the correspondence between the dialed code and the handset, special jumpers are used - jumpers - which bridge the required contacts in the answering machine.
To correctly program the operation of the handset, jumpers are placed between the numbered terminals so that the sum of the numbers equals the apartment number.
The advantages of such intercoms include ease of installation and connection of new subscribers.
The main disadvantage of such equipment is the influence of each tube on the operation of the entire system. When replacing a device due to its breakdown, as well as when connecting new subscribers, the correct installation of jumpers is extremely important.
Currently, to partially eliminate this drawback, floor controllers are used, which allow the fault to be localized within one level.
Another disadvantage of digital intercoms is their relative high cost, which does not allow these devices to become widespread.
Analog installations use a coordinate matrix connection and operate on the principle of a telephone exchange. An additional element of such a system is a switch, which processes and analyzes the signal, as well as redirecting it to a specific subscriber.
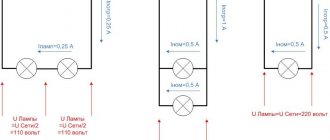
To connect the intercom handset to the switch, two buses are used. The contacts of the first of them (D0–D9) correspond to tens, and the second (E0–E9) to ones. Thus, to connect an intercom to an apartment whose number, for example, is 74, you need:
- connect the conductor from the positive terminal of the subscriber handset to the contact corresponding to number 7 on the tens bus;
- the conductor adjacent to the negative terminal is to the contact corresponding to number 4 on the units bus.
In the considered connection option, a device was used that was designed to serve up to 100 subscribers. There are models that can work with a large number of numbers, but their principle of operation is no different from that discussed above.
They are widely used in apartment buildings, so let’s consider the specifics of the process of introducing a new element - an intercom tube. With this addressing scheme, a two-core cable is used, to which subscriber handsets are connected in parallel. The most important requirement is to maintain polarity.
When connecting an intercom handset in an apartment, it is worth remembering that each subscriber device is equipped with a microcircuit. It is programmed with jumpers, or jumpers, to a specific apartment number. Therefore, to find out the apartment code, you will have to disassemble the handset and carefully examine the microcircuit.
Opposite each jumper you can see a special panel with numbers arranged in ascending order: each of them represents a positive power of the number “2”. The apartment code will consist of numbers corresponding to closed jumpers. Having an old disassembled handset in front of you, you can use it as a sample to transfer data to a new device. By following these recommendations, you will immediately understand how to change the intercom handset.
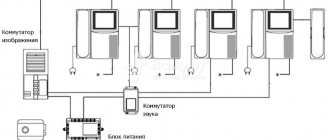
Intercom in an apartment building
In high-rise buildings, the intercom has a much more complex structure. In addition to the calling device, it contains a switch and a key reader (needed when the lock is opened from the outside by one of the residents). This system also has a large number of handsets, the signals from which must be received and processed by the switch. He must also identify the signal dialed from the calling device and connect the desired handset.
Intercom installation in an apartment building
When installing an intercom in an apartment building, special boards for connecting tubes are installed in the cabinets of low-current systems. This is the only operation you can do yourself. The installation of the system itself is too complicated.
The method of connecting the intercom handset depends on the model, but basically the systems are similar. The most commonly used coordinate connection is in tens and units. The connection board has two rows of contacts, numbered 0 to 9. The top row is tens, the bottom row is ones. You must connect the handset using your apartment number. Moreover, we connect the wire from the plus of the tube to the tens (first line), and to the units (second line) from the minus of the tube.
Connecting an intercom handset in an apartment building
For example, apartment 58: on the first line we find contact number 5 (don’t forget that we count starting from 0, that is, this will be the sixth screw), on the second line it will be the penultimate screw. To these terminals we connect the wires that are stretched from the tube
Once again we draw your attention: to the tens - the first line of terminals - we connect the wire that is connected to the positive contact of the tube, to the units - the second row of terminals - the wire that comes from the negative terminal of the tube. If you mix it up, it won't work properly.
Breakdowns that can be fixed
The most common problem is button failure. This seemingly insignificant detail significantly affects the entire repair of the intercom handset, since it has a direct connection with the switch located inside the device. When a problem arises, a crackling sound is heard at the initial stage, and then many people notice that the intercom is making noise, and significantly.
When the caller presses the button, the crackling sound is clearly audible. At the beginning of the problem, the door will open normally. But if you wait a little time and don’t make an effort to repair it, it will stop opening.
Intercom button
The switch itself cannot be repaired. You just need to purchase a replacement part. Its cost is not high. If a professional is involved in the work, then everything will be done not only quickly, but also efficiently.
When guests come to a person and they ring the intercom, a specific sound appears in the room, after which the owner of the room picks up the phone to clarify who has arrived. But when pressed, the button refuses to function. More often, the culprit is the switch, which is located under the button. To understand in more detail the reasons and repairs, we remove the cover of the device and carefully examine its “insides”.
To understand that in the place where the owner assumes, a new part is connected to the problem area for some time through a four-wire version of the system. Thus, through these 4 cables the problem that has arisen is dealt with.
Pay attention to the speaker that the handset is equipped with. It often becomes the reason that the subscriber is hard to hear. Inside the device there is a special resistor that regulates the microphone and speaker. But you don’t need to immediately turn down or turn up the volume. From the beginning, remember the position in which the resistor was located and only then start twisting it.
Design and principle of operation
An intercom is an electromagnetic locking device with the ability to remotely control the opening and closing process from remote controls (handsets) located in apartments or offices. The system is installed on the entrance door and protects the building from unwanted entry.
Depending on the system for connecting apartments to the intercom device, a distinction is made between digital and coordinate devices.
With a coordinate switching system, a separate cable goes from the intercom to each apartment, but with a digital system, there is only one connecting cable. It would seem that digital intercom devices should be cheaper, however, in fact, everything is exactly the opposite - their cost is almost 3 times higher than that of coordinate ones. But it is believed that this pays off with the higher reliability and security of such a communication system.
Based on the type of communication, intercoms are divided into audio and video devices. From the name it is clear that video intercoms have a screen that displays the identity of the calling visitor, while audio devices provide only voice communication. Naturally, devices that transmit video images provide a higher level of protection, but do not forget about the price aspect - they are much more expensive than voice intercoms and, as a result, much less common. Typically, video devices are installed on the gates of large private properties.
Types of modern intercoms
An audio or video intercom is used to reliably identify visitors. The latter is often installed in private cottages and is created for additional visual control of the space in front of the front door. As for city apartments in multi-storey buildings, they are often equipped with an audio option, the design of which includes the following elements:
- A handset that is equipped with buttons for accepting a call and opening an entrance electromagnetic or electromechanical lock. The device is installed by a company that provides intercom installation and maintenance services. If such devices were not installed in some apartments when installing the entrance, there is the possibility of installing them yourself. You can also use the services of a specialist service company.
- A call panel equipped with a numeric dial field that allows the visitor to signal the intercom by pressing the required code, usually the apartment number. In addition, there is a reading device on the panel, with which you can use a special key to open the electromagnetic lock that blocks the entrance doors.
- Locking device with power supply. The most common type of lock today is electromagnetic. Until recently, electromechanical latches equipped with sliding mechanisms were ubiquitous. Such devices are often present in the entrances of apartment buildings even now. To operate a remotely controlled unit, you must use a DC voltage of 12 or 24 V.
- Switch. This device is designed to transmit a signal from the call panel to the subscriber handset of a specific apartment.
Depending on the type of signal processing, digital and analog intercoms are distinguished.
Situation three, no handset.
That is, we need to determine what type of system we have. As we already know, this can be done in the following ways: - by the presence of a constant voltage of 6 - 7 Volts - this is definitely a DIGITAL system, - by the type of handset from a neighbor (presence/absence of an apartment number block).
Buying a handset : I recommend handsets from Laskomex, which is a leading Polish manufacturer of intercom systems, their products are compatible with most devices from other manufacturers (not an advertisement!).
Aspects to consider when choosing replacement parts
The correct choice of replacement part becomes important in the repair process. Make purchases in special stores. In addition, pay attention to the intercom model for which you are purchasing parts.
Internal components of the device
If we consider modern models that appear in the assortment, intercoms that do not have stands stand out. Consider the type during the selection process. The differences between the proposed options may be as follows:
- Type of call addressing;
- Mode of application;
- Features of functional work.
There shouldn't be any problems with purchasing and choosing. Moreover, the assortment is full of various models. But it’s still better not to install the equipment yourself, but to turn to specialists for help. Of course, they will ask for a fee for their services, but you can be sure that everything will be done with high quality and with a long-term guarantee of service.
Device repair
Watch our educational video to see how specialists carry out repairs.
In country houses and apartments, you can install inexpensive intercoms that will provide control of entrances to entrances or premises. These systems differ from industrial systems in their simpler design and functionality within the stated cost. Due to the availability of home video surveillance and access control, there is a need to decide how to connect the intercom handset in compliance with technical details and security measures.
How to install an intercom in an apartment
The principle of connecting an intercom in an apartment is not much different from a private house. The only thing is that the cable footage increases significantly, and special switching equipment is required to connect all subscribers with the calling panel. Now more details. Let's start traditionally with the diagram:
It is worth noting that a magnetic lock with a high holding force is usually installed on the entrance door at the entrance.
Perhaps the most difficult stage is connecting the intercom to the calling panel at the entrance to the front door. We start by laying the cable from the apartment to the panel located on the landing. We run the wire from the apartment to the panel, laying it in a plastic cable channel, then carefully lower it down the shaft of the access panel to the first floor. Next, placing it in the corrugation, we lead it to the call panel or to the installation site of the switch.
Then you need to install and connect the handset. The installation location should be convenient and accessible - as in the case of a video intercom in a private house, this is the wall near the front door. We screw it with self-tapping screws into pre-hammered dowels. Let's move on to connecting the intercom in the apartment. Removing the front front cover reveals the terminals. There can be two or four, depending on the selected type of device. The presence of four terminals indicates the possibility of connecting another additional speaking tube. The photo shows the connection order:
You can also organize a simpler connection when the calling device is mounted directly behind the apartment entrance door, as in the picture:
In this scheme there is no electric lock, and the system is used only for video communication.
At the end of the article, I would like to talk about what wires to use. As mentioned above, to connect a video intercom, use signal cables like KVK P 2 2x0.75 or twisted pair FTP 4x2x0.51. You can connect the audio handset using a two-wire telephone wire or twisted pair cable. To power the electric lock, a two-core cable ShVVP 2x0.75 is suitable.
We also note one important nuance regarding electric locks related to access to the premises. If there is a power outage, the electromagnetic lock will stop working and the door will open automatically, but the electromechanical lock will still remain closed
Remember this important detail both at the operating stage and in the process of choosing a kit for your own conditions.
This is the principle used to install and connect an intercom with your own hands. As you can see, in a private house or apartment it is not difficult to carry out the installation yourself, the main thing is to know the rules provided and have the right tool at hand!
It will be interesting to read:
- Electrician's tools - list
- Wire colors in electrical wiring
- How to properly tap walls
Design features of the equipment
To make the most of the system’s capabilities, you need to delve into the basic technical characteristics, understand the structure and operation of such equipment.
To do this, first of all, you should understand that such devices provide the transmission of audio and video signals and guarantee blocking of entrance locks. The most famous devices are Vizit, Falcon Eye, Commax.
In an apartment building, the installation of such equipment is carried out centrally with the involvement of companies that know how to connect an intercom in an apartment and provide such services on a paid basis. These same specialists also perform technical maintenance of the systems.
But if you plan to save money and do without contacting installers, then you need to get an idea of the set of intercom equipment, including the purpose and functionality of the following elements:
- a speaking tube, which is installed indoors and allows you to answer the visitor’s request (connected to the locking system);
- personal call panel for reading codes, entering numbers, displaying video information and transmitting audio;
- a locking device with an electromagnetic mechanism or older versions with a bolt and electric drive;
- switch in the form of a module for transmitting signals in accordance with the dialed apartment number;
- power supply, buttons and switching parts.
Those wishing to understand how to connect an intercom themselves should know that such a system is powered from a voltage of 12 or 24 V. In this case, you can choose options with the transmission of only audio or also video signals.
Connecting an intercom with your own hands - all the nuances
There are several features, without taking into account which you can make some mistakes that will either lead to a malfunction of the device for one resident, or disable the devices in the entire entrance.
These features and nuances look like this:
- Compliance with polarities. The connection must be made strictly according to polarity. This is one of the critical errors that leads to the system shutting down in the entire entrance.
- Correct search for decimal and unit bus. You need to find the buses to which the connection will be made correctly. There are several ways to do this, which involve the correct order of steps.
- Wire insulation. Any twist must be insulated; we do the same with wires that were not needed in the system and turned out to be superfluous.
- Device maintenance. You need to report the installation of the device to the company that maintains it in this house or entrance.
- Availability of an individual scheme. You need to study the diagram that is in the box with the tube before carrying out work.
Don't miss: What are panel doors: advantages and disadvantages
It is better to study these features before installing the device.
Start installing a video intercom
Installing a video intercom in an apartment begins with choosing the location of the calling panel. An important point is the installation height. The person making the call must be comfortable doing this in order to avoid strong downward bends or upward pulls; the average installation height of the calling panel is 1.5 meters. This value can be absolutely anything, but this indicator is the most common in modern practice.
In appearance, the panels are radically different from each other; the following elements can be installed in the housing:
- Built-in video camera;
- Illumination (IR), allowing image transmission with a weak light source;
- Element that controls the lock;
- Negotiation elements: Speaker;
- Microphone.
Additional devices
In order to increase the level of security for the apartment, you can install an additional video camera to the one built into the video intercom calling panel. This will allow you to see not only the person standing opposite the call panel, but also, if you additionally install a camera under the ceiling, the entire area of the room directly in front of the door.
Note: if the installation of a video intercom is carried out in a private house, therefore, the installation of the calling panel will be carried out on the street, you need to think about protecting it against moisture, snow and other possible weather conditions. If you cannot integrate the equipment into the fence wall, then the best option would be to create a hinged canopy. The calling panel circuit has a fairly simple structure, which does not require additional special work to protect it from various types of influences.
The next step is to select the wires with which you can connect the calling panel to the monitor. When the distance between the components of the system is less than 35 meters, the ShSM wire is suitable, combining cores for broadcasting video, sound and 12 V power. In cases where it is necessary to lay a longer line, it is better to use a coaxial cable; it will also connect additional cameras when they availability. The wires running from the video intercom calling panel to the lock must be of the ShVVP type.
ShSM, coaxial and ShVVP cables
Wireless video intercom
A wireless video intercom with a connection diagram is shown in the figure below. A distinctive feature of this model is the absence of wires between the monitor and the calling panel.
The next important element of the entire system is the monitor. How well it will be located indoors will depend on the convenience of using it and the speed of answering an incoming call.
The dom ds-10s video intercom offers the following monitor option:
Modern design, great functionality, device configuration is carried out on a convenient and understandable interface.
TV as a monitor
There are situations when you don’t really want to go to the monitor to answer the call signal (if it is located at the front door), but there is a solution. Below we will describe how to connect a video intercom to a TV, which can easily replace a monitor. Modern TV equipment manufacturers include this function in their products. The implementation of this scheme when connecting a video intercom with your own hands or with the help of specialists is possible thanks to the use of a special module.
With its help, when there is an incoming call, you can switch the TV to a specific channel assigned to the video signal from the intercom camera and see who made the call. It is also possible to connect several cameras, with expanded functionality of the module used.
Installing a video intercom with your own hands should not take much time if you understand all the schemes and have the skill to work with the tool. To install an intercom with your own hands in a private house, it will take a little more time, which will be spent on laying the cable from the fence of the house, where the call panel will be installed, to the interior. In this case, it will be necessary to take into account which route the wire will go through: through the air or in the ground, which will affect its integrity and accessibility, and will also help to avoid unexpected damage.
How to install an intercom with your own hands in an apartment will become clear after reading the material above. In this case, the wire footage will be minimal, and therefore, the main work will be carried out with the installation of the calling panel and monitor.
Installing an intercom is quite a serious procedure, as it may not seem at first glance. The safety of the premises and people will literally depend on the successful completion of installation. Those inside. Therefore, a possible option is to install a video intercom in the apartment by professionals.
Tags: , automatic, sconce, view, internal, choice, switch, house, , clamp, bell, cable, like, computer, crown, , magnet, magnetic, monitor, installation, power, setting, lighting, connection, rule, principle , wire, start, , work, size, resistor, repair, socket, row, garden, light, network, system, connection, means, term, circuit, ten, type, current, , smart, installation, shield, electricity, electrical panel
Installation on a coordinate matrix type device
Connecting a handset to an analog (coordinate matrix) device differs from the same operation with a digital device. An analog intercom system operates on the principle of a telephone exchange - reception, analysis and connection with the desired subscriber is carried out by a switch. Subscribers are most often connected to the system in parallel.
There are 2 special buses for connecting the intercom with the switch. On the first bus, the contacts (D0-D9) are responsible for tens in apartment numbers, on the second (E0-E9) - for units. Connect the wire from the terminal with a plus sign to the contact responsible for the ten in your room (for apartment No. 87 - 8), the wire from the negative terminal is connected to a single contact (7 in our example).
If there are more than 100 apartments in your entrance, the intercom model must correspond to this number (there must also be a third bus, responsible for hundreds in apartment numbers). The principle is the same.
In some cases, when installing an intercom system, installers reprogram the panel, shifting the numbers by a certain amount. This action is performed, for example, if it is impossible to connect hundredth numbers. In such a situation, you will not be able to connect the handset yourself; you will have to call the specialist who set up your system. Switches are usually installed on each floor in distribution panels and connected to each other in a parallel circuit.
It is also possible to install one switching device for the entire entrance, but in such a situation additional tens of meters of cable will be required in order to sequentially connect the apartments on the upper floors. If, when connecting at least one subscriber intercom to the entrance analogue system, the polarity of the wire connection is violated, this may affect the functioning of all system devices, as is the case with digital intercom communication.
Preparation for installation
Preparation for installation comes down to the selection of materials and tools for installation. You will need the following:
- hammer drill and screwdriver;
- knife, side cutters, wall pick or wall chaser;
- pliers, hammer, insulation stripper;
- power wire;
- twisted pair - UTP;
- equipment switch, socket and plug;
- electrical pipe or corrugation;
- fasteners, punched tapes and other additional materials.
Inside the building, the cable is laid in grooves - it’s easier and more convenient. When installing an intercom on a gate or gate, the cable will have to be pulled along the ground. Here they hide him in a pipe.
Everything that was once analog can become digital
In our previous articles we have already compared analog and digital technologies. In particular, we looked at IP telephony, IP television and IP video surveillance, and it must be said that these are not the last “IP representatives” of modern devices. Thus, opening the intercom from your phone no longer seems impossible.
IP intercoms are a convenient access system for both private and apartment buildings. They differ from conventional intercoms primarily in their integration with the home network. The connection to the router occurs via a standard twisted pair cable or via Wi-Fi if the device supports wireless communication, and communication between the components of the IP intercom occurs via the SIP protocol. This scheme is very similar to connecting digital video surveillance and telephony, and with some additional options, the intercom can work as an alarm and security system, which is more like an access control system than just a device that opens the front door.
- Remote access. Connecting an intercom to a phone, tablet, computer and other devices.
- Forwarding audio and video communications to home network devices.
- Equipped with a motion sensor.
- Saving video recordings to an external drive or other device.
- Integration with various network systems: smart home, alarm, home automation, etc.
Selecting compatible devices
If the devices - the calling panel and the intercom monitor - are analog, most likely they will be compatible. Analog devices use the same analog television image transmission systems - PAL or NTSC. For example, a calling panel from Polyvision and a monitor from Commax can easily become friends.
If we are talking about digital systems, then it is better to use devices recommended by the same manufacturer of the main unit. Whether it will be a general house calling panel with a built-in contactless access control system or a monitor for a private home (or cottage) - everything is decided by the cooperation of different companies.
However, in both digital and analog systems there is often a situation where both the external and internal panels of the intercom system are made by the same supplier.
Compatibility of analog and digital components is questionable. It is quite simple to distinguish an analog system from a digital one: digital ones use a simple cable (twisted pair) with 4-8 wires, or a special cable. A technology similar to PoE (power is supplied through the same cable) is becoming extremely popular in digital video intercoms.
Features of installing an electric lock
Breakdown of wiring connections by color
To connect an electric lock, you will have to spend from 45 minutes to 2-3 hours - it all depends on the type of lock, as well as the necessary experience. Overhead mechanisms are easier to install, but mortise ones are much more difficult. But if you had to work with a grinder and a drill, then there should not be any special problems.
To connect an electromechanical lock you need:
- Buy the locking mechanism itself;
- Prepare a hammer drill or drill;
- Apply markings.
Most often, the device is mounted using a T-shaped corner that connects the frame and profile. To do this, you must first mark the locations of the holes for the fastenings.
This stage is considered the most responsible. The accuracy and precision of this work affects the further connection of the electromechanical lock. Immediately after marking, you can make holes for the screws.
Then you need to drill holes in the door frame through which the electrical cable will be laid. The same work must be done on the opposite part of the door: where the profile connects to the frame.
Connection diagram between electric lock and controller
The cable must be routed to the mounting box on which the call unit and reader will be installed. If there are places where the cable bends, then you need to place it in a specialized channel. This is especially true for those locks that are installed on gates.
Then, continuing to connect the electric lock, you need to position the counter part according to the specific design of the door frame. This can be done in several ways:
- Using a grinder, cut an opening of the required size in the door frame;
- Place metal plates under the mating part;
- Connect the video intercom to the call panel.
How to connect an electric lock and a video intercom?
Connecting the lock to an intercom device
The easiest way is to connect the calling panel to the monitor. Such a system does not require additional elements, only a connecting cable. It is best to use twisted pair for wiring. This product consists of several pairs of insulated cores that are twisted together.
The calling panel is connected at a distance of one and a half meters from the floor. And the video intercom monitor should be connected at the most convenient height.
To connect a device over a long distance, you need a special combination cable that can simultaneously transmit audio and video signals, as well as electricity. This cable contains several flexible cores of different colors, one of which is braided with copper wire.
To carry out installation, you need the correct connection diagram. Mostly on the calling panel and video intercom, all terminal contacts are designated by color or numbers. Monitor and call panel colors may vary.
There are models of video intercoms in which the lock is connected not to the intercom, but to its monitor. In this case, the connection diagram will not change too much.
Connecting the lock to the monitor
The main advantages of electromechanical locks
Although the instructions for installing such a lock may seem very complicated, such devices have many different advantages, among them it is worth highlighting:
- High reliability;
- Durability;
- Possibility of use in different conditions;
- Price;
- Ease of combining electromechanical circuits with other security systems.
You can find out how this lock works by watching this video:
By installing a video intercom on the gate and fulfilling all the conditions for connecting an electric lock, you can get rid of the need to leave the house to let a visitor in.
Possible faults
During operation of the intercom system, various malfunctions :
- mechanical damage to the tube;
- When you pick up the handset, the signal continues to sound;
- failure of the lock release button;
- the voice of the caller is hard to hear;
- if you press the door open button, the call is dropped.
In the first case, it is easier to replace the damaged part (pipe), because they are not so expensive. The main thing is to choose the right intercom for your intercom system model. In situations where the call signal does not turn off when the handset is picked up, there is no connection with the calling visitor and there is no reaction to pressing the lock control button - look for a breakdown in the handset switch. You can repair or replace it yourself, however, it is still recommended to entrust this to professionals, especially if you have never done anything like this before. This procedure requires some experience and appropriate tools.