An experienced construction worker always has his indispensable tool at hand - a screwdriver. This can be explained by the fact that this device is multifunctional and greatly facilitates the work, which cannot be said about screwing in screws with a screwdriver. However, over time, any equipment, including a cordless screwdriver, loses its operating efficiency and no longer works as well as before. What to do and what to do if you encounter such a problem? Of course, you can purchase a new battery, but we are not looking for easy ways, and the price of a new battery is steep, so we offer the following alternative. One way out of this situation is to design a homemade power supply for the tool.
- How to reanimate a screwdriver battery
- How to convert a 12V screwdriver to work from the network: video
Benefits of cordless tools
Today there are many devices that successfully cope with installation work using fasteners: screwdrivers, drills, drilling machines, many of them have a charger for a screwdriver.
Small, lightweight, mobile and self-contained screwdrivers have the following advantages:
- The comfortable, easy-to-hold handle shape facilitates high-speed work.
- Economical. Many models come with useful options and attachments, such as universal bits and attachments that are easily replaced, giving you more flexibility on the job.
- Energy-saving design, saves energy and increases the charging period.
- Increased efficiency, the tool allows you to quickly and accurately tighten fasteners in hard-to-reach places.
- High versatility. Variable speed of rotation, forward and reverse stroke.
- Flexibility of use, three-mode range of work.
- Good repairability, availability of a sufficient number of spare parts on the market.
Wireless power supply device
Battery chargers convert 220 V alternating current from the mains into direct current. To perform its functions, the charger has a transformer and a special printed circuit board. Batteries produce current through a chemical reaction between two electrodes and an electrolyte. The voltage ranges from 1.2 to 24 V or more, depending on the battery type and amperage.
Many wireless devices are powered by a rechargeable nickel-cadmium (nicad) battery or a 20-cell battery. Each cell provides approximately 1.2 V DC current. The packs are built directly into the tool and have snap-on clamps.
A number of batteries have permanent built-in batteries that cannot be removed and are charged in the unit.
Types of chargers
Battery charger
This section describes typical electrical circuits. Select a suitable charger for a screwdriver taking into account the following factors:
- battery type;
- number of cells;
- possibility of careful control of the charging process;
- availability of skills and knowledge for high-quality assembly (adjustment) of a certain design;
- additional requirements for weight, dimensions, and other individual criteria.
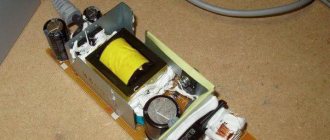
Analog with built-in power supply
The popularity of such engineering solutions is explained by their comparative simplicity and low cost. The device shown in the following drawing provides stable voltage maintenance for charging a 12-volt unit with a sufficiently high current.
Analog charger
Explanations for the electrical diagram:
- the KR142EN microcircuit performs the main function - stabilization;
- for the example given (at 12V), the modification with the index “8B” in the designation is suitable;
- this element heats up, so it is mounted on a metal radiator with a dispersion area of 20-25 cm2;
- transformer windings (conductor cross-section) are calculated based on the required output current;
- capacitor C1 removes residual ripples after rectification by a diode bridge;
- The completion of the charging cycle is indicated by the extinguished LED (HL1), there is no automatic shutdown.
Analog with external power supply
The circuit diagram in this embodiment is similar to the considered example. The main difference is the separate design of the rectifier block:
- transformer;
- diode bridge;
- capacitor.
Electrical circuit of the charger control unit
Such a device can be made miniature. It can be connected to a standard, fairly powerful rectifier (this is a power supply for a laptop, tablet, or other equipment). Assembly instructions:
- the KT 818 transistor dissipates a lot of power, so it is installed on an efficient radiator (area from 35 to 45 sq. cm);
- using a tuning resistor, the optimal output current is adjusted taking into account the characteristics of the battery;
- as in the previous version, the end of the procedure is the LED going out.
Pulse
Previous devices are capable of restoring the functionality of a standard screwdriver battery in 4-6 hours. The scheme presented below will perform a similar task much faster (45 minutes - 1.5 hours). The main advantages are minimal size and lightness.
Pulse memory
This circuit is designed to charge advanced Ni-Cd batteries. They are equipped with a special contact, which is necessary for monitoring temperature indicators. Such a device reproduces the accelerated discharge cycle without additional commands. The user can set various combinations of output parameters using jumpers.
Restoring the drill
When working under increased loads and in a polluted repair environment, the screwdriver may break. The most common causes of malfunctions are dirt or dust. Sometimes a screwdriver stops working when the copper connections on the contacts oxidize. You can repair and at the same time configure the screwdriver yourself after studying the manufacturer’s instructions in the following sequence:
- Precautions must be taken before any type of repair work.
- Before replacing the chuck or removing the housing, make sure that the electric screwdriver is not connected to power.
- Try turning on the tool via the battery. If it does not function, there may be a problem with the battery or power supply. Replace the battery and check operation. If the electric screwdriver does not turn, there may be something inside that is blocking the start and you will have to remove the socket.
- To do this, use a screwdriver to loosen the screws and carefully remove the cartridge. Before that, you need to make sure that there is a spare part for replacement.
- Carefully unscrew the housing using a screwdriver. Open it, lift it up and check the device for internal defects.
- Cleaning the copper connection. If they are covered with dust or copper oxide, they need to be cleaned. To do this, you can use sandpaper until the surfaces are shiny and smooth.
- Wipe the instrument from dust and copper filings with a soft cloth.
- Save the connection diagram by taking photographs and a drawing on paper. This is very important, otherwise it will be difficult to assemble the wires in the same way as before the repair.
- Replacement and reassembly. Identify the parts where the parts are stuck and carefully replace them.
- Assemble the screwdriver, connect the wires and install the housing.
Troubleshooting the adapter
It often happens that the user charges the battery, but it stops working almost immediately; the indicator reports that the batteries are low. In this case, diagnostics are necessary to determine exactly what is faulty - the battery or the charger.
If the wireless mechanism (with built-in rechargeable battery) does not work, there is not enough power, you need to make sure that:
- The power is on at the output and the outlet is not connected to the network.
- Check the electrical cord and replace it if it is faulty.
- Test the power supply and carry out repairs.
- If your wireless device or rechargeable batteries are operating for shorter periods between charges, they are likely worn out. They should be inspected for damage or leaks and replaced if necessary.
Self-charging lithium-ion batteries
Sometimes for older tool models it is impossible to purchase a new charger and it is necessary to modify it or make a new one yourself. Lead-acid Ni-Cd and Li-ion batteries will require a charger circuit for an 18-volt screwdriver. The main features of this universal source are:
- DC voltage.
- Automatic shutdown when fully charged.
- The maximum current is 5 amperes, batteries can be charged normally.
- Fully customizable mode according to battery specifications.
- Low cost.
- Optimal electrical circuit. No special parts are required, they are all standard and easily available.
- LED indicators to monitor cut-off and charging status.
- Suitable for garages and home use.
This multi-purpose fixture is a 5 amp DC source, however, charging at a lower current may require an additional DC circuit between the input power supply.
When deep charging, the battery may overheat, which must be protected by automatic temperature controller circuitry or cooling fan. List of parts for repairing a screwdriver with your own hands:
- Resistors.
- Capacitors.
- Simistry.
- Zener diodes.
- Gearbox.
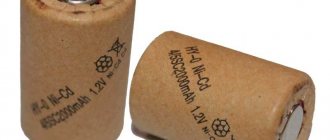
Revitalizing a nickel-cadmium battery
Screwdrivers equipped with nickel-cadmium batteries are practically a thing of the past. But they are still sold, found and even work, since Ni-Cd cells can “live” up to 20-25 years, although they can withstand about 900 charge/discharge cycles. Another feature of nickel-cadmium batteries is that they can be stored in a discharged state. So if you find your grandfather’s screwdriver with a Ni-Cd battery in the attic, then it makes sense to try to revive it.
Let's try to charge the battery. Any charger capable of providing the required voltage and current equal to half the battery capacity will do.
For Ni-Cd cells this charging current is normal. They can easily withstand a current equal to their capacity, and even twice as much.
We turn it on and try to charge it. If the battery takes charge, then we continue. If not and there is a hollow zero on it, we move on to plan “G” and “P” (see below).
As soon as the voltage on the battery reaches 1.37 V, multiplied by the number of batteries, we stop the process. But that's not all. It is not a fact that the battery is fully charged. Nickel-cadmium batteries suffer from the so-called memory effect. If they were constantly discharged, say, to 60%, and then put on charge, then they will get used to it and will continue to refuse to work when discharged to the same 60%. Therefore, we discharge our battery with approximately the same current as we charged it. We discharge to a value of 1 V, multiplied by the number of batteries. You can use car lamps or the screwdriver itself as a load.
After that, fully charge again. We repeat the “charge/discharge” operation 3-4 times. We fully charge and try to use a screwdriver. If even after all these manipulations the battery capacity is significantly lower than declared, then, unfortunately, we have on our hands a decrepit, outdated old man. He cannot be resuscitated.
Plan "Zh", push
Plan “G” is to “push” the battery with short (0.2-0.3 sec) high current pulses. Moreover, the current should be much (tens of times) greater than the battery capacity. It is better to “push” each battery separately. Therefore, we open the battery and find out where each battery has a plus and a minus. We will use a car battery as a pusher, but any other powerful source with a voltage of 10-15 V will do.
We connect the minus of our element to the minus of the “pusher”, connect one end of the wire to the plus of the “pusher”, and with the other end we briefly touch the positive terminal of the Ni-Cd element. The frequency of touches is 2-3 per second. As a result of such burning, the dendrites that caused microcircuits are eliminated, and the battery comes to life.
While touching, make sure that the wire does not weld to the battery terminal. In general, it is better to touch not with the wire, but, say, with the head of the screw on which the wire is screwed. And don't forget about safety glasses!
The operation is carried out within 5-6 seconds. We put it on charge. If the process has started, we eliminate the memory effect (see above). Let's try to use it.
Repair of current sources
Rechargeable batteries actually do not have complex spare parts, since they are assembled from simple charging elements. In order to determine the repair, you need to open the source and check for damage. Tools and materials that will be needed when performing repairs:
- Multimeter.
- Screwdriver.
- Electrical contact cleaner.
- Insulating tape.
There are times when the coil of a cordless screwdriver is defective and hence overheats the device. The insulation melts easily, the batteries are damaged and the cordless screwdriver cannot be used. A technical error cannot always be determined by external inspection and disassembly of the instrument is required.
Sequence of operations:
- Unplug the tool from the electrical outlet.
- Use a rag, sandpaper, or electric contact cleaner to clean the contacts between the power handle and the charger.
- Plug in the power supply several times to make sure it is functioning correctly.
- Check the device for DC output. Set the multimeter to 25 DCV. Plug it into an electrical outlet.
- Touch its two probes to the corresponding contacts (+ and -). If the meter readings are zero, swap them.
- The DCV output should be around or slightly above the power rating of the source. That is, at 9 V DC the device should show no more than 10 V.
- Check the AC output source. Set the multimeter to 25 ACV. Touch the two probes to the contacts. If there is no reading, the transformer is faulty. Select a replacement with the same denomination and size.
- Check the battery. Fully charge the battery. Set the meter to a DCV scale greater than the rated power of the battery pack.
- Touch the red probe to the + terminal and the black probe to the terminal and measure.
- Replace the battery if the reading is 1 volt below rated power.
Diagnostics of the condition of power tools
Hot surfaces of the cordless screwdriver and battery indicate overheating of the tool. Overheating is a process that can occur in two cases. On the one hand, the screwdriver has an internal defect, and on the other hand, it is possible that it is being used incorrectly. To do this, before repairing, you need to check:
- First, test the current sources - an electrical outlet. There are 3 ways to check. First, connect another device to it and see if it works properly. And you can also connect the tool you are testing to another outlet and see if the battery charges. Finally, check the indicators on it, such as lights or sound, to make sure it is receiving electricity.
- Battery performance. Sometimes the reason may not be in it, but in some separate elementary battery. This can be determined in two ways. Try connecting the battery to a different charger and see if it will charge. You can try replacing the problematic element in the battery.
- Check the charger and determine if there are any visible damaged parts. You need to pay attention to the contacts that connect to the outputs. Make sure they are not bent or broken.
- Check metal parts for corrosion or rust, which is a sign of moisture. If the parts have come into contact with liquid, there may be a short circuit that prevents the battery from turning on.
- Use a voltmeter connected to it to repair battery chargers. Touch the contacts of the device using the probes and ensure there is a reading. If they are missing, switch probes and try again. If there is still no reading, the battery is not working and needs to be replaced.
- Clean with a small amount of alcohol and a cotton swab. Remove corrosion using fine sandpaper. Before applying test voltage to the device, you need to make sure that the alcohol is dry and the electrical parts do not have a wet surface.
Screwdrivers are produced by a large number of companies; tools from Interskol, Bosch, and Makita are especially popular. They are usually extremely durable and reliable, however, individual parts may wear out. For example, when the drill does not work when you pull the trigger. Such a breakdown indicates that the trigger (button) does not work. Replacing the trigger is a fairly simple operation. Before starting repairs, the battery must be removed to prevent injury when the engine is engaged. The procedure for replacing the regulator using the example of a charger for a Bosch screwdriver:
- Remove the battery before using the drill. Release the two release clips on each side of the battery and remove the battery. After removing the 12.0V battery, place it in a safe location away from the work area. Place the equipment on a clean, level surface with the screw holes facing up.
- Locate the screw that connects the two halves of the outer housing at the rear edge of the battery shaft. Use angled tweezers to remove it.
- Place the tweezers into the slot on the inside of the clamp. Use your other hand to firmly attach the drill and pull up until the clamp releases.
- Locate the eight 5.5mm screws located on the upward facing side of the drill bit.
- Remove each screw using a T8 screwdriver, storing them in a safe place. Once all the screws are loose, release the housing to open the motor and remove it.
- Place your finger under the metal tab and carefully lift it up to release the trigger. Gently grasp the trigger assembly and gently pull up.
- Disconnect the two wires connecting the motor to the trigger using a pair of pliers.
- Fix a faulty trigger.
Another type of repair with a Bosch screwdriver, for example, or from another well-known manufacturer is required much less frequently and is best entrusted to a service center.
Cordless screwdrivers are quite reliable these days, so it's actually hard to find any failures on the 18V model. Lithium-ion batteries have excellent battery life and low self-discharge rates, making tools equipped with them a regular choice in the home.
Instructions for charging a lithium battery
Modern screwdrivers are equipped with lithium-ion (Li-ion) batteries, so we will charge devices of this type. If you don’t have a standard charger (charger) at hand, there are several options to solve the problem:
- use a car charger;
- use a car battery;
- charge the battery using the laptop power supply;
- use a specialized charger for lithium batteries;
- use a laboratory power supply.
Since lithium batteries are capricious and can even be dangerous if charged incorrectly, we will analyze each option in more detail.
Before reading further, we recommend that you read the article “How to properly charge Li-ion, NiCd and NiMh screwdriver batteries?”.
From car charger
Every motorist has a device for charging 12 V lead-acid car batteries. But the charger is different from the charger. We need at least one that allows you to manually adjust the charging current. Although the ideal option would be a charger with current stabilization, or even better with current and voltage stabilization.
If we have an automatic machine, everything is simple. We set the final charging voltage. It can be easily calculated using the following formula: the final charging voltage of one lithium battery (4.2 V), multiplied by the number of batteries in the battery. For example, a 12V lithium battery has 3 batteries. Therefore, you need to set the voltage on the charger to 12.6 V. Then we set the charging current regulator to zero, connect the battery to the screwdriver, observing the polarity (plus the battery to the plus of the charger, minus to the minus), turn on charging and set the charging current to no higher than 25% of the battery capacity screwdriver. The battery capacity is usually indicated on its case.
Lithium batteries can be charged with a current equal to the capacity, but this mode causes rapid degradation of the elements. It is better to use it when “there is no time, but you need the edge.”
That's it, we just have to wait. When the battery is charged, the charger will automatically stop the process.
If we do not have current and voltage stabilization, we will have to constantly monitor the charging current, which will change as charging proceeds, and the voltage. If the charger is equipped with its own voltmeter and ammeter, then we use them. If not, you will have to add measuring instruments to the charging circuit. It looks something like this:
Lithium batteries cannot be overcharged. An overcharged lithium cell will catch fire or even explode. Therefore, we carefully monitor the voltage on the battery.
Expert opinion
Alexey Bartosh
Specialist in repair and maintenance of electrical equipment and industrial electronics.
Ask a Question
A car charger can only be used if the standard charger of the screwdriver is designed for a voltage of no higher than 14 V. If our screwdriver is designed for charging with a voltage of, say, 18 V, then it will not be charged from a car charger.
From a car battery
This method is only suitable for screwdrivers whose charger outputs 12 volts.
But you cannot connect the screwdriver battery directly to a car battery. It is necessary to limit the charging current. This is easy to do using a tuning wire-wound resistor with a power of at least 10 W or car lamps connected in parallel. How many lamps are needed is selected experimentally. They must provide a charging current in the range of 10 – 50% of the capacity. Exceeding the charging current may cause the lithium battery to explode, too low will significantly increase the charging current.
We add measuring instruments, a voltmeter and an ammeter to our circuit (see above), and begin charging, constantly monitoring the voltage. As soon as it rises to the required value (4.2 V, multiplied by the number of batteries in the screwdriver battery), we stop charging.
A 12-volt screwdriver can only be charged from a fully charged battery. If it is discharged and the voltage at its terminals is below 12 V, then the screwdriver will not charge.
Laptop power supply
This method is suitable for charging the battery of any screwdriver - be it twelve or eighteen volt. To do this, just take a laptop power supply that produces 19 V.
The charging algorithm is the same as when charging from a car battery. We limit the current with a ballast resistor or car lamps, add measuring instruments to the circuit, connect the screwdriver battery and charge it, constantly monitoring the voltage.
Special charger
The most convenient, but not the cheapest option is a universal charger. For example, what is shown below costs about 2,500 rubles. And this is not the most expensive option.
Universal automatic charger
But this device can do everything - independently charge almost all types of batteries and batteries for any voltage. We just need to indicate to the device the type of battery and its capacity. All current information is displayed on the display, including charging time, current state of charge, amount of energy received by the battery, etc. There is a built-in balancer for balancing individual batteries, an automatic discharge device, a battery capacity meter and much more.
Expert opinion
Alexey Bartosh
Specialist in repair and maintenance of electrical equipment and industrial electronics.
Ask a Question
This option is optimal if we are actively engaged in servicing different types of batteries. If we only need to charge a screwdriver, then buying such a device is a waste of money, since the vast majority of functions will not be in demand.
So, we only need to charge the screwdriver. Let's go to the store and look. This is what we need. Relatively cheap (from 250 to 350 rubles depending on the output voltage) and cheerful. The main thing is to buy one that is designed for the voltage we need. They all look the same, but differ in output voltage - 12.6 V, 16.8 V, 21 V, 25 V, and current - 1 A, 2A. The one shown in the photo produces 12.6 volts and provides a current of 2 amps.
We tell the seller what kind of battery we have (voltage and capacity) or what voltage and current we need the charger for. We pay, take the warranty card, charger and go home to try. Don't we have such a nest? No problem. Included with the charger is:
If it is not included in the kit, then it is easy to find it separately in the same store. We cut the socket into the battery. We solder, observing the polarity: the inner pin is “plus”, the outer contact is “minus” (this information is printed on the charger body). We connect the charger and smoke. While charging is in progress, the red eye on the charger glows. Once the process is complete, the red eye will change to green and charging will stop. Turn it off and go turn the screws.
Important! Although this device looks like a regular adapter, in fact it is an automatic charger for lithium batteries. It cannot be used as a power supply.
By the way, you can order this charger for lithium batteries from aliexpress:
Option #1
Option No. 2
Expert opinion
Alexey Bartosh
Specialist in repair and maintenance of electrical equipment and industrial electronics.
Ask a Question
How to choose:
1. For screwdrivers with a 12-volt battery, you need a 12.6-volt charger; sellers may designate it as 3S (from the name of the battery assembly - 3 in series).
2. For screwdrivers with a 14.4-volt battery, you need a 16.8-volt charger; sellers may designate it as 4S (4 banks connected in series).
Laboratory power supply
The process here is no different from working with a car charger. We set the required current, if the power supply allows it, then the final voltage, and charge. If it is impossible to set the final voltage, then monitor the current and voltage. As soon as it reaches the specified value, disconnect the battery.
The convenience of this option is that it allows you to charge screwdrivers with any battery voltage, since almost all laboratory power supplies can provide 25 V. For example, the one shown in the photo produces a voltage of up to 30 V at a current of up to 5 A.
On a note. There is no point in buying a laboratory power supply to charge a screwdriver. It’s easier to contact a radio technician you know, who probably has a similar device. Or maybe you have it too.
Sometimes you can top up via USB
There are screwdrivers equipped with a USB port. An example is the Xiaomi Akku Ankuo screwdriver.
If you have one, then there are no problems. According to the manufacturer, this tool can even be charged from the USB port of a computer or laptop! True, he (the manufacturer) modestly keeps silent about how long such charging from a laptop will take. A week? Two? Therefore, it is better to use a five-volt network charger capable of providing a current of at least 2-3 A. However, there is one more problem: you will have to find a USB/USB cable in a store or make it yourself.
Important! There is a lot of information on the Internet on how to independently convert a regular screwdriver for USB charging. It is suggested to simply cut the corresponding socket into a screwdriver and solder it to the battery. This is complete nonsense, which was written by one literate person, and the rest was copied and pasted from him.