When to connect the wire
There are three common situations where a coaxial cable connection is needed.
- Complete break or partial damage to the cable antenna line. The wire transmits an ethereal signal, which is very sensitive and can be attenuated by the slightest factors. Therefore, if you see some very vulnerable spot on the line, where the wire is barely holding on, it is better to cut it and connect it again.
- It is necessary to extend the antenna cable for the TV. It often happens when television equipment is moved to another place in the room. Accordingly, the previously laid wire may not be enough. Then you have to lengthen the wire. A second piece is connected to the end of the previous cable to reach its destination.
- Connecting an existing wire to another television receiver. Instead of installing a separate antenna for each TV, you can connect to an already working one. Then a wire is drawn from the new TV, which connects to the line running to the apartment or house.
Useful tips
Which television cable is better: features of choice
Experts use the methods described to recommend how to repair a TV cable and talk about the need for proper installation. When laying it in the baseboard channel, it is advisable to use a construction stapler to create a fastening for the inner wall of the baseboard.
Important! When renovating an apartment, always leave a supply of television wires, based on half the perimeter of the room, in case you rearrange furniture or TV.
Note! Modern television receivers use, in addition to the antenna cable, additional adapters that connect to the TV wire.
The quality of the image is also affected by the shelf life (operability of the TV cable), the reason for this is the qualitative change in television broadcasting stations and improvement in technology. For this reason, when looking for a malfunction or a bad TV picture on the screen, you need to start from the parameters of the installed TV wire.
Additional Information. In order to simplify the work of extending the television wire, experts recommend choosing threaded F connectors, without soldering. There are plugs with a soldered screen, then before soldering the screen, you need to tin it and quickly solder it to the plug without melting the internal insulation.
If you connect a TV extension cable to an antenna with an amplifier, you should use only the plug that is included with the antenna. It has a decoupling device and a power supply with connection.
Experts recommend:
- during the renovation process, install a television cable in each room of the apartment;
- try to install television wires with hidden installation in a protected version: corrugated sleeve or plastic box;
- it is recommended to use a cable with a lower attenuation coefficient, but not less than 22 decibels;
- the distance between the power electrical wiring on one side and the antenna cable with Internet wires on the other side must be at least 150 millimeters.
When choosing a method for extending a television cable, you must understand that this violates its integrity and always reduces the quality of the resulting image on the television receiver - it is advisable to change the cable completely, from the splitter to the TV signal receiver. Connection using F connectors is considered the simplest and most accessible for cable extension; in addition, the reliability of the connection is maintained.
When choosing soldering to extend wires, you need to remember about the temperature heating of the surfaces, carry out all operations without melting the insulation, check the reliability and quality of soldering, do not make low-quality twists, it is better to have a soldered bandage on the central cores.
Is it possible to connect without losing signal?
Having an attachment point on any sensitive conductor creates losses. But, depending on the connection method, the losses will either be invisible or be felt even with the naked eye when channels are displayed.
If you need to connect an antenna cable without loss of signal, the only correct method is to install two F-connectors at the ends and connect them with a threaded adapter. This is the most reliable way, and you can always disconnect back if necessary.
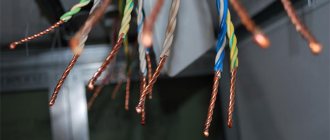
If we talk about twisting, then this is the worst way to connect a television cable to each other. A high-quality alternative is soldering, which also eliminates the loss of the television signal after connection.
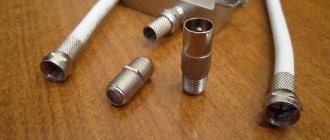
Connection of plug and socket
Antenna cable connection via connector
This method is suitable for you if you already have a “destination” to which you need to direct and then connect the antenna cord. This can be the F-type receiving socket of a TV or set-top box; you can also connect a coaxial cable with a plug to the nearest antenna socket and connect it to the F-socket of the extension cable. For such connections it is convenient to use corner terminals.
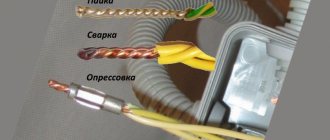
How to connect: working methods
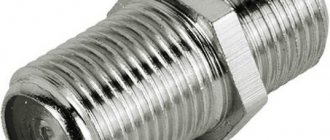
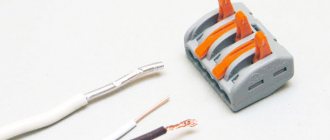
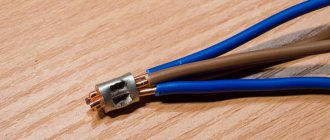
- Adapter for connecting two F-type connectors to each other (coupling coupling). In common parlance it is called a barrel. The screen is connected through the common metal part of the adapter. And inside there is a groove for connecting the cable core. This is the best way to connect or extend a TV cable.
- Soldering. The second best method of attaching wires. But you need to know how to use a soldering iron. Therefore, you need a soldering iron and solder.
- Twisting. Allows you to return the line to functionality, but is not recommended for use. It is better to use it only as a temporary connection until you buy an adapter.
- Extension cord for television cable. Sold immediately with plugs attached. A female connector is attached to one side to connect it to the male end of the previous wire. If you need to do cable extension, then this is a good option. There is nothing you need to do other than plug in the extension cord. The cost of the cord depends on the length and quality of workmanship (conductor material and insulation).
- Splitter. If in a home television system only one TV operates from the antenna, then installing even the simplest two-channel splitter is not worth it. Yes, the divider contains one antenna signal input and outputs. Therefore, connect one part of the wire that leads from the on-air receiver to the input of the splitter, and connect the second to the output. But the problem is that the splitter not only passes the signal through the connected cable, but also splits it. The division is performed by the number of outputs on the splitter. Therefore, if one TV receiver is used, then initially the maximum signal will be halved. This may affect the reception of television channels. So, if the already weak signal level decreases by half, then half of the channels may disappear. That is, the TV will show 10 channels, not 20. This is a fairly common situation with people who connect through a television divider.
How does a television cable work?
The typical antenna-type television cable was invented in 1880 by British physicist Oliver Heaviside.
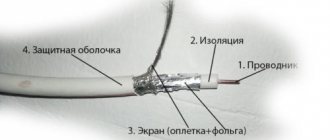
It was called coaxial because the transmission of a radio frequency electrical signal was carried out through a coaxial wire - a wire with a special internal structure. Unlike a shielded cord, it contains the following required elements:
- Central core - internal conductor in the form of a single wire made of copper or aluminum;
- Insulation made of solid or semi-air polypropylene, which serves as a “gasket” between the conductor and the braid;
- Screen - an external conductor in the form of a foil sheet or braid made of aluminum alloy or copper, and coated with a layer of aluminum;
- The outer shell serves to protect against external electrical interference and mechanical influences, and is made of light-stabilized polypropylene.
All elements are important for transmitting a stable signal, so thorough preparation of everyone is required. In the language of specialists, this process is called “cutting”. It involves disconnecting the cable, removing the insulation from individual parts and shaping it for future jointing.
How to make the connection correctly
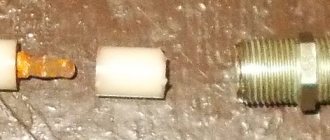
Before connecting a TV cable without causing loss of the antenna signal, it is necessary to install F-type connectors on the two ends being connected. The action is quite simple, even beginners can handle it. To work you need a sharp knife, the connector itself and pliers.
- First, the cable sheath is removed from the edge by 1 cm.
- The screen straightens and bends in the opposite direction (inward).
- The vein is exposed. To do this, 7-8 mm of the inner layer is removed from the previously cleaned area.
When the cable for the F-connector is cut, installation is done. Start winding the part onto the wire with your hands. If installation is difficult, use pliers to help. But you don’t need to clamp it too hard, as this can lead to breakage of the connector housing. Modern parts are made of thin metal of poor quality.
Also mount the antenna connector on the end of the second TV cable.
Afterwards, complete the connection by screwing the connectors onto the barrel.
If you need to connect three cables, then not a double, but a triple coupling is used. The principle of operation is similar, only three wires are processed.
How to connect the cables
Extension, connection and connection of modern antenna cables is carried out using special F-sockets and factory-made splitters. In the first case, in order to connect several wires using an adapter, you need to purchase several wrap-around plugs and F-type adapters. Before repairing a damaged element, it is necessary to cut through the cable braid shield with a sharp blade to expose the core. After this, it is necessary to bend the aluminum screen and foil with a braid of thin copper wire in the opposite direction.
You may be interested in Heating wire for pipes
Next, you need to carefully remove the plastic insulator, which will require cutting the insulation in the central part of the product. Once this procedure is completed, the pre-prepared plug is installed over the foil collar and secured by a forced threading device to the soft cable material, and the metal core is cut so that it protrudes no more than 5 mm beyond the metal tip of the plug. A factory-made conductor element is installed on the head of the plug, which comes complete with a standard connection.
Upon completion of all work, an antenna wire of the required length is obtained with a securely fixed plug for connection to the antenna socket.
Connection using F-connector
In the second case, to extend the cable, you will need a splitter - a device designed to evenly distribute the incoming signal. The design of this device is similar to the plug, and the installation procedure is exactly the same as the process described above. You just have to point out that thanks to the splitter you can not only extend the wires, but also connect them to several television signal receivers. All products are also fixed through an adapter with a threaded connection.
Connection with splitter
Solder connection
You can take the easiest route and solder without any problems. Simply expose the conductive parts of the wire (shielding layer and copper core). Next, solder the wire and rewind it with electrical tape. Then do the same with the braid, cover with insulating tape. The option is working, but unprofessional.
Soldering can be done much more accurately, maintaining maximum joint quality. First, text instructions are provided, and then a step-by-step gallery of pictures is located.
- Make a longitudinal cut of the shell to a length of 50-60 mm.
- Bend the shell along with the entire shielding layer back.
- Cut about 20 mm of internal insulation from the conductor. The shortening is done so that after joining the core for connecting the screen there is a reserve.
- Position the cables so that the sides of the outer cuts face each other. From the inside, half expose the core by making a transverse cut of 20 mm.
- Bend the insulation away from the core to make it easier to work further.
- Solder the wires together along all available lengths.
- Align the core so that it is flush with the rest of the wire. The insulation halves must fit together. If there are any excess pieces left on top, cut them off with a knife.
- Then connect the foil and solder the braid. The inside of the foil does not conduct current, so when the top foil layer is placed on the bottom, there may be no contact. Therefore, you need to unfold the top or bottom layer so that the top of the foil of one wire is in contact with the top of the other.
- At the last stage, return the previously cut shell to its place and rewind with electrical tape.
What is needed to extend the antenna cable
Ideally, the signal cable should be laid in one piece without breaks or connections to ensure:
- minimum active and inductive resistance of the transmission line;
- uniformity of wave resistance along the length;
- continuity of the screen, for protection against electromagnetic fields.
As practice shows, lossless connections are not possible with HDMI cables designed to transmit signals in Ultra HD format. A high-quality connection of sections of a coaxial antenna cable cannot negatively affect the level of the received TV signal.
The list of necessary materials and tools for joining will depend on the chosen connection method. And it will be described in detail when considering each method separately. However, no matter what option you choose, you will definitely need an additional piece of cable of the required length.
If you go to a specialized store, you will come across at least 5–10 types of cable, significantly different from each other. The sales consultant will tell you about the product presented and advise you on the best option, but you need not just a piece of high-quality wire, but a piece of cable with the most similar characteristics to the existing one.
Therefore, before going to the store, carefully study and write down the markings on the piece you have, or even better if you can cut off and take a small piece with you for a sample.
Twist
The connection cannot be used for dissimilar materials, for example, copper and steel, or aluminum and copper. In the future, this will lead to oxidation and, as a result, contact breakdown.
The operating technology is very simple:
- perform stripping;
- Twist the wires, wrap them with high-quality electrical tape in several layers;
- twist the screens and also wrap them with insulation on top.
This can be done using the same algorithm as soldering (see above).
Why do you need an external antenna?
A modern 3g modem is small in size and light in weight; it can be carried in your pocket.
This is a significant advantage, but the small dimensions impose restrictions on the size of the internal antenna; as a result, satisfactory operation of the device is possible only at a short distance from the base station.
It follows from this that a modem that copes with its duties perfectly in the city center will be completely useless, for example, in the country. If you solder the antenna to a 3g modem, you can pick up even a very weak signal, and thus solve the problem. But to do this, the gadget will have to be disassembled.
Connection via a splitter
Twisting three or more cables together is not the best solution. If you need to watch more than one TV receiver from one terrestrial DVB-T2 antenna, you should connect through a splitter.
To connect, use the instructions above about using a coupling (adapter). The splitter uses threads of the same diameter, so the connection principle is no different.
The only thing is that the nests must match. The crab's input is signed IN, ANT IN. This is the input for connecting the cable that leads from the antenna. Each output is signed OUT with a number. There can be up to 8 of the latter on one device. The quantity depends on the splitter.
If the antenna is active, then the same divider is needed. The ability to pass power from an external unit or set-top box through a splitter is required. Typically the divider will have a "Power Pass" designation on it.
Application of passive antenna
A homemade antenna extender can be used in conjunction with a laptop, access point or Wi-Fi modem
It is important to understand that after such manipulations the result may not always be positive, and in the event of a breakdown, it will be impossible to repair the equipment under warranty
Updating network adapters to match your router
If not, look up your model number online to see its exact specifications. Of course, depending on what devices you own, find out what wireless standard they can use.
Buy or build a high gain antenna
Most wireless routers and wireless adapters with external antennas come with cheap omnidirectional antennas.
Turn your cable or electrical outlets into wireless access points
If you want to double or even triple your wireless range, you can try adding additional wireless access points to your network. However, this performance hit may be acceptable if you plan to do basic web browsing on these computers; You won't really enjoy transferring large files or streaming video between computers on a network.
Additional wireless access points
A router is basically a network controller, and it connects to or is integrated with your internet modem.
If you decide to connect the antenna to the modem, then you need to study the features of the process. The fact is that inside the modem there is a small antenna, to which a homemade antenna is attached. To complete this process, you will have to disassemble the modem flash drive. You can remove the cover using a scalpel, screwdriver or utility knife (pull towards the top from the USB connector, do not press too hard, otherwise the case will break).
When a signal passes through any cable, it loses strength. Thus, the shorter the cable, the less loss. Less is more in this situation, and the correct cable length is important to maintain signal quality. All cell phone signal boosters are complete kits and come with the appropriate cable type and length to maintain reasonable dB gain
But there are times when you need a little more reach, so it's important to figure out how much length you can afford before the signal loss offsets any signal gain
Opening the modem, you will see two connectors covered with paper. Follow these instructions:
- remove the protective layer from the modem elements;
- connect the antenna you assembled yourself to the left connector (the hole you need will be on the left side if the device itself is positioned with the USB connector facing you);
- use a coaxial cable that is not too long, otherwise the result will not be much different from using a modem without an extension cord.
There are three types of cables for home cell phone signal boosters. As mentioned earlier, as the cable length increases, more signal loss occurs. Signal gain and loss are measured in decibels. And decibels are measured exponentially.
And as always, you can convert your cable installation. Think of the signal as the drink and the cables as the straws. 75 ohm cables are your typical soda straws, and 50 ohm cables are the big straws of the carlav's throat. Nothing is more frustrating than trying to install a new TV on a cable or satellite system and discovering that the existing coaxial cable is not long enough to fit it into the desired viewing location. Coaxial cable, often called "coaxial cable", can become expensive in length, so replacing the entire cable may be out of a consumer's budget.
Choosing a cable for your needs
Let's look at each popular television cable for digital television. Which one will be better for your needs is up to you to determine.
RG-6U
This is the optimal cable in terms of price/quality ratio. It has a steel conductor with a cross-section from 0.724 mm2 to 0.816 mm2 (depending on the manufacturer), coated with copper. The external insulation is made of PVC, and the internal dielectric is made of polyurethane with a thickness of up to 4.7 mm. The total cable diameter averages 6.6 - 6.8 mm.
Note that the RG-6U cable has good flexibility, so it is convenient for them to perform angular turns. It also has a relatively low signal attenuation rate of around 9.2 dB per 100 m of cable - this is better than its younger predecessor RG-59, although they are approximately the same price.
The only drawback is the low density of external PVC insulation, which deteriorates quite quickly under the influence of environmental factors. That is why it is better to use the cable for laying inside the house.
Average cost: 9 – 20 rubles per 1 m.
RK-75
This is the Russian analogue of the RG-6U cable. It has a huge number of varieties in terms of conductor cross-section, braiding and insulation. The core cross-section ranges from 0.75 mm2 to 1.63 mm2. To connect a TV to an antenna at a distance of up to 30 m, a cable with a cross-section of 0.75 - 0.9 mm2 is quite suitable. A thicker cable is only worth taking for satellite TV.
The outer insulation is made of polyvinyl chloride, and the braiding is made of tinned copper wire. Note that all types of RK-75 are able to withstand temperatures from -60°C to +60°C, and cope well with the influence of moisture and ultraviolet radiation, so it can be used for outdoor installation. The amount of bends should be at least 30 mm - this is enough to pass most corners.
Average cost: 13 – 30 rubles per 1 m.
SAT-50
The creation of the Italian company Cavel perfectly transmits high-frequency video and audio signals. The cross-section of the copper core of the conductor is 1 mm2, which allows the cable to be used for both digital and satellite television. The wire has a screen in the form of 64 aluminum threads with a cross-section of 0.12 mm2 and a double layer of foil. The screen perfectly blocks interference and improves signal transmission.
The signal improvement factor here is 60 dB, and the total wire thickness is 6.6 mm. The external insulation perfectly withstands UV rays and precipitation, so you can install the cable outside the window. The manufacturer claims that the cable has a service life of 15 years, but in fact it all depends on the operating conditions.
Average cost: 30 – 50 rubles per 1 m.
SAT-703
This is the older brother of the SAT-50 and is designed for laying over long distances (from 50 m). It has an increased copper core cross-section of 1.13 mm2 and a high-quality shielding system consisting of tinned copper wire and a double layer of foil. The signal amplification factor is 80 dB, which allows for virtually no loss of signal quality even with large sections of cable between the antenna and the receiver. They can connect several TVs to one antenna via a splitter.
Thanks to the foamed dielectric, the cable has low attenuation. It weighs 3.95 kg at 100 m - about 0.5 kg more than the SAT-50. The bends of SAT-703 must be at least 43 mm. For the most part, it is designed for installation in extreme conditions outside the window. It is not practical to install it indoors for reasons of economy.
Average cost: 35 – 60 rubles per 1m.
DG-113
The cable is manufactured by Cavel and is designed for connecting digital, cable and satellite television. It is considered the best in signal transmission, since the gain here is 90 dB thanks to the improved screen design made of tinned copper and double foil. The diameter of the copper core here is the same as that of the SAT-703 - 1.13 mm2. Note that the foamed dielectric is coated on top with a thin hydrocarbon layer (PIB), which improves moisture-proof properties. The outer insulation is resistant to ultraviolet radiation and does not crack over time.
The overall cable thickness is 6.6mm, so it fits standard 6mm F connectors. The manufacturer claims a product service life of at least 15 years. Cable DG-113, like SAT-703, is better to use for outdoor installation, and for indoor use another cheaper one
Laying such a wire over long distances will cost a considerable amount, so if you want to save money, it is better to pay attention to cheaper analogues
Average cost: 55 – 70 rubles per 1 m.
How to connect different types of antennas to your TV
The method of connecting an antenna to a TV directly depends on its type. Satellite is the most difficult to connect, followed by outdoor ones, and indoor ones are the easiest to connect.
Features of connecting a satellite dish
A satellite TV system consists of the following components:
- the antenna itself;
- receiver;
- tuning cable;
- converter
The first step is to install the “plate” itself on an adjustable mount. Experts calculate for each area the direction in which the satellite is located and the angle of inclination of the antenna, determined by its height. The connector is not tightened too much, since a special adjustment cable will be used, which will then be replaced with a permanent one.
Then the receiver is prepared. It needs to be flashed to work with a specific satellite, and a list of channels must be “uploaded” into it. In the future, if the number of channels steadily decreases, this procedure must be repeated. The receiver is connected to the TV via an AV cable (“tulip”) or HDMI.
When cable connections are required
Connecting antenna lines is necessary in the following cases:
- If the cable sheath is damaged, pinched or completely torn, it can be replaced with a new one. However, for those who want to save time and money, it is easier to connect it. Sometimes, if the outer shell is damaged, the screen and the main core are not affected, you can insulate the wire. When there are gusts, both ends are stripped and connected in a convenient way.
- Extending the antenna cable also involves connecting it. Most often this is due to a rearrangement, a change of residence or a change in the location of the TV. Sometimes a coaxial cable is bought end-to-end, without taking into account updating the contacts, and over time it becomes short.
- Connecting a second TV to the same antenna. This is often done when there are children in the family or disputes arise over watching TV channels. This is not entirely convenient, but it is cheap - you don’t have to buy a receiver and a new antenna.
Sometimes during repairs, owners try to hide the TV line by laying the cable along a longer path.
How to connect an antenna to a TV
Many people still have old versions of TVs, on the back panel of which you may not find a connector for the F-connector. If you have a suitable plug, great, just below we will tell you how to install it on the cable in order to properly connect the TV.
To the common house antenna
In apartment buildings, you often need to connect to a common building antenna or to a collective antenna in the entrance. What does it mean? A group of antennas is installed on the building. Most often this is a “dish” and one or two terrestrial antennas, depending on how many channels are broadcast in the region and from which directions.
Each apartment has a television outlet. The antennas are connected to a distribution box, from which the cables extend to the sockets in the apartments. The TV or decoder is connected to a socket in the apartment, and not to the antenna on the roof.
The TV signal from a professional, well-designed antenna equipment installation is strong and stable, and interference may be minor.
Individual passive antenna
Even a child can be trusted to connect a passive television antenna (it’s safe). All you need to do is insert the cable into the socket of your TV or digital tuner. Another thing is if the signal is to be divided, then connect the splitter first.
Individual active antenna
In active antennas, current is supplied to the amplifier through the same cable through which the TV signal comes from the antenna. They often use almost identical power supplies. Their design includes a separator - a special television plug in which the TV signal is separated from the supply voltage for the amplifier. Therefore, connecting an active antenna comes down to bringing the coaxial inside the separator and securing it using an SWA type clamp, and connecting the separator connector to the antenna input on the TV.