Advantages and disadvantages of soldering electrical wiring
A soldered connection is considered one of the best in terms of reliability.
In order to properly solder wires, you need to familiarize yourself with the advantages and disadvantages of the method. Despite existing analogues, this method is considered the most widespread and in demand, especially in electronics.
Advantages:
- Reliability. An important parameter is the presence and magnitude of the contact resistance. The lower it is, the better. For soldering, this parameter is extremely small. In terms of reliability, soldering is inferior to welding only in one case - if the work had to be performed in extreme conditions, for example, in an environment with extremely high or low temperatures, or exposure to aggressive environments. If we are talking about apartment wiring or a country house, such factors are excluded.
- The connection does not require maintenance.
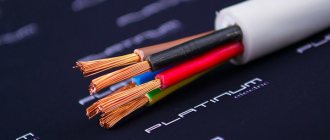
- Versatility of use. With the help of soldering, it is possible to connect single-core and stranded wires with different cross-sectional areas, in any combination. This versatility allows you to solve many non-standard and difficult tasks. In addition, the use of fluxes ensures a reliable connection of copper and aluminum conductors.
- Low connection cost. To carry out the work you will need a soldering iron, solder and flux. The cost is low and the consumption is economical.
Flaws:
- Low technology. To carry out the work, it is necessary to carry out many preparatory measures, hence the high labor intensity.
- The need for performer qualifications.
When soldering, changes in materials occur at the molecular level, so the pre-soldered parts undergo thorough preparation.
Methods for connecting conductors in a box
There is no single possible method. When choosing a way to connect wires in a junction box, an electrician weighs all factors: from the cost of materials to the expected load.
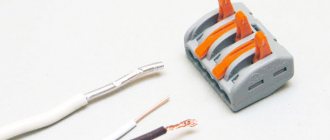
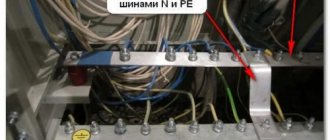
- Terminals. There is an opinion that this method is the most reliable, but this is a false statement. Most often, terminals are used on boxes with ready-made contact pads.
This connection of wires in the box allows you to disconnect one of the lines at any time (for example, for repairs) without causing damage to the entire power system. There are two ways to connect, directly to the block (by making a ring from a wire core), or using a terminal. With the ring everything is simple, you just need to ensure that the wire is laid in such a way that when tightening the threaded connection, the contact does not loosen.
But with terminals everything is more complicated. It is irrational to crimp a single-core wire: you can mechanically damage the conductor, and the core will break off at any moment. And when laid in a box, a single-core cable with terminals takes up a lot of space, and it is difficult to separate different phases at a sufficient distance.
An excellent result is obtained when crimping a multi-core soft cable; the contact terminal fits comfortably. But stationary installation of multi-core cable is nonsense.
Bottom line: Terminal blocks in the distribution box are convenient, but it is better to make the connection directly to the conductor under the screw, without using crimp terminals.
There are modern boxes with quick-installation contact blocks. This solution is really convenient, but is designed for light load.
Thus, the use of contact blocks is justified only if it is necessary to periodically disconnect one of the lines. And even then, sooner or later the conductor will break off.
- For standard wiring in an apartment (or household), the classics are still more suitable:
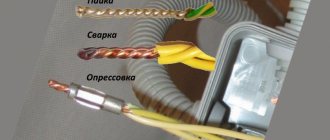
Welding wires in a junction box has been used since time immemorial. Anyone who repaired their Khrushchev or Brezhnev cars probably noticed a drop of solidified melt at the end of the aluminum strands in the boxes.
Today, the use of aluminum wiring is prohibited by the PUE, and the welding connection method is still popular. The point is this: after carefully twisting the stripped wires, the contact of the welding machine is briefly applied to the end point.
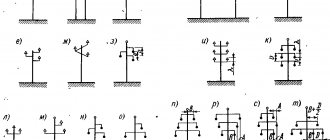
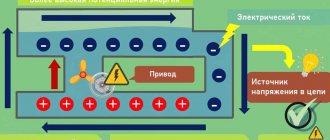
Usually this is a compact device of low power. It is used by almost all professional electricians. Works on the principle of a spot welding spotter. It will not be possible to light an arc, but the metal at the point of application melts properly. The figure shows the simplest circuit that can be assembled at home.
The connection quality is more than sufficient. In addition to the total twist length (40–50 mm), the ball at the end forms a point with minimal resistance. An additional plus is that this twist will not unwind even when moving the wires inside the box.
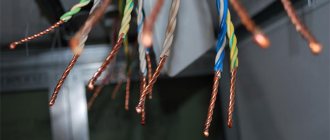
If a welding machine is not available, we limit ourselves to ordinary twisting. Of course, we make the connection not with our fingers, but with the help of pliers. All ends of the conductor must be stripped (but not reduced in cross-section), the length of the bare part before twisting begins is at least 70 mm.
Twisting is done after the wires are finally secured in the box. If the cable moves, the connection may become weak. The result is sparking, overheating, and contact breakage. It will be good if there is no fire.
- As an option, after twisting, the wires are soldered in the junction box.
Important! There is a widespread opinion among amateurs: under load, the twist will heat up and the solder will melt. Firstly: a load capable of heating a conductor to the melting temperature of solder is unrealistic at home. Of course, provided that the circuit breakers are in working order. Secondly: heating during twisting occurs due to loose contact, and this can be solved by soldering.
The reliability is not much worse than with welding. In this case, there is no need to purchase (do it yourself) a welding machine, a fairly powerful soldering iron, or even a hair dryer.
Tip: Use the most powerful soldering tool possible. It is better to expose the contacts to high temperatures for a short time than to heat the contacts slowly and for a long time with a weak heater.
During heating, monitor the condition of the insulation. If it starts to melt, take a break until it cools completely. Immediately after soldering, do not move the wire; allow both the solder and the insulation to cool.
Use refractory solders; these alloys have higher strength characteristics.
- Crimping. From the point of view of electrical conductivity, the quality of contact is no better than that of conventional twisting. But the strength of the connection increases significantly. If it is not possible to weld or solder the twist, crimp it using a special sleeve.
You can get by with pliers, but a special tool is still more reliable. There are bushings for parallel splicing of wires, and there are for fixing twists. There is no fundamental difference. If there are two or three conductors, parallel crimping is suitable. For larger quantities - crimping after twisting.
In fact, the methods discussed above are a modernization of the good old twisting. You should not be skeptical about the issue. Due to poor contact in the junction box, many fires occurred and damage to household appliances was caused. Therefore, when repairing electrical wiring in your home, use technical means to improve contact in the twist to the maximum.
What you need to solder electrical wiring
Electric soldering iron
Before soldering the wire, prepare the working tool and consumables. To complete the work you will need the following list of tools:
- An ordinary household soldering iron, the power of which ranges from 40-100 W. As an analogue, a welding machine is used, on which it is possible to control the temperature of the tip, which simplifies the soldering process.
- A small file for cleaning the soldering iron tip.
- Knife for removing the insulating layer.
- Twisting pliers.
- Rosin intended for tinning surfaces.
- Solder for soldering different materials; acid-free fluxes are used as an analogue.
Gas torch Solder
Pine rosin for soldering
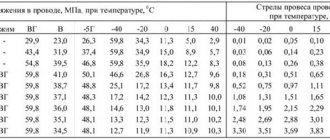
Soldering aluminum and copper wires differs somewhat in the types of solders used.
| Copper | Aluminum |
Tin and lead compounds are used. The markings are as follows:
|
|
How to solder wires correctly
An example of universal sharpening of a soldering iron tip and proper maintenance of its working area.
The soldering process may differ slightly depending on the materials used. Different methods involve the use of different soldering compounds and fluxes. Most often, soldering of wires is carried out when connecting copper wires with a cross-sectional area of up to 6 mm2.
When performing work, follow the following algorithm:
- An insulating layer of approximately 5-6 cm in length is removed from the wires.
- Heat up the working tool and cover the surface with a layer of rosin or flux. The first one does not work well on oxidized surfaces; when penetrating deeply into the twist, it is important to thoroughly pre-treat the materials.
- When heating the wire using a heated tool with solder on the tip, it is important to achieve uniform distribution of solder over the entire surface being processed.
- When soldering twists, specialists must fill all irregularities with solder.
- Upon completion of the work, all twists are carefully insulated using special nozzles, electrical tape and heat-shrink tubing.
If you need to work with aluminum, it is important to take into account its high oxidation rate when in contact with oxygen. The resulting film does not allow for reliable adhesion of the metal to the solder.
Stripping wires of insulation
The oxide is removed mechanically, then the surface is serviced. The algorithm for connecting aluminum cores depends on the type of flux used and the cross-sectional area. A gas burner is usually used for heating.
The procedure for soldering cores with an area of 4-10 mm2:
- At the ends of cores 5-6 cm long, the insulating layer is removed.
- To obtain a metallic shine, the wires are cleaned with a file, sandpaper or a knife. Tinning of stranded wires
- The cores are connected to each other overlapping using a double twist method, and a groove is made at the point of contact in the middle.
- The joint is heated to a temperature that is close to the melting point of the solder joint.
- Each side of the twist is processed in a similar way, all cavities are filled with tin.
- At the end of the work, clean the connection area with gasoline.
- The cleaned surface is covered with asphalt varnish and carefully insulated.
The work is not fast, but the high quality and durability of the connections is worth the time and effort.
Headphone wire connection
Often, working headphones become unusable due to a broken wire near the plug. But if you have broken headphones with an intact plug, you can replace this element by connecting the wires.
The work is performed in this order:
- the cable at the plug in front of the damaged area and the entire element from faulty headphones are cut off;
- insulation is removed to a length of up to 2 cm;
- the common wire is located and the integrity of the remaining wires is checked;
- the internal cores are cut as follows: one is left untouched, the common one is 5 mm, the second is twice as much;
- joints up to 5 mm long are cleaned and tinned;
- a heat-shrinkable tube is placed on the wires with a margin of 3 cm relative to the length of the contact point;
- a heat-shrinkable tube up to 1 cm in length is placed on the longer ends, the common wire remains free;
- the wires are twisted and soldered;
- the finished contacts are bent outward, covered with heat-shrinkable tubing and heated with the fire of a lighter or match.
In this way you can restore damaged headphones.
How to solder copper and aluminum wires
Soldering wires using the twisting method.
The copper wire is thoroughly cleaned, then immersed in rosin. A specialist melts a few drops of solder and, for tinning, the wire is immersed in the molten mass. The procedure is performed with careful and uniform movements.
Solder for soldering should cover the surface of the wire as little as possible. Excess is removed with a hot soldering iron. As the work progresses, the red tint of the copper wire should change to silver.
If the work is to be done with multi-core soldering irons, each wire should be untwisted and only then tinned. Then everything returns to its original position.
Before soldering electrical wires, the aluminum wire must be cleaned, and then the previously prepared flux must be evenly distributed over its surface. Next, the aluminum wire is thoroughly rubbed with a small piece of tinol and heated with the flame of a gas burner. Such manipulations will allow you to effectively get rid of the oxide film.
To increase the quality of connection of single-wire wires, twisting of tinned wires of small sizes is used. All resulting cavities are filled with tinol.
The next stage is connecting copper and aluminum wires. To do this, restore the insulating layer. For dry rooms, only cotton tape can be used.
How can you insulate solder?
There are three methods:
- Solder mask;
- Insulating varnish;
- Protective flux.
Solder mask is widely used among cell phone and laptop repair technicians. They use a mask to isolate thin wires, or traces, from each other.
The mask hardens under ultraviolet light. It is applied to the surface and hardens in 5-10 minutes under the rays of an ultraviolet flashlight. It comes in different colors: green, yellow, blue, red, etc.
Insulating varnish is usually colorless. Apply a thin layer to the contact. It has a pungent odor, so you should work in a ventilated area. The time for complete hardening varies depending on the manufacturer. Complete hardening can take either 6 hours or 24 hours.
Protective flux is the simplest option. After soldering, you don’t have to remove it; it has high resistance and hardens over time.
Previously, during electronics production, a simple method of coating circuit boards from external influences was used. It is a mixture of rosin and alcohol. It securely covers the solder layer. However, this is not a perfect method, but it works.
Recommendations, precautions
Professional soldering iron DANIU 110V/220V 60W with temperature control and a set of tools.
You should familiarize yourself with the recommendations that will allow you to perform the assigned tasks efficiently:
- When choosing a soldering iron, you need to pay attention to models equipped with additional cones, needles and a set of replaceable tips.
- Before you begin soldering, you need to pay special attention to cleaning the tip. If the tip is too dirty, remove all dirt using a soldering iron. You can use pieces of wood or cardboard as an aid.
- When changing the length of the soldering iron, the heating temperature of the tool also changes.
- It is not recommended to leave the soldering iron “dry” while heating the working element. The tip needs to be dipped into rosin regularly.
It is important to take precautions. You need to work in personal protective equipment: special clothing (overalls), goggles and gloves. Do not leave exposed areas of the body, otherwise severe burns may occur.