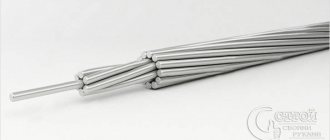
It would seem that what could be simpler than connecting wires? After all, there are several ways to connect wires. This includes twisting wires, soldering wires, welding wires, crimping and connecting wires using a terminal block. Even a schoolchild knows the easiest way to twist conductors. You need to put the ends of the metal wires, called strands, together and twist them into one “pigtail”, and then wrap them with electrical tape. There is no need for a soldering iron, terminal block, connecting caps and other “unnecessaries”. Any “own electrician” has mastered this operation. And, when the need arises, he applies this method in his daily practice. For example, it splices the power cord wires of a household appliance, tablet or computer adapter after a break. Russian “technicians” use this technology for fastening wires everywhere. It’s just that the rules for the design of electrical installations of PES do not provide for “twisting”, all kinds of “bends” and “rivets”. There are no such electrical installation methods in other regulatory documents. Why?
What is wire twisting and why is it dangerous?
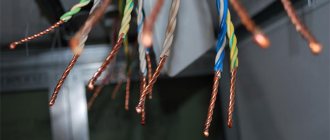
Several decades ago, when the load on electrical wiring was not so great, such a connection was popular. Moreover, experienced craftsmen taught me, then a young electrician, to first thoroughly strip the metal cores, twist them tightly, and crimp them with pliers.
The length of this twist had to be created on the order of 10 cm to ensure good electrical contact, as shown in the lowest example. And they would reject anything higher, despite its beauty.
Inside closed, dry rooms, such twists worked for years and decades. However, many electricians violated the technology and created poor-quality contact.
In addition, in a humid environment, the metal oxidizes. The electrical resistance of its transition surface layer deteriorates. This leads to increased heating of the cores and premature damage to the insulation.
Therefore, modern rules, in particular the PUE (clause 2.1.21.), simply twisting wires is prohibited, no matter how beautifully and reliably it is done.
Particularly dangerous are twists of aluminum wires, as well as cores made of different metals - copper and aluminum.
This is due to the high ductility of soft aluminum and its high ability to create, under the influence of atmospheric oxygen, an outer layer of oxides that protects the internal structure of the metal. This film reduces conductivity.
When currents flow with increased loads, aluminum, which has a high coefficient of linear expansion, heats up, increasing its volume. After cooling, it contracts, breaking the tightness of the joint.
Each heating and cooling cycle degrades the electrical performance of the strand. In addition, copper and aluminum work as a galvanic couple, and these are additional chemical reactions with the formation of surface oxides.
My recommendation: wherever you find a simple twist, get rid of it. Reinforce it by soldering, welding, crimping or any other approved method.
How to twist with soldering to create reliable electrical contact: 3 ways
When soldering, reliable electrical contact is created due to the penetration of molten solder into all voids. Between the turns of twist and the solder, a strong bond of mutual diffusion of both metals is created.
Soldering provides a guaranteed durable electrical contact with good conductivity. It requires adherence to certain technology and high-quality training.
It is necessary to remove the insulation from the wires, clean the metal cores from oxides, and impregnate it with flux. It will remove all organic contaminants from the prepared surface.
Acidic fluxes, such as a solution of zinc in sulfuric acid or aspirin, are difficult to remove from the surface of soldered parts. Over time, the remaining droplets enter into a chemical reaction with the metal of the veins and disrupt their conductivity.
Rosin is used for soldering electrical circuits. It can be dissolved in ethyl alcohol and applied with a brush to the wires to be connected.
When soldering twists, it is convenient to keep the prepared flux solution in a small bottle and simply dip the stripped and twisted wires into it one by one. This way you can work at heights.
Conventional electric soldering irons with resistive heating make this work difficult: you need to perform a lot of steps to distribute the solder over the surface of the twist and warm it up well.
For household electrical wires, it is convenient to use gas soldering irons, the flame of which is directed onto a special crucible with solder, mounted at a distance from the burner.
A twist treated with a rosin solution, even one located high above the ceiling in a distribution box, is placed for a short time in a crucible with molten solder and removed.
Similar work can be done with an electric soldering iron for polypropylene pipes. A certain part of electricians have adapted well and quickly to soldering strands with it.
Another modern way of obtaining high-quality soldering of almost any metal is to use solder paste, which is specially created for use in electrical installation work.
It is simply applied with a stick to the twist, as shown below for aluminum wire, and then heated in the flame of a burner.
The adhesion of metals is characterized by good current conductivity. For small amounts of electrical work in an apartment, you can get by with the flame of an ordinary lighter.
The paste has neutral acidity with a pH of about 7.5. It is used sparingly. If there is a lot of flux left at the soldering site, it can be easily washed off with water and wiped with a paper napkin.
ELP solder paste is recommended for connecting wires made of different metals, including copper and aluminum. It eliminates the effect of creating a galvanic couple due to the phenomenon of diffusion created by partial penetration of solder into the surface layer of the wires being soldered.
How to weld twisted wires: what is important to consider
This method is based on creating local heating of the end of the twist to the temperature of the metal melt, followed by its solidification in the form of a contact ball.
The work can be done with a homemade step-down transformer with a voltage of about 24 volts and a power of 1 kilowatt.
But it is better to use an inverter that produces direct current. To create an arc, a carbon electrode is used, which touches the welding site. It can be replaced with graphite.
The second contact of the circuit is formed by crimping the opposite part of the twist with pliers near the insulation. Their wide jaws serve as a cooling radiator, removing heat from the dielectric layer, protecting it from overheating and damage.
The current strength is about 30-80 amperes and the duration of its flow is about a second, which is selected experimentally depending on the design of the welding machine, the chemical composition and thickness of the cores.
When working at heights near the ceiling, it is convenient to place the wires down.
At the end of the weld, a drop-shaped alloy is formed in the shape of a contact ball.
To ensure reliable contact, you first need to practice on a control sample. A small current will not heat the joint well, but an excessive current will transfer excessive temperature to the insulation layer and burn the metal.
Evaluate the test welding both for mechanical strength and for the created weld structure.
What to pay attention to
The vertical arrangement of the twist during welding allows the melt to better fill the space between the copper wires, giving the drop of metal the shape of a sphere.
You must work in protective gloves, use a welder's mask to protect your eyes, and special shoes. You can easily “catch bunnies” or “catch” a drop of molten metal on clothes or shoes.
After welding one joint, it is better to wait a short time and let it cool, and then move on to processing the next one. This recommendation will prevent accidental burns.
After welding, the exposed conductors are insulated, put on a heat-shrinkable tube, and treated with an industrial hair dryer.
Then the wires are placed in a junction box and covered with a lid.
Crimping with sleeves: technology features
The installation method is based on creating tight contact between metal conductors placed inside a tube made of the same material and compressing the entire structure under a certain force with a uniform distribution of the acting load.
Good electrical contact is created due to the joint deformation of metals.
The sleeve (tube for connecting wires) is produced by industry for specific wire sizes and their quantity. They can be designed to connect cores from:
- copper;
- aluminum;
- and even copper and aluminum.
Copper sleeves (CM) can be produced with additional tinning with tin and bismuth. They are designated GML and are noted for their high resistance to corrosion.
Aluminum sleeves are designated GA. To connect copper and aluminum wires, GAM sleeves are used, and with an insulation layer they are called GSI.
Their sizes can be found in catalogs. As an example, I present the main characteristics of some GML cartridges in a small table.
The dimensions of the sleeve are specially selected for the cross-section of the switched wire. Their correct choice affects the quality of the electrical connection.
For crimping, a special tool is used: press pliers. If you work with pliers, hammers and other improvised means, the contact created will be of poor quality.
Press pliers are produced in various designs and operating principles for crimping different types of sleeves and tips.
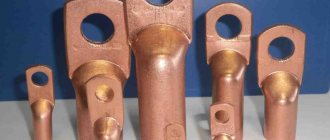
Using the same principle, lugs for stranded wires are selected and crimped for connecting them to the terminals of electrical equipment.
This is especially true for automotive equipment, where wiring is subject to increased mechanical vibrations and electrical loads. Yes, and in the household network there is installation with flexible conductors.
As an example, retro wiring in a wooden house. Although this is not the only case.
Crimping of conductors is a rather large and complex topic, which allows you to create a high-quality connection of electrical contacts. Andrey Kulagin explains its technology well in his video. I recommend watching it.
Connecting wires by crimping
To crimp wires, a special aluminum or copper sleeve is required - it is selected based on the size of the twist (bundle diameter), and the material is the same as for the conductors. The bare wires, stripped to a shine, are twisted, a tube-sleeve is put on them, which is clamped with special pliers.
An example of crimping conductors with a sleeve
Both sleeves and pliers are different, there are several types. Each of them has its own rules of use (the number of wires that can be packed in a sleeve), which you need to be well versed in. It is necessary to pack the wires according to certain rules, measure the size of the resulting bundle, and adjust it to the requirements. In general, a rather dreary task. Therefore, this type of wire connection is mainly used by professional electricians, and more and more often they are switching to spring clamps.
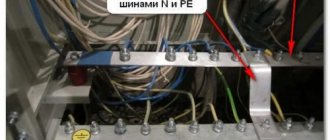
Terminal blocks and terminal blocks: how to distinguish between durable and unreliable structures
Most often, terminal blocks are used in lighting circuits with relatively small loads. They are made from different materials and different shapes.
The plastic-covered housing has holes for installing stripped wires and a slot for the head of the clamping screw.
All simple terminal blocks are made of cheap transparent polyethylene with inserts of thin brass sockets with screw terminals, as shown at the very top of the picture.
Their disadvantages:
- thin-walled brass easily bursts when the metal core is normally clamped with a screw;
- weak threads on the nut cannot withstand the load when tightening the wire;
- the lower edge of the screw is made with sharp edges, which greatly deform the wire, even when crimped into NShVI lugs.
Working with such structures is difficult. They are not reliable, break, and create excessive heating of the wiring.
After connecting each wire to the screw connection, it is necessary to check the quality of the connection: take the terminal block in one hand and the wire in the other. A sharp pull should not destroy the contact created.
Higher quality terminal blocks are made of durable, smooth plastic with thick metal tubes and clamping plates that do not crush the metal cores. They have strong screws and nuts.
With their help, it is convenient to connect wires made of different metals, for example, connecting aluminum apartment wiring to flexible copper conductors of an LED chandelier or lamp. But you shouldn’t neglect NShVI tips.
Previously, terminals with a screw clamp under a ring were common, which ensured tighter contact between the core and the terminal. When installing, pay attention to the correct installation in the direction of tightening the screw.
The squeezing force should compress the ring inward, and not bend outward, weakening the contact.
When connecting without a ring with a straight section, the metal cores are placed closer to the thread, and their position is monitored when clamping. When tightened, it should be well secured and not fall out. Checked by pulling.
In all terminal blocks, without exception, the condition of the wire insulation is monitored. It should not get under the thread anywhere or interfere with the creation of electrical contact.
Terminal connections are permitted by all electrical installation regulations. But, they require periodic inspection and tightening of screw terminals approximately every two years in circuits with permissible loads. After overloads and short circuits they should be inspected immediately.
Connection insulation means
The resulting assembly must be insulated efficiently. For this purpose, three technologies are used.
Insulation tape
Insulating tape Adhesive
backed tape is made from polyester and epoxy film, fiberglass and mica, acetate material and paper. To insulate a household electrical network, tape with PVC film of class P and a rubber adhesive side is suitable. The material has good adhesion, elasticity and density. Closing the twist with electrical tape is carried out step by step:
- Winding begins 2-3 cm above the bare area, on top of the wire insulation.
- The tape is wound at a slight angle towards the end of the twist.
- At the tip, the material is folded around it and wound in the opposite direction.
- After the winding point, the tape is trimmed with a stationery knife or scissors.
A two-layer coating with insulating tape will ensure reliability and maximum tightness of the contact connection.
Electrical tape is suitable for twisting electrical cords located in a dry room.
Heat shrink tube
Heat shrink for wires
Thermal tube is made from special polymers, which compress and expand when blown with hot air or exposed to warm water. Heat-shrinkable material can be placed on top of objects with complex terrain. When working with twisted wires, the products provide high-quality insulation and protect against ruptures.
The isolation process is carried out as follows:
- A piece is cut from the tube, 1 cm larger than the bare area.
- The piece is put on 1 wire before the seam begins.
- The cable is twisted.
- After twisting the wires, the thermotube is pulled into place where it was twisted.
- Use a hair dryer or lighter to heat the tube at a distance of 1-2 cm. Under the heat jet it will shrink and press tightly to the area.
Conductors insulated with a thermal tube, according to GOST, can be laid in a bathroom, immersed in soil or water.
Construction Insulating Clamp
When organizing home or apartment wiring, it is advisable to use special PPE caps. The products are put into place for insulation after twisting. The tip of the cap is cut off, and the PPE itself is forced onto the wire. Special springs on the surface will expand and tightly grasp the connection. For added strength, you can turn the cap clockwise.
When using PPE, the twisted section does not need to be soldered.
Bolt connection: when to use
I specifically highlighted this type of connection separately because it is used in rare cases. Here, too, you can connect wires made of different metals, including connecting copper and aluminum through intermediate steel washers.
The rings must work in compression. It is acceptable, but highly undesirable, to connect three wires. No more.
A separate threaded connection for a screw does not look beautiful and requires additional insulation. It cannot be hidden in plaster, grooves, under suspended or suspended ceilings. It must be provided with free access for preventive examinations.
For these reasons, a connection with a separate bolt or screw is used as an exception when other methods cannot be used or are not advisable.
Most often it can be found in industrial installations after repairing a certain section of the circuit, and not in a home environment.
Walnut connection
3 square metal plates with four holes in the corners are bolted together, forming two cavities for connecting different conductors. They can be used to join copper and aluminum.
The increased dimensions of the plates ensure heat dissipation. Live parts are covered with a dielectric casing.
The bolt compression force provides good contact resistance of the electrical contacts.
The disadvantages of the design include the large dimensions of the walnut terminal block, which require additional space in the electrical panel.
Types of twists
Types of twists
By correctly twisting the wires, you can get a reliable and dense section. Craftsmen resort to various types of connections - safe and durable:
- Bandage - an additional one is applied to two sections and braided around them. This creates additional reinforcement of the area.
- Groove - with the parallel technique, one core remains motionless, and the second wraps around it. This type involves making 3-4 turns of one cable around the second. Then the first one is laid tightly parallel to the second one and 3-4 turns are made again;
- parallel connection. Two conductors with the insulation removed at the same level are laid side by side. The tips cross tightly and twist in any direction.
All types of twists can be used as temporary fastening.
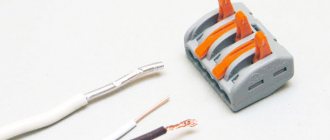
PPE caps: why electricians constantly argue about them
The basis for creating an electrical contact here is the same twist, but it is performed in a short section and is reinforced by compressed coils of the spring, immediately closed with a dielectric cap.
Similar connectors came to us from the west. They are now widely used in frame construction: installation is easy and quick, and is stipulated by the rules.
At first glance, the design is ideal for an electrician: the work is done quickly and does not require much effort. But there are many complaints about PPE caps (insulated compression). Let's dwell on them.
The caps are not universal. They are created for a specific wire size. A thinner section will not allow the spring to compress the twist normally, although it is made in a conical shape.
Careless installers do the twisting using pliers, and simply put the cap on it as insulation. Since it is poorly secured by springs, it often flies off, exposing the metal under tension, which is dangerous.
Initially, the twisting must be prepared, but the main pressing force is created by springs when manually screwing the housing clockwise.
Simple PPE caps have an insufficiently strong spring and a satisfactory dielectric body. Manufacturers improved their shortcomings by releasing the SIZ-K model, specified by the technical specifications of the TU 3449-036-97284872-2007 series.
They allow you to mount three cores in one housing due to the use of a special galvanized spring with a rectangular cross-section profile, which has increased adhesion to the metal of the conductors.
Reinforced wings on the body facilitate installation and reduce the manual effort that must be applied when screwing. The design of the lower part of the skirt has increased protection of the contact connection.
The insulation of PPE caps is designed for voltages up to 600 volts.
However, many electricians try to use this design only in lighting networks with small current loads, for example, when using LED lamps.
Independent tests under maximum loads do not show reliable performance of PPE. In addition, the market is flooded with beautiful fakes made using simplified technology.
We twist it ourselves
During professional installation, special clamps are used to make the connection - PPE (connecting insulating clamp); when using them, the final twisting is allowed from the point of view of the PUE, but it is worth remembering that such a device is not designed for high currents.
So, how to properly twist wires at home? To carry out this manipulation you need:
- take into account all the nuances in advance (location, load of connected equipment, etc.);
- acquire the necessary tools (pliers, knife, sandpaper, heat shrink, it is advisable to have a hot air gun and a device for removing insulation, a screwdriver if available).
Let's consider the situation with weaving from a cord with a monolithic core:
- It is necessary to strip the ends of each wire by 3–4 cm using a special tool (stripper) or a construction knife. It is extremely important to remove the insulation and not leave deep cuts on the core.
- Then we put heat shrink on one of the ends.
- Then degrease the cleaned surfaces with alcohol/acetone/white spirit.
- Then, taking sandpaper, we clean the wire strands.
- We lay the wires parallel to each other and hold them with pliers.
- We weave (in accordance with the diagram) clockwise, at least 5 turns for one core. The wires must fit tightly to each other.
- We move the heat shrink to the contact point and warm it up with a hairdryer or lighter. It is important that the heat shrink fits tightly at the twisting site.
It is possible to hold one end of the cord with a screwdriver and slowly turn it, while weaving the other end onto the rotating end, creating tension with your hands, thereby making the connection tighter.
With a stranded cord the situation is a little different:
- We strip the ends of each wire by 3–4 cm using a special tool (stripper) or a construction knife. It is extremely important to carefully remove the insulation and not damage/cut off the cord cores.
- We put heat shrink on one end of the cord.
- We unravel the strands of each cord into small “braids”.
- We degrease the resulting “braids” with alcohol/acetone and so on.
- We lay the cores on top of each other from each cord.
- We weave together, making the connection tight (at least 5-6 turns per braid).
- We move the heat shrink to the place of twisting, warm it up with a hairdryer/lighter. The heat shrink should fit tightly at the joint.
If it is necessary to create a “braid” from monocore and multicore cords, the algorithm also changes, and it is highly advisable to weave using the “Branching” method:
- We strip the ends of each wire by 3–4 cm using a special tool (stripper) or a construction knife. We take care not to damage the cores of each cord.
- We put heat shrink on one of the cords.
- We degrease the cleaned areas with alcohol/acetone and so on.
- We bend the single-core end 180 degrees, so that it then presses the twist.
- We twist the multi-core cord around the single-core end in accordance with the diagram (clockwise), at least 5-6 turns, the more the better.
- We clamp the pre-bent end of the single-core wire and press it against the twist made with pliers.
- We move the heat shrink to the contact area and heat it with a hairdryer/lighter. We make sure that the heat shrink is well fixed at the twisting site.
At this point, we can consider the work done competently and efficiently. If you follow the instructions and take all necessary measures, you are guaranteed to get a high-quality connection for a long time.