Introduction
I am solemnly opening a new blog on Habré dedicated to Arduino! A blog about the universal opensource microcontroller Arduino, which will be of interest to all lovers of microelectronics, homemade gadgets and everyone who is not afraid to pick up a soldering iron.
Arduino is a line of electronic boards that can be connected to a computer via USB, and as peripherals - any devices from LEDs to mechanisms of radio-controlled models and robots. Programs for it are written in a simple and intuitive C-like Wiring language (with the ability to connect third-party libraries in C/C++, for example, to control LCD displays or motors), compiled and loaded into the device with one button, after which you immediately receive working autonomous gadget. No assembler, no extra wires and expensive parts and programmers - pure creativity, plug and play!
1"Brain" Arduino
The “brain” of Arduino is a microcontroller of the Atmega family. A microcontroller is a microprocessor with memory and various peripheral devices, implemented on a single chip. In fact, it is a single-chip microcomputer that is capable of performing relatively simple tasks. Different models from the Arduino family are equipped with different microcontrollers.
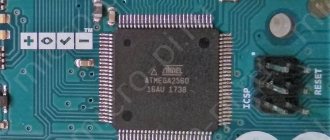
Atmega328 – the brain of the Arduino UNO
The photo shows an Atmega328 microcontroller. Such microcontrollers are based on Arduino UNO and Arduino Nano (but in a different case).
Application
After a short story to friends and acquaintances about Arduino (“this is a type of electronic construction kit, a micro-computer into which you can load any program and get any other device”), the most frequently asked question is “Why is all this?” or “How do I benefit from this?” Boring people, aren't they? Is there really not a single radio amateur among your acquaintances, or maybe you yourself are a radio amateur? The use of Arduino is very simple - not for fun, but for brain development. Is it interesting for Linux users to tinker with the kernel code? What's the use of this? Why don’t you do some “hardware” (as opposed to “software”) creativity? Right now, a fellow designer is sitting next to me and understanding... neural networks. In general, what can I say, the spirit of technical creativity has been forgotten, radio circles and aircraft modeling clubs have been forgotten. Everyone just sits at their computers and can’t do anything worthwhile with hardware other than plugging a plug into a socket. Build your own web server, color music installation or cool robot! The Arduino community already knows about successful examples: a GPS tracker with recording on an SD card, a simple audio player, a Twitter display, electronic games with a display and a touchscreen... Try to buy radio components and make something of your own! There is even a ready-made kit for creating a quad-core Arduino cluster...
VOICE CONTROL VIA SMARTPHONE
For the fourth point, I used another wonderful app - Utter!
Voice Commands Beta because it integrates with Tasker and can perform its tasks by voice command. But setting it up simply requires angelic patience. The procedure is simple: despite the requirement of Utter! install Russian voice search language for Android. Then we open the Utter interface! (what is important is not the recognition of commands, but the program interface) - Customization - Create commands - Run Tasker Task - select a task and try to pronounce the command the same way twice in a row. If it works, don’t relax and say two more words: for successful execution of the command and for errors.
If Utter! doesn’t understand at all, then you can leave the search engine in English and find any word/phrase that you can pronounce twice in a row the same way. The same applies to confirmation and error messages. Then just go to the Edit commands item and replace the texts with the ones you need. Just remember that Utter! cannot speak Russian, and therefore it is better to write confirmation and error messages in English or in transliteration.
Yes, we are not afraid when Utter! when repeating a command in Russian, he does not pronounce it. This, again, is a consequence of the fact that the app does not know how to use the Russian voice engine.
In general, the task is dreary, but solvable.
Specifications
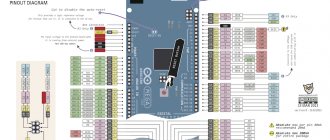
Arduino Diecimila is a small electronic board (hereinafter simply the board) whose core is the ATmega168 microcontroller.
The board has: 14 digital inputs/outputs, 6 of which can operate in PWM mode (and therefore control analog devices such as motors and transmit binary data), 6 analog inputs (the source information is not logical 0/1, but value voltage), a 16 MHz clock generator, power and USB connectors, an ICSP port (something like a serial interface for digital devices), several control LEDs and a reset button. This is quite enough to connect the board to the USB port of your computer, install the necessary software and start programming. Brief Specification
- Microcontroller: ATmega168
- Operating voltage: 5V
- Input voltage (recommended) : 7-12 V
- Input voltage (limits) : 6-20 V
- Digital I/O ports: 14 ports (6 with PWM signal)
- Analog input ports: 6 ports
- Port current: 40 mA
- Current for 3.3V source: 50 mA
- PROM (Flash Memory): 16 KB (of which 2 KB are used by the bootloader)
- RAM (SRAM): 1 KB
- ROM (EEPROM): 512 bytes
- Clock frequency: 16 MHz
Power The board is powered in two ways: via a USB cable (no other tricks need to be done, it is used during the debugging process), or via a special connector like the one found on laptops. You can buy such a connector at a radio store and attach a battery or a 9-volt Krona battery to it. Power supplies can be changed using a jumper on the board.
2"Hands" Arduino
But what good is a brain if it has no hands? In this case, the hands are electrical leads placed around the perimeter of the Arduino board. There are boards with more pins, and some with fewer. For example, the largest board in the Arduino family - Arduino Mega - has more than 70 independent pins, and the smallest - Arduino Pro Mini - has only 22 pins.
Comparison of Arduino Mega and Arduino Pro Mini
The photo shows a comparison of Arduino Mega and Arduino Pro Mini. Can you imagine what a person could do with as many hands as there are Arduino Mega pins?
Advantages and disadvantages
- Price. In Moscow, Arduino Diecimila can be bought for less than 1000 rubles. At the same time, you are buying a complete (well, almost) device that does not require additional equipment, such as expensive programmers and debugging stands, and does not require paid software.
- Cross-platform. Arduino software works on Windows, Macintosh OS X, Linux and other operating systems as it is open source and runs on Java. Most microcontroller systems are limited to Windows.
- Simple programming environment. The software interface is easy to use for beginners, but flexible enough for advanced users to quickly achieve the desired result. This is especially convenient in an educational environment, where students can easily understand the platform, and teachers can develop a course and assignments.
- Open source. The language can be extended with C++ libraries; more advanced specialists can create their own Arduino toolkit based on the AVR C compiler.
- Open specifications and equipment diagrams. Arduino is based on Atmel ATMEGA8 and ATMEGA168 microcontrollers. The module schematics are published under a Creative Commons license so experienced circuit designers can create their own version of the module to suit their needs. Even relatively inexperienced users can mock up a module to understand how it works and save money.
Among the shortcomings, I would like to note, perhaps, a rather poor software shell, a low processor frequency (which is actually quite high and, in addition, reduces power consumption) and a small amount of “disk” (flash) memory for programs. With such a clock frequency and memory capacity, it is unlikely that it will be possible to assemble a simple mp3 player. However, it is unlikely that anyone will try to make, say, a guided cruise missile based on Arduino. In addition, I could not find sane sources for assembling avr-gcc. Well, of course, you will have to know (or study in the process) the basics of electronics at the level of “plus/minus, resistor/capacitor” - there’s absolutely no way without this.
4What can Arduino control
As a result, such a number of “arms” of Arduino allows you to connect a huge number of different peripheral devices to it. Among them, for example:
- buttons, reed switches and joysticks,
- LEDs and photodiodes,
- microphones and speakers,
- electric motors and servos,
- LCD displays,
- radio tag readers (RFID and NFC),
- bluetooth, WiFi and Ethernet modules,
- SD card readers,
- radio receivers and radio transmitters,
- GPS and GSM modules...
And also dozens of different sensors:
- illumination,
- magnetic field,
- ultrasonic and laser rangefinders,
- gyroscopes and accelerometers,
- smoke and air composition sensors,
- pressure, temperature and humidity sensors...
And much, much more
All this turns Arduino into a universal system core that can be configured in a completely variety of ways. Want to make a radio-controlled pet feeder? Please! Do you want the window on your loggia to close when it starts to rain? Please! Do you want to control the brightness of the lighting in your room from your smartphone? Easily! Would you like to receive email notifications if your houseplants' soil becomes too dry? And this is possible!
Various sensors that can be connected to Arduino
The photo shows only a tiny part of the peripherals that can be connected to the Arduino. In fact, there are many, many more.
P.S
In the future, I will try to publish other notes, I will tell you how to assemble simple devices using Arduino and radio components purchased in the store, and I will also publish demo videos of finished devices. I would also really like to hear the opinion of Habrapeople about this phenomenon, find out what you would like to read about in the following posts, translate a number of articles for this blog, and perhaps gather a small Russian-speaking community of Arduino fans. Yes, and due to the lack of normal Internet at home, I will not be able to answer everyone at once... I apologize.
CONTROL VIA APP ON A SMARTPHONE
I have an Android smartphone, for which there is a wonderful Tasker app.
This is exactly what I wanted to use for automation. The beauty of Tasker is that the scripts and dialogs created in it can be exported to a stand-alone application, which is installed on Android devices in the same way as any other app. In other words, the advantage is that you don’t need to buy Tasker for every phone and tablet: just one full-featured version is enough to deploy control on all gadgets.
The procedure is:
1) Methodically create new Tasks in the Net category - GET request. In the request parameters you only need one thing: fill the address line with the full command. In my case, for example, 192.168.1.1/?1-on.
2) Open the Scenes editor, and add the necessary buttons there, not forgetting to assign one of the previously created tasks to a short press.
3) Create service tasks: Show Scene and Destroy Scene, they will be needed to open and close the virtual remote control. In principle, you can do without Destroy, you just need to make sure in Show Scene that the exit button option is enabled.
That's basically it. In this way, the third point of the technical specification is implemented: control via an app on a smartphone.