You can install lighting in your garage without involving specialists to save money. The work is not difficult, you can figure it out in just a few hours. To assemble a safe and reliable system, you must comply with the basic requirements from the Electrical Installation Rules (ELR) and first make a detailed project, which indicates the location and characteristics of all elements.
Making good lighting in the garage is not difficult if you understand all the nuances.
Types of light sources
When choosing a lamp or other light source, you need to pay attention to several points: equipment safety, operating life, protection from moisture and dust, resistance to temperature changes. Therefore, you need to evaluate all the pros and cons of each type and make the right decision.
Types of lamps
Various options are suitable for a garage, but you need to take into account the conditions of use and the features of the structure. Based on them, you can choose one of the following types:
- Incandescent lamps used to be installed in all garages, but today they are rarely used due to high electricity consumption and short service life. The filament does not produce very high-quality light and distributes it unevenly. Garage lamps are often bulky due to the large diffuser and massive body. During operation, they become very hot, which creates additional danger.
Example of incandescent lighting - Halogen light bulbs are advanced products with a tungsten filament and an inert gas pumped into the bulb. The light from them is much brighter, but the electricity consumption is also high. During operation, the surface gets very hot, so you definitely need a lampshade; this type does not tolerate shocks, voltage surges, or dust, so it is not suitable for the garage. A plus is the ability to use low-voltage lamps operating on 12 V through a power supply.
- Fluorescent lamps provide bright light without consuming much electricity. They can be either in the form of flasks or in a compact design for a standard cartridge. Suitable only for heated garages, since at temperatures below 5 degrees they work poorly and quickly fail. Another drawback is the mercury vapor inside, which evaporates into the air when the flask is damaged.
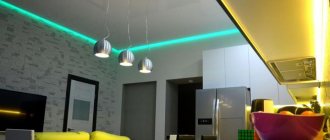
- LED lamps and luminaires consume the least amount of electricity and provide even, flicker-free light. You can choose different color temperatures, which is also important for comfort. For good visibility, it is better to choose cool colors that provide bright, uniform lighting. Instead of lamps, you can use lamps or LED strips, which can serve as backlight or full illumination of individual zones.
LED lighting is the safest and most economical to date.
You can combine different options if it gives a good result. But if possible, it is better to equip the garage with low-voltage LED lighting to ensure safety. A good LED garage lamp is more expensive, but due to energy savings and a long service life, it will ultimately cost less.
Useful tips from an electrician
- If you have divided all the lighting into certain zones, it is advisable to install the switch directly next to it. For example, near the mechanic’s table, near the hood, etc. If desired, you can install pass-through switches that will allow you to turn the lighting on and off, both from the entrance and from the zone itself.
- In case of a power outage, install emergency lighting in your garage. Halogen lamps or 12 V LED lamps are perfect for this. If the power goes out during repairs, you can always continue by powering the emergency lighting from the battery.
- If you have a spotlight at the entrance, connect it through a motion sensor, this way you will save on street lighting and can create a kind of alarm system.
- For greater efficiency, the luminous flux from stationary lighting in the garage must be diffused, which can be achieved with the help of lampshades and reflectors. But portable local illumination can be done with one beam of light for a specific point.
- Install a grounding loop and lay a third wire in the wiring, this will prevent electrical injury and fire due to a short to the frame.
- When choosing materials and devices, purchase products from well-known manufacturers.
Calculation of the number and power of lamps
Lighting standards are in SNIP 05.23.95. In order not to understand the documents, it is easier to highlight the main points and, in accordance with them, determine the required number of lamps and their location:
- For simplicity, use the standard for garage lighting in lux (this is an indicator equal to 1 lumen per square meter). If the garage is for repair work, then the minimum norm is 200 lux; when you just park a car in the room, 50-100 lux is enough. When carrying out work for a long time (more than 4 hours a day), illumination should be provided at least 300 lux, and for painting and body work - 500 lux or higher.
- For each type of lamp there is data on the luminous flux, and for LED lamps it is indicated on the packaging. To calculate the level of illumination for a garage, you need to multiply its area in square meters by 200 . For example, if the room is 4x5, then 20x200=4000 lux. On average, a 10-watt LED option produces a luminous flux of 700 lm, so you will need 6 light sources (you need to round up).
- It is better to use two less powerful lamps instead of one - the more uniform the light, the better. Therefore, it is worth considering in advance the location of the equipment, based on the characteristics of the garage and its size.
- If the garage is large, it is better to place the lamps on the ceiling with a distance of at least 50 cm from the wall; the rows should be no less than a meter apart from each other. If the ceiling height is large, additionally fix the lighting elements on the walls at a height of 150 cm from the floor.
The location of the lamps should be selected individually for each garage. - If the ceilings are low, you can get by with only wall lamps, evenly distributing them along the walls. Light the work area either with equipment located below eye level, or install lampshades that can be adjusted if necessary.
- Plan lighting for the inspection pit based on the norm of 200 lumens per square meter. Place evenly so that there are no dark areas. You can additionally add lighting on the steps to make movement safer.
By the way! To see what is on the floor and get out of the car safely, you can make the light at a level of 40 cm from the floor.
How to make lighting in the garage with your own hands?
For most car owners, a garage is not only a place to park their car, but also their own workshop, which allows them to carry out minor repairs to a four-wheeled unit. Due to the lack of sources of natural light, even during daylight hours, all repair operations are carried out under artificial lighting in the garage. Therefore, the quality of repairs and other work will directly depend on the competent choice and arrangement of lighting. Consider the procedure for making your own garage lighting.
A budget method of lighting with LED strip
If you don’t want to bother with wiring and installing lamps, you can make safe low-voltage lighting, which can be powered by one switch or socket. First of all, you will need a sufficient quantity of LED strip (you need to know the characteristics of one diode in order to divide the required power by this indicator, the result will be the number of diodes that will be required).
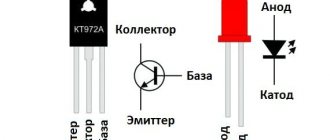
Three rows of LEDs provide excellent luminous flux.
Diodes can be located on the tape at different frequencies; the more of them, the better. Choose options with cool white light. It is better not to take RGB colored tapes, since their light characteristics are an order of magnitude lower than those of plain ones.
Density of LEDs on the strip.
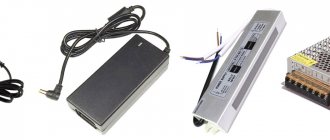
For power supply, you can buy a ready-made module, or you can adapt power supplies from a computer to further reduce the cost of the project. You will also need connection wires, connectors or a soldering iron to connect the contacts.
Installation work
It is recommended to provide illumination in the inspection hole as well.
For the work you will need an electric drill and a hammer drill with a set of drills suitable for the material from which the walls are made, as well as a screwdriver. You also need to purchase a multimeter. The screwdriver and gloves must be electrically insulated. You also need to prepare a level and pliers. The cross-section of the cables used for wiring is selected according to tables that take into account the rated electric current and power.
The places where the devices, distribution box, switches and sockets will be located are marked on the walls. Then they check that the wiring fits comfortably in the path of the planned installation, and put the car in the garage. If the arrangement of the system elements is comfortable, the car is taken out and holes are drilled to install the main components. Then the walls are grooved, a box is attached to them and a cable is threaded into it. When the input panel is installed, the wires are connected to the machines. You need to check that the input devices and RCDs are connected correctly. After installing sockets and lighting fixtures, the performance of the system is tested.
A low-voltage circuit is required for the inspection pit, since high humidity creates corresponding safety requirements. The permissible maximum direct current is 24 V, alternating current is 36. Power is supplied by a system consisting of a transformer, stabilizer and rectifier. The light stream should be directed to the bottom of the vehicle. Car transformers cannot be used.