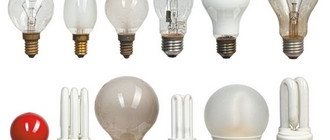
For those who like to read a book or work while sitting at a table, not to mention schoolchildren who spend hours studying textbooks, a table lamp is an indispensable lighting accessory.
When choosing it, you must take into account all the nuances that directly determine how convenient and safe it will be to use the device.
Few people think about it, but the wrong table lamp can easily burn down your house or cripple the health of a child. To prevent this from happening, when purchasing, you should know the main points and errors that are responsible for safety and affect your vision.
It’s hard to call an incorrectly selected lamp anything other than a hidden instrument of torture.
Lamp support or base
When choosing, first of all pay attention to the lamp support. It can be of two types:
- brilliant
- matte
If it is shiny, then such a base reflects most of the light. The light first falls on the leg and then reflects into your or your child’s eyes.
This greatly damages the retina and its crystalline lens. If you bought such a lamp and use it for 3 to 6 months, every day, for several hours, then your vision may drop by several diopters during this period.
Therefore, the base and leg should always be made of matte material.
This will help avoid glare and damage to your vision.
By the way, the requirements for a matte surface equally apply to the desktop.
Do not use a table lamp and plexiglass or other glass materials together.
The structure of a table lamp and its advantageous characteristics
A table lamp consists of several components:
- frame;
- the wire;
- switch;
- plug for connecting to the network.
A lamp is a necessary item for additional illumination of the workplace. It is impossible to imagine the workplace of a schoolchild or office worker without a table lamp. Advantages:
- mobility – devices weigh less than 5 kg and are easy to move;
- a variety of types at any price;
- direction of light to a specific area;
- versatility.
Flaws:
- fragility of the lampshade;
- difficulty of disposal;
- Mains power required.
Before purchasing a device, think through its location and, based on this, select the desired lamp.
Case color
When a schoolchild or adult works for a long time at his desk, the bright color of the desk lamp itself is an additional irritant. This causes the eyes to strain even more.
As a result, in just six months of such proximity, your vision may deteriorate significantly. If a shiny support gives a negative effect immediately, work under such lighting for a couple of minutes and then look into the distance and see for yourself.
But the bright, glossy color of the body, for example the same support leg, although it will already be plastic, will have an effect after at least a few months of use.
1 of 3
Therefore, a good lamp should be of a neutral color - gray, beige, dark.
Plus, it shouldn't glare.
Shade
The illuminators of rack-mount table lamps are made in the form of a light bulb under the lampshade. Its purpose is not only to be a fertile field for decoration, but also to be a partially translucent reflector, providing the required illumination of the working area of a given size. The lampshade for a table lamp can be made hard frameless or soft with a frame. The frame of the lampshade is most often made of wire in the form of a truncated straight cone, on the left in the figure, with simple (in the center) and complex (on the right) curvilinear elements.
Table lamp shade frames
The simplest way to cover a straight conical lampshade is with pieces of tape. It is labor-intensive, but the good thing is that the outer surface turns out smoothly curved, without breaks. The seams on the rims of the lampshade are masked with ruffles (item 1 in the next figure), braid, fringe, etc.
Textile lampshades for table lamps
There is no point in cutting the fabric in the form of a truncated cone to cover a conical lampshade, because... As a result of tightening the material, the lampshade will not be conical, but faceted, pyramidal. It will be easier to sew a lampshade cover from wedges, the patterns of which are built step by step without using any geometry:
- A sheet of thin cardboard or thick, rigid paper is placed on the frame section;
- Cardboard/paper is attached to the frame with an elastic band or tape;
- The outline of the pattern is drawn from the inside, this will give the lack of fabric necessary for tightly covering the lampshade;
- The fabric is taken from satin, twill or staple weave;
- Cut so that the warp threads of the fabric are oriented along the longitudinal axis of the pattern.
The finished lampshade is often decorated with rosettes, bows, etc. For such a case, there is an interesting design technique: the main fabric is thin, highly translucent, colorful, and the rosettes are sewn in pale pastel colors or very light ones, pos. 2. In the light, the lamp stands modestly in the interior, but when turned on in the dark, everything lights up.
How to cover a lampshade
An embroidered cover can simply be thrown over the frame of a lampshade with complex curved ribs (with a “waist”) and tightened with ribbons (item 3), thread, and an elastic band. But according to the rules, covering a lampshade with fabric is done like this:
Schemes for covering the edges of the frame of a table lamp lampshadeWedges are cut, giving a minimum allowance of 10-15 mm on the seam cuffs;
- Place the cover on the frame so that the seams are located exactly on the ribs;
- The seam flaps are straightened on both sides, respectively. ribs with a thin knitting needle or the eye of a gypsy needle;
- Sew up the seam flaps on the ribs in a stitch or with a spiral yarn over so that each rib is in the drawstring sleeve;
- The upper and lower rims are left unstitched for approx. 1.5 cm lapels;
- To achieve a uniform fit, the ribs are sheathed with cuffs not going along the circumference, but “jumping” along the diameter or largest chord. Schemes for covering the ribs for frames of 5, 6, 7 and 8 sections are given in Fig. on right. Based on them, sheathing schemes for frames of larger multiplicity are developed;
- The fabric is straightened, the lower flap is folded and the lower rim is trimmed with it in the same way as the ribs;
- Straighten the fabric again and trim the upper rim;
- They mask the seams on the rims, see above.
How about in a different way?
There are other ways to make a table lamp shade, allowing you to embody a variety of original design ideas in the material. For example, a dummy mandrel is glued from ordinary writing paper (item 1 in the figure) and impregnated twice with acrylic varnish. After the varnish has dried, lanolin is rubbed into the block several times until it stops being absorbed. The lanolin-coated blank is wrapped with a thread pulled through PVA glue, as when making Christmas tree decorations with your own hands. A device for pulling thread through PVA is shown in Fig. lower right. The finished hard lampshade cover is fixed with drops of glue onto the frame, which in this case can only consist of the lower rim, fastening ties and a faceplate for the luster socket.
Simple table lamp shades
A rigid seamless lampshade made of thin synthetic fabric is made on the same block. A cut cut like the development of a truncated cone (with an allowance) is used to wrap the block. The fabric is fixed at the edges with paper clips and impregnated with acrylic varnish with a wide stripe in the middle. When the varnish is dry, remove the staples and saturate the edges from the outside. The paper is torn out from the dried lampshade. The inside of the cuffs is trimmed, a thick fishing line is inserted into the bends and secured with drops of glue.
Device for pulling thread through PVA glue
A frame with curved ribs can be braided horizontally with strips of fabric (item 3) or narrow tape, newspaper tubes, straws, etc. For lighting technology, ordinary propylene twine is excellent, but its aesthetics are... not that great... Finally, a soft textile cover for the lampshade can be sewn with a simple straight sleeve along the diameter of the lower rim, and gathered at the top, pos. 4.
Quite original
The following 3 table lamp shade options are outwardly extravagant, but provide very good lighting performance. Which, by the way, cannot be said about many homemade textile lampshades. For example, we buy (stealing is a sin, as Captain Barbosa from Pirates of the Caribbean would say) a milky plastic shade for a street lamp. Not that expensive, ideal light transmission with light diffusion, and does not break. And below there is a wide opening through which enough light will come out for local working lighting. We decorate the outer surface of the lampshade with decoupage on a transparent basis or paint it by hand. What happens in the end - see in fig. But this, of course, is an option for an amateur who is resistant to psychedelic influences.
Original table lamp with spherical lampshade
A plywood or board lampshade with glue (see next figure) due to internal reflections has good light transmission and greatly softens the light. You can even put an LED light bulb with a frosted bulb into a table lamp with it. The rims are embroidery hoops of different diameters. In the same way, you can make a table lamp integrated with a lampshade (on the right in the figure). It will take up a lot of space on the table, but it looks original, “ecologically”, and the light produces a very soft, non-tiring light.
Lampshade and table lamp made of wood
A table lamp integrated with a lampshade can also be made from the same wonderful material – polymer clay; in a thin layer it is translucent. The jellyfish lamp (see picture on the right) is made from this very material. The manufacturing procedure is as follows:
- Polymer clay table lamp
They make a foam plastic mandrel.
- The mandrel is coated several times with water-based acrylic varnish.
- Once completely dry, each layer of varnish is sanded with fine sandpaper.
- Varnishing and grinding is repeated until a smooth surface is formed, from under which the foam plastic does not show through.
- The varnished block is rubbed with lanolin.
- Buy or make your own polymer clay and roll it out like dough into a layer up to 4 mm thick.
- A layer of plastic is placed on the block and, gradually smoothing, is formed along the mandrel. “Stubborn” folds are cut with scissors.
- While the plastic has not hardened, cut it out where necessary using a mounting knife.
- After the plastic has hardened, the foam is picked out from the workpiece.
Shape of the lampshade
Under no circumstances should the light bulb in a lighting fixture be pushed beyond the lampshade, i.e. stuck out.
In this case, it will definitely “hit you in the eyes.” Ophthalmologists say that this strains both the lens of the eye and the retina.
Therefore, in an ideal model, the light bulb should be completely hidden in the lampshade. And the lampshade itself has the shape of a trapezoid with wide cone edges.
In this case, the width of the light beam will be approximately 40 degrees. This guarantees optimal illumination, while at the same time ensuring that the light is directed precisely towards the subject, without any impact on your eyes.
There are flat lampshades that diffuse light well.
These models are good for creating dim lighting throughout the room, but not for reading or working at a desk.
Visual acuity with such a lamp will also decrease, and your eyes will get tired.
Design
In any type of table lamp you can highlight the trace. design elements:
- Electromechanical – ensures the stability of the lamp and the safe supply of power to the lamp socket.
- Support – supports the illuminator or reflector and, possibly, allows you to change its position.
- Illuminator - an electric light bulb in a lampshade or reflector.
Electromechanics play a role in the design of a table lamp only insofar as it can be hidden in the lamp support. The design touches come in the form of support and illuminator. In stand-mount lamps, as a rule, the main aesthetic load is carried by the lampshade, and the stand complements it; in hinged ones it’s the other way around. But there are plenty of exceptions to this rule.
Electromechanics
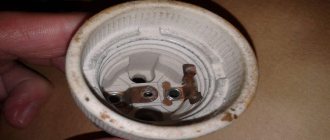
The electrical circuit of a table lamp is simple: power plug, cable, switch, light bulb socket. Sometimes a voltage regulator is added. An E27 pendant lamp socket (for a lamp base of a regular width, item 1 in the figure) can only be mounted on an M10 or M12 threaded shank. The cartridge for a narrow E14 mignon base is also attached to a thread or to a lamella in the form of a steel strip; the socket for it is shown by a green arrow in pos. 2. For a table lamp, chandelier sockets (item 3) with screw-on threaded flanges are best suited: between them you can clamp a steel faceplate with a lampshade frame or a clamp for mounting on a hinge. Drawings of the E27 electric chandelier socket of various modifications are given in pos. 4.
Light bulb sockets
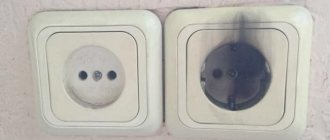
It is necessary to make a table lamp in such a way as to ensure its electrical safety. This is especially true for hinged and console lamps. Making your desk lamp safe is quite simple:
- The cable must be round and double insulated.
- The conductive cores of the cable are flexible, made of many wires. Core cross-section from 0.35 sq. mm.
- Places where cables are routed through conductive or damp-prone structural parts must be protected with sufficiently strong flexible dielectric bushings, cuffs or elbows.
- The cable inside the lamp structure should not be strained.
The diagram of the mechanical part of the support with a weight of a homemade rack-mount table lamp is shown in the figure:
Diagram of a table lamp support
Before insertion, the cable from the inside (highlighted in color) is tied in a knot or pulled through the holes of the dielectric fixing washer so that by pulling it from the outside, the cable cannot be torn inside. Decorative finishing from polymer clay (plastic, cold porcelain) on a block from a cut plastic bottle is the best option for home use, but, of course, only one of many. If you want, for example, to carve the decorative shell of a stand out of wood, please, as long as it fits properly on the mechanics. However, polymer clay as a material for a table lamp stand allows you to realize the most original ideas for its decoration and fully satisfies safety requirements: dried polymer clay is a mechanically strong, non-wetting, non-flammable dielectric.
Original supports
Bottle table lamps
It is not necessary to fence the support of a rack table lamp, which is quite complex and requires turning work, if its lampshade is light, for example. made of thread (see below) or thin hard plastic, and it is not intended to place a light controller or other electronics in the support. In this case, a fairly stable lamp support is obtained from a “pot-bellied” glass bottle with a wide bottom, pos. 1 in Fig. A narrow bottle can be made heavier by throwing pebbles (item 2), steel balls, etc. into it. The lampshade holder is secured to the neck with a standard threaded plug or a piece of hard EPS polystyrene foam, ground into the neck thread.
The hole for the cable in the bottle is drilled with a tubular thin-walled diamond drill. But glass is not at all the same as tile, so you need to drill it like this:
- The bottle is placed on its side and secured securely.
- A plasticine side 2-3 cm high is molded around the future hole.
- Water is poured into the resulting hole.
- They drill under a layer of water at no less than 2500 rpm with the most gentle and smooth feed.
How to make a table lamp from a Jack Daniels whiskey bottle, see the video below:
Video: DIY bottle table lamp
Such a lamp will organically fit into the interior of loft, steampunk and other technogenic-utilitarian styles. Just don’t make the mistake of trying to make her lampshade out of a flower pot or any other utensil. Technogenic-utilitarian styles are not a meaningless pile of rubbish; their concepts are clearly thought out. Interior elements for them should be related to industrial, and not agricultural or food production. A lampshade, for example, is needed from a tin reflector from an old production pendant lamp on a pantograph, a car headlight, a small spotlight, etc.
In Fig. on the right is another very original version of the support of a “real big” table lamp made of... rope! It is done this way:
Table lamp on a rope support
- The rope is taken from natural organic braid 6+1, i.e. 1 strand along the axis and 6 around the circumference;
- A section of rope is stretched by hand and loosened, simultaneously turning in different directions against the direction of twisting of the strands;
- The axial strand is carefully pulled out and a thin-walled copper tube with a fishing line threaded into it is inserted instead to tighten the cable;
- The rope with the tube inside is tightened by turning it with your hands in the direction of twisting the strands;
- The ends of the rope are firmly secured to the tube by winding with a cord;
- Tighten the cable into the tube;
- The workpiece is bent and knitted in a knot. You need to bend it little by little, carefully, so that the tube does not break;
- The rope is tightened once again, picking up any ruffled strands, and impregnated with acrylic varnish.
Note: the tube must be taken for air conditioning systems, made of oxygen-free copper. The red copper gas or electrical pipe in the assembly will probably break.
Hinge Features
The mechanical part of a table lamp with an articulated arm is more complex. The lamp shown on the left in the figure does not meet electrical and fire safety requirements: the cable is clamped in flammable parts and may become strained when handling the lamp. Its hanging loop can be caught in the semi-darkness by a hand or a sharp object.
Incorrect and correct routing of the electrical cable in a table lamp on a hinged bracket.
The cable to the light bulb socket in a table lamp on a hinged bracket should be routed along dielectric fireproof elbows either between the sidewalls of its links, or, if the hinge link is solid, along its top, in the center and on the right in Fig. In this case, the cable must be secured to the hinge link. If the hinge links are tubular, the cable is routed inside them. In any case, Ω-shaped cable loops with a diameter of 60 mm or more, but not less than 12 cable diameters, are made over the kinks of the hinge links. At the cable transition from the bracket to the illuminator, an Ω-loop is made from 90 mm, but not less than 20 cable diameters.
Table lamp on a complex hinge
The balance of a table lamp on a hinge varies widely and it is quite difficult to ensure its stability with a weight. Because of this, manufacturers sometimes come up with such systems that it is easier to shine a flashlight than to adjust the light from such a miracle, see fig. left. Therefore, table lamps on hinges are often equipped with screw terminals.
Small carpentry clamp
A small carpenter's clamp is excellent as a screw clamp for attaching a homemade table lamp to a tabletop, see fig. on right. Better than a lamp clip from a furniture store: it costs less and holds more securely. The grip of the clamp is wider, and the lamp can be attached to a tabletop of any conceivable and inconceivable thickness. You need to ask the carpentry shop, because... jaws of metalwork clamps without a soft coating.
A clamp is converted into a lamp holder using a socket made of a steel tube with an internal diameter of 10 mm and a length of 120-150 mm. The tube contains approx. A longitudinal cut is made halfway along the length, with a width equal to the thickness of the clamp holder. The socket is attached to the clamp with through bolts. A steel pin with an eye, which is the fixed link of the lower hinge of the lamp bracket, is inserted into the socket tightly, but not tightly. Hooks for hanging chandeliers with the end bent into a ring are well suited here; the thread does not prevent them from turning smoothly in the socket.
When adapting a clamp to a lamp holder, you need to remember that its holder is made of highly carbonized steel; This is so that the jaws of the clamp do not give way under the back pressure of the compressed parts. High-carbon steel is very hard and quite brittle, so you need to drill it with a carbide drill at 800-900 rpm with a gentle, smooth feed. Do not hit with hard objects or try to bend the clamp clamp!
Illuminator
This desk lamp assembly should provide the right amount of light to the work area and is often the main decorative element. Here you should first of all note that compact, lightweight and economical LED illuminators (see figure) only shine well in 3D models. In reality, their light is still far from satisfying the medical and sanitary requirements for local work lighting.
LED table lamps
Reflectors
The illuminators of table lamps on a hinge are made to be reflective; the lampshade for them is too bulky and heavy. The reflector needs to be selected parabolic; it gives a fairly concentrated and even light. You can make a single conical reflector yourself, but the light from it is uneven, tiring for the eyes, and a lot of it is wasted “scattered” to the sides. Reflectors of good articulated table lamps are made with a reflective surface of the 4th order of curvature (for example, “Hobby”, which has not lost popularity for more than 20 years), but it is unrealistic to build one yourself.
The solution, if a suitable reflector is not available, is to use a krypton incandescent lamp with an internal reflector; conscientious manufacturers also have it of the 4th order of curvature. In this case, the manufacture of the illuminator comes down to installing a shell of any shape around the light bulb, made of any sufficiently strong and light material, protecting the lamp from accidental impacts.
The reflector of a table lamp illuminator on an articulated bracket must have an opening or holes at the top for the exit of heated air. Fluorescent energy-saving lamps and LED lamps seem to heat up weakly, but being in a heated air cushion reduces their service life sharply, and they are not cheap.
Heating temperature
If you have chosen a lamp with a thin plastic shade less than 2mm thick, there is a high probability that if it is used continuously for more than 3 hours, it will begin to melt.
This is also affected by the proximity of the light bulb itself to the walls of the lampshade. And if the case is metal, does the thickness of its walls play a role?
Of course yes! The heating temperature of a thin metal lamp can reach such temperatures that you can easily fry sausages or scrambled eggs on the lamp.
Now think about it, because even your child’s fingers can touch such a hot body. What will happen to them?
In fact, this is not a lighting device, but a kind of frying pan. Therefore, buy models made of thick metal or plastic.
The minimum distance between the incandescent light bulb and the walls of the lampshade should be at least 5cm.
And the thickness of its walls is more than 2 mm.
Base
Most of this lighting technology uses lamps of the E27 threaded standard. Due to their widespread use and simple design, they are inexpensive and available in a wide range. E27 lamps come in any type (mostly incandescent or LED) and the required wattage.
More compact desktop electrical appliances use the E27 base, which is also quite widespread. LED lamps of this standard create a powerful luminous flux, which is sufficient for most tasks. They are available in many hardware stores and are inexpensive.
The third place in popularity is occupied by lamps with non-removable light-emitting diode (LED) elements. They are comfortable, reliable, durable and designed specifically for the specific model (or series) to provide optimal illumination. There are also luminaires with G9 and G4 pin sockets, GU10 rotary pin sockets and less common standards.
Glass shade
If the glass of a table lamp is made poorly, the body may simply crack.
Moreover, these fragments will injure you and your children while you are at your desk.
Therefore, it is not recommended to buy products with glass shades.
In addition, such models are easy to damage simply by moving them from one room to another, or by accidentally hitting them.
A children's room is also a place for active games and fun for your child.
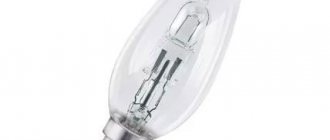
Light color and light bulb power
Ophthalmologists recommend choosing regular yellowish light bulbs for table lamps.
The fact is that our eyes are naturally accustomed to the sun. Therefore, this particular shade will have minimal impact on vision.
It is the most natural and natural for all of us.
White color with a slight blue from energy-saving light bulbs will cause not only discomfort, but also be accompanied by intramuscular spasms of the optic nerve, due to flickering that is imperceptible at first glance.
Regarding power, always read the instructions. It should clearly state how many watts of light bulbs can be screwed in for a given type of lamp.
There are often situations when an overheated light bulb explodes right inside the base.
How much power can be used safely?
For conventional incandescent lamps this is a maximum of 40-60W.
There is no need to screw in 100 watt units. Excessive light output can cause irritation and dry eye syndrome.
For LED, power values range from 7 to 11W.
The minimum luminous flux is 300 lm, recommended 500-600 lumens.
Incorrect angle of light incidence and height from the desktop surface can also lead to:
- to rapid fatigue
- retinal dystrophy
If you and your children are right-handed, place the lamp so that it is on your left side.
If left-handed, then with the right. This will help avoid disturbing shadows when reading and writing.
The lamp itself should be positioned so that your face is in the shadow of the light of the lamp, but no further than 40-50 cm from the book you are reading.
This is adjustable by the height and bend of the tripod.
Short specimens below 35 cm will not distribute the light flux correctly.
Also remember a very important thing: the presence of a table lamp, no matter how powerful it is, in no way cancels out the general light.
That is, a chandelier or spotlights on the ceiling in a room must be lit. This is due to the physiological mechanism of our vision.
When it’s dark around, the pupil tends to expand to “absorb” more light. You turn on the lamp and at this very moment, the eye receives a very bright local beam, which falls directly on the retina.
This leads to irreversible changes. And general lighting:
- firstly, it constricts the pupil
- secondly, it allows you to reduce the power of the lamp itself
How to make your own lamp from a bottle
A table lamp made from a bottle, made by yourself, firstly, will not take much time, and secondly, it will be an ideal addition to the interior of the room. The most important advantage of such a product is its exclusivity. Below you will find a small master class of do-it-yourself lamps, for the manufacture of which you will need the following components:
- Glass bottle;
- goggles, mask and gloves for safety;
- glass cutter;
- bulb;
- wire with switch and socket;
- wire of any color you like;
- sandpaper;
- screwdriver.
A homemade lamp using a bottle looks impressive and is quick to make
Before production begins, preparatory work should be carried out. To do this, you will need to rinse and dry the bottle, and also clean its surface of stickers and dried glue. To ensure that the sticker comes off easily and does not leave traces of glue, you can use a hairdryer, after which the residue can be removed with any solvent.
Helpful advice! To make a lamp from a bottle, a container that expands significantly towards the bottom is better suited. The wider the bottom of a homemade lamp, the more stable it will be.
After the surface is cleaned, you need to place the bottle in the cutter, adjust the glass cutter to the required level and rotate the bottle to obtain an even cut. Then it is placed in a “contrast shower” for several minutes until it disintegrates along the cut made. For greater evenness and accuracy, you should go over the cut area with sandpaper. The wire is carefully pulled through the neck of the bottle, after which the base with the lamp is screwed to the cable. To keep the cable firmly in place, a suitable sized clip is inserted into the neck.
Upon completion of the work, they begin to decorate the walls of the bottle. To do this, you can use wire or thread of a suitable color. Glued glass pebbles of different colors look very original, which are easy to find in large construction stores or retail outlets specializing in the sale of decorative items.
If you have nowhere to get a glass cutter, but have a drill, you can make a lamp from a solid bottle. In this case, you will only be able to use a small LED bayonet light bulb in the form of a candle that can fit into the neck. To make it, take a bottle of any size, in the bottom of which a hole is drilled for a cable that is pulled through the neck. After installing the light bulb, they begin to make a lampshade or decorate the bottle at their own discretion.