Standards to be followed when gating walls
The beginning of any work is drawing up a plan, and when it comes to wiring, a number of rules must also be taken into account. in advance about the location of all sockets, switches, lamps and household appliances . Mark each of the electricity consumption points on the plan. Also on the drawing it is necessary to indicate the route along which the wires will pass. You can depict all this on paper, or you can use specialized programs.
When drawing up an electrical wiring plan and determining where the grooves will go, take into account the following points regulated by SNiP 3.05.06-85
- The grooves must be strictly vertical or horizontal . This will make someone's life easier years later when searching for wiring in the wall. The only exception is gating walls with a slope, such as in the attic, then the groove must be parallel to the slope of the wall;
- maximum groove width – 30 mm, depth – 26 mm;
- the length of the route from the distribution box to the point is no more than 3 m;
- between two points only one turn of the wire is allowed, since each turn is a source of increased heating of the cable;
- the distance from the groove to the gas pipe and battery is at least 50 cm, from the door and window - at least 10 cm, from the floor and ceiling - from 5 cm;
- It is prohibited to tap internal load-bearing walls , since if the material is damaged, the reinforcement may be exposed, which will start the corrosion process, and this will certainly affect the strength of the entire building. But still there are several options for getting out of the situation - read about it below;
- Corners and floor slabs cannot be tapped. The wiring can be hidden in a concrete screed, in a cable channel.
Wall chipping is a dusty and noisy process, so be sure to wear a mask, or better yet, a respirator, as well as gloves and goggles. Carry out work from 10 to 17, taking breaks to maintain good neighborly relations.
Features of gating
Cutting grooves has its own nuances and non-standard situations, in the event of which there are standards and rules that differ from the general ones.
Grilling walls for air conditioning
To install a household air conditioner that has two standard units, you will need a groove with special dimensions. The width of such a groove is at least 60 mm, depth - 50 mm.
This is necessary so that all the wiring and other elements necessary to connect the air conditioner fit freely into the groove without being damaged.
Grilling wooden walls
Fire safety regulations prohibit trenching walls in wooden buildings, this also applies to baths. In the event of a short circuit, there is a risk of the walls igniting from the electrical wiring installed in them. In this case, special cable channels are used.
Strobe in tiled floor
Sometimes you have to lay wiring along already glued tiles. This type of work can only be done with a grinder or wall cutter with diamond discs installed on them. A hammer drill or drill is not suitable for this purpose, as their use can lead to chips and cracks in the tiles.
Surface marking
Preparation for gating walls is as follows:
- detect old wiring , for which testers and indicators are used. It’s good if you have a plan for the old wiring, but, as practice shows, not everyone is so lucky. The location of the old wiring must be marked on the wall;
- the old wiring needs to be disconnected, and if this is completely impossible, then the new line should not intersect with the old one;
- the new wiring route is also marked on the walls from the junction box to each connection point;
- It is better to cover doorways with a damp cloth. Even if the door leaf is closed, dust will find its way into the cracks and fill the rest of the room.
Wall gating technology
Electrical wiring is laid in concrete at the first stage of repair activities. It is not recommended to ditch in an occupied room, as the work is very dusty. First you need to remove furniture, office equipment, etc. If this is not possible, then cover them with film or other material to protect them from dust. You will also need a construction vacuum cleaner to remove debris and dust.
Preparing the room and marking the work surface
Before starting work, you need to check the location plan of the old wiring. If there is no such plan, then using a tester or indicator you need to detect it and note how it goes. It is best to de-energize the old wiring, but if this is not possible, then try to lay a new one without intersecting with it. This is to prevent injury from electric shock.
The new wiring route is marked on the walls. Marking is carried out from distribution boxes to all connection points.
Basic rules for gating
During work, protection of hands, eyes and respiratory organs must be provided. For this, a respirator, strong gloves and safety glasses are used. It is recommended to carry out gating with a rubber mat under your feet.
It is important to follow the following rules:
- The grooves are made parallel to the main structures of the building in a vertical or horizontal form. An exception is the attic, where gating can be carried out on a sloped base.
- Horizontal grooves are made at a distance of at least 150 mm from the ceilings. Vertical furrows are made with a distance of at least 100 mm from door and window openings, as well as corners.
- The distance between the groove groove and the gas pipes must be at least 400 mm.
- It is not recommended to make horizontal grooves in load-bearing walls.
- It is prohibited to use a slab joint instead of a groove groove.
- If the thickness of the structure exceeds 8 cm, the electrical wiring is laid in a short way; if less, it is laid parallel to the construction lines.
Methods for gating walls for wiring
Hammer and chisel
A hammer and chisel are old-fashioned tools that will allow you to spend a minimum of money on chiselling walls. The downside is that the grooves will be crooked, and the process itself will be very long . It’s hard to imagine using a hammer and chisel to make grooves for all the wires in an apartment.
The process itself is quite simple and can be done without much preparation. First, the wide side of the chisel is applied to the intended line and hit with a hammer. In this way, the edges of the groove are outlined. Then the chisel is placed across the groove and begins to knock out a recess in the wall. You can mark the boundaries of the groove in a certain area, and then “dig” in depth, or you can “go deeper” after every couple of centimeters of the boundaries made.
The lines of the grooves will be uneven, but subsequently they will still be hidden under a layer of plaster and finishing. You can get smoother edges if you make cuts with a hacksaw in advance.
A hammer and chisel is the longest and most labor-intensive method of chipping walls. It is suitable if suddenly there is a need to extend the existing route, but you no longer want to call a specialist with a wall chaser.
This method is useless for concrete and brick walls.
Rotary hammer or impact drill
Both tools allow you to quickly groove walls, but the edges of the grooves will be uneven. An impact drill and a hammer drill are not the same thing. An impact drill makes holes through rotation, a hammer drill makes holes through impact. In a drill, the blow is weak, but with high frequency; in a hammer drill, the blow is stronger and does not require any assistance from a person. The drill can handle concrete and brick, but is not designed for frequent impact drilling. A rotary hammer is much more powerful and can chisel concrete and brick of any density, so it is a priority for chiseling.
The operating principle is as follows:
- use a drill to make indentations at a distance of 1-1.5 cm from each other along the entire route;
- replace the drill with a blade and clean the groove at an angle of 45 degrees, moving from point to point. Use the “no drilling” mode;
- It is better not to place the hammer drill blade across the wall, otherwise you can break off a piece of the wall;
- If you only have a drill at your disposal, then take a Victory drill with a diameter of 8-10 mm. The distance between the holes is smaller - 0.5-1 cm. If you need a wide groove, make the holes in a checkerboard pattern. The gaps are knocked out using a hammer and chisel, as described above. This method is suitable if it is necessary, for example, to make grooves in one room. If the task is to carry out wiring throughout the entire apartment, then it is better to invite a specialist. Residents of Kyiv and the region can contact the Relicon company; on the page https://relicon.kiev.ua/elektromontazh/ you can find a list of services, prices and benefits. The company's specialists carry out both entire projects and individual electrical installation work.
Bulgarian
The grinder allows you to create a groove with perfectly smooth edges , without chips or cracks, so further rough finishing work will be simplified. You will need a tool with a diamond blade. Along the intended wiring route, two parallel lines are cut, the width between them corresponds to the width of the groove. You will have to remove the material from the groove using a hammer drill or a hammer and chisel.
When working, the grinder produces a lot of dust, so you can immediately suck it up with a vacuum cleaner, holding the tube close to the source of its formation. A household vacuum cleaner will not work - only a construction vacuum cleaner. You can rent it or borrow it from friends. But even with a construction vacuum cleaner you won’t be able to collect all the dust.
To minimize the formation of dust, you can constantly moisten the wall, but this must be done before starting to use the tool so that water does not get on the disk. You can also find special vacuum cleaners on sale that connect to an angle grinder - an option in case you can’t find an assistant.
Wall chaser
A wall chaser is a professional tool. There is no point in buying it for one time, but if you have the opportunity to rent it, then why not. The wall chaser is equipped with two diamond disks; you can vary the distance between them, determining the width of the groove, and you can also set the desired depth. Both circles are covered with a casing on top, which is adjacent to the wall when cutting. All dust is immediately drawn into the vacuum cleaner through the outlet provided for this purpose.
After the edges of the grooves are formed (they turn out perfectly smooth, the process itself is quick and not particularly dusty), the remaining material is removed with a puncher.
What should you pay attention to when choosing a wall chaser?
The choice of wall chaser must be made according to the following parameters:
- Decide which material will have to be sawed most often: brick, concrete, shell rock or other materials. Practice shows that modern buildings are most often made of brick and concrete.
- To cut concrete, you need to choose wall chasers with electric motors with a power of at least 900-1400 W and a disk rotation speed of 9000 - 9500 rpm.
- Check the presence of a dust extraction pipe when working with a vacuum cleaner; this significantly improves working conditions. You don’t have to swallow dust, pick sand out of your ears, hair and other parts of the body after work.
- During operation, discs sometimes tear, fragments fly away at great speed and can injure surrounding people. Make sure that the casing covering the discs is not deformed and is securely fastened; your safety depends on it.
- It is advisable that the tool be equipped with electronic overheating protection, which automatically turns off the motor.
- On some models, in order to increase safety, a lock is installed to prevent accidental activation. Slip clutches reduce vibration, making the work process smoother.
All these features will provide you with reliable safety and efficient cutting, which doubles productivity compared to a conventional angle grinder.
Features of gating of different materials
Grooves in aerated concrete and foam concrete
These are quite soft materials; a drill, an angle grinder, and a hammer drill can easily handle it. You can even use a manual wall chaser , which is equipped with a pointed arc. A groove of the required depth can be made in 3-4 approaches. If necessary, such a tool can even be made independently from rigid punched paper tape or a metal plate sharpened on one side. For convenience, attach a handle or pipe.
Grooves in wood
It is prohibited to install hidden electrical wiring in wooden houses . All cables are laid openly and can be hidden in cable ducts, so there is no need to ditch the walls.
Grooves in drywall
Drywall is too fragile a material to be chipped. All wires are laid behind it, and holes for sockets are made using a crown attachment on a drill or hammer drill.
Grooves in brick and concrete
For horizontal grooves in a brick wall, even a hammer and chisel will do if you can get into the seam, but vertical grooves are best done using a power tool - a drill, hammer drill, wall chaser.
Concrete is a durable material, so you definitely can’t do anything with a hammer and chisel, but all other methods will do. If the concrete is of high strength, then it is better not to use a grinder - the circle may break when pressed.
Grilling load-bearing walls
You should be extremely careful with internal load-bearing walls. An awkward movement - the reinforcement is exposed, and now the strength of the entire building is compromised. What should apartment owners do? There are several options:
- from the local construction department obtain permission to groove walls, trying to prove that the grooves will not be so deep and you will not reach the reinforcement frame;
- Apply a layer of plaster to the wall and only then trench the wall. The entire depth of the grooves will fall mainly on the plaster layer;
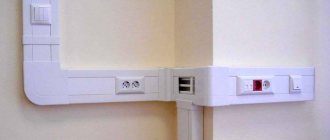
- hide the wires behind the drywall , this will also solve the problem of wall alignment;
- lay wires in electrical skirting boards. If you choose a model of the right color and design, you won’t do much harm to the aesthetics.
Design and principle of operation of a wall chaser
Wall chasers are used for cutting channels in solid walls made of brick and concrete, not only for laying electrical wiring; grooves are made for various communications:
- ducts for the exhaust ventilation system,
- water supply pipes,
- sewer pipes,
- Coaxial cables for television, Internet and telephone lines are also very often hidden in the walls.
The general design and operating principle of a wall chaser are no different from an angle grinder. Surfaces are cut with a rotating concrete disc; the wall chaser uses two discs at the same time, so the electric motors are more powerful than those of grinders. The distance between the disks is adjustable; two parallel lines of equal depth are cut in one pass. After which the remaining layer of concrete between the lines is destroyed with a hammer drill with a “shovel” attachment, then the wiring can be laid.
Protection is provided by a special nozzle with a casing above the discs; one of the most important elements of its design is the lower platform. It is pressed against the surface to be treated and drawn in the direction of the groove line. The level of the platform in relation to the protruding discs is adjustable, thus setting the cutting depth.
There are different models on sale, a good tool with dust suction elements costs around $1000, so before you ask yourself where to buy and how to choose a wall chaser.
Think about whether it is needed at all, finish construction or repairs, expensive equipment will lie gathering dust. When you are engaged in professional construction, interior decoration, electrical wiring and equipment installation. Definitely buy quality products from well-known Japanese and European manufacturers:
- Prorab,
- Sparky,
- Bosch,
- Makita,
- Hitachi.
There are other companies that make good tools, but these are the most famous ones, whose products have already shown their capabilities.
How to seal a groove?
The final stage of work proceeds as follows:
- the grooves must be cleaned of dust; either a construction vacuum cleaner or an ordinary broom will do;
- grooves should be treated with a primer;
- to reduce the level of shrinkage, you can slightly wet the wall near the grooves;
- when everything is completely dry, cables and distribution boxes are installed according to the diagram;
- gypsum plaster is usually used to seal the grooves;
- To prevent the plaster layer from sagging and starting to collapse, you can use a reinforcing mesh.
Finally, let us note again. If you are not sure that you can do all the work yourself, it is better to immediately contact specialists.
The article was written for the site.
Tags:Electricity