Requirements for laying electrical cables are defined in the relevant regulatory and technical documents containing a complete list of procedures and measures, the implementation and adoption of which is necessary to ensure fire and electrical safety of electricity consuming facilities. In this article we will consider the main points (general rules) of the construction of indoor (indoor) and outdoor cable power lines. We will also describe some measures taken to make it possible to operate cables in various environments (conditions) - air (overhead power lines), soil, water.
Rules for laying electrical cables inside buildings
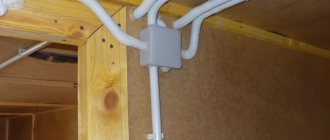
There are two main ways to lay electrical network cables inside buildings - open and hidden. The first method involves the placement of electrical wiring along the surface of walls and/or ceilings inside the building, as well as in trays, cable racks, etc. Standards for laying open electrical cables require the use of various types of mounting elements or components, such as strings, baseboards, brackets, cables, boxes , metal/plastic hoses, pipes and other fittings. Open wiring, in turn, can be stationary or mobile (non-stationary).
Basic standards for laying electrical cables in residential areas and industrial facilities (open wiring):
• Cable lines designed for voltages from 42 V must be laid at a height of 2–2.5 m above the floor level. The height is not standardized if the cable is laid in boxes, sleeves and other structures with a degree of protection of IP20. • If the cable crosses a pipeline, it should be laid at a distance of 50 mm (clear) or 100 mm (pipelines for transporting flammable gases or liquids). Moreover, if the distance is less than 250 mm, the cables must have additional protection from mechanical damage. Also, electrical wiring must be protected from high temperatures if it runs next to a heating or hot water supply system. • In places where the cable passes through walls and ceilings (from one room to another, cable output to the outside or entry into the room from the outside), it is necessary to insert pipes. • Boxes, sleeves or other structural elements are mounted in such a way that moisture cannot accumulate in them. If there are emissions of vapors, gases or dust in the premises that have a negative effect on the cable sheath, then the boxes, pipes and other elements used for laying must be sealed, and their joints must be sealed.
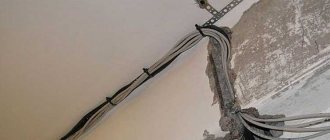
According to regulatory documents for laying electrical cables, “hidden” refers to electrical wiring laid directly inside the structural elements of a building - walls, ceilings, ceilings, floors. In this case, the cable can also be laid in pipes, sleeves, boxes or other installation elements laid through voids in the ceilings or in grooves created during or at any time after the construction of the building.
The standards for laying an electrical cable in this installation method require compliance with the same rules that apply to open wiring. There are also additional requirements. Firstly, when laying in boxes or other mounting elements, the same requirements must be met as for open installation. Secondly, it is prohibited to lay hidden wiring in ventilation shafts and ducts (permitted provided the cables are laid in steel pipes).
How to install internal sewerage
Pipes for the sewer system can be installed in two ways - open or closed. The first option is used for a system that is located in the basement or utility room. The pipeline is attached to the wall surface using additional supports. The second installation option is closed, and provides for the location of the pipeline:
Taking into account SNiP, sewer pipes cannot be laid under the ceiling surface if the installation is carried out in a one-story building, in the wall or in the floor of bedrooms. The same requirements apply to the kitchen, in which wet cleaning is carried out regularly.
On the pipeline risers, approximately opposite the so-called inspection, you need to install a hatch, and this needs to be done in the opposite direction to each point. When installing a sewer pipeline in a restroom, the system is placed above the floor surface, on which a layer of waterproofing is previously laid.
Expert opinion
It-Technology, Electrical power and electronics specialist
Ask questions to the “Specialist for modernization of energy generation systems”
Wall made of wood or chipboard In cable shafts, in places where they pass through each ceiling, but at least every 20 m, partitions made of fireproof materials with a fire resistance rating of at least EI 45 must be provided. Ask, I’m in touch!
Basic requirements and standards for laying electrical cables in the ground:
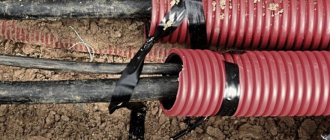
• Electrical wiring is laid in a trench with a depth of 70 cm. Cable lines for voltages from 35 kV must be protected from mechanical damage by covering them with reinforced concrete slabs with a thickness of 50 mm or more. At voltages up to 35 kV, ordinary bricks laid along the route can be used. When using armored cables, a protection device is not necessary. • The minimum trench width is 25 cm. If you plan to lay several cables, the distance between them should be 10 cm (up to 1 kV), 25 cm (20–35 kV) or more (depending on the specific situation). This must be taken into account when calculating the trench width. • Before laying the cables, a sand and gravel cushion about 10 cm thick is poured onto the bottom of the trench. • If the cables do not have metal armor, it is necessary to use protective structures to prevent mechanical damage - for example, metal / plastic pipes. Protection may also be required for armored cables (depending on the type of soil, weather conditions in the region and other criteria). • Next, the cable is again covered with sand about 15 cm thick. A warning tape or cable cover plates (CCP) are laid on top of the outer cushion, which serve to inform about the presence of electrical wiring underneath them. • On top of the warning tape or PZK, soil is poured with a reserve (after some time it will settle).
Do-it-yourself installation of hidden, permanent electrical wiring
Hidden, permanent electrical wiring is perhaps the most popular when arranging electrical networks in residential construction. Simply put, this is electrical wiring under plaster, usually used in houses with brick, concrete walls, as well as with walls made of cellular blocks.
Tool kit for electrical wiring installation:
- electric hammer drill;
- set of drills;
- ring drills (core drills) for drilling holes for mounting and distribution boxes;
- hammer;
- Screwdriver Set;
- knife;
- pliers;
- side cutters (nippers);
- indicator screwdriver;
- multimeter or Avometer (in extreme cases, you can get by with a 4.5V battery and a 2.5V or 3.5V flashlight bulb).
Grooving, drilling out seats for mounting and branch boxes, metering box
At the points where the mounting and branching boxes are located, using an electric hammer drill and a ring drill (core drill) with pobedit inserts, drill out seats according to the diameter of the mounting and branching boxes (the most common are 70mm and 80mm), and at the places where the cable enters the mounting and branching boxes, knock out additional deepening When drilling, it will be better to water the drilling area with water: there will be less dust and the drill will last longer. At the points where the conductors pass through the wall, drill through holes in them using a twist drill. For the accounting box, in the place of its future location, hollow out a niche (here you will have to work hard).
Next, if necessary, grooves are cut out in the wall material at the places where the cable is installed using an angle grinder (grinder) and a cutting wheel for stone or a wall chaser. If you use an angle grinder or wall chaser without a vacuum cleaner, there will be a lot of dust. In this case, it is better to use a hammer drill with a chisel-strobe. There will be much less dust, but the edges of the grooves will not be entirely even, which is not so important when installing under plaster.
Because health is the most precious thing, then when performing these works it is simply necessary to use the following protective equipment:
- glasses;
- dust mask or respirator;
- headphones or earplugs.
Installation of wiring (cable, wire)
Laying of a cable or wire must be carried out, moving from the automatic protection panel to the branching, electrical fittings and outlets to the lamps. To avoid confusion, installation should be done in groups. Only after completing one group completely do you move on to the next.
The cable must be secured to the wall using special fasteners every 30 - 40 cm and additionally in places where it bends or enters installation and branch boxes (1-1.5 cm). To secure the cable, you can also use wire scraps, bending them in a loop around the cable and nailing them to the wall. Another method of fastening can be cut strips of tin nailed to the wall. The laid cable is crimped into a lock with these strips using pliers. When laying the cable in a groove or relatively small volumes of work, you can cover or glue the cable with gypsum adhesive. Cut the fixed section of cable taking into account the margin for mounting electrical accessories on one side, and twisting the wires in the junction box on the other (15-20 cm).
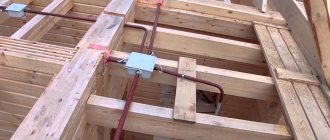
Installation of mounting and branch boxes, metering box.
This work can be performed both before plastering and after. It is much easier to carry out installation and unsoldering (twisting of wires) in installation and junction boxes before plastering work, since it remains possible to visually trace each wire. It is best to install the boxes, or rather glue them, on a gypsum composition, but cement ones are also suitable, for example, for ceramic tiles.
Place the solution in a seat that has been cleaned of dust and moistened with water. Then insert the wires into the mounting box and forcefully press it into the seat, displacing the adhesive. Do the same with junction boxes. If the installation is carried out before plastering, then the boxes should protrude from the wall to the thickness of the future plaster layer. Each mounting box or group of boxes assembled into a block should be aligned horizontally and vertically. Otherwise, all your switches and sockets will be crooked and askew. Place the empty metering box in the prepared niche, insert the input cable and wires of the electrical wiring groups into it. Using anchors, secure the box in the niche, and cover the gaps between it and the wall with adhesive.
Air lines
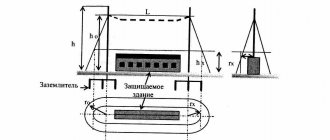
Requirements and standards for laying cables along overhead power lines depend on the specific situation. Many factors are taken into account: types of cables and supports, electrical voltage, the presence of parallel/intersecting lines, weather conditions in the region, etc. The main points of the construction of overhead power lines can be given as follows: • Design features, load-bearing capacity and other physical characteristics overhead power line supports that will be used for laying electrical wiring are determined at the design stage of overhead power lines and depend on many factors - soil properties, weather conditions in the region, the type of cables used and other criteria. Compliance of the characteristics of overhead line supports with these criteria is one of the main requirements for their design and subsequent construction. • Overhead line supports should not be erected in places where their presence may interfere with the movement of vehicles and pedestrians. Otherwise, power lines are surrounded by barrier structures (baffle pipes and other structures). • When constructing overhead line supports in forest areas, cutting down plantings is not necessary. One condition must be observed here: the distance between the plantings and the lowest point of the cable sag should be 0.5 m. • Regulatory documents for laying electric cables also provide for grounding of overhead line supports and traverses.
Submarine lines
• Cable routes crossing and/or running along water bodies can be laid on the bottom and banks of both stable and erosion-prone soil. In the first case, the laying depth is 1 m, in the second - depending on the characteristics of the soil. • The cable must run along the bottom or along the shore of the reservoir in such a way that it does not become sagging in uneven areas. Such areas should be avoided or covered with crushed stone, pebbles or other materials. If there are obstacles along the route in the form of shallows, rock ridges, etc., the cable is laid in a previously prepared trench. • Information boards should be installed near bodies of water where cables are laid, notifying about the presence of electrical wiring under water. • Crossing cables during underwater installation is prohibited.
A large selection of electrical cables is presented on the website. After reading the product description, you can make a choice yourself or contact a company specialist who will competently advise you on issues of price and quality.