The first models of screwdrivers were equipped with nickel-cadmium batteries Ni-CD (less often nickel-metal hydride batteries Ni-MH). They have disadvantages - the “memory effect”, difficult to store, extended recharging time and toxicity. If you charge a battery that is not completely discharged, its energy capacity decreases, which causes discomfort when actively working with the tool. To eliminate operational defects, a screwdriver in good condition can be converted to operate on a lithium battery. Upgrading the tool is easy without the help of a specialist. Let's figure out how to convert a screwdriver to lithium batteries in order to improve its performance.
What difficulties can you encounter during modernization?
Before starting work, it is necessary to determine the feasibility of modification.
It is wiser not to remake a low-quality instrument or one that has been in use for a long time - it is unprofitable. The price of the necessary materials and the effort expended will be 2/3 of the cost of the equipment itself. It is more rational to buy a new screwdriver or drill. Other points to consider:
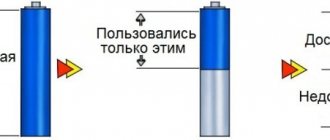
- Lithium batteries of the 18650 standard (the only ones suitable as a replacement) have a length of 6.5 cm and a diameter of 1.8 cm. The Ni-CD socket will not fit Li-ion. The batteries will have to be placed in the battery housing. In this case, you will need to install the wires and protective chip yourself.
- The output voltage of Li-ion is 3.6 V. This parameter for Ni-CD is 1.2 V. New batteries may simply be incompatible with the equipment.
- Lithium-ion batteries will not withstand a recharge voltage of more than 4.2 V and a discharge voltage of up to 2.7 V. Operating in this mode will very quickly damage the battery cells, so installing a protective board is mandatory.
- In 8 out of 10 cases, the native charger (attached to the equipment for operation from Ni-CD) cannot be used for Li-ion. You will need to buy a new one. If there are no plans to purchase, then you also need to modify the screwdriver charger to run on lithium batteries, which can also have its own difficulties.
Remaking the instrument cannot eliminate all inconveniences.
The new lithium battery exhibits poor performance when used in low temperature conditions. You need to weigh the pros and cons when starting work.
Pros and cons of upgrading a screwdriver
One disadvantage has already been indicated - a rapid decrease in the capacity of the elements at ambient temperatures below +7-+100C. There is one more thing - the price of batteries, but unlike Ni-CD cells, lithium-ion batteries are much more durable. Nickel-cadmium batteries are chemically unpredictable. If one battery fails, the remaining ones will not provide the required voltage to operate the equipment.
Replacement is also carried out for other reasons:
- The capacity of lithium-ion batteries is 2 times greater than that of nickel-cadmium batteries with the same parameters;
- There is no “memory effect” of charge. Charging can be carried out during any discharge of the element, at any time.
- The 18650 standard will lighten the weight of the structure. It will be simpler and easier to work.
Do not forget about the need to install a protective board (if the Li-ion element overheats, it explodes and can cause a fire) during the work.
Parts and tools for conversion
To convert an existing screwdriver to lithium, you need to purchase:
- set of Li-Ion batteries;
- charge controller board (BMS):
- wires with a cross-section of at least 2.5 sq. mm (preferably in silicone insulation).
Tools you will need:
- a soldering iron with a power of at least 40 watts with a set of consumables, including acid flux;
- small plumbing tools (screwdrivers, scalpel, etc.).
The process itself is quite creative, depending on the existing initial conditions and the design of the screwdriver, so something else may be required as the alteration progresses. You need to be prepared for this.
Before converting a power tool to run on Li-Ion batteries, future operating conditions must be taken into account. Lithium-ion cells are not suitable for use in low temperature environments.
How many and what batteries should I buy?
In most cases, to convert any screwdriver to lithium batteries, elements of standard size 18650 are used. This figure means linear dimensions:
- length 65 mm (actually a little more);
- diameter 18 mm.
These batteries belong to the category of pen-type batteries - they have a cylindrical shape with positive and negative terminals on opposite sides. The voltage of one cell in a fully charged state is 3.6 volts. For each screwdriver you need to dial in the required voltage. It can be found on the body of the old battery.
| Standard battery voltage, V | Number of lithium-ion cells | Final voltage, V |
| 10,8 | 3 | 10,8 |
| 12 | 3-4 | 10.8 or 14.4 |
| 14 | 4 | 14,4 |
| 18 | 5 | 18 |
Obviously, it is not always possible to obtain a voltage strictly equal to the nominal value from 3.6-volt elements. So, for 18 V everything works out perfectly, but for 12 V you will have to be content with either a little less or a little more voltage. You must understand that in the first option the torque will drop slightly, and in the second it will increase, but you must be prepared for a decrease in the service life of the mechanical part. In addition, there is a possibility that the increased voltage may damage the electronic control circuit. Although reviews on the network say that in this regard everything works fine.
Instructions for setting up the memory
- We connect to a power supply whose voltage is at least 1 V higher than the battery assembly can provide. For example, to assemble from 6xLi-Ion you need a power supply with an output of 26.2V. The output current of the power supply depends on the battery charging current.
- At XX we set the desired output voltage corresponding to the maximum battery voltage in a charged state. In my case - 25.2 V.
- We connect the battery to the charger, and place a current meter in the gap between them - set the required charge current. I set 1 A for a battery with a capacity of 2800 mAh.
- When the charging current decreases to 0.1 x Charge current, turn the middle multi-turn until the blue LED lights up - “charging is complete.”
Everything corresponds to the clumsy description)). Works great. I will use a converted screwdriver to charge. It reached Samara in 25 days. For those who cannot understand the operation of LEDs, I found an excellent description:
The top one lights up while the converter is capable of delivering the set current to the load (if used as a charger, this is an indicator of the CC phase; as soon as it goes out, the CV phase has started) the middle LED lights up until the current in the load drops to 0.1 of the set value, then goes off - the charge is complete.
The value 0.1 is set by default; if desired, it can be adjusted either higher (charge faster, capacity less) or lower (charging time increases, battery is charged more fully) with the middle potentiometer. But the charge continues even after it is turned off, this is only an indicator that the battery is in principle charged and ready for use. The lower LED is simply an indicator of the converter's operation.
charge - this indicator lights up while the current in the output circuit is above the set value. This value is set relative to the maximum current. When setting a large maximum current (units of amperes), it may not be possible to set the indication to a small current (units and tens of milliamps).
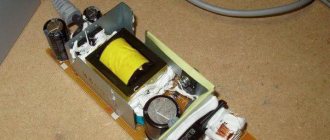
We continue to disassemble the Interskol screwdriver battery
This can be done in several ways - you can unsolder the wires that go to the board.
You can also simply remove the contacts from the top battery cover. The photo shows what shape the curved contacts have, so you can easily remove them yourself.
Under the plastic cover we see how the batteries are connected to each other. They were spot welded. This solution is used in almost any battery of another tool. This is a reliable and gentle battery connection. At the same time, the destructive heating of the lithium batteries themselves is minimal.
Carefully tear off or bite off the metal tape with pliers to disconnect the cans from each other. On the board side, they were also connected to each other with tape and placed on a cardboard spacer with glue. This is done so as not to short anything on the board. You must remember to return it to its place when reassembling the battery.
Due to the lack of a spot welding machine, we will solder new lithium-ion batteries with a well-heated, powerful soldering iron very quickly. We remember that heating reduces their service life and is generally explosive.
Pay special attention to the condition of the wires inside the battery. They may be broken or frayed. They need to be properly insulated or replaced with fresh ones.
Since I was repairing a screwdriver battery on the go in the field, I had to use a brilliant invention of an engineering mind. I took out blue electrical tape.
When disassembling the battery of the Interskol DA-10/10.8 ER screwdriver, I was pleasantly surprised - they installed a thermal sensor to monitor the temperature of the batteries. It turns out that if it overheats, the protection circuit turns off the power until the temperature is restored to normal. True, the owner has never been able to drive him into this mode. We carefully tear off this thermal sensor so as not to break it - then we will place it in the same place on the new cans.
Restoring functionality
After the faulty element is identified, it is cut off and a new one is soldered using a soldering iron.
It is impossible to restore the operation of lithium-ion batteries, but you can try to revive other types of cells. To do this, you can use 1 of 2 methods:
- Compression or compaction. This method is effective if the electrolyte is present, but has lost volume.
- Firmware with voltage and increased current. This method is suitable for eliminating the memory effect and can slightly increase the cell capacity.
However, none of these methods can completely eliminate the problem. Most likely, after a little time the fault will return, so it is much more effective to replace the failed elements.
Selecting the type of lithium battery chemistry
First of all, you need to decide on the type of lithium battery chemistry. There are two options here - either lithium iron phosphate (LiFePO4) or lithium ion (Li Ion). But in any case, when working with such a powerful load, you need to take into account that the battery must be able to deliver the required current without harm to your well-being! Let us briefly examine the features of these types of batteries.
Working temperature
If you plan to use a screwdriver at sub-zero temperatures, then it is better to choose lithium iron phosphate (LiFePO4) batteries. The temperature range at which they can be discharged is -20 ~ 65 °C. Li Ion's capacity drops faster in cold weather. If the work is mainly planned at positive temperatures, then both will do. But both types of batteries (with the exception of some LiFePO4 models) cannot be charged at negative temperatures. And the upper temperature limit during charging for both is about 60°C.
Durability
The number of complete charge/discharge cycles for LiFePO4 batteries is more than 1000, for Li Ion less than 500. But! If you do not discharge to 0% and do not charge to 100%, then the number of cycles increases significantly. All lithium batteries are best stored half-charged at a temperature of 0 +10°C. You can read more about storage in
Operating voltage
One cell of a Li Ion battery at 100% charge has a voltage of 4.2 V, with a full discharge about 3 - 2.5 V. The average operating voltage is 3.7 V.
One cell of a LiFePO4 battery at 100% charge has a voltage of 3.6 V, with a full discharge of about 2 V. The average operating voltage is 3.2 V.
Based on this, we calculate the number of cells connected in series to obtain the required voltage at the battery output. This is usually denoted by the number of consecutive cells + the symbol S (serial). The voltage at this connection is summed up.
series connection of cells 3s 1p
Li Ion: 1S-4.2V, 2S-8.4V, 3S-12.6V, 4S-16.8V, 5S-21V…
LiFePO4: 1S-3.6V, 2S-7.2V, 3S-10.8V, 4S-14.4V, 5S-18V…
That is, for example, for a 12 volt screwdriver you need a Li Ion 3S or LiFePO4 4S battery.
Operating current
The battery characteristics usually indicate the nominal and maximum (peak) discharge current. At rated current it can operate for a long time, and at peak current it can operate for several seconds.
Therefore, for such a powerful load as a screwdriver, you need to pay attention to this indicator and choose high-current battery models
At idle, a 12 volt screwdriver of average power consumes a current of 1-2 A, and at maximum load (especially in a braked state) the current can reach 30 A. Therefore, if you intend to use, for example, a GTF HG2 18650 3000 mAh battery with rated and peak currents, respectively 10A and 25A, then it is necessary to assemble at least 3S2P so as not to overload the batteries. When two batteries are connected in parallel, the permissible currents are doubled, when three batteries are connected, they are tripled, etc.
series - parallel connection of cells 3s 2p
Types of batteries
Batteries are of different types and their charging modes may be different. Nickel-cadmium (Ni-Cd) batteries are a very good source of energy and are capable of delivering high power. However, for environmental reasons their production has ceased and they will become less and less common. Now they have been replaced everywhere by lithium-ion batteries.
Sulfuric acid (Pb) lead gel batteries have good characteristics, but they make the tool heavier and therefore are not very popular, despite their relative cheapness. Since they are gel (the sulfuric acid solution is thickened with sodium silicate), there are no plugs in them, the electrolyte does not leak out of them, and they can be used in any position. (By the way, nickel-cadmium batteries for screwdrivers also belong to the gel class.)
Lithium-ion batteries (Li-ion) are now the most promising and promoted in technology and on the market. Their feature is the complete sealing of the cell. They have a very high power density, are safe to use (thanks to the built-in charge controller!), can be disposed of favorably, are the most environmentally friendly, and are lightweight. They are currently used very often in screwdrivers.
The meaning and procedure for converting screwdrivers to lithium batteries
Why do nickel-cadmium batteries fail quickly? In a garland of cans connected in series, each one is special. The chemical process is individual, the charge in closed systems is different. If there is a malfunction in one bank, the design does not provide the required voltage. A charge control and balancing system is not provided in individual components.
- Each Ni-Cd bank provides 1.2 V, and li-ion 18650 - 3.6 V.
- The capacity of a lithium battery is 2 times larger than a nickel-cadmium battery, which is similar in size.
- An overheated li-ion battery threatens to explode and catch fire, so installing charge uniformity control in the banks is mandatory. BMS is not installed in nickel-cadmium batteries - the manufacturer is not interested.
- Lithium cells do not have a memory effect, unlike Ni-Cd, they can be charged at any time and within an hour.
- The screwdriver becomes much lighter after converting the battery to li-ion, using 18650 cans.
There are only two obstacles to converting a screwdriver for lithium batteries - it is impossible to work with it at minus. The capacity of the cans decreases, starting from a decrease already from 10 0 C. Lithium batteries are expensive.
Knowing what input voltage is required for the screwdriver, the charger is redesigned, taking into account the placement of lithium battery cans and control elements in the factory container. You can do the same with a flashlight by upgrading the socket for a block of 18650 elements.
Let's say you need to rework a 12 V screwdriver using Ni-Cd cans on li-ion. If you use 3 banks, the output voltage is not enough: 3.6 x 3 = 10.8 V. With 4 components, the power of the device will be higher: 3.6 x 4 = 14.4 V. At the same time, the tool will become 182 g lighter , its power and capacity will increase slightly - all pluses. But when dismantling it is necessary to leave the terminals and the original temperature sensor.
Features of the conversion
Most models, at least Interskol, Makita, Hitachi, feature universal mechanisms. This means that the charger is designed to power Ni-Mh and Li-Ion batteries.
Features are related to battery power. New and replaced products must match each other. Otherwise, a failure or circuit break will occur, as indicated by the indicator. When overloaded or broken, the red and green lights flash simultaneously.
In a situation where the charger is not universal, it will need modification, as well as the power supply. The process depends on the type of charger and the manufacturer, implying almost complete desoldering of the board elements, installation of a capacitor, resistors and their subsequent adjustment.
Along with this, there is a universal method for transforming the memory. It involves the use of a BMS board that stabilizes the input voltage and current. On the market it is designated DC-DC StepDown, and trimming resistors are present directly on the board. The module is soldered into the charger circuit using the P+ and P- connections on the board and the old charging terminals.
Battery cell connection methods
The energy storage unit is assembled in one of three ways:
- Spot welding. If you don’t have a welding machine at home, you can contact a specialist. This technique of connecting elements into a block is the most preferred.
- Soldering. There is probably a soldering iron in every home. But when soldering, all manipulations must be performed very quickly, since the solder cools almost instantly. Prolonged heating of the batteries should be avoided. High temperatures will damage the elements. If you don’t have soldering skills, it’s better to entrust the work to a specialist.
- Cassette. An alternative, but not the most reliable way. The contacts obtained in the process will have significant contact resistance. This means that you need to be prepared for the fact that at high currents it will quickly collapse. Using special cassettes, batteries are quickly connected into a block.
In order for the voltage to be summed and the capacitance value not to change, you need to connect the elements in series.
Conversion to 12 volt lithium batteries
The above method applies to all batteries. The voltage is determined by the parameters of the power supply. The differences are related to the number of batteries. The bulk of the transformation manuals refer to 14 V units, where 4 18650 lithium batteries are used for replacement. For a 12 V device, this amount is too much. 3 18650 batteries will be enough here.
Conversion to 18 volt lithium batteries
A similar approach applies to 18 volt products. The differences here are also related to the number of batteries. The battery consists of 5 18650 units, which ensures super efficient operation. If the work process is too intense, the screwdriver even produces burnt marks. Therefore, subsequently the 5th battery is often removed.
Detailed video tutorial on converting a screwdriver to lithium
Key points regarding the assembly of protected batteries for converting a screwdriver to lithium batteries
How to replace faulty batteries
In addition to restoring unusable elements of a screwdriver battery, the most effective repair of a screwdriver battery is replacing the batteries included in its composition with new ones. Before repairing, you must purchase suitable batteries online. Their technical characteristics must be identical to those indicated on the body of the cans in the battery pack of the screwdriver.
To change the batteries in the unit with your own hands, you will need a soldering iron and soldering materials: tin and alcohol flux (rosin).
Replacing batteries requires following certain rules.
- To connect the cans, you need to use plates that were previously sealed off from the batteries. They have the correct cross-section and the required resistance indicator.
- To avoid overheating the cans during soldering, it should be done quickly. Excessive heating of batteries can render them unusable.
- The batteries are connected in series: the minus of each bank is connected to the plus of the next one.
- After assembling the battery pack, carry out at least 3 cycles of completely discharging and charging the battery.
Power supply options
You can use a standard charger for this purpose. Here's how to turn a cordless screwdriver into a corded one: you need to do the following:
- You need to remove the cover from the charger body.
- You need to make a hole in it for the connected two-core wire.
- On the board you can see the terminals to which the battery was previously connected for charging. You need to connect the cores of the prepared wire to them in order to remake the screwdriver for such work. In this case, you need to take into account the polarity of the terminals. To determine it, you need to look at the inscriptions on the board or on the device case.
- You need to open the screwdriver battery case and remove all the galvanic cells from it.
- Holes are made in it for the wire.
- The wires that were soldered to the terminals of the charger are connected, observing polarity, to the output contacts of the battery.
- Once the body is assembled, the tool can be used.
Although it is recommended to connect the power supply taking into account the polarity, however, if you connect the contacts in a different order, this will mean that the direction of rotation will change to the opposite. Most screwdrivers provide the ability to switch it, which makes it possible not to depend on polarity when switching.
Using a laptop charger
The laptop charger can be replaced for this tool with only minor modifications. It receives AC voltage from a 220V network at the input, and produces 12V DC at the output.
However, it will still be necessary to modify the wires:
- The plug used for a laptop will not fit a screwdriver. Therefore, it will be necessary to cut the wire coming out of the charger and strip it.
- If necessary, you need to attach a cable of the required length to it.
- The tool body needs to be disassembled.
- The cable is connected to the terminals from which power is supplied to the screwdriver. You need to make a hole in the tool body for it.
- The tool, once assembled, will be ready for use.
Important. After the modification is completed, you will need to connect the power source to the network and make sure that the tool is in working condition.
Computer power supply as a basis
You can power the instrument so that it uses the computer's power supply. Here's how else to make a power supply for a screwdriver: to remake this way, you need to do the following:
- You need to find or purchase a power supply with a power of at least 300 W.
- The screwdriver body needs to be disassembled and the location for connecting the wires to power the motor must be found. The cores of a pre-prepared wire are connected to them.
- A hole must be made in the housing for the wires to exit.
- To connect to the power supply, you will need special connectors. One of them is soldered to the wires coming from the screwdriver, the other is already installed on the wire that is connected to the computer power supply. This is necessary in order to power the screwdriver from the network
- Now we need to assemble the screwdriver body.
Now it remains to check how the tool works. To do this, you need to connect the power supply to a 220V outlet and plug in the screwdriver.
Power from car charger
You can convert this tool to be powered by a car battery. In this case, autonomy increases, since you can use the screwdriver in close proximity to the car.
In order to convert the voltage to 220 V you need:
- Disassemble the tool body. In this case, you can see the contacts to which power should be connected.
- It is necessary to prepare the wires that are used to charge car batteries. They have alligator clips. The other ends need to be carefully cleaned with a knife.
- Wires are attached to the contacts to power the screwdriver. They can be attached with zip ties or soldered. The last option will be more reliable.
- You need to make a hole in the tool body for the wires.
- Now the screwdriver body needs to be assembled.
To complete the work, you will need to connect the wires to the car battery using clamps.
Homemade power supply
Having made a power supply for a screwdriver with your own hands according to one of the diagrams, you need to insert the housing and connect it with wires to the motor of the tool.
Network block built into the battery
One of the options for converting a screwdriver into a network one is that the power supply, which converts 220V alternating current to 12V direct current, can be placed directly into the battery case. To do this you need to do the following:
- It is necessary to disassemble the battery housing.
- The contents are removed from it.
- You must first purchase a power supply that has the characteristics necessary for the screwdriver to operate.
- You need to remove the motherboard from the purchased device and install it in the case where the screwdriver battery was previously located.
- The output wires are connected to the battery contacts.
- For the input wires through which 220V voltage will be supplied, you need to make a hole in the housing.
- Now you need to assemble the screwdriver.
Read also: Makita saw chain
After the changes have been made, this tool can be used where there are electrical outlets.
Converting a 12V Hitachi screwdriver to 18640 lithium batteries
Features of converting a 12 V Hitachi screwdriver to lithium batteries. The very compact battery cell socket is designed for finger-type cells. Therefore, you should prepare space for 18650 elements. It is necessary to cut one side of the partition in order to tightly place 1 element.
You need to get flux, flat metal connecting tape, hot glue. It is necessary to install lithium batteries in a screwdriver during remodeling through a protective controller. It should handle 3 18650 cells, 3.7V and rated at 20-30 amps.
Remove the old battery from the socket, carefully disconnect the contacts in the assembly with the temperature sensor and power indicator. Clear and sign contacts. They should be brought out in one direction, connected with solder to the leads from thick wires, and the assembly should be filled with hot glue.
Assemble an energy source with one of the controllers designed for 3 elements. Assemble a sequential circuit of 3 Li-ion elements. Connect the controller. The 12-volt lithium battery conversion is complete when the structure is installed in the block, secured, and the charging indicator lights up. After full charging, measurements show 12.17 volts in the external network. But this is enough for trouble-free long-term operation of the device.
Electrical circuit for converting a screwdriver for Li-Ion batteries
The components have been selected, and now you can draw up an electrical assembly diagram. The source of operation of the screwdriver is household electrical wiring, from which the batteries are charged through the charger and BMS board. The BMS board has two printed pads to which the charger and screwdriver are connected. By the way, if the battery is almost discharged, but you need to work, then you can charge it and work with a screwdriver at the same time.
The battery terminals are soldered directly to the BMS board, since during operation of the screwdriver they give off a large current and the shorter and larger the cross-section of the conductors, the less energy loss.
A charge level indicator is connected directly to the battery terminals via the power button. One division corresponds to 25%. Lithium batteries do not have a memory effect and can be charged at any time without waiting for complete discharge.
Manufacturers of Li-Ion batteries recommend that in order for the battery to gain full power, it must be completely discharged a couple of times, followed by a full charge.
When assembling the circuit, to avoid component failure, strict adherence to the polarity of the connection is required. In the diagram, wires of positive polarity are indicated in red, and negative ones are indicated in blue.
Battery cell connection methods
The block that accumulates energy can be assembled in different ways. There are three types of assembly:
- soldering;
- spot welding;
- cassette.
You need to solder as quickly as possible, so you need a powerful soldering iron of about 100 W. Lithium batteries are afraid of overheating, so they should not be heated for a long time; high temperatures will cause damage. If you lack experience, you should resort to the services of a professional.
The technique of connecting elements into a block using spot welding is considered the best. A master who has a special welding machine can do the job better.
Special cassettes are considered not a very reliable method. The resulting contacts have significant contact resistance, which will quickly begin to deteriorate at high current.
The elements are connected in series, then the voltage is summed, but the capacitance value does not change. Batteries connected in series do not all fail at the same time, therefore, in some cases, from two batteries of a screwdriver, you can restore one working bank by selecting serviceable ones. But we must keep in mind that it will not last long. Therefore, experts advise resorting to such repairs in rare cases.
Safety precautions when working with batteries
When assembling the battery, you should remember that the currents during operation of a screwdriver can reach 11-12 amperes, so the contact area of the connecting bars between the elements should be maximum. Therefore, the spot welding connection option, often offered on the Internet, is not the best . It is better to solder the busbars over the entire contact area of the battery. At the same time, you need to understand that the elements are very sensitive to overheating, so you need to solder quickly and confidently, using acid fluxes - battery cases are not made of copper or brass. It is advisable to use heat sinks, which can be pliers, etc.
It is necessary to ensure that splashes of acid during soldering do not fall on other surfaces, because this will subsequently lead to corrosion in these places. The ration areas must be thoroughly washed.
Restoration, alteration and repair of screwdriver battery
It is no secret that the cost of a new battery for a screwdriver is equal to 70% of the total cost of the device. During operation, any rechargeable battery begins to lose its capacity and eventually fails completely or partially. But you shouldn’t throw away an old battery, because it can be revived at home.
Test under load
To find out how long it takes for the battery to drain completely, you need to test the battery under load. The latter is selected in accordance with the battery power.
As a rule, it is customary to select the load for testing the battery within the range of 35-40 W. To do this, you can use a 12 V light bulb with a power of 40 W.
Connect the battery through an ammeter to the light bulb for 2-3 minutes. All measurements must be carried out with a voltmeter. The voltage at the battery outputs should be slightly more than 12.4 V. If during this time the readings have dropped and are in the range of 12-12.4 V, then this indicates that there are damaged banks in the circuit. Also, the fact that there are faulty elements in the unit can be indicated by a drop in the brightness of the connected lamp.
DIY charger for 12V screwdriver
"People's" charger for a screwdriver
Author: arhimed2007, Published 10/27/2015 Created using KotoEd.
Mrr-meow! Truly, laziness is a brake on progress. I've had a screwdriver lying around in my stash for several years now. Polish (according to the passport), brand “VERTO”, 12 V. I once exchanged it for one of the ancient mobile phones. NEW! PACKAGED. But damn, the battery. From a full charge, after a month of work, it was no longer enough for a dozen screws. A little later, I smelled someone’s discarded filling from a BOSH battery and used it to repackage my battery. But. the same rake! New ones to buy were crushed by a toad. In general, I threw it far away.
So the Polish product lay around for several years. And recently they brought me another 14.4 V Shurik, MATRIX brand, for repair. One of the included batteries died, and most of the batteries were stupidly shorted. As a result, the charger made a noise and burned out so much that the case was deformed and the power supply turned sour. As always, thermal fuse. The second battery turned out to be quite alive.
Naturally, simply restoring the “original” charger is not an option if such defects are possible. At a minimum, overload protection is required. A serious charger with an analyzer was a waste, in addition, smart books said that the simplest design for NiCd is the “drip” charging mode - with a current of 0.1 C, where C is the numerical equivalent of the battery capacity in ampere-hours. In this case, there is no overcharging and the charging current at the end of the process simply compensates for the self-discharge, which is quite high in the cans from Uncle Liao. Thus, the charger simply must be a current stabilizer. It will not allow the power supply to burn if the story with a dead battery repeats itself.
“Native” chargers, as it turned out, do not shine not only in complexity, but also in quality of work. The current-setting resistor in them very often burns through to holes in the board, the current is set at random by Lazar, no protection, no stabilization! Therefore, it was decided to get rid of the original Chinese boards and install a more decent charger instead.
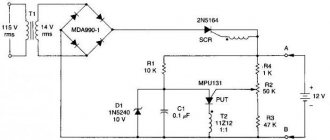
It was decided, as always, to sculpt this device from improvised means, namely old computer hardware. A powerful MOSFET from the motherboard was chosen as a regulating element. The typical current stabilizer circuit on a field-effect transistor was supplemented with an indication of power supply and charging process. This is what happened:
The current stabilizer itself is made of elements VT2, VT3 and current-measuring resistor R5. Zener diode VD2 protects the MOSFET from excess drain-gate voltage. VT1 has an end-of-charge indicator that turns off the red LED HL2 when the voltage at the source of VT3 drops below the opening threshold minus the voltage drop across R4. And this, in turn, happens when the voltage on the battery increases above 15 V. The second LED lights up all the time, indicating the presence of power on the charger. Diode VD1 protects the battery from discharge through the circuit when the power supply is turned off.
The most common MMBT3904 in computer junk (SOT-23 case marked 1Am, t04, p04 or several other options) were taken as VT1, VT2. VT3 - APM2025, although any n-MOSFET used in motherboard power regulators will do. Resistors of size 1206 were taken from old server boards, although smaller ones can be used. It's just easier to make a board for 1206. A capacitor of the same size was also blown out from there. The only output resistor is R5, which I set to 3W. Although, if desired, it can be sculpted from several 1210 hard drives connected in parallel, they will withstand such current.
The meaning and procedure for converting screwdrivers to lithium batteries
Why do nickel-cadmium batteries fail quickly? In a garland of cans connected in series, each one is special. The chemical process is individual, the charge in closed systems is different. If there is a malfunction in one bank, the design does not provide the required voltage. A charge control and balancing system is not provided in individual components.
- Each Ni-Cd bank provides 1.2 V, and li-ion 18650 - 3.6 V.
- The capacity of a lithium battery is 2 times larger than a nickel-cadmium battery, which is similar in size.
- An overheated li-ion battery threatens to explode and catch fire, so installing charge uniformity control in the banks is mandatory. BMS is not installed in nickel-cadmium batteries - the manufacturer is not interested.
- Lithium cells do not have a memory effect, unlike Ni-Cd, they can be charged at any time and within an hour.
- The screwdriver becomes much lighter after converting the battery to li-ion, using 18650 cans.
There are only two obstacles to converting a screwdriver for lithium batteries - it is impossible to work with it at minus. The capacity of the cans decreases, starting from a decrease already from +10 0 C. Lithium batteries are expensive.
Knowing what input voltage is required for the screwdriver, the charger is redesigned, taking into account the placement of lithium battery cans and control elements in the factory container. You can do the same with a flashlight by upgrading the socket for a block of 18650 elements.
Let's say you need to rework a 12 V screwdriver using Ni-Cd cans on li-ion. If you use 3 banks, the output voltage is not enough: 3.6 x 3 = 10.8 V. With 4 components, the power of the device will be higher: 3.6 x 4 = 14.4 V. At the same time, the tool will become 182 g lighter , its power and capacity will increase slightly - all pluses. But when dismantling it is necessary to leave the terminals and the original temperature sensor.
Charging For Lithium Batteries Screwdriver With Your Hands
Charger for a screwdriver - how to choose and whether you can make it yourself
Screwdrivers are found in everyone where simple repairs are made. Any electrical appliance requires stationary electricity, or in other words, a power supply. Since cordless screwdrivers are very necessary, an additional charger is required.
It comes complete with a drill, so no electrical appliance can fail. So that you do not encounter the problem of non-working equipment, we will study the general description of chargers for a screwdriver.
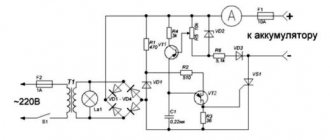
Analog with built-in power supply
Their popularity is justified by their low price. If a drill (screwdriver) is not designed for professional use, the duration of work is not the first issue. Benefits of automation. Do-it-yourself automated ice drill from a screwdriver has a number of advantages. The task of a conventional charger is to obtain a constant voltage with a current load sufficient to charge the battery.
This type of charging works following the principle of an ordinary stabilizer. For example, let's look at the circuit of a charger for a 9-11 volt battery. The type of batteries does not matter.
You can assemble such a power supply (aka charger) with your own hands. It is natural to solder the circuit on a universal circuit board. To dissipate the heat of the stabilizer chip, a copper radiator with an area of 20 cm² is sufficient.
The input transformer (Tr1) reduces the 220 volt AC voltage to 20 volts. The power of the transformer is calculated based on the current and voltage at the output of the charger. Next, the alternating current is rectified using the diode bridge VD1. Typically, the Russian automotive industry (especially the Chinese) use an assembly of Schottky diodes.
After rectification, the current will pulsate, which is detrimental to the production performance of the circuit. The ripples are smoothed out by a filtering electrolytic capacitor (C1).
The role of the stabilizer is performed by the KR142EN microcircuit, or “crank” in amateur radio slang. To obtain a voltage of 12 volts, the microcircuit index must be 8B. The control is assembled on a transistor (VT2) not trimming resistors.
https://www.youtube.com/watch?v=_0WXmu0Q5gU
Automation is not provided on similar devices; the battery charging time is determined by the user. To control the charge, a lightweight circuit has been assembled using a transistor (VT1) and a diode (VD2). When the charging voltage is reached, the indicator (LED HL1) goes out.
More advanced systems include a switch that turns off the voltage at the end of the charge in the form of an electronic key.
Included with economy class screwdrivers (manufactured in the Middle Kingdom), there are no more ordinary chargers. It’s not surprising that the failure rate is quite high. The owner faces the prospect of being left with a relatively new, inoperable screwdriver.
Using the attached diagram, you can assemble a charger for a screwdriver without the help of others, which will last longer than the factory one. Technology for laying paving slabs step by step planning. At this stage, you should decide on the future site for laying paving slabs with your own hands and create a plan for it.
By changing the transformer not the stabilizer, you can easily select the desired value for your battery.
Analog with external power supply
The charger circuit itself is primitive, given the ability. The kit includes a mains power supply, not actually a charger, in a housing that holds the battery module.
It is stupid to consider the power supply, its circuit is standard - a transformer, a diode bridge, a capacitor filter, not a rectifier. The output is 18 volts, for traditional 14 volt batteries.
Do-it-yourself conversion of standard interskol charging for Li-ion-18650
save on your purchases start saving here.
How to charge a li-ion battery using a screwdriver
DO NOT IN ANY CASE INCREASE A SCORET HERE is a link to a conventional converter Here is a slightly different one
The charge control board occupies the area of a matchbox:
You, there is no heat sink on such assemblies, just a high-power load resistor. Therefore, such devices often become unusable. The question arises: how to charge a screwdriver without a charger ?
The solution is simple for a person who knows how to hold a soldering iron.
- The first condition is the presence of a power source. If the “native” unit is working, it is enough to assemble a simple control circuit. If the entire set fails, you can use a laptop power supply. The output is the required 18 volts. The power of such a source is enough for any set of batteries
- The second condition is basic skills in assembling electrical circuits. The parts are the most affordable, you can remove them from old household appliances, or buy them on the radio market for literally pennies.
Schematic diagram of the control unit:
The input is a zener diode of 18 volts. The control circuit is based on the KT817 transistor; amplification is provided by the powerful KT818 transistor. DIY paths for the garden and dacha: 50 photos of how. It must be equipped with a radiator. Depending on the charging current, it can dissipate up to 10 W, so a radiator with an area of 30-40 cm² will be required.
It is the savings on matches that make Chinese chargers so unreliable. A 1 KOhm trimmer is needed to accurately set the charge current.
The 4.7 ohm resistor at the output of the circuit should also dissipate enough heat. Power not less than 5 W. A selection of circuits for homemade chargers for do-it-yourself car batteries.
The LED indicator will notify you that the charge is complete and will go off.
The assembled circuit can be easily placed in the standard charging case. It is not necessary to remove the transistor heatsink; the main thing is to ensure air circulation inside the case.
The savings lie in the fact that the power supply from the laptop is still used for its intended purpose.
For a household screwdriver this is not a problem. I left it to charge overnight before starting work - it was enough to assemble the cabinet. The average charging time for a Chinese cordless drill is 3-5 hours.
Pulse
Let's move on to heavy weapons. Professional screwdrivers are used intensively, and downtime due to a low battery is unacceptable. We leave out the price issue; any serious equipment is expensive. Moreover, the kit usually includes two batteries. While one is in work, the second is being recharged.
A switching power supply, complete with an intelligent charge control circuit, fills the battery 100% in literally 1 hour. You can also assemble an analog charger with the same power. But its weight and dimensions will be comparable to a screwdriver.
Pulse chargers do not have all these disadvantages. Compact size, high charge currents, thoughtful protection. There is only one problem: the complexity of the scheme, and as a result, the high price. However, it is possible to assemble such a device. Saving at least 2 times.
We offer an option for “advanced” nickel-cadmium batteries equipped with a third signal contact.
The circuit is assembled on the popular MAX713 controller. Steps to take when replacing the power supply for a 12V and 18V screwdriver with your own hands. You can find a suitable power source in the market or from someone you know. The proposed implementation is designed for an input voltage of 25 volts DC. It is not difficult to assemble such a power supply, so we omit its circuit diagram.
The charger is intelligent. After checking the voltage level, the accelerated discharge mode starts (to prevent the memory effect). Charging occurs in 1-1.15 hours. A special feature of the circuit is the ability to select the charging voltage and battery type. The description in the figure indicates the position of the jumpers and the value of resistor R19 for changing modes.
If the branded charger
If a professional screwdriver fails, you can save on repairs by assembling the circuit yourself.
Power supply for a screwdriver - diagram and assembly procedure
Many people are familiar with the situation: the screwdriver is alive and well, but the battery pack has died. There are many ways to restore a battery, but not everyone likes to tinker with toxic elements.
How to use an electrical appliance
The answer is simple: connect an external power supply. If you have a typical Chinese device with 14.4 volt batteries, you can use a car battery (convenient for working in the garage). Or you can choose a transformer with an output of 15-17 volts and assemble a full-fledged power supply.
The set of parts is the most inexpensive. Rectifier (diode bridge) and thermostat to protect against overheating. The remaining elements have a service task - indicating input and output voltage. No stabilizer required - your screwdriver's electric motor is not as demanding as the battery.
If your screwdriver batteries are completely out of order, then you can convert it to mains power, see how to make such a power supply in this video
Here you can download the printed circuit board in lay format
This is what the charger conversion circuit looks like.
Source: https://ctln.ru/zarjadka-dlja-litievyh-akkumuljatorov-shurupoverta/
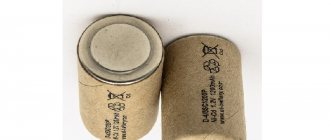
What do lithium batteries look like?
Most lithium devices are housed in a prismatic body, but some models are cylindrical. These batteries use roll electrodes and separators. The body is made of aluminum or steel. The positive pole goes to the housing cover.
In prismatic configurations, the electrodes are in the form of rectangular plates. To ensure safety, the battery is equipped with a device that acts as a regulator of all processes and opens the electrical circuit in critical situations. Increased sealing of the housing prevents electrolyte from leaking out and oxygen and moisture from penetrating inside.
Malfunctions and repair of the battery charger
To repair a charger, you must have at least minimal knowledge of radio technology, as well as a device for “dialing” the radio components of the device - a tester. All chargers for screwdrivers are similar to each other and have the following components:
- the low-voltage part, which includes the converter rectifier, as well as a circuit that provides power for charging the battery;
- step-down inverter;
- network rectifier.
Mains rectifiers can be called the most durable elements of chargers if they are used correctly. But if the charger is designed to operate from a 120-130 V power supply, and the fuse blows while connecting it through the converter, then in order to fix it, the fault should be looked for in the rectifier. In chargers operating from 220 V, high-voltage inverter transistors often burn. At the same time, the rest of the charging electronics and the inverter rectifier very rarely fail. Broken or swollen capacitors can also be considered the reason why the charger does not work.
Before troubleshooting, you will need to disassemble the charger housing. This should be done carefully, since most cases are assembled with 1 screw and latches, which are easily broken.
All components of the electronic charging circuit must be checked with a tester. Most often, the rectifier capacitor turns out to be faulty. Even if during a visual inspection you see swollen electrolytes, they must be resoldered and replaced with serviceable analogues. Next, by installing a fuse with the required rating, you can check the operation of the board in battery charging mode. If no problems are found, the current and voltage readings are within normal limits, then the board can be mounted in the case.
If the charger board still refuses to work and the battery does not charge, then you need to look for problems further. The serviceability of the fuse, as well as the presence of voltage on the capacitor, indicates that the fault is in the inverter. Diagnostics of an inverter is a complex task and requires certain experience, as well as special equipment - an oscilloscope. If you have no experience and equipment, then you can repair the charger by checking all the radio components one by one, changing the transistors and converter chips, and each time checking the board for functionality.
Also, upon visual inspection, you can notice broken diodes. They will be distinguished by their yellowness due to overheating. If at least one diode (of the diode bridge) breaks, it short-circuits the transformer. This causes overheating of the remaining diodes, resulting in overheating of the transformer windings and their turn-to-turn short circuit. Therefore, you need to check all suspicious diodes and both windings of the transformer with a tester. The test most often shows a break in the primary winding.
It is worth knowing that almost all transformers of this type have thermal protection, which operates at a temperature of 130°C. Typically this sensor is located under the top layers of transformer insulation. If there is nothing to replace the sensor with, then at your own peril and risk you can simply solder the legs of the sensor, eliminating a break. Next, you should return the insulation removed from the windings to its place and check the functionality of the charger. In most cases, this transformer malfunction can be resolved in a fairly simple way.
Pros
- The energy density of lithium-ion elements is significantly higher than that of nickel-cadmium elements, which are used by default in screwdrivers. That is, a lithium battery will have less weight than a cadmium battery with the same capacity and output voltage;
- Charging of lithium battery cells occurs much faster than in the case of Ni─Cd. It will take about an hour to charge them safely;
- Lithium-ion batteries do not have a “memory effect”. This means that they do not have to be completely discharged before charging.
Now about the disadvantages and difficulties of lithium batteries.
Protection for the battery and modification of the battery controller.
We've sorted out the batteries, so we continue our conversion of the screwdriver battery for Li-ion.
Lithium needs a protection controller. Which will protect battery banks from overcurrent, overdischarge, overcharge, and also balance the banks when charging.
Of those that I tried in terms of price/quality ratio, I liked this controller better.
Works great. Handles the load. But there are also disadvantages. Protection is not removed automatically. To remove it, you need to apply voltage to the battery or just put it on charge for a couple of seconds.
The second drawback on some screwdrivers is that the protection may be triggered when the trigger of the screwdriver is sharply pressed, and in general it is not configured for our banks (which can easily handle higher currents), but based on the datasheet for the key transistors (which are also designed for higher current) of the controller battery protection, it can be roughened.
I corrected both shortcomings as follows.
Improvement of the lithium battery controller. In the picture of the board we see two SMD resistors marked R010. Their nominal value is 0.01 ohm each. They specify at what load current the protection will operate.
I added another 0.01 Ohm resistor of the same type to my battery controller, see diagram. You can also add a film capacitor to it, which is just useful so that when you press the trigger sharply, the protection does not work.
The upper part of the circuit is responsible for the “Power” mode. When in the on position, the transistor switches do not work at all and there is no load on them. But also protection. Therefore, it is better not to use this mode.
A 15 Amp fuse in this mode provides current protection. We put it to your taste. We take a more powerful diode. I have two pulse diodes in parallel, 6A each (together 12A), whatever came to hand in general.
You can connect a small digital voltmeter, for example, one to monitor the discharge control.
Instead of a voltmeter, I connected a homemade discharge indicator set to 12V. Its operation coincides with the operation of the protection board during normal operation.
Also, for clarity, in parallel with the discharge indicator (in the diagram it is a voltmeter), I connected an LED through a 2KΩ resistor in order to immediately see when the “Power” mode is turned on.
I practically don’t use the “Power” mode to operate a screwdriver, but it is needed to remove triggered protection. Just switch back and forth and you can continue to spin.
.
We solder the cans according to the diagram below:
I stuffed the whole thing back into the case.
This is how I got the switch to the “Power” mode. It is also used to reset protection.
There are two indicators at the back. The red LED indicates that the “Power” mode is on. Yellow lights up when the “Power” mode is on, when the battery runs down to 12 volts.
I also added an outlet. USB with battery voltage. The main thing is that no one mistakenly inserts the phone to recharge :) I use it at a construction site for listening to an adapted receiver and an LED lamp.
I've been testing a new battery conversion for lithium for a month now, and now I like everything. The battery does not sit down for a long time. Shurik easily copes with heavy loads.
There's one more thing left. Fast charging, like in top models :)
Tips from home craftsmen
Despite the large selection of professional and household tools in stores, many home craftsmen make these tools with their own hands from simple and affordable materials.
How to make an electric screwdriver with your own hands
Most often, craftsmen make a mini cordless screwdriver with their own hands for disassembly, assembly and repair work with office equipment, electrical toys and other types of fasteners with miniature screws, bolts and nuts. For these purposes they use:
- four 1.5 volt AA batteries with a housing from an old spray gun;
- two three-pin metal toggle switches;
- 6 volt electric motor and gearbox from a children's toy;
- plastic magazine for bits;
- two plastic bottles.
In addition, you will need inexpensive materials and standard household tools:
- silicone glue;
- plastic strip;
- insulating tape;
- scissors;
- screwdriver;
- wire cutters;
- soldering iron
Video: how to make a mini electric screwdriver with your own hands
Converting an electric screwdriver to lithium batteries
It makes sense to replace the NiCd batteries in the cordless screwdriver with lithium ones. The benefits are obvious:
- Li-ion batteries are used more often and are easier to buy;
- they can be charged without waiting for complete discharge;
- The capacity, and therefore the power, of lithium batteries is greater than that of their cadmium counterparts.
Here we will consider an example of converting a cordless screwdriver to lithium batteries, which are used in the repair of system units, printers and other office equipment. Therefore, it will be charged from the computer port.
Tools and materials
To convert to lithium you will need:
- charge controller board TP 4056 without protection (can be purchased at any radio market);
A board for charging lithium batteries is sold in computer markets. - lithium batteries from a laptop;
- connecting wires of various lengths;
- set of files;
- hot glue gun.
To reduce the standard charging current of the board from 1 A by half, you should solder a resistor with a resistance of 1.2K to a resistor of 2.4K.
Sequence of work
Replacing batteries is quite simple; special electrical skills are not required.
- Carefully separate the halves of the housing.
To do this, unscrew the screws and remove one half. The screwdriver body is disassembled into two parts after unscrewing all connecting bolts - We take out the old cadmium batteries and figure out where to place the USB socket.
An acceptable option is in the plane of the connector. After disconnecting the NiCd battery pack, you need to determine the location for installing the USB connector through which the device will be charged. - Using a cutter, we cut out a recess in the plastic case at the junction for USB and charging LEDs.
The body of the screwdriver is usually made of thick plastic, so it is better to use a special tool to make the hole accurately. - We insert the lithium battery and charging controller into their places.
We connect wires between ourselves and the electric motor. Fix with dielectric paste. We place lithium batteries in the screwdriver handle and connect them to the charging board and to the electric motor - Assembling the body of the battery screwdriver.
To do this, degrease the joint and apply glue. Then we press the halves of the case against each other and tighten them with screws. Degrease the joint and apply hot glue to it - We connect the charging cord to the turned on computer and to the USB socket on the screwdriver body.
To check the correct assembly, you need to connect the screwdriver to the computer - the charging indicators should light up - We are waiting for the charging process to complete.
As soon as the indicators turn blue, you can start using the screwdriver. The screwdriver can be used after the indicators turn blue
Video: converting a screwdriver to a Li-on battery
Converting a cordless screwdriver into a corded one
This work is done in the following order.
- Unscrew the body halves, not forgetting to unscrew the hidden screws.
- Remove the old batteries from the battery by cutting off the wires and insulating the ends.
- Find out the voltage from the markings on the handle.
- Remove the old charging adapter.
- Instead, choose a new power adapter, with a current limit slightly higher than the rated voltage.
- Reassemble in reverse order.
In the simplest version, instead of a battery, you can insert a power adapter into the screwdriver and pull out a cable with a terminal connector
Useful tips
Despite the fact that the use of lithium-ion batteries provides many advantages - the absence of battery “memory”, extremely low self-discharge, the ability to work as a screwdriver in subzero temperatures, a long shelf life (up to 8 years) - they are more sensitive to compliance with charging technology. If you do not control the voltage rating, then Li-ion batteries are quickly destroyed. Consequently, you will have to purchase a special, more expensive charger. The one that was originally equipped with the screwdriver is not suitable for lithium-ion batteries.
On the Internet there are recommendations for reusing Li-ion batteries that were previously installed in other technical devices. For example, to ensure autonomous operation of a laptop or telephone (cell phone). There are many options. The author suggests asking a simple question: is such savings rational if used products do not ensure the normal functioning of the screwdriver, taking into account the specific application of this electric tool? Perhaps it will perform its task for some time, but how effectively and for how long is a completely logical question. Therefore, such advice from various “homemade” people is hardly worthy of attention.
To monitor the condition of the battery cells, you can purchase a voltage indicator. The radio shop will tell you which board is best to use. It is inexpensive - around 180 rubles.
Before reworking the battery, you should look at the screwdriver's data sheet. What is the rated voltage indicated? Depending on this, the required number of elements is selected.
The author draws attention to the fact that without sufficient knowledge of radio engineering, it is not advisable to independently manufacture electronic boards. The slightest mistake, for example, in selecting parts for a balancing circuit will lead to the elements starting to “fly out” one after another, and they will have to be replaced regularly with new mini-batteries
If you are not sure that the work will be completed efficiently, you should not waste time on remodeling and purchase a lithium-ion battery for the screwdriver in the store. Despite its price, in the long run it will be cheaper than constant resuscitation of a homemade battery. Or it’s easier to do it - buy the appropriate model of charger. Then you won't have to mount the boards.