- home
- Miscellaneous
>
⬎
Battery screwdrivers are very convenient to use and are widely used by both professionals and home craftsmen. The battery is usually the first to fail. Currently, all manufacturers of power tools have switched to lithium batteries and purchasing a new nickel-cadmium battery for an old screwdriver is becoming more and more problematic, and the prices for these batteries are much higher than for lithium ones.
Of course, it is possible to purchase batteries on various services that sell Chinese goods. But it takes time for the package with the “cans” to arrive, and again, these are certain costs. There is an alternative to buying batteries/cans - connect the screwdriver to the mains power supply and forget about quickly draining the batteries. Powerful power supply on Aliexpress. There are many inconveniences due to the power cord, but you always have to sacrifice something.
How much current does a screwdriver consume?
Before choosing a suitable power supply, you need to understand what current consumption you need to count on. Unfortunately, cordless screwdriver manufacturers do not indicate the current consumed by the motor. The capacity of the battery itself in ampere-hours, which is necessarily indicated on the battery, does not allow us to understand how much current the screwdriver consumes in operating mode
. The maximum that the manufacturer can indicate is the power in watts, but this is very rare, usually the power is indicated directly in torque.
If the power in watts is still indicated, we can have an idea of the current consumption and select an appropriate power supply with a small current/power margin. To calculate the current, it is enough to divide the power in watts by the operating voltage of the screwdriver, in this case it is 12 volts. So, if the manufacturer indicated a power of, for example, 200 watts - 200:12 = 16.6 A - this is the current consumed by the screwdriver in operating mode.
However, the indicated power is very rare and there is no universal figure that characterizes all 12-volt screwdrivers. You need to understand that when the motor shaft is fully braked, the currents can significantly exceed the rated ones and calculating this value is not very easy. At the same time, an analysis of various forums and our own experience has shown that a current of 10 A is often sufficient to operate a screwdriver; this is enough to perform many screwing and drilling functions. It is known that current surges during complete braking of the shaft can exceed 30 A.
Well, what conclusion can be drawn from all this? A 12 V power supply providing 10 A current is suitable for a screwdriver; if it is possible to use a 20-30 A unit, this is even better. These are average figures that apply to most screwdrivers.
Why redo it?
A cordless screwdriver has many advantages over a corded device. It can be used even where there is no electricity supply; you can tighten fasteners in hard-to-reach places; the master’s movements are not limited by the length of the wire or extension cord. In short, this option is often chosen for household work.
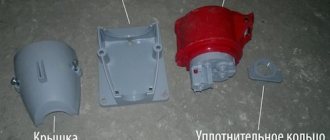
But the cordless screwdriver is limited in operating time by the capacity and quality of the installed battery. You can use it until she sits down. Moreover, if the battery fails and stops holding a charge or cannot be charged at all, then the screwdriver itself will not work. You need to either replace the battery or convert it into a network version. In some cases, replacing the battery is completely impossible. And a new one costs almost the same as a new device. Of course, in this case, most people will decide to buy a new model of screwdriver.
A new battery for a screwdriver sometimes costs as much as a new tool
But, as practice shows, in some cases it is easier and cheaper to convert a cordless screwdriver into a 220 V powered one. You will give the tool a new life and save money. The only limitation that such an updated screwdriver will have is the need to plug it into an outlet before use. But it is possible not to interrupt work while recharging the battery.
power unit
We will not consider purchasing any units or transformers, and if we do buy it, it will be a new battery! We will consider using what we have on hand. I’ll say right away that the charger from the same screwdriver is only suitable for drilling overripe bananas, its power is too low.
Ideally, a step-down, powerful 12 V transformer, for example from a computer uninterruptible power supply, would be suitable. The power of such a transformer is usually 350-500 watts. But I didn’t have such a transformer, but I had a lot of computer power supplies. I am sure that if someone has various electronic junk, ATX computers are definitely lying around in it.
This is one of the first representatives of computer ATX power supplies.
The computer ATX unit is quite suitable for a screwdriver; the load capacity on the +12 volt bus allows you to remove currents of 10-20 amperes. I would like to dispel a small myth - it will not be possible to stuff the unit into the battery housing of a screwdriver, the ATX board is too large. You will have to make a separate case for the block or leave it in its original metal case. The disadvantage of the original case is sensitivity to dust, and even the smallest repair requires a lot of dust.
A rather weak unit, the load on the +12V bus is only 10 A. If possible, it is better to choose units with a more powerful twelve-volt bus.
Advantages and disadvantages of different batteries
Nickel-cadmium devices are considered one of the most popular today. The power supply for a screwdriver with such a battery is quite cheap, and the charging process is quite fast. Among the disadvantages is the loss of unused capacity on repeated charging.
Chargers for nickel-metal hydride batteries are offered by Hitachi. These batteries are more environmentally friendly, more expensive, but the capacity, and with it the energy density, is much higher. There is virtually no memory loss in these batteries.
Lithium-ion batteries have more interesting characteristics. There is no memory effect here. The energy density is also significantly higher. The price is also slightly higher than the other two types. Among the advantages is the ability to charge at any time, regardless of capacity.
Mock Tests
Before starting to build a working structure, you should test everything on the knees, make sure that the screwdriver is operating stable under load and that there is no severe overheating in the power supply.
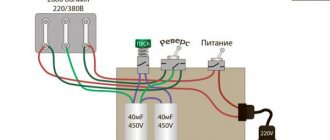
We take the computer power supply and check it: plug it into the network, find green in the output bundle of wires (they say it can be a different color, but I always came across green ones) and connect it with a jumper to any of the black ones (all black wires at the output are the common output, in our case it is a minus). The unit should turn on and a voltage of 12 volts will appear between the black and yellow wires. You can check this with a multimeter or by connecting any computer cooler to the named terminals.
If everything is in order and the unit produces about 12 volts on the yellow (+) and black (-) terminals, continue. If there is no voltage at the output, we look for another unit or repair this one; this separate topic will be described separately.
We cut off the plug from the output of the block and take 3-4 yellow and black wires coming from the block and connect them in parallel. When cutting off the plug, do not forget about the green starting conductor, it must be shorted to black. We received a 12 V source with a decent current load capacity of 10-20 A, the currents depend on the model and power of the unit.
Now we need to connect our 12 V to the terminals of the screwdriver without a battery; we look at the polarity of the connection using the battery. Well, we check the screwdriver - at idle speed, then slowing down by hand. At this stage, I encountered a problem: when I press the button fully, the screwdriver works, but when I slowly, smoothly press the screwdriver button, the power supply goes into protection. To reset the protection, you must disconnect the unit from the network and turn it on again. This won’t work at all, we need to somehow correct this instability.
I pulled the block board out of the case and additionally hooked up a multimeter to constantly monitor the voltage
In my opinion, this phenomenon may occur due to the fact that the power supply and the screwdriver button are controlled by PWM controllers; due to interference along the power wires, the controllers somehow interfere with each other. We are trying to solve this problem using an improvised LC filter.
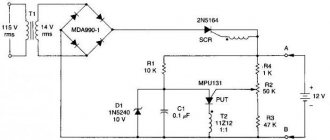
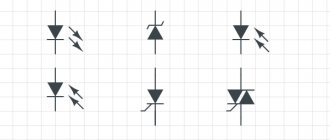
I assembled the filter in 5 minutes from what was at hand: 3 electrolytic capacitors of 1000 uF at 16 volts, a non-polar capacitor of less than 1 uF and wound 20 turns of copper wire with a diameter of 2 mm on a ferrite ring from another unit. Here is his diagram:
And this is what he looks like. This is a purely trial version, in the future this design will be transferred to the battery housing of the screwdriver and will be made more accurately.
We check the entire structure: the block does not go into protection in any position of the button, great! Now you can try tightening several screws - all in a bunch. It seems that the screwdriver will be able to tighten larger screws.
Well, now you need to remove all the snot and piles of wires, remove the “dead cans” from the battery case, replace them with an LC filter, and test the screwdriver in more realistic conditions.
Connecting the screwdriver to the charger
Sequencing:
- Solder or attach two wires with alligator clips to the terminals of the charger.
- Disassemble the old battery and remove the dead cells from it.
- Drill a hole in the battery case for the cable, thread the cable into the hole. It is advisable to seal the connection with electrical tape or heat-shrink tubing to prevent the wire from tearing out of the housing.
- Elements removed from the battery will disrupt the weight distribution of the screwdriver - your hand will get tired. To restore balance, a weight should be placed in the body - it can be dense wood or a piece of rubber.
- Solder the cable to the terminals of the former battery, connected to the screwdriver.
- Assemble the battery housing.
- All that remains is to test the updated tool in action.
Installation of a finished power supply in the housing of an old battery
Procedure:
- Disassemble the old battery and remove the non-functioning elements from it.
- Install the power supply into the battery case. Connect the high voltage terminals and low voltage terminals.
- Assemble and close the battery case.
- Install the battery into the screwdriver.
- Plug the power supply into the outlet and check the updated network tool in operation.
Homemade power supply
Step-by-step instruction:
- Disassemble the old battery case and remove the dead batteries from it.
- Install the elements of the electrical circuit of the power supply onto the circuit board, solder the contacts.
- Install the assembled board into the case. Use a tester to check the presence of voltage at the output.
- Connect the low voltage wires to the terminals of the old battery. Assemble the body.
- Connect the screwdriver to the electrical network and check its operation.
Connecting to an external power supply
What to do:
- Disassemble the screwdriver and find the motor power wires inside. Install the connector for the power supply into the case and solder the wires to the connector. Secure the wires with hot glue.
- Choose a suitable power supply, for example, from a laptop. Find an adapter for the low voltage connector.
- Connect the screwdriver to the new power supply and check its operation.
Connecting to a power supply from a computer
Instructions:
- Find or buy a computer power supply with a power of at least 300 W.
- Disassemble the screwdriver body. Find the motor power wires inside. Solder the connectors for the computer power supply to the wires.
- Remove the connectors for connecting the computer power supply from the case.
- Connect the screwdriver to the new power supply.
- Connect the power supply to the network and check the operation of the device.
Assembly of the working structure
For ease of use and connection, I brought the cord from the power supply into the battery case. I took a 3.5 meter long cord that was available. I removed all the battery cells from the battery and installed an LC filter. Now, if I somehow get a working battery, I can always put it on a screwdriver and put the power supply away as a reserve. I didn’t throw the batteries out of the battery, I have an idea where to use them, but that’s a topic for another review.
Since the cord connecting the unit to the screwdriver has a certain resistance and inductance, you can try to close the terminals of the L1 coil with a jumper. In theory, this could increase power by a tiny amount.
The screwdriver feels great with a cord, but to be honest, it seemed a little weak to me when braking by hand. But trial tightening of the self-tapping screws dispelled my doubts: self-tapping screws 35 mm long can easily be screwed into 20 mm plywood. This means that a screwdriver will cover most repair needs.
I cut off all the output wires from the block, leaving the green starting wire; I soldered its end to the common conductor of the board, where all the black ones are soldered. It's best to carefully desolder all the wires, but my soldering iron was too weak for this and had to be cut. I soldered two short, hard copper wires to the common contact and +12 (where the yellow ones are soldered) and connected them through the terminal block to the cord to the Shura.
This is where we will finish this review; we have achieved what we wanted - the screwdriver works perfectly with a computer power supply. In the future, I plan to make a high-quality plywood case without cracks for the power supply board - tests have shown that the heatsinks on the board do not heat up at all and you don’t have to worry about overheating of the elements in a closed case.
Update from December 28, 2019
The power supply is very powerful and can cope with long drilling sessions. In an implementation without voltage feedback, the unit can be connected to the network for at least a whole day - there is no heating.
However, during operation at the facility, a significant drawback was revealed: when the motor shaft becomes jammed, the power switches can burn out. My “negative” transistor (the bottom one in the diagram) always flew out, but the second one remained intact.
Since shaft jamming is equivalent to a short circuit at the power supply output, measures must be taken to eliminate this phenomenon. Let's look at the operation of a cordless tool - due to the “soft” current-voltage characteristic (volt-ampere characteristic) of the battery, when the load is too heavy and jammed, the voltage drops, as a result of which the current decreases.
I have not conducted experiments yet, but I consider measures to “soften” the current-voltage characteristic useful: 1. The secondary winding of the power transformer needs to be wound “more closely”, without spreading it across the entire ring. 2. Reduce the rated output voltage (under a 30 W lamp load, for example) by several volts by reducing the number of turns of the secondary. That is, if the screwdriver is 14.4 V, then select the voltage at the power supply output 9-10. It is quite possible that there will be a drop in rotational power after such manipulations; the best option should be found here.
I consider it irrelevant to make protection in the “hot” part of the block, because under heavy loads the protection will often trip and the ease of use will be lost. Still, measures to “soften” the current-voltage characteristics seem more acceptable to me.
It will be very interesting to know your experience if you assemble a circuit and try to make the jamming of the shaft “soft”. Contacts are in the footer of the site.
Rate this publication:
Currently 4.59
Rating: 4.6 (22 votes)
Few additions
To compensate for losses in the cord connecting the screwdriver to the power supply, it is useful to increase the voltage by 2-3 volts. But this is provided that you know the circuit design of ATX computers and know what to do.
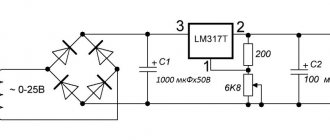
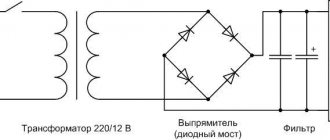
If it is possible to use a powerful transformer, then its output, secondary winding should have an alternating voltage of 12 V. If the voltage is different, it is recommended to adjust the secondary winding by unwinding (if the voltage is more than 12 V) or rewinding (if less than 12 V) several turns. It is worth noting that when rectifying and filtering the 12 V AC voltage, it turns out to be about 14.4 V without load. So don’t let this confuse you, this is the EMF voltage and it is natural that it is higher than the nominal one.
In addition to the transformer, a rectifier is assembled; the diodes should easily hold 30 A. It is more expedient to place the capacitor filter in the battery case, as in the ATX version.
Is a rework necessary?
Should I remake the screwdriver or not? Before starting work, it is necessary to evaluate the advantages and disadvantages of this solution. If we talk about the first, then as a result the owner will achieve:
- disappearance of problems with a suddenly discharged tool;
- lack of dependence on low temperatures, because under such conditions the batteries discharge very quickly;
- obtaining stable torque;
- significant savings, since purchasing a new, rather expensive battery is not required.
In addition, this is the only remaining option if the model has already been discontinued, when the tool is urgently needed, and there is no time to wait for the arrival of a new battery. If the screwdriver itself works flawlessly, then there are no contraindications to modifying it. The only thing he will lose is mobility, but this minus is still not so significant, it can be dealt with.
Tips for use
Experts in changing screwdrivers, who easily cope with the assigned task, advise beginners to follow certain rules:
- A corded screwdriver can operate for several hours at a time, so give it five-minute breaks to protect it from overload.
- The wire should be attached to the elbow area to prevent interference during operation.
- The power supply must be systematically cleaned of dust and dirt.
- The battery (new) is provided with grounding.
- It is not recommended to use a large number of extension cords.
- Do not use a screwdriver when working at height (from two meters and above).
Following these tips will help keep the tool in working condition and extend its life.