Design and circuit of LED strip
Briefly, what is an LED strip and how it works. As an example – Gauss Led, 5 meters, power supply 12 V, 4.8 W/m, 60 LEDs 3528 per meter, without moisture protection.
I’ll say right away that the tape can have a different design, circuit, supply voltage, number of LEDs per meter, their power, color, etc. The LED strip that I discuss in this article is perhaps the simplest and cheapest.
Such a tape actually consists of these pieces:
2 pieces of diode strip.
The photo shows two such pieces, each containing 3 LEDs and 1 limiting resistor. The tape is sold in reels in long pieces, usually 5 meters long. The design of the LED strip is such that it can be cut, like duralight, but the pieces are much shorter - usually 5 centimeters. In duralight – a meter or 2!
The diagram of an elementary (minimum possible) piece of diode strip looks like this:
LED strip - diagram of an elementary segment. It can't be less.
The diagram of the entire LED strip looks like this:
LED strip circuit
If the length of the tape is 5 m, and the length of the minimum segment is 5 cm, then it is easy to guess that the number of pieces in the tape will be 100 pieces.
Connection with controller
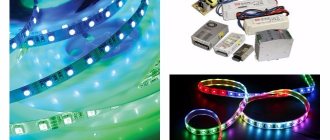
Multicolor LED strips can be used not only for lighting, but also as an additional decoration for the interior of the room. They are divided into groups and controlled using a remote control and a special controller. Thus, additional elements are added to the circuit.
The color scheme is conveyed in three colors. These are Red, Green and Blue. Therefore, multi-colored LED strips are of the RGB type. Each strip has three groups of LEDs that glow in these three colors. LEDs of the same color do not have schematic connections with each other. Each group has its own output, so any tape is equipped with four contacts, three of which correspond to color groups, and one serves to supply power.
When all three controlled contacts are connected to a common signal output, the color will be white. If you turn them on one at a time, they will only produce red, blue or green. To obtain different shades and control them, the LED strip must be connected through a controller. The controller ensures that all three lines are turned on simultaneously. However, the signal intensity in each channel will be different. Depending on the type of control, these devices can be mechanical or electronic. In the first case, switching is carried out manually, for example, using a conventional three-key switch. The main disadvantage of this method is considered to be a significant limitation in the range of color effects. Electronic controllers provide control of more than just the number of available LEDs. They regulate the intensity of their glow. These devices can be equipped with one or more channels, depending on the number of tapes to be controlled. Each controller has a separate output in the form of a wire with a sensitive element at the end. It is necessary to adjust the light using the control panel.
Power (brightness) of the tape
It is clear that brightness depends on the density of LEDs per linear meter, and on the power of these diodes.
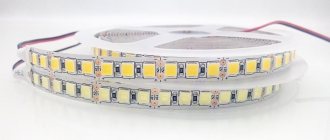
Nowadays, strips with two types of LEDs are mainly on sale - 3528 (less powerful, example in the article) and 5050 (more powerful). At a glance, it is very easy to distinguish them - 5050 is larger and has a square shape.
For information, SMD LEDs, which are used in LED strips. Their parameters are summarized in the table. The first two digits and the second two digits in the name are the length and width, respectively. And size indirectly indicates power.
Standard sizes of SMD LEDs
How to do without a power source
If it is not possible to install a power supply, there are two options:
- use a tape rated for 220 V;
- power a low-voltage lamp without a transformer through a ballast element that limits the current and absorbs excess voltage.
In the first case, you cannot directly connect the LED device to the AC network . An LED, as a semiconductor device, will only transmit the positive part of the sine wave. But during a negative voltage, a reverse voltage will be applied to it, for which the LED or chain is not designed for. Therefore, the life of the lighting device will be short. It must be connected via a rectifier. Better across the pavement. The diodes must withstand the full current of the strip and a reverse voltage of at least 320 V.
Connecting the lamp via a rectifier.
This also applies to the second option, but here you will still need an additional resistor. Its resistance is calculated using the following method:
- The operating current is found using the formula I = Rud*L/Unom , where: Rud is the specific power consumed by 1 meter of tape, W; L – total length of the LED strip, m; Unom – rated voltage of the luminaire (12..36 V).
- The voltage drop across the ballast is determined Ubal=310-Unom , where 310 is the amplitude value of the voltage in the network.
- The ballast resistance is R=Ubal/I. If the current is in amperes, then the resistance will be in ohms.
- The resistor power is calculated as Рres = Ubal*I. The nearest larger value of the standard power series is taken.
Connection diagram with quenching resistor.
The calculation is somewhat simplified; the resistance of the LED in the open state is not taken into account. But for practice the accuracy is sufficient.
Expert advice
Starikov Mikhail
Senior Electronics Engineer
Ask a Question
This method has two disadvantages. All elements of the tape, when connected to the network, will be under a voltage of 220 V. It should also be borne in mind that the calculation relates to the specific length of a particular tape. When replacing a luminaire or changing the total length, the ballast must be calculated again.
Instead of a resistor, you can install a capacitor. The advantage is that it will not heat up. Capacity is calculated using the following formula:
С=4.45*I/(310 - Unom) , where:
- C – required capacitance in microfarads;
- I is the operating current found earlier;
- 310 – amplitude voltage of the network in volts;
- Unom – rated voltage of the luminaire (12..36 V).
But additional elements will appear in the scheme:
- R1 – resistor for discharging the capacitor after removing the power;
- R2 – to limit the inrush current on the capacitor charge at the moment of switching on.
Connection diagram with ballast capacitor.
The value of the first resistor is several hundred kilo-ohms, the second – several tens of ohms.
Connecting LED strip
The LED strip turned on in laboratory conditions looks like this:
2 pieces of diode strip - power is applied. +/- polarity matters.
When connecting power to an LED strip, power polarity , as in the entire semiconductor world. Unlike incandescent lamps and heating elements, where polarity does not matter. However, if you turn on the LED strip in the wrong polarity, nothing bad will happen - it simply won’t light up. You can safely check the correct connection by swapping the power wires.
If you need to cut a piece of tape from a whole piece, you have to solder , that is, solder the power wires to the contact pads that are located at the ends of each elementary piece. There are also scissors drawn there. The wire for connecting the LED strip should be used thin, with a cross-section of no more than 0.5 mm2, as shown in the first photo of the article. Before soldering, clean and tin the contact pads. Use a soldering iron with a power of no more than 40 W, preferably 25 W.
And remember, the soldering point is the most unreliable place in the entire structure; it must be protected from mechanical overloads!
For some types of tapes, there are special connectors on sale that fit onto the tape, without the need to use soldering.
The photo below shows an example of how to connect an LED strip through a connector:
Connectors for connecting Jazzway LED strip
LED strip connected via connector
Connection methods
The connection of the LED strip to the power supply is serial. Therefore, we pay attention to the polarity: we connect “+” only to the same pole, and “-” to the minus.
At the end of the tape that comes on a reel, conductors are soldered. If the glow is monochrome, there are two conductors - “+” and “-“, for multi-color ones there are 4, - one common “positive” (+V) and three colored ones (R - red, G - green, B - blue).
Bobbins in their purest form
But a 5-meter piece is not always needed. shorter lengths are often required. Cut the tape along the marked lines.
Cutting lines on LED strips
In the photo you see contact pads on both sides of the cut line. They are labeled on each tape, so it’s quite difficult to get confused when connecting. To make it even easier, use wires of different colors. It will be clearer this way and you definitely won’t get confused.
Connectors
You can connect the LED strip without soldering. There are special connectors for this. These are specially designed devices - plastic housings that ensure proper contact. There are connectors:
- for connecting conductors to the strip;
- connection of two tapes. Different types of connectors
Everything is very simple: open the lid, insert a tape or conductors with bare ends. The lid closes. The connection is ready.
The method is very simple, but not very reliable. Contact is ensured only by pressure, and if the cap is loosened a little, problems begin.
Soldering
If you have any soldering skills, it is better to use this method. To work, you will need a soldering iron of medium power, with a thin or sharpened tip. You need rosin or flux, as well as tin or solder.
We strip the ends of the conductors from insulation and twist them into a tight bundle. We take a heated soldering iron, lay the conductor on the rosin, and warm it up. We take a little solder onto the soldering iron tip and warm up the wires again. The veins should be covered with tin - tinned. In this form, the conductors are easy to solder.
How to connect a diode strip
It is advisable to tin the contact pads in the same way: dip the soldering iron in rosin and warm up the pad. Make sure that tin does not leak beyond the pads. Take the prepared conductor, place it on the pad, and heat it with a soldering iron. The tin should melt and tighten the conductor. Hold the conductor in place for 10-20 seconds (sometimes it’s easier to hold it with thin-nose pliers or tweezers - the conductor gets hot), tug. He must hold on tight. Similarly, we solder all the necessary conductors.
On RGB strips with 4 wires, make sure that the pads do not connect during soldering. The distance between the contacts is very small, the slightest drip can ruin the whole thing. Proceed carefully.
Watch the process of soldering the diode strip in the video. You will need to repeat everything.
Connecting the power supply for the LED strip
As a bonus, this is how to practically connect an LED strip. There are several subtleties here (I don’t like the word “nuances”).
Power for the LED strip is provided by a power supply. For this case, two parameters are important: voltage (usually 12 or 24 Volts) and power (depending on the length of the strip and the power of the LEDs). I’ll tell you more about this below.
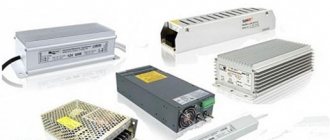
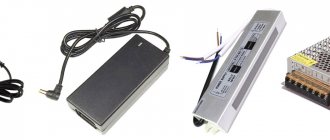
Here's a photo of the power supply, just in case:
Power supply for LED strip.
This unit has a power of 60 watts, with a reserve of two pieces of 24 watts each.
LED strip power supply contacts.
It is best to buy such power supplies on AliExpress; compare prices there and in a nearby store. The only negative is that you have to wait 30-40 days, so this option is for the thrifty and prudent).
Here are some links as an example. The power supply unit and the length of the tape are selected with reserve.
1. Power supply for tape 12 V 5A 60 W. For a tape of 4.8 W/m it is enough for 10 meters, for 9.6 W/m – for 5 meters (1 reel).
2. Power supply for tape 12 V 10A 120 W. For a tape of 4.8 W/m it is enough for 20 meters, for 9.6 W/m – for 10 meters.
3. Power supply for tape 12 V 20A 240 W. For a tape of 4.8 W/m it is enough for 40 meters, for 9.6 W/m – for 20 meters.
Since we are talking about such long lengths, an important note. If the length of the connected section of the LED strip is 10 m or more, and you can look around this entire section, you will notice that the brightness decreases towards the end of the section. To eliminate this effect, you need to connect such a long piece in one more place. For example, at the end, or in the middle.
When connecting the LED strip to the power supply, the main thing is to observe the polarity. According to the contacts - phase, zero, ground - this is the input of the power supply. The -V and +V contacts are an output voltage of 12 V. To the right is a trimming resistor, which can be used to adjust the output voltage from approximately 11 to 13 Volts.
As the supply voltage increases, the temperature of the LEDs increases, and the service life of the LED strip decreases sharply (the brightness decreases over time).
The voltage of the tape is usually written on the packaging; based on this, the power supply is selected - 12 or 24 V.
The power of the LED strip should be no more than 75% of the power of the power supply . In other words, there must be a power reserve of at least 25%. The power of a given piece (segment) of tape is easy to find out. It is necessary to multiply the power per linear meter (Watts per meter) by the length of the tape.
For example, the linear power of the Gauss tape given as an example below is 4.8 W/m. This means that the power of a 5m piece will be 24 W. And the power supply must be selected with a power of 35...50W.
If the power of the unit is comparable to the power of the load, the unit may overheat, especially if installed in a tight space under the ceiling. And if the power of the power source is less than the power of the tape, the tape simply will not be able to turn on, and will blink, trying to turn on. In other words, the power supply simply will not be able to start, the internal protection will be triggered.
And also on connecting the power supply. Under no circumstances supply power to it through an illuminated switch ! Otherwise, something similar will happen, described in the article about how a switched off energy-saving lamp blinks. Here the power supply will try to start, and a 1 MOhm resistor will not get rid of it. Even 100 kOhm may not be enough.
Naturally, the contacts must be carefully protected from accidental touch. Below are photos of how to simply protect open contacts from touching using a piece of cable duct of the selected width.
How to close the BP_safety contacts using a cable channel
PSU contacts for LED strip closed by a cable channel
There are power supplies for LED strips with special protective caps, but they are of little help, and electrical safety is still low. You can, of course, wrap it all up with electrical tape... but it won’t look very good.
There are other power supplies, in plastic cases and waterproof. Perhaps they are more preferable in residential areas, in places where a child/cat/dog can get into.
Types and types
Before connecting the LED strip, you should understand their types and markings. This way you won’t make a mistake when choosing a power supply and will accurately calculate the required glow intensity, tape length and other parameters.
The most popular in interior lighting are strips made of single-color—monochrome—crystals. The constant change of colors is too stressful and does not allow you to relax. This is illumination, not lighting. Therefore, universal tapes are used to create advertising, illuminate cars - where it is necessary to attract attention. When decorating interiors, SMD tapes are mainly used.
Degree of protection
Since the scope of application is wide, the degree of protection varies. For dry rooms, regular open ones are available - without a protective coating. There are waterproof ones - they can be used in damp areas - in bathrooms, for example. They are filled with a layer of varnish. There is another option - moisture resistant. They are sealed in a sealed housing and can be mounted directly in the water - in an aquarium, pond or pool. They can also be used for outdoor lighting.
Sealed tapes for illuminating aquariums, swimming pools or decorative ponds
Yandex.RTB RA-1479455-7
For exterior car styling, LED strips placed in a transparent polymer tube are most often used. It protects not only from moisture, but also from mechanical damage, but their cost is also higher.
LED sizes, brightness and density
Let's figure out the sizes. If you take several strips, you can see that they are made of LEDs of different sizes. In addition, they are sometimes located tightly next to each other, in some - at a fairly decent distance, and there are also strips with LEDs in two lines.
Most popular LED sizes
Yandex.RTB RA-1479455-3
It is not difficult to distinguish the sizes of elements externally, but how can you tell by the markings? Dimensions are displayed in numbers that appear after the letters indicating the type of LED. For example, LED-R-SMD3528 (red) and LED-RGB3528 (universal) are assembled from elements measuring 3.5 * 2.8 mm, LED-G-SMD5050 (green) and LED-RGB5050 (universal) - 5.0 * 5.0 mm.
These are the two most common types, although there are larger ones - 56 * 30 mm, and smaller ones - 20 * 20 mm.
The larger the crystal size, the greater the light intensity they produce. For monochrome crystals the indicators are as follows:
- size 3.2 * 2.8 mm produces a luminous flux from 0.6 to 2.2 lm;
- size 5.0*5.0 mm - from 2 to 8 lm.
Universal LEDs of the same size have lower intensity: three small crystals of different colors are sealed in one housing, and therefore the RGB glow intensity is lower:
- 3.2*2.8 mm produces 0.3 to 1.6 lm;
- size 5.0*5.0 mm - from 0.6 to 2.5 lm.
All values are given for crystals without protective coating. Any of them reduces the intensity of the glow and this must be taken into account when calculating the brightness of the glow.
Length calculation
Above we talked about each individual LED on the strip, and there are many of them on the strip and they are arranged with different densities, and accordingly they can produce a stream of light of different intensities. The minimum number of crystals per meter is 30 pieces, the highest density in one row is 120 pieces/m, in two rows—240 pieces/m.
Depending on the number of crystals, the total intensity of the glow and electrical power consumption change. For the convenience of calculating the required lighting intensity and electrical parameters, the technical data is summarized in a table.
Power table of LED strips with different LED densities
Yandex.RTB RA-1479455-8
Using this table you can determine how long the lighting strip is needed. For example, you want to illuminate the room with a medium-intensity glow. Two 80 W incandescent lamps need to be replaced. It is necessary to organize a luminous flux of about 140 W (two 80 W lamps will never give 160 W).
If for these purposes you take SMD3528 with a number of LEDs of 120 pcs/m, you will need about 5 meters of tape (we take it with a margin of 20%), SMD5050 with an installation density of 60 pcs/m will require 4-4.5 meters.
In general, LED strips are sold by the meter. It comes from the factory in 5 m reels and a piece of that length is not always necessary. Therefore, it is possible to cut off the required amount: along the dotted lines with the image of scissors. Strictly along these lines you can cut.
Cut the LED strip with scissors strictly according to the markings
If the scissors are not drawn, then there must be a dotted line. Also, the cutting line can be determined by the presence of contact pads on both sides of the line.
Instructions for the LED strip
For those who need it, I’ll post what was included with the tape.
Label for Gauss Led 1 tape
Label for Gauss Led 2 tape
Instructions for LED strip 1
Instructions for LED strip 2
Choose a quality cable
Cables for connecting LED strips must be purchased of normal quality so that their cross-section corresponds to the nominal one. Cheap cables may have a cross-section that is 20-30% smaller, which will increase the voltage drop in the cable and reduce the brightness of the tape.
This generally applies to all cables, including VVGng and even twisted pair - a cheap cable almost always has a smaller cross-section than what is written on it. On lighting cables, if they have a cross-section of 1.5mm2, or for sockets, with a cross-section of 2.5mm2, protected by 16A circuit breakers, a slight reduction in the cross-section will not affect the work, but in the case of tapes, it can greatly affect the result.
I remind you: SHVVP and PVS cables for stationary installation cannot be used for any purpose. Of course, it is convenient to connect the tape with a multi-core flexible cable, rather than a single-core rigid one, so you can use MKSh, KGVV cables, and even single-core PUGV cables as jumpers.
Arlight itself, by the way, has connecting cables for LED strips. They are convenient because the colors of their cores are clear. They are convenient for installation and soldering. But the maximum cross-section there is 0.84mm2 - suitable for connecting weak cables or for installation from the junction box to the tape. And the cost is much higher than that of KGVVng(A)-LS.
Buyer Information
The market offers a wide range of LED strips and additional equipment for connecting them. This includes:
- Power supplies;
- controllers;
- dimmers;
- profiles for tape.
The average price of an LED strip, unit and one controller is from $20 to $200. The cost of the product depends on many factors. This takes into account the brand of equipment and its technical characteristics.
Make the right choice, gentlemen, and remember: “the miser pays twice”!
Available variety
The lighting market today surprises us with its diversity. But if we take only the part that is represented exclusively by LED strips, we will also have something to look at. Today the most popular models are:
- SMD 3528;
- SMD 5050;
In addition, such products can have different voltages: 12 volts and 220 volts. To connect a 12-volt product to a 220-volt power supply, you must use a power supply. It will allow you to connect a 12-volt strip to a standard 220-volt network without any problems. Knowing how the tape is structured makes it possible to properly control its luminous flux using additional equipment. Let us consider separately each type of tape in terms of its structure.
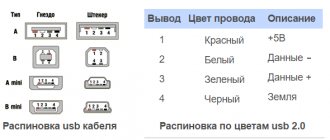
USB connection system
Connecting a backlight to your monitor can reduce eye strain, especially when watching movies in the dark. For this purpose, backlight kits are sold with a power supply and control unit, LEDs and the necessary connectors.
The power supply is installed on the back wall of the monitor (it can be glued or secured with double-sided tape). Next, attach the LED strips along the edge of the back panel of the monitor and connect them with wires to the unit and the USB connector. Install the necessary driver and you can use it. Drivers are not included in the package, but they can be downloaded from the manufacturer's website.
Materials and tools required for work
To create and connect a USB LED strip you may need:
- the tape itself;
- wire or separate USB plug for soldering (best option);
- soldering iron and solder, ideally a soldering station with adjustable temperature and smoke extraction;
- scissors, knife or other tool for removing insulation;
- tester or multimeter;
- connecting wires;
- current-limiting resistor (the value is calculated based on the operating voltage of the LED);
- screwdriver, pliers (just in case).
Materials for fastening the tape are deliberately not included in this list, since different installation methods are used for each case.