Basic rules for using Vago
1. For lighting and other circuits limited in current to 10A, the terminals are excellent; you don’t need to know any subtleties. Connected - and let's go!
2. If the current is from 10 to 20 A, you need to think about the cleanliness of the surface of the wires. Moreover, the current must really be limited by the corresponding circuit breaker (10, 13, 16, 20 A), and the wire must have a cross-section of 1.5 or 2.5 mm². Otherwise it might look something like this:
The Vago 773 terminal block with the paste burned out because... the old aluminum wire was not stripped
3. At currents of 25 A or more, I would limit the use of Vago by moving on to crimping, welding or soldering wires. Although, for quick repairs of home electrical wiring, there are no better or more convenient methods than Vago.
Series 2273
Terminals of this series with Alu-Plus paste began to be supplied to Russia in 2014. “Alu-Plus” paste allows you to ensure high reliability and cleanliness when installing single-core aluminum conductors.
WAGO connectors of this series (Fig. 23) allow you to:
- visually monitor the connection,
- test current and voltage levels,
- fix up to 8 single-core conductors.
Rice. 21 WAGO 773 series terminal block
Table 6
Characteristics of WAGO terminal blocks 273, 773 series
| Characteristic | Meaning |
| Cross-section of single-core conductors, mm2 | 0,75 — 6 |
| Rated voltage, V | 400 |
| Maximum impulse, kV | 4 |
| Degree of pollution | 2 |
| Maximum current, A | 24 |
| Length of the section free from insulation, mm | 10 — 13 |
| AWG | 18 — 10 |
| Number of connected conductors | 2, 4, 5, 8 |
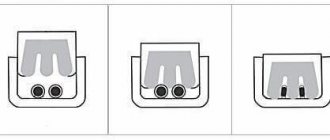
The order of connecting (disconnecting) conductors is illustrated in Figures 22 – 24.
Fig.22. Remove 11mm of insulation
Rice. 23. Insert the solid conductor until it is completely fixed
Fig.24. To remove the wire, pull it out by turning it left and right. Hold the terminal block with your other hand.
Price issue
WAGO terminal blocks can be purchased almost everywhere at a very affordable price. Many stores, along with retail, will gladly offer to buy WAGO terminal blocks in bulk. The WAGO website provides a list of 29 partners of this company. Most of the partners are registered in Moscow. Also, by typing the words “WAGO” or “VAGO” into your browser, you can find many offers for this product at various prices.
Table 6 shows prices for some products that can be purchased on popular sites in June 2022.
table 6
| Product | Firm | Retail price, rub. | Wholesale price, rub. |
| 221-412 | Chip & Dip | 26 | 21 |
| 221-412 | Tinko | 16,11 | 15,36 |
| 221-412 | ETM | 17,9 | 16,12 |
| 222-412 | Chip & Dip | 28 | 21 |
| 222-412 | Tinko | 13,87 | 13,87 |
| 222-412 | ETM | 15,9 | 14,29 |
From this simple example you can see:
- WAGO terminal blocks cannot be bought cheaply;
- the price spread is quite significant.
A 20 ml syringe with Alu-Plus contact paste costs 150 - 200 rubles.
Of course, twisting wires will cost much less than using the products described. But is that all you need?
How to use Wago 773 terminals at high currents
If I need reliable operation of the Vago 773 connecting terminals at maximum currents (up to 25A), I recommend using the method - strip the wires by 20-30 mm, connect them using the connecting terminal as usual, and twist and insulate the remaining bare parts.
Strengthening Wago 773. Insert the wires
Strengthening Wago. Now we twist it. You can rest assured about contact.
We isolate and quietly seal the contact, its reliability has increased many times over.
Attention! All connection points must be accessible!
How to use Vago 222 terminals correctly
The main thing is to understand that one terminal block is one electrical contact.
How to properly connect Vago 222 clamps
How to properly connect Vago_larger clamps
Now let’s move on from general cases to an analysis of the practical application of these wonderful terminal blocks.
KVT contact paste
I would also not like to ignore the electrically conductive contact paste produced by KVT, and although it is positioned a little differently, the essence of its application remains the same.
The paste formulation is a mixture of metal filler with organic binders and includes mineral oil, thickeners and an electrically conductive composition. Contact paste is functional regardless of the type of current, frequency and voltage, and has high, time-stable electrical conductivity.
Contact conductive paste KVT
Operating temperature range from -40 to +100 degrees Celsius.
Applying contact paste to the metal surface provides long-term protection of the electrical contact from various physical and chemical processes occurring during operation.
The contact paste is seamlessly compatible with cable lugs and connectors produced by the KVT Electrical Plant and is guaranteed to provide a reliable electrical connection.
Contact paste is applied to the working surface of the electrical contact, while fine particles fill all the unevenness of the contact surfaces.
When the contact is tightened, the contact paste is compressed into a solid metal spacer, thereby increasing the working surface of the connection.
Example 1. How to use Wago 222 terminal blocks
The example shows how easy it is to put things in order in a control panel with automatic machines, where it is a mess, very crowded, there are different wires, and you need to connect more. There is no photo of what was originally, but it may be good. I will consider both the pros and cons.
In the utility room, where everything is made with corrugation, you need to install and connect an additional plastic panel with 4 circuit breakers. Moreover, it must be connected to the existing panel, minimally interfering with it.
It’s correct to say “plastic modular housing”, but I say “shield”, it’s simpler and clearer.
Here is the old panel to which you will connect.
Old electrical panel assembled
What is the main problem with such shields (pictured)? Despite the fact that it is positioned as a housing for 4 circuit breakers (4 modules), 4 circuit breakers fit into it with great difficulty. After all, you still need to connect zeros and grounds. And these are two more terminal blocks. Therefore, you should always leave approximately 20-30% of free space in the shield as a reserve.
The wires of zeros and grounds were connected to plastic terminal blocks with a screw (Lego type), without lugs. And where should I go with my rigid single-core VVG 3x2.5?
Fortunately, German engineers came up with universal clamps Wago 222 , which helped me out. This is how I installed the connections.
An old shield with the cover removed. The wires are connected through Vago clamps
Participating in the connection: multi-core PVA wires with a cross-section of 2.5 (input from the top) and 1.5 mm and single-core VVG 2.5 mm (this goes to my panel, bottom left). If there is another way to connect in this situation, write in the comments.
My shield is installed below, and the connections in it now look like this:
New electrical panel with connections via Wago clamps
Please note, this is important - I chose a panel with 6 modules to install 4 machine modules. There are 3 reasons for this:
- Space for laying wires, you can leave a small margin;
- There is somewhere to place the clamps (terminals), you can put the terminals on a DIN rail;
- For the future, if you need to connect another consumer (not two!), there will be somewhere to install an additional machine.
Close the shield.
New shield assembled. Room sockets, utility room sockets, lighting, boiler.
This is what both shields look like. All the work on installing the panel, automatic devices, connecting wires, laying 4 cables in three corrugations took no more than an hour.
Result - both shields are assembled
The main thing is that the current is limited by the machine to 25 A, the wires are all copper and new, heating will be minimal.
The disadvantage of using Wago 222 connecting terminals this way is that if there is a possible overcurrent, the terminals may begin to melt. Therefore, for peace of mind, it is better to reduce the ratings of circuit breakers.
For connecting lamps
Connecting a chandelier or any other lamp yourself is not the most difficult thing. The most difficult thing is to figure out the wires that stick out from the ceiling or from the wall, but a multimeter can help here. If there are more horns than keys, you also need to group them. It's not too difficult either. But connecting wires under the ceiling is even more fun. Everything happens faster and easier using WAGO terminal blocks for connecting lamps. They are available in two series - 224 and 294. Series 224 is designed for connecting single wires, series 294 allows you to connect up to eight conductors.
The most convenient way to connect a chandelier is with Vago
Episode 224
The Wago 224 series connection terminal is designed specifically for connecting chandeliers, sconces, spotlights and other lighting devices. They may also be called “chandelier clamps” or something like that. A handy thing for quick and easy connection. Designed to operate in an alternating current network with a frequency of 50 Hz and a voltage of up to 400 V. Rated current when connecting wires with a diameter of 2.5 mm²:
- copper - 24 A,
- aluminum - 16 A.
This is what the Vago spring terminals for connecting a chandelier look like
WAGO 224 series terminal blocks are made on the basis of a flat-spring contact plate. That is, the contact of both wires occurs through one strip of metal, which clamps both conductors.
To connect the power cable, you only need to strip it to the specified length. The recommended length of the bare conductor is 10 mm. There is a mark on the body by which you can check how accurately you completed the task. After this, the wire is inserted into the appropriate socket. Clamping occurs automatically. The 224 series terminal clamps on the power cable connection side can be with or without paste. The paste removes oxides from the surface of the conductor, which ensures good contact. This is necessary if the wires have been stripped for a long time and they are too short to cut them and remove the insulation again.
Luminaire terminal blocks WAGO - 224 series
From the side of the lamp you can connect wires of any type: monocore, stranded hard or soft. On this side, to connect the wire, you need to press on the protruding part of the housing. A rectangular window will open, large enough in size so that you can easily insert a stranded wire. Insert the stripped (also 10 mm) wire all the way and release the “button”. The connection is ready.
What's good about WAGO 224 terminal clamps is that they can be used to connect copper and aluminum wires without any problems. They do not have direct contact, so there will be no electrolysis and destruction of the conductors.
Episode 294
This series is also positioned for connecting lighting equipment. These terminal clamps can also operate in an alternating current network with voltages up to 500 V. The maximum current when connecting 2.5 mm² copper wires is 24 A, the same aluminum wire is 16 A. It differs from the series described above in that all wires are connected to connectors mounted in one housing. Terminal blocks of the 294 series can have from two to seven inputs. There are options with a terminal for connecting grounding, and others without.
WAGO terminal clamp for connecting lighting equipment 294 series
All contact groups are signed, which will prevent confusion. On the side where the wires from the chandelier/sconce are connected there are holes through which you can use a probe to check the presence of voltage on the contact/wire. Terminals of the 294 series can be fixed to the wall using a self-tapping screw - for this purpose, the body has a special metal leg with a hole for a self-tapping screw. The second installation option is a special latch.
Inside there is a chromium-nickel (CrNi) spring that ensures proper contact. On the line side (wires are connected from the ceiling or from the wall) the clamp is self-clamping. On this side there is a spring, which can only be pressed out by a sufficiently rigid conductor. This is a mono-core or low-core rigid wire. The diameter of the conductors connected on this side is from 1 mm² to 2.5 mm² (small ones are recommended up to 2.0 mm²). Please note that this connection is not detachable. If desired, the wire can be pulled out, but it will need to be stripped again and a new terminal block used.
Using Vaga terminal blocks, connecting a chandelier is not a problem
You can connect any wires from a chandelier, sconce or other lighting fixture. Here, as in the 224 series, there is a spring-loaded button - a proprietary WINSTA
® Linect®. When you click on it, a window opens into which the conductor is inserted. The diameter of the wires on this side is from 0.75 to 2.5 mm². This connection is good because the wire can be easily removed - press the button and remove the conductor. The reconnection will be no worse in terms of parameters.
Example 2: Using Wago terminals to repair electrical wiring
The following example shows how to quickly repair electrical wiring that has been broken with a literal axe. The man tried to twist something himself, set up a short circuit in the house, and then called me:
Quick repair of wiring to an outlet. This is what we have today (C)
Here's how I carried out a quick electrical wiring repair using Wago 773 connecting terminals:
Quick repair of wiring to an outlet using Vago disposable terminals
The phase is wrapped with black electrical tape. Then you need to turn off the electricity, carefully hollow out a place for new connections, and plaster over the whole mess. It is better to insulate the places where the wires enter the terminals with electrical tape before doing this.
How to install a socket in such socket boxes is described in detail in my articles about how to reliably install a socket here and here. Be sure to read!
Installation of terminal blocks
To complete the installation, several recommendations should be followed. They are simple and, using them, it will be easy to understand any algorithms for connecting wires:
- The cables should be kept in reserve for one more use.
- Junction boxes must be opened for inspection.
- The terminals are mounted in mounting boxes.
- The terminal block is purchased with a reserve in terms of current passed.
- The total load of the lines in the terminal block should not exceed the rated current.
- When the terminals are already installed, the device checking their voltage should be connected to the required sockets.
- Aluminum oxidation must be prevented by using a paste.
- When the wires are stripped, it is more convenient to check the marks on the terminal block.
- It is important to consider the permissible device parameters.
They are very easy to install. If the connection is intended to be made only once, then the wire is first stripped and then inserted into the terminal. She herself will fix it inside with a clamp. You can only pull it back out with great force; this can damage both it and the terminal. There is no guarantee that it can be used again.
The same cannot be said about reusable models. Here the cables are also stripped, then inserted into the sockets and clamped by lowering the orange flag. By lifting it, the cable can be pulled back out.
Example 3. Repair of distribution unit
In this (I don’t dare call it a box) ... This box of wires has everything - the input from the entrance (wires thinner than one and a half rubles, turning into aluminum, turning into a ball-and-socket screw with single-layer insulation, and rigid wires, and flexible wires, and copper, and luminium.
How did it work? Don't know. The owner called me when he himself caused a short circuit, and the floor of the apartment was left without voltage. At the same time, the entrance Soviet machine gun 25A did not work, which is natural.
I temporarily restored the power (the wires were burned out) by using two Vagos (222 and 773, can be seen at the top of the photo):
Repair of old aluminum electrical wiring. The worst thing is that people lived with this for many years, it was simply covered with plaster, and the machine was set to 25A!
A couple of days later I came again, first threw out everything unnecessary, and figured out what came from where and where. I also threw out the wires from the entrance, I will lay new ones later:
Repair of old aluminum electrical wiring. On the left there are wires - light for the toilet and power supply for the entire apartment. Down – toilet and bathroom switch. On the right is the bathroom light and kitchen power.
Now, using pieces of hard copper wire and Vago terminal blocks for different numbers and different types of wires, I assemble a circuit:
Repair of old aluminum electrical wiring. The VVG3x2.5 cable from the entrance comes from below. Wago 222, Wago 773 with and without paste were used.
Here's what we ended up with:
Repair of old aluminum electrical wiring. Vago helps out great!
Of course, if you do everything wisely, you need to completely change the wiring in the entire apartment. But such a task was not before me.
I am calm about my work and this apartment, especially considering that it is now powered through a 16A circuit breaker. And the most powerful consumers are the washing machine and refrigerator.
Example 4. Wago terminal blocks: how to use when installing a new junction box
I’ll give you an example of how I make connections in a distribution box when installing new electrical wiring.
Here's a cheap option. This is the hallway. Through a 20A machine, a cable with wires with a cross-section of 2.5 mm² comes into the box, and diverges into 1 socket (2.5 mm²), lighting and a bell (1.5 mm²).
Initially, after the plasterers, we have this:
Connecting wires in a new junction box. Let's sign the wires. On the left, a VVG2x1.5 cable for the bell sticks out of the wall. Guess through which terminals I will connect it)?
We strip the wires and determine where we have what. As usual - white phase, blue zero, yellow-green - ground. For switches - white phase, blue first key, yellow-green - second.
Connecting wires in a new junction box. wires are stripped, targets are identified
Connecting wires in a new junction box. The stripped wires are ready for connection.
3-5 minutes - and you're done:
Connecting wires in a new junction box via Vago 773
Close the box with a lid
Now you can plaster and paint or wallpaper. It is important that there must be access to the box, or at least its location must be known. Who knows what could happen in 20-30 years?
Don't forget to check everything!
Review of popular types of terminal blocks
There are several classifications of Vago terminals. They can be grouped by size, purpose, method and place of application. But the most convenient division into categories is considered to be a combined classification, which takes into account both functionality and installation location.
Let's consider the main groups of terminal blocks used for the electrical network. We will not consider terminal blocks with a choke, a capacitor, as well as for transformers and printed circuit boards due to their rare use in domestic conditions.
Category #1 – for lighting equipment
The category includes several types of products designed for connecting spotlights, sconces, chandeliers and other lighting equipment.
Kinds:
- Series 294 and 294 Linect® are used for switching fine-core, single-core and stranded wires without prior preparation. A special plate can be used to relieve tension. Maximum current – 24 A.
- The 272 series for wires with a cross-section of 2.5 mm² is divided into insulated and compact terminals.
- The 293 series is distinguished by having a direct ground contact and a snap-on mounting foot.
The advantage of this category is the development of Push-in CAGE CLAMP, thanks to which there is no need to put lugs on the wires or seal them before installation.
Optionally, a PE earthing contact can be installed directly below the wire connection so that the metal housing can be integrated into the protection system
On one side there is a hole for connecting a third contact with a cross-section of 0.5-0.75 mm².
Category #2 – for electrical installation work
This is the largest and most popular group, since the universal devices presented in it can be useful at any stage of arranging an electrical network.
The basic principle of connecting conductors is the abandonment of screw contacts and the use of spring clamping mechanisms.
Kinds:
- Series 224 is a specially designed device for connecting a single-core conductor to a thin stranded one.
- Series 243 - for servicing low-voltage systems that use 1-core wires of small cross-section - 0.6-0.8 mm.
- Series 2273 are compact yet powerful devices for saving space in junction boxes.
- Series 273/773 – for 1-core conductors 2.5 mm² and 4 mm². Recognized as the best-selling in the world.
- Series 222 are universal devices for all types of conductors, withstanding even high currents.
- Series 221 is an improved version of the 222 series with a transparent compact case.
Products of the 221 series are especially popular in Russia. Due to their reduced size, they are often used where space is limited, for example when many connections need to be squeezed into a small junction box.
The transparent case makes it possible to carefully examine the installation results: how long the cores are inserted and how correctly they are stripped
Installing the terminals is easy due to the well-thought-out design: due to the recesses on the sides, the connectors do not slip out of your hands, and the lever does not require much effort to manipulate.
Which series the terminal block belongs to can be determined by the markings on the housing. From it they guess that this is an original product and not a fake
Inside the plastic case there are tinned rods protected from gases. Despite the apparent fragility, the terminals can withstand heavy loads. They are capable of transmitting current up to 32 A and 450 V at a maximum temperature of +105 ° C.
Universal terminals 222 series are no less popular due to their simple design and reasonable price. Their versatility is explained by the possibility of switching conductors with a cross section of 0.08-4 mm².
Convenient lever devices are used when installing telephones, blinds, pumps, and installing lighting, audio and video equipment. No tools are needed
The advantage of the series is the ability to make a bridge connection between two conductors of different cross-sections and types, for example, single-core and thin multi-core.
Category #3 – for installation on a base
Locking terminal blocks and modular blocks are not loose or hanging without support. They are installed on a plane - a mounting base.
Kinds:
- Series 862 - housing blocks are designed for connecting up to 4 conductors, allowing you to switch crimped, ultrasonic sealed and unprepared conductors.
- Series 260-262 are for side mounting, and 264 are for front mounting. These are modular terminals and blocks for installation on a DIN rail.
- Series 869 is used for terminals up to 4 mm². They are fixed on the front side and equipped with support legs or mounting flanges.
What exactly to choose, terminals or blocks, depends on the amount of work, the number of conductors and electrical installation tasks.
All products in the listed series have special fastenings for DIN rails, holes for mounting conductors and clamps that ensure a reliable connection
Also, all pads have special holes - measurement points for testing after installation. The design is designed in such a way that it is easy to attach marking tape and indicate the purpose of each module.
Another example of using Wago 773
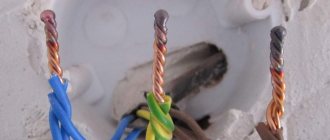
Below is a photo showing the use of Wago terminal blocks when disconnecting wires in a junction box.
Application of Vago terminal blocks. Another example
What can you say about this photo?
1. The wire used has a cross-section of 1.5mm2. This means that the circuit breaker through which this box is powered must have a current of 13A, or better yet, 10A.
Wago 773-302 terminal block with paste is adapted for connecting the lamp , which actually holds more current than the orange terminal blocks 773-324 , through which power goes to the sockets. It's better the other way around, if possible.
3. It is better to separate power outlet lines and lighting lines, since currents of different magnitudes flow in them (the difference is an order of magnitude). And accordingly, different circuit breakers for different currents. Another advantage of this connection is that if the machine breaks due to an overload or a short circuit in the socket, the light in the room will remain on.
Characteristics and terminal design
A terminal is a special clamp with a flat-spring operating principle. Its entire area affects the cable, but does not lead to damage. This clamping force is large enough to firmly connect the conductors, while there will be low contact resistance over the entire contact surface.
The current-carrying rail is made of electrolytic solid copper with a soft tinned surface. It is coated on top with an alloy of 60% tin and 40% lead, which protects the rail from corrosion.
Springs are made from chrome-nickel steel because it has very high tensile strength. The insulation is made from polyamide because it is difficult to ignite, is self-extinguishing and does not corrode.
Wago terminals are used in industry and in domestic environments. Such versatility is achieved not only thanks to the design and material of the elements, but also to the ranges of required values:
- The cable cross-section will be between 0.08 and 95 mm².
- Voltage between 100 and 1000 Volts.
- Passed current from 6 to 323 Amps.
- Operating temperatures are also impressive - the coldest will be -35 °C, and the top ranges between 170 °C to 200 °C depending on the type of device.
Application of stranded wires
As I already said in the articles, stranded flexible wires are connected through Wago 222 terminals with a lever. However, flexible wires can also be connected through disposable 773. To do this, you need to use tips:
Flexible wire with lugs. The two tips on the right are not crimped
The tips are crimped using a special tool; pliers are not enough:
Tips for wires. Crimping in action
After this, you can use flexible wires on the same basis as rigid wires using one type of Wago clamp. For example, like in this photo:
Flexible wire into disposable Wago 773 through lugs
Another bonus is the tool and tips.
Crimping pliers, popularly known as crimping tips
Who doesn’t like IEK, you can use the branded one from Wago
Tips are sold in different sizes
They have different colors for convenience. May vary from manufacturer to manufacturer.
And they can be stored in this case