Masterclear timer socket: instructions for use
It should be noted that correct installation, configuration and operation of timers of any type is carried out only in accordance with the technical manual or instructions. First you need to charge the socket from a 220 V network (within 14 hours).
Enable the Masterclear button to reset existing settings. While holding the CLOCK key, set the desired time and the type of its display (the HOUR button sets the hours, and the MINUTE button sets the minutes). To select the current day of the week, hold down CLOCK and then use the WEEK button to select the desired day. The Masterclear timer is a weekly electronic timer with battery.
The sequence of setting it up according to a given program is as follows:
- The ON/AUTO/OFF button is used to select summer/winter time while holding the CLOCK button.
- Timer programming/selection of already installed settings. Press the TIMER button. When you press the TIMER button once, ON1 (first setting) appears on the screen. Afterwards, use the WEEK key to set a specific day of the week (or several days). Next, the hours and minutes are set. In this way, the switching on of electrical appliances is adjusted.
- Then press the TIMER key again, after which OFF1 will appear on the screen. The sequence of steps for setting up to turn off the outlet is the same.
- To program the next on/off block, you must perform the above manipulations. To view the list of saved settings, you must hold down the TIMER button.
- After setting the timer, press CLOCK to exit the program menu. After this, the electronic timer
is ready for use.
Device setup
Below we will look at ways to configure the device using the example of a socket with a timer from the Masterclear brand.
The device is equipped with a battery operating at a voltage of 1.2 V. The battery reserve is sufficient for 100 hours of operation. A special feature of this device is that all settings are stored in memory even in the absence of power supply.
Before use, the socket must be charged from the mains for at least 14 hours. Next, you need to press the Master Clear key, which will reset the previous settings. After this, the device is ready for use.
Button functions
To properly control the device, you need to have an idea of the purpose of the buttons located on the panel:
- Master Clear - as mentioned above, this is a task reset button.
- Clock - using this key, several parameters are set at once, including the current time, time format, summer or winter time.
- Timer is a key that allows you to configure various time parameters. Used in conjunction with the Week, Hour, Min, Clock buttons.
- Week—set the days of the week.
- Hour - hours.
- Min - minutes.
- On/Auto/Off - select one of the operating modes.
- Random - This feature allows you to control random connections and disconnections.
- RST/RCL - software activation and deactivation.
Setting the clock and season
Click on the Clock button and set the time you need, as well as the option for displaying it (use the Hour and Min keys). By default, the time is set in a 24-hour range, but if desired, you can set the 12-hour format (am - daytime, pm - evening) using the Timer key. To set the day of the week, first press Clock and then Week. Summer or winter time is set using the On/Auto/Off key while pressing the Clock button.
Mode selection
The device can operate in one of four modes:
- Always in the "off" state. The mode is set using the On/Auto/Off key by selecting the Manual Off item in the menu.
- Always in the "on" state. To do this, use the same button to select Manual On.
- Turn on and off randomly. Adjustable by the Random menu item. If you set this function, the device will turn on and off randomly at night. Auto mode. Using the On/Auto/Off key, you can pre-program the desired operating parameters of the device.
When setting up the device, make sure that the program parameters do not contradict each other. Otherwise, the Off option always takes precedence. In other words, if programs overlap each other, none of them will work fully.
An example is a situation where one of the settings indicates the operating time of the device from 9:00 to 19:00, and another setting indicates from 11:00 to 17:00. As a result of such settings, the outlet will only work until 17:00, since it is at this time that the first command to “turn off” occurs.
What type of device is better to choose?
Before purchasing, you must clearly describe your needs. It is on this that the model of a switched device with a timer depends, which can ideally satisfy all user requests.
It is necessary to clearly define the installation location and the necessary functions that will be responsible for executing commands - it is possible that for this you will need to purchase additional accessories in the form of sensors. Or choose a modification in which all these elements are already built into the design of the smart device.
For installation in the bathroom, basement, on the landing, before entering the house, it is better to take a closer look at models with protection from vandals, dust and moisture
When choosing, you need to consider the following factors:
- technical capabilities - what voltage the product is designed for;
- desired type of control - mechanical or digital;
- type of installation - in a socket, socket box, distribution box, on a DIN rail;
- operating conditions - is moisture protection necessary?
In order not to get confused in the variety of models, you need to decide to which stimulus the time switch should respond. Or the onset of the specified time of day is sufficient.
Image gallery Photo from A product that responds to changes in light levels is a twilight or astronomical timer. The kit includes photocells that react when the level of solar activity decreases. Delayed triggering is provided to minimize the impact of random stimuli
Response to the appearance of a person or other object weighing, as a rule, from 20 kg. These are switches equipped with a motion sensor. In them, the timer is programmed to go off when such a stimulus enters the field of view
Noise response is a popular solution used in smart home improvement systems. Such models are triggered by the sound of a certain range specified by the user in the settings
Time delay of 30 seconds or other interval preset by the manufacturer. This is the simplest option, ideal for hallways, stairs or installation in front of the front door
Twilight timer
Switch with motion sensor and timer
Noise responsive switch
Time delay switch
When choosing among simpler models, you need to decide what frequency is required when controlling the shutdown of devices. If we are talking about processes that are repeated daily, then you can choose the daily option.
When it comes to triggering on certain days of the week or month, you will need a device with a weekly or monthly timer. This choice will cost more.
But to automate the control of several supply lines and devices installed on them, a more complex modification in the form of a multifunctional switch is suitable.
As for manufacturers, users with many years of experience in using smart time-delay switching devices speak well of companies such as Legrand, Feron, Livolo, Orbis.
Advantages of using timers to turn off electrical equipment and electrical appliances
Sockets with a timer help solve a number of household problems and reduce energy consumption. A timed electrical socket of any type, when used, allows you to do a lot of things. Namely, optimization of the operation of equipment that operates periodically, to ensure uninterrupted periodic operation without human intervention for a certain period of time.
It is advisable to use timer sockets in cases where periodically operating electrical appliances are used:
- Water electric pump;
- Heating devices (convector, boiler);
- Lighting equipment (street lighting lamp, aquarium lamp, etc.);
- Household appliances (fans, coffee makers, etc.).
It is possible to reduce electricity consumption, in particular for houses and apartments with multi-tariff electricity metering. Timer sockets can be used for a wide range of home electrical installations.
Principles for setting up different types of sockets
Mechanical and digital timers for 220 V have different principles for entering program data. In the first case, a ready-made time scale is used (as in a time relay), which serves as a template for configuration. Each of the blue segment keys is responsible for a period of 15 minutes. If any of the segments is pressed, the timer organizes the supply of electricity to the device. The TM50 scale looks like this:
As you can see, some of the keys are pressed (the period between 16-00 and 18-00, and also below - starting from 2-00). In addition, in the central part there is a rotating disk (the direction is indicated by an arc arrow) with a current time indicator (in the example, the triangle is set to 13-00).
You can learn more about how to set up such a timer in the following video:
The digital timer is set using the display and softkeys:
- TIMER – key for entering data and confirming it;
- WEEK – button to select the required day of the week. The screen displays the selection in English (MO, TU, WE, etc.);
- HOUR, MINUTE – enter time;
- CLOCK – used in combination with TIMER to change the time format from 12 to 24 hour;
- ON/AUTO/OFF – key for selecting manual or automatic operating mode;
- RANDOM – selection of the floating switching function (periodic switching is carried out within a given period of time with an interval of up to 30 minutes).
A visual overview of such a timer is in the following video:
Programming a time relay
Programming is activated using the button (hereinafter referred to as programming ).
1) Press the programming to turn on the first switching cycle, then use the D+ , H+ and M+ to select the day of the week and switching . 2) Press the programming to turn on the first shutdown cycle, then use the D+ , H+ and M+ to select the day of the week and shutdown . If necessary, you can add several more on and off cycles by adjusting the second, third, etc. cycles.
What does programming a socket include?
It is worth dwelling in more detail on the method of programming an outlet with a timer:
- First you need to set the exact time. To do this, click on Clock with a sharp object, then set the current day of the week (Week key), hour (Hour) and minutes (Min).
- We designate the turn-on time - you will need a Timer button. After pressing this button, the display will show On 1. Next, you can set the timer to turn off. The time can also be set using the Week, Hour and Min keys.
- To see if the tasks have successfully registered, you need to hold down the Timer button for a couple of seconds.
- Having finished programming, you must press the Clock key again, thereby putting the device into operating mode.
It is worth noting that the programmable socket (instructions for any model are included) can carry out scheduled tasks only in Auto mode. If the Manual on function is activated on the device, the device will act as a simple socket, and the Manual off function completely turns off the device.
A little history
Previously, a mechanical timer was popular. Built into an outlet, it could turn on household appliances for a certain time (see Fig. 2). In essence, it was a countdown timer; accordingly, its scope of application was limited.
Rice. 2 Kitchen timer - Lemanso LM671 socket
In fact, this is an ordinary socket with a timer; the peak of popularity of such devices occurred in the mid-80s of the last century. Time passed, gradually mechanical devices replaced electromechanical ones, which, in turn, were replaced by electronic ones, such as an electronic stopwatch. The functionality of these devices has expanded significantly. Now it's the turn of digital devices.
Let's return to the topic of the article.
What is important to know
A socket with a timer is a universal device, but you still need to learn how to use it correctly. In this article we talked about how to set it up. However, it should be clearly understood that there are mechanical sockets with a timer, they do not need to be charged and turn off automatically when necessary. But such sockets have a serious drawback - the response time is not accurate and may be confused. The advantages include low cost, but a lot depends on the settings.
Remember! If you need a weekly or daily socket with a high-precision timer, choose expensive models from trusted manufacturers.
How to set up an outlet with a timer
It has a 1.2 W battery. She needs it to save memory of different settings. And it is designed for 100 hours of continuous operation. This is an important feature that is not erased from memory. Before connecting the outlet for the first time, it must be charged from the mains for at least 14–15 hours. Then press the Master Clear button. Thanks to this, all its previous settings will be reset and it will be completely ready for work. Subsequently, the Master Clear button can be used to reset the settings. Sockets in drywall may also have a timer. It is purchased separately and simply inserted into a finished device.
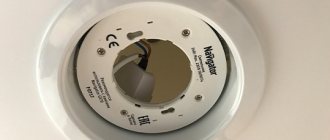
Masterclear Specifications
A universal option is a double socket with one timer
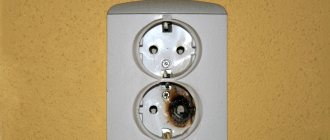
To use such an outlet, you need to know the rules for its use. They are designed for a load of 16 A, but if you exceed it, you can cause various damage to the device. If you connect the plug, be sure to ensure that it is well connected. Clean the socket only with a dry cloth.
The Masterclear weekly rosette has these characteristics.
- mains voltage: 230-240 W;
- frequency: 50 Hz;
- control: electronic;
- operating temperature: – 10 … + 40.
To make the outlet safer, it is equipped with special gates that prevent direct contact of various devices with its electrical contacts.
Where can I use it?
The main area of application for sockets with timers is automatic control of equipment in a house or apartment. With their help, you can power household appliances, heating systems, irrigation pumps, heating and lighting systems.
Before connecting, the user makes the settings himself and sets the response intervals.
For a better understanding, here are some application examples:
- Turning on and off the lighting inside the house and in the local area. After selecting the mode, the outlet will itself supply or remove voltage from the lighting devices. The owner does not need to waste time performing these actions. The periodic on/off feature can be used to prevent intruders from entering. Periodically turning on the light will signal to thieves that the owners of the house are present.
- Indoor heating. Another way to use an outlet with a timer is to connect heating equipment to it. Electrical appliances will turn on and off at the specified time.
- Management of agricultural equipment. Devices help optimize agriculture. With their help, you can set up watering, organize the switching on of lighting and heating, resolve issues with feeding and perform other tasks.
- Turning on the water heater. Alternatively, you can turn on the boiler through an outlet with a timer and ensure timely heating of the water. This way you can avoid a situation where you forget to turn on the equipment and are left without the opportunity to buy.
The scope of application of the products is very wide, and an additional advantage is the opportunity to save up to 30-40% on electricity.
Smart plug comparison chart
| Name | Main characteristics | Price |
| TP-Link Smart Plug | Protocol: IEEE 802.11b/g/n, wireless transmission type: 2.4GHz, 1T1R, system requirements: Android 4.1 or higher, iOS 8 or higher. | ₽ 2329 |
| NooLite | Supply voltage: 230V ± 10%, 50Hz, number of load channels: 1, maximum load power: 3000W. | ₽ 1829 |
| Enaut | Temperature range 5 °C to 30 °C, operating accuracy +/-1 °C, maximum permissible voltage 230 V. | ₽ 2254 |
| Merlin | Rated current: 10A, rated voltage: 90-260V, wireless frequency: 2.24GHz | ₽ 3001 |
| Elgato Eve Energy | Plastic case, Phone, iPad or iPod touch with iOS 9.1 and higher, Wireless standards: Bluetooth 4.0, maximum power of connected electrical appliances: 2500 W. | ₽ 3890 |
| Xiaomi Mi Smart Power Plug | Automatic shutdown when overheated, made of durable thermoplastic, temperature sensor, timer function, compatible with iOS and Android. | ₽ 2489 |
| ZDK GSM SC-1 | GSM network frequency: 900 / 1800 MHz, input voltage: ~110V-220V, own consumption: 110-180 mA, power of connected devices: up to 2 kW | ₽ 2489 |
| Smart home Hommyn Wi-Fi | Works over a Wi-Fi network, timer mode, compatible with iOS and Android, on and off by timer, plastic case. | ₽ 2490 |
You may also be interested in: How to choose a security system for your home?
Electronic
Using the TM24 model as an example, let's look at how to set up an electronic socket with a timer.
When you turn it on for the first time, you must leave the device in the outlet for 12-14 hours to charge the built-in battery.
Button functions:
This programmer has the ability to configure twenty on and off programs.
As can be seen from the diagram - point 1, it is possible to install the program from Monday to Sunday. That is, it turned on and off at the same time. Setting up individual programs by day of the week from 2nd to 8th point. Combination of the program on weekdays from Monday to Friday, paragraph 9, or only on weekends (Saturday and Sunday), paragraph 10. For six days a week, point 11. Every other day, Monday, Wednesday, Friday, point 12. Tuesday, Thursday, Saturday, point 13. Three days in a row, points 14 and 15.
To start using the outlet, you must first set the current time. You must hold SET for 5 seconds until the day of the week flashes. Use the RIGHT or LEFT buttons to set the desired day. Pressing and holding SET again takes us to setting the clock. Using RIGHT or LEFT we set the desired time. We repeat the same procedure to set the minutes.
Now you can start setting up the program. You can do this as follows:
- Press and hold RIGHT until “1_ON” appears, this is the first timer.
- After this, press and hold SET until the days of the week flash, use the RIGHT or LEFT buttons to select the desired day or combination of days.
- Next, using SET, select the hours and RIGHT or LEFT the desired value, and so on with the minutes.
- Then we repeat the operation while holding RIGHT until the value “OFF_1” appears.
- We repeat the setting similar to the point above, set the day, hour and minutes.
- To exit programming mode, press CLK.
Press the MANUAL button to reset the current program settings to set new parameters. To force the timer to turn on or off, there is a “MANUAL” function, which has three modes: “MANUAL-OFF”, “MANUAL-ON”, “MANUAL-AUTO”. In OFF mode, the timer does not execute programs and is in the off state. In ON mode, the device is in the forced position, and in AUTO mode, programs are executed.
To simulate the presence of a person, there is an interesting RND button on the socket. This function has a floating advance timer that randomly varies from two minutes to half an hour. The time interval is processed taking into account the advance. The switching on of electrical appliances is not strictly tied to a specific minute, which can confuse thieves trying to find out whether people are at home or not.
Instructions for setting the parameters of an electronic socket are provided in the video below:
Setting up the remaining sockets with a timer is no different from the installation algorithm described in the example and should not cause difficulties. Do not forget to change the clock to winter and summer time for more correct operation of the device.
We hope our instructions were clear and useful for you. Now you know how to set up a socket with a mechanical and electronic timer!
It will be interesting to read:
Both in industry and in everyday life, there is often a need to automatically turn on and off electrical appliances at a given time. To do this, use a mechanical or electronic socket timer. Each model has its own advantages and installation methods.
Recommendations for selection
First of all, you need to decide for what purpose the outlet is being purchased. In order for it to cope with its task in the best possible way, it is worth familiarizing yourself with their main functional features.
Electronic or mechanical
According to this criterion, the choice is individual. So, to regulate watering in a greenhouse over a couple of hours, a budget brand with a mechanical timer is suitable.
For a longer period of time and automation of several devices, it is better to opt for an electronic system.
An important criterion is the accuracy of the timer
It is especially worth paying attention to inexpensive mechanical brands. In most cases, they do not show the most accurate reading.
For many everyday activities, only the correct cyclicity is important.
If the reliability of the timer’s operation is important, then it is better to choose products from proven and proven manufacturers on the market.
Time programming function
Each outlet has a maximum possible time for which you can set power to devices. Usually it is a day, and in more expensive models - from 7 to 30 days. The latter can be found in the increasingly popular intelligent “smart home” system.
Load
For most lines, the standardized load is 16A. You can choose both 10A and 7A, and for more enhanced throughput - 40A. The type of device is selected taking into account the planned load. For example, the consumption of 5 kW of electricity corresponds to 25A. Consequently, the 16A load will be small - the device will not cope with the task.
Protection from dust and moisture
There are models that can be used even in open areas. They have a high degree of protection against moisture and dust. It all depends on the purpose of using the product. For home use, you can choose a model without reinforced coating and protection from negative environmental factors.
Price
The price varies depending on the functional features, type of outlet and manufacturer. In most cases, more expensive brands have first-class assembly and thoughtful functionality. They are more wear-resistant, reliable and less likely to fail.