The installation of power supply systems must ensure their safety and reliability. And the main vector of attention must be directed to the connection points of the wires. An amateur approach to the matter saves minor money, but does not provide the required level of quality and security of the system. Only knowledge of the technical conditions and features of specific components makes it possible to provide the connections with the proper quality, and the user - confidence in the safety and durability of the electrical system of the room. Putting the technical point at the forefront, we will see that the most reliable and safe method of connecting electrical wiring is welding!
To carry out welding work you will need a welding machine and some skill. An overview of the devices is given below, and to acquire the skill you just need to read the article and practice a little.
Resistance welding of aluminum and copper
Resistance welding of aluminum-copper joints is successfully used in the electrical industry for welding aluminum busbars with copper tips, and aluminum wires with copper tips. In the cable industry, capacitor welding of aluminum and copper wires is widely used according to the modes indicated in the table below:
| Diameter of welded wire, mm | Capacitor capacity, μF | Capacitor voltage, V | Distance between parts, mm | Upsetting force, N |
| 2,5 | 256 | 1100 | 14 | 1471 |
| 2,8 | 256 | 1400 | 10 | 1471 |
| 2,8 | 260 | 1400 | 15 | 1471 |
| 2,8 | 380 | 1350 | 15 | 1569 |
| 2,8 | 550 | 1200 | 15 | 1716 |
| 3,5 | 550 | 1500 | 12 | 1569 |
| 5,0 | 1000 | 1500 | 14 | 1716 |
Flash butt welding of aluminum and copper tubes
Welding joints between aluminum and copper pipes is used mainly in the refrigeration industry. In this case, one should take into account the fact that during the welding process, aluminum melts much more than copper, therefore the installed length of the aluminum tube must be greater than the required length, taking into account the melting allowance.
To reduce the amount of burr on the inner sides of the tubes, it is recommended to blow the tube with nitrogen under a pressure of about 0.25 atm during the welding process. It is not advisable to use air for this purpose, because the oxygen contained in it promotes the oxidation of the metal.
Before starting butt welding, the tubes are pressed on a special device to a length of 10 mm with thickening of the walls. This technique is necessary in order to later, when processing the joint, obtain the same diameter of the hole, because it was distorted during the upset at the time of welding.
Processing the joint consists of turning the thickened surface on a lathe and drilling out the hole in the tube. For welding together copper and aluminum tubes with a diameter of 10-30mm and a wall thickness of 1.5-4mm, the following welding modes are recommended:
| Specific settlement pressure, MN/m2 | 196-216 |
| Precipitation current density, A/mm2 | 500 |
| Current density during reflow, A/mm2 | 240 |
| Average reflow speed, mm/s | 12-15 |
| Settlement speed, mm/s | 100-120 |
| Amount of melting of aluminum tube, mm | 8-10 |
| The amount of copper tube plating, mm | 2-8 |
| Total settlement, mm | 3,5-5 |
| Welding duration, s | 1,1-1,2 |
At the fracture of the joint, one can observe the inclusion of aluminum particles in the copper. There is no inclusion of copper in aluminum.
Additional
Difficulties in fusion welding of aluminum and copper products
It is quite difficult to weld copper to aluminum using fusion welding.
This happens due to the fact that the composition of the molten metal is almost impossible to regulate, and the mechanical properties of the welded joint strongly depend on the copper content in it, this is clearly visible from the diagram (see figure on the left). If the copper content in a copper-aluminum alloy exceeds 12%, then the tensile strength stops increasing, and the toughness of the alloy and its corrosion resistance drop sharply. Therefore, when the copper content in the weld metal is more than 12%, the joint becomes very brittle and prone to cracking after welding.
Practical studies on welding aluminum and copper using a carbon electrode have not yielded positive results. It is possible to join copper and aluminum using fusion welding if the material being melted is predominantly aluminum. The so-called “lock” connection is often used, where possible.
"Lock" connection between aluminum and copper
The essence of the “lock” connection (see figure on the left) is as follows. A copper plate, item 2, is placed on the aluminum sheet, item 1, and it is welded around the entire perimeter, flush with the plate. Next, surfacing is performed, position 3, which connects the welds deposited along the perimeter of the copper plate. This creates something like an aluminum alloy lock. The welding process must be carried out with forming graphite strips.
Welding modes for aluminum and copper
The welding modes for aluminum and copper are very similar to the welding modes for aluminum. The nature of the welding current is constant, straight polarity. Cast aluminum rods with a diameter of 12-20mm for a thickness of aluminum of 29-30mm and copper of 10mm are used as filler material. Welding current strength is 500-550A. The electric arc voltage is 50-60V, and its length is 20-25mm. For welding, graphite electrodes with a diameter of 15-20 mm are selected.
What is arc gap
The arc gap is also known as the arc length. This is the name of the gap that occurs between the material being welded and the electrode. Experienced welders claim that to obtain a high-quality weld, it is necessary to constantly maintain this gap at a constant level. There are three types of arc.
- Short arc. An arc gap of 1 mm, at which the metal is heated in a small zone. Due to this, the weld becomes convex. Because of this, a defect known as an undercut can form at the junction of the seam and the product. It is a shallow groove running along the seam itself. Undercutting has a negative impact on the quality and strength of the seam.
- Long arc. It is very unstable and poorly protected from exposure to air. A long arc does not heat the metal well enough, resulting in a weld that is not very deep.
- Normal arc. If you ensure a normal gap during welding, you get a high-quality, well-welded seam. A normal arc gap is considered to be a gap of 2-3 mm.
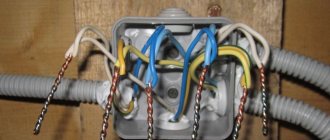
Welding in a junction box
First, you should get acquainted with the box and appreciate its full significance. This is the most important part of all electrical wiring running throughout an apartment or house. Take this very seriously.
Directly for the soldering process you will need a welding machine. We can recommend one of the most attractive models for such purposes. This is the Patriot Max Welder DC-200 C
It has a silent level of operation, high safety, which is important when there is a lack of experience, and precise operation. Its weight is 4.5 kg, so there are no problems with transportation
It is powered by a 220 V network, the current floats in the range of 10-190 A. The price is at an acceptable level for everyone, from 8,000 to 10,000 rubles. This does not mean that you only need to choose this one; there are other devices that are just as suitable for this type of welding.
Welding of copper wires in the junction box begins with ensuring all safety measures. We set the device to a power of about 1 kW. Carbon and graphite electrodes are used. You will also need flux. A mask or special glasses must be used. To remove insulation and twists of copper wires, you need a knife and a clamp in the form of pliers. Always have electrical tape, nuts and screws on hand. The wire strands are stripped to about 4-5 cm, then twisted around each other 7 times. Let's start welding.
If you are not confident in your abilities, practice on similar types of metal and twists. When everything works out, start. We have already talked about the procedure for welding copper wires earlier.
Safety precautions when working
The established safety rules, one might say, were written in the “blood” of the victims, and therefore it is strictly forbidden to neglect them. The health and life of not only the welding equipment operator, but also the people around him depends on their compliance. So, the safety rules include the following.
- Before starting work, you should check the integrity of the insulation on all wires and cables connected to the device. It is also necessary to check the serviceability of the equipment, namely, make sure that the open circuit voltage is zero. In this case, there must be a working system that turns off the voltage on the electrode when the device is idle.
- Before connecting the equipment, you should check the electrical network under load (measure the sag range).
- To protect the retina of the eyes from ultraviolet radiation arising from the burning of a welding arc, it is necessary to use a protective mask (shield) or special glasses. Not so long ago, welding masks and glasses with “chameleon” glasses appeared on sale, which automatically darken when exposed to bright radiation. Not only the welder, but also his assistant should wear glasses or a mask.
- If welding work is carried out indoors, then to protect the respiratory system and prevent poisoning by harmful gases, respirators with replaceable cartridges or masks through which purified air is forcedly supplied are used.
- To protect hands from metal splashes, use special gloves - welder's gloves.
- To protect the body, overalls, jackets and pants made of fire-resistant fabric are used.
- To protect your feet, you need to wear high boots to prevent metal sparks from getting into them. Boots must be covered with pants.
- The workplace should be well lit.
- There should be a rubber mat or wooden flooring under the welder's feet to prevent a person from receiving an electric shock.
- There should be no foreign objects around the workplace that could cause a tripping hazard.
- Sand and a fire extinguisher should be located near the workplace to timely extinguish the source of fire.
- Grounding the welding machine is mandatory.
If the safety rules have already been studied, then you can begin to familiarize yourself with how to properly work with electric welding.
Difficulties in soldering aluminum wires
In addition to the oxide film and the lack of visual control over the heating temperature of the metal, there are several other difficulties. Soldering aluminum single-core wires should be carried out in just a few seconds so as not to damage the wire itself. The temperature effect on aluminum changes the structure of the metal, as a result of which it loses its strength and flexibility.
Soldering aluminum with a soldering iron at home
Almost all procedures, regardless of what type of soldering is used, must undergo a full range of preparatory procedures, which includes tinning, fluxing and stripping. It is precisely such procedures that help eliminate the oxide film, due to which the bulk of soldering defects are obtained. Another difficulty is the correct choice of parameters, since discounts with thin elements require a delicate approach. At the same time, the small thickness of the products helps to easily produce everything at home without any obvious loss of quality.
Methods for soldering aluminum wires
Soldering aluminum wires at home can be done in several ways. One of the main ones is soldering aluminum wires with a soldering iron, as this is one of the simplest and most common tools that is found in every home. It is enough to select a soldering iron of the required power to melt the solder and make the connection. Unlike other methods, it is the easiest to prepare, but requires that there be a source of electricity nearby. Unlike a torch, a soldering iron is a more crude method, so it may not be suitable for working with materials that are too thin.
Soldering aluminum with a soldering iron
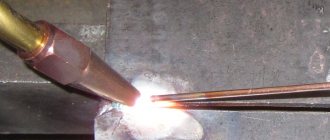
The method using a burner, which can be gas or gasoline, helps to carry out more delicate procedures, since it is easier to regulate the temperature and the gas perfectly warms up not only the wire and solder itself, but also the areas that are located next to them. Preparing the burner is a longer procedure, since it needs to be refueled, the mode selected, and so on. This is also a less safe option, but after all, you don’t need to wait until the tool cools down for a long time, as happens when working with a soldering iron.
Soldering aluminum wires with a torch
Preparation for soldering
Regardless of whether aluminum wires are soldered with copper wires, or with the same ones as them, you should take the preparation responsibly, since the success of the operation depends on this. First of all, you need to clean the surface, which helps remove the oxide film. For the wires, fine-grit sandpaper or something similar will work. After this, you should tin the end of the wire that will be soldered and, if everything is done using a soldering iron, you should also tin the soldering iron tip. Despite the problematic use of some types of flux, metal shavings of solder or some liquid options can be used as a substitute, which will improve mixability and increase the joining speed.
Step-by-step instruction
- The first step is to prepare all available tools and consumables, which should always be at hand, and also free the workplace from unnecessary items;
- Prepare the metal for soldering by cleaning, fluxing, tinning and other procedures;
- After this, you need to set the equipment to the required mode so as not to spoil the workpieces during soldering and everything goes as efficiently as possible;
- Next, with precise and quick movements you need to carry out the soldering itself, bringing a small part of the solder to the wires, and applying it to their ends, connecting them into a single product;
- After this, you need to let the metal cool and check the strength of the connection.
Soldering mode table
| Wire diameter, mm | Material consumption, grams | Soldering duration, sec | |
| solder | petrol | ||
| 2,5-4 | 1 | 5,5 | 25 |
| 6 | 1,5 | 7 | 30 |
| 10 | 2 | 11 | 55 |
Safety precautions
Work should only be carried out using proper tools. When using fluxes, it is worth ensuring normal ventilation of the room, since many of them not only emit an unpleasant odor, but also turn out to be toxic. The soldering iron should not be left turned on and should always be in a safe place where there are no flammable objects nearby. The same safety measures must be observed when working with a burner, only here the flame source itself must be kept as far as possible from the container with consumables so that an explosion does not occur.
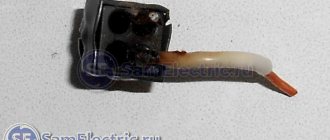
Welding pencils
We are talking about a welding rod. The product is a rod resembling a pencil with a diameter of 4 to 15 mm, a length of 7 -20 cm. Only instead of a rod there is an exothermic mixture inside. Such products were used by the military when repairing mats. parts in the field.
Principle of operation
The burning mixture releases a large amount of heat sufficient to melt thin sheet metal or copper cable cores. A thin rod can be set on fire with an ordinary match; thicker ones have a special wick that is ignited with a regular lighter. The burning time of such a pencil is from 20 seconds to 5 minutes. Which is quite enough to weld several twists, naturally observing safety precautions when holding the rod and preventive fire-fighting measures, for example, placing a bucket of water next to it so that in case of a fall the burning rod falls into the water, laying a metal sheet, and preparing a fire extinguisher.
Facebook
Attention bearing buyers Dear customers, please send your questions and requests for the purchase of bearings and components by email or call now:
Delivery of bearings throughout the Russian Federation and abroad. Bearing catalog on the website
Difficulties in welding aluminum wires
Welding aluminum wires at home can be quite a complicated process. Here it is worth taking into account all the difficulties that one has to experience when working with aluminum, which only intensify with the thinness of the wires. The factor of the characteristics of the connection of these products also influences. After all, here we work with a minimum length, since there is no need to make a seam several tens of centimeters long. When welding aluminum wires occurs, the movements must be precise and the impact of the arc or other temperature source on the joint must be as short as possible so as not to burn the metal.
Scheme for welding aluminum wires with argon
When working with welding, everything is carried out at high temperatures, so the problem of instant melting of thin metal always remains. The next difficulty lies in selecting the correct mode, since otherwise the arc may not ignite or the problem of metal burnout will arise again. You have to build on minimal settings in the absence of precise regulations for modes, so everything is done by eye.
Wire welding methods
This process can be carried out using several technical means. One of the most common is argon-arc welding. The advantage of this method is reliable protection from the influence of external negative factors, as well as the absence of filler wire impurities that can affect the electrical conductivity properties. Here, aluminum wires are welded with a carbon electrode, which does not melt and creates a joint seam from the metal of the workpiece itself.
Welding with fusible electrodes with a winding can also be carried out. This is a more complex process, for which it is necessary to select the required grade of aluminum electrode. Movements must be fast and careful, since here there is the greatest risk of burning the end of the wire with high temperature. A safer alternative is gas welding, since the possibility of unexpected melting is much lower here. The speed of welding with gas is three times lower than when using electricity, so for craftsmen without experience this will be one of the best options.
Welding aluminum wires with an inverter is a very common option, since this type of equipment turns out to be the most affordable among professionals, especially since the balance of cost and quality of this process is higher than that of other methods.
Preparation for welding
Before starting the process, the metal should be carefully prepared to avoid any trouble during joining. Welding aluminum wires together requires removing the insulation and other types of sheathing that covers the metal parts. They need to be stripped to the required length and then cleaned to remove possible remnants of insulation, debris, oxide film and other things. If the thickness of the wires is relatively small, then they should be twisted to form a single bundle.
Twisting wires before soldering
If any part of the wire sticks out, it should be cut so that the entire surface has a smooth appearance. If necessary, the ends of the wire can be treated with flux, and slightly melted if we are talking about solid options. The heating process, as required by the welding technology of other aluminum parts, is not necessary here.
Welding instructions
- The first stage is preparation, which includes removing the insulation, stripping the wires of all excess and preparing the ends;
- At the second stage, it is necessary to treat the ends of the workpieces with flux to improve the quality of the connection;
- After this, you need to set the modes of the working device to the desired position;
- After all this, you can start welding;
- Remove protruding parts that appeared after welding;
- Insulate the resulting connection.
Safety precautions
Considering the speed of the procedure, the master is not exposed to great danger, but basic precautions are also required here. First of all, personal protective equipment should be used, such as a welding helmet, gloves and fire-resistant clothing
When using gas cylinders, they should be moved at least 5 meters from the source of fire. All hoses and cylinders must be checked for serviceability and integrity before work. We must not forget about electrical safety, since electric shock when working with electric welding can always occur due to carelessness and high ambient humidity.
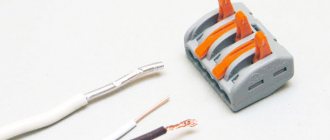
Connection with spring and self-clamping terminal blocks
Currently, both reusable and single-use terminal blocks and terminal blocks are produced.
- spring terminal blocks and reusable terminal blocks have a retaining spring that can be loosened by lifting a lever located on the device body. This allows you to remove or insert the wire without any effort. Lowering the lever securely fixes the cable cores;
- Single-use terminal blocks automatically clamp the wire when inserting it into the socket; removing the wire will require physical force, which can damage the clamping spring, so their single use is recommended.
Both reusable and single-use terminal blocks are produced in a wide range, including with a different number of connected wiring branches, designed to fix wires with a cross-section from 0.08 mm² to 6 mm². Including in the form of ready-to-install terminal boxes. This method of connecting aluminum and copper wires is currently the most optimal in terms of reliability and ease of use.
Section of the spring terminal block and placement of the connection in the junction box
Terminal boxes with spring clamps were first produced by the German company Wago, from which they got their name, but currently there are a large number of analogues, including counterfeit ones. For this reason, it is necessary to purchase spring terminal boxes only from electrical stores. When purchasing terminal boxes on the market, there is a high probability of purchasing low-quality products that do not meet the stated requirements.
Self-clamping terminal block WAGO
To fix the wires in the terminal box, it is necessary to prepare the wires; to do this, remove the insulation from their ends; the size of the exposed part must be at least 0.5 cm. After that, the open part of the cable core is inserted into the desired socket of the terminal box and fixed in it using a spring clamp or screw. It should be noted that mounting in a terminal box usually does not require additional insulation, but at the same time, when they are located in a wall, a distribution box is required. Thus, spring terminal blocks have a number of advantages over other types of connections due to ease of connection.
Self-clamping terminal block
About wire welding
The process includes the preparation of the cores and their further connection.
These include:
- cutting the ends of cables and wires, removing insulation;
twisting of exposed veins;
preparation of welding equipment.
Features of the technology
To connect wires, you can use alternating, direct or rectified current. Its value should melt copper at the site of application of the electrode without disturbing the internal structure of the metal. In this case, the shape of the applied voltage does not have a significant effect, although it is easier to ensure a good quality weld with direct current.
Welding creates the most monolithic and durable metal alloy with reliable contact. For it, it is enough to regulate the currents within 40÷120 A, selecting them according to the cross-section and number of connected wires: the electrode should not stick, and the arc must ensure stable combustion.
Copper has a lower melting point than steel. There is no need to heat it with high currents or create a large arc. The process takes place briefly, without the formation of a large amount of metal splashes. For short-term work as a welder, it is permissible to use safety glasses instead of a mask to simplify some safety measures. But you should still work in special clothes and shoes.
For welding, a carbon electrode with a copper plating layer is used. It is quite acceptable to replace it with a rod from a used battery or a brush from an electric motor.
Such an electrode is brought close to the twist and immediately withdrawn by 0.5÷1 mm. The resulting arc melts the copper, forming a characteristic ball at the end. The current circuit is immediately broken: the short duration of the process preserves the integrity of the insulation on the wires and eliminates the formation of a porous metal structure in the created seam.
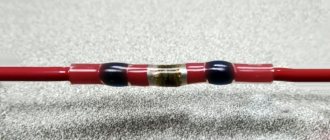
After the metal has cooled, the twist and weld are wrapped with electrical tape (preferably fabric) or covered with heat-shrink tube.
I recommend that you sign the cables entering the junction box immediately. This connection of cores by twisting and welding works reliably for decades. If necessary, checking the electrical circuit of the inscription will greatly facilitate the work of descendants.
detailed instructions
First, let's consider the simplest option, when it is necessary to connect two single-core conductors of the same metal (for example, copper).
The technology looks like this:
- We carefully strip both cores of insulation to about 5 cm. You can also use a special tool for removing insulation for this.
- We clean the exposed veins to a metallic shine with a knife or sandpaper.
- We cross the two wires and twist them clockwise together so that they wrap around each other in a spiral (see diagram below).
- We insulate the finished twist using electrical tape. It is also recommended to use heat-shrink tubing, which reliably protects the exposed area from the external environment.
As you can see, there is nothing complicated. The peculiarity is that it is necessary to expose the veins by at least 5 cm and twist them with pliers so that there is continuous and reliable contact.
I would also like to give a couple of tips about a more complex situation when it is necessary to twist single-core and stranded wire. In this case, first repeat points “1” and “2” from the instructions provided above. Next, you need to cross the products and carefully wind the stranded wire around the middle of the single-core wire (at a distance of 2.5 cm from the end). When all the turns are wound, the free end of the single-core conductor must be bent with pliers towards the turns, as shown in the photo below. After this, the connection is insulated and placed in the junction box. By the way, in the same way you can make a good twist of two stranded wires.
You should draw your attention to the fact that it is forbidden to twist aluminum and copper under any circumstances. The first and main reason is that a galvanic couple is formed between aluminum and copper; as a result of chemical reactions, when moisture enters (it will be there in any case), electrolysis begins and the connection is destroyed. The contact resistance increases until it disappears completely, at which time it begins to heat up and burn
With direct current, such a connection will be destroyed especially quickly.
The contact resistance increases until it disappears completely, at which time it begins to heat up and burn. With direct current, such a connection will be destroyed especially quickly.
The first and main reason is that a galvanic couple is formed between aluminum and copper; as a result of chemical reactions, when moisture enters (it will be there in any case), electrolysis begins and the connection is destroyed. The contact resistance increases until it disappears completely, at which time it begins to heat up and burn. With direct current, such a connection will be destroyed especially quickly.
The second reason is that copper and aluminum have different coefficients of thermal expansion; under load, when the contact heats up, the conductors will expand “differently,” and after cooling, the twist will weaken and the resistance will increase even more - like a snowball.
The third reason is that an oxide protective film always forms on the surface of aluminum, which also increases the contact resistance, therefore, to connect aluminum wires, they are coated with quartz vaseline paste, and terminal blocks for them are sold already filled with this paste.
These are the diagrams you can use when twisting wires with your own hands:
We also advise you to watch the visual instructions:
An interesting device will allow you to quickly fasten:
Inverter devices
The most reliable type of connecting electrical wires is welding using direct and alternating current, voltage from 12 to 36 V. For welding, electricians are increasingly using inverter welding machines. They are economical, lightweight, easy to carry and use. To weld wires, you can use graphite or simple carbon rods from a battery. You can set the current mode on the device, taking into account the diameter and number of wires being welded
How to choose a device
Preference is given to a welding inverter. Its main advantages are: wide range, the ability to softly regulate current, stability in operation, small size and weight.
For welding wires, you can choose a universal inverter machine. This device is the most modern. With this device you can perform all kinds of welding, and not just wires. When choosing a device, you need to look at the power source and its power. For work at home, a device with a power of 4 - 5 kW, with a current strength of up to 160 A, is suitable. It is advisable to have a “hot start”. It is needed to protect against sticking during welding and voltage surges. Such a device is useful for welding wires and for performing other welding work at home. Another advantage is that it is easy to use and does not require great skills. The disadvantages include its high price.
In practice, electricians use compact, portable, easy-to-use DC machines for welding wires. Welding transformers are compact and inexpensive. Transformers with a power of 500 W or more and 25 V secondary voltage can be used.
DIY wire welding machine
Do you want to make a wire welding machine? Don't know how? It's done like this. Purchase a strong magnet and copper wire insulated with fiberglass or cotton. It is needed for the transformer core. It is desirable that its cross-sectional area is no more than 50 square centimeters. If desired, you can also do the wire wrapping yourself. The required material is taken, wound on a wire, coated with electrical varnish and the primary winding is ready. The core is made in a U-shape for convenient winding of wire. It must have a rod structure. The reel frame can be made of PCB or cardboard. The secondary winding is wound on top of the primary winding. After applying the winding to one side of the coil, it is applied in the same way to the other half. If you place cardboard or fiberglass between the layers of the winding, the quality of the insulation will improve. A copper wire welding machine is connected to the network to measure the voltage on the secondary winding. It should be about 60 V. If it is much more or less, then by decreasing or increasing the winding, you can set the desired voltage value. A cable is connected to the primary winding. It must be two-wire. Instead, you can use an internal wire. A PRG wire is connected to the terminals of the secondary winding. The primary winding is used to receive current from the mains at 220 W through the cable. The secondary winding is used directly for welding.
Anyone who has at least once encountered the need to connect wires during electrical installation work knows how responsible the approach to this matter must be. The main task is to minimize the transient electrical resistance that occurs between the contacting conductors.
As you know from a physics course, the weaker the contact, the more the conductors heat up due to increased resistance. Therefore, it is necessary to achieve the most durable, almost monolithic, connection of electrical wires. This is a prerequisite for reliable and safe operation of electrical installations.
Welding cable for inverter: types
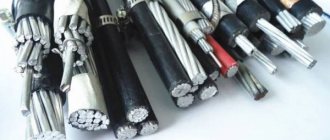
There are few brands of conductors designed specifically for welding work. And there are only two types of cables that meet the above characteristics: KG and KOG.
Among craftsmen, the first type is in particular demand - flexible cable (KG). It should be used to connect mobile mechanisms to networks with alternating voltage up to 660 V with a frequency of 400 Hz. DC voltages up to 1000 V are also allowed.
KOG is a particularly flexible cable, analogous to KG, indispensable when working in hard-to-reach places, ensures quick changes in the position of equipment and guarantees freedom of action for the performer. It is recommended to use it for connecting electrode holders, automatic and semi-automatic installations to networks with alternating voltage up to 220 V with a frequency of 50 Hz or constant - up to 700 V. If the performer is thinking about which brand of cable on the remote control of the welding inverter is more suitable, then you can choose KOG.
Each of these brands has the following varieties, which are clearly distinguishable if you look at the markings:
- KOG-HL/KG-HL – cold-resistant, resistant to extremely low temperatures, down to -60°C;
- KOG-T/KG-T – tropical, resistant to various types of mold formations, operating temperature should not exceed +55°C.
You should also pay special attention to the following varieties:
- KGn has non-flammable insulation and should be used in fire hazardous conditions.
- KOG-U is used only in temperate climates, in the temperature range from -45 to +40°C.
Many performers have equipment of specific brands or manufactured by specific factories. Welders are especially often concerned with the question of which welding cable to choose for the Resanta inverter? Both brands: KG and KOG will be a suitable choice in such a case.