Connecting a private house, cottage or any other low-rise building to electrical networks can be done in three ways: by air, in the ground or a combination. The owner himself chooses the electrification option, depending on the cost of the work, his own preferences and, of course, on the actual possibility of implementing this or that type of connection. Laying an electric wire by air is the cheapest method, but it has a number of disadvantages: there is a high possibility of cable damage due to strong winds, icing and other natural factors. In addition, theft of an expensive wire cannot be ruled out.
The option in which the cable is laid in the ground to electrify the facility does not have all these disadvantages. The cost of such work is much higher than an overhead connection, but the high financial costs are offset by the reliability of underground communications and a longer service life. If the power cable is installed correctly underground, it can last for several decades. Below we will look at all the advantages of underground installation of electrical communications, and also provide complete instructions for doing such work yourself.
Advantages of laying cables underground
As mentioned above, laying an electrical cable in a pre-dug and prepared trench has only one advantage over air supply and no disadvantages in terms of reliability. Of course, all this is valid if the installation is carried out in compliance with all the rules. Let's look at the main advantages of this method of electrifying a private house, cottage or other facility.
- The possibility of using an electrical cable of a larger cross-section, so to speak, with a reserve, without the reinforcement of the supporting structure necessary for overhead lines.
- Minimization of all external devices such as switches, isolators and so on. It is enough to install one circuit breaker at the input to completely de-energize the internal electrical network.
- The aesthetics of the general appearance of the structure is also an important advantage of this connection option. Hanging and swinging wires do not add to the overall attractiveness of the building.
- If the trench is deep enough and communications are installed correctly, you can forget about the cable forever. The possibility of its failure and subsequent replacement is practically excluded.
How to lay a cable in the ground? The technology for such work is almost the same for all regions of the Russian Federation, with some nuances for different soils and climatic conditions. It is regulated by GOSTs and standards that have remained unchanged since the 60s of the last century. Laying cables underground at a dacha, in a private house or other low-rise building begins with the development of the route.
Wiring before repair
Wiring and installing an Internet cable in an empty house is a great idea. There are no obstacles, you can plan everything from start to finish. The result will be a beautiful system that will please the eye after moving in.
Examples of wiring diagrams:
Scheme for 1k/2k apartment
Scheme for a 3k apartment
Here are a few nuances:
- You need to clearly understand where and what will be located in the room.
- Select in advance the location for the router from which all other wires will disperse.
- The cable is laid simultaneously with sockets and other cables.
You can run cables in the wall or remove them during repairs under the plaster. Popular choice, but not worth doing. Now it is recommended to run all wires in cable ducts. This is important because if the cable breaks, short circuits, or some other problem, they can be quickly found and repaired. Once the renovation begins, all the channels will be hidden; in addition, they are bought to match the color of the room or furniture so that they stand out less. If there are none, then paint them yourself.
As a result of such planning, you will get such sockets. A telephone, TV, computer and any device that requires power are immediately connected to them. You won't be tied to one place in the whole house and can move your TV or computer at any time. Or connect to the network for a minute from anywhere in the house.
Underground cable route design
The owner receives a plan of the route from the pole to the building along with the project for connecting to the electrical networks, but he carries out the wiring along the site to the bathhouse, garage and other objects independently. The most economical option is to lay the cable in a straight line, but in reality this is rarely feasible, since you will have to work around various obstacles. When developing a plan for laying underground cables across a site, the following rules must be followed.
- If possible, avoid intersection with other communications. If this can be done, then the cable without a protective sheath must be placed at a distance of no closer than 0.5 m from gas, water and sewer pipes. When laying the conductor in a casing, this distance is reduced to 0.25 m. When crossing with another electrical cable, this parameter is 15 cm.
- It is necessary to bypass parking areas and vehicle entry areas. If this condition cannot be met, then it is necessary to increase the depth of the trench or pass the cable through a protective case. Large trees and bushes should be avoided. When passing the route along the foundation, the distance from it must be at least 60 cm.
As a result, the cable laying plan will correspond to a broken line, not a straight line. Marking the trench is best done with a stream of sand or pegs. After the preparatory work, it is necessary to once again check the plan for compliance with the standards and transfer it to paper, linking it to all objects on the site and underground utilities.
This drawing will subsequently be useful during the construction of new facilities, redevelopment of the site, as well as in the event of a need to repair an underground power line, which can happen if the technology for laying an electric cable in the ground is not followed or in other force majeure circumstances. The plan has been developed, transferred to paper - it’s time to start the main work!
Obtaining permission for underground input
An example of a project for introducing a cable into a house.
First, you need to complete the project. It should be developed by a specialist. Technical documentation, plans and drawings must comply with all rules and regulations. The designer determines the brand of cable and calculates the cross-section of the conductors.
To receive a project, a number of technical conditions must be met. To connect a house to a common power line, you will need appropriate permission. For example, an agreement for excavation work is drawn up by the service responsible for facilities and communications.
Then the land plot is traced. If there are any communications in the immediate vicinity of the cable being laid, it is necessary to invite their representative to coordinate the position of the trench and control the work being carried out.
Underground cable installation technology
Laying an electrical cable in the ground at a summer cottage, the territory of a private household or other facility begins with excavation work. Before this, you need to decide on the depth and width of the trench. The depth must be at least 80 cm, and the width 30 cm for each cable, if there are several of them. In accordance with the developed plan and route markings, soil sampling is carried out. The trench is cleared of foreign hard and sharp objects, and its walls should have a slight slope. After excavation work is completed, the cable is laid according to the following algorithm:
- the bottom of the trench is leveled, covered with sand in a layer of 15 cm and compacted;
- Protective cases are placed on the prepared pillow, if necessary;
- the cable is pulled through the cases, maintaining the required slack;
- the protection pipes are connected into one whole in one of several ways;
- a layer of sand 25 cm thick is poured on top of the laid cable in protection;
- the top filling is slightly compacted, preferably with your own feet;
- plastic warning tape must be laid with the lettering facing up;
- the trench is filled with soil, layer by layer, with mandatory compaction.
Attention! Don't rush to bury the cable! Be sure to invite a representative of the energy company that gives permission to connect to public electrical networks. You can carry out underground laying and installation of the necessary equipment yourself, but authorized power engineers must check for compliance with GOSTs and PUE (electrical installation rules)!
It is advisable to lay the cable in one single piece, without any connections. If this option cannot be implemented, then the individual pieces must be connected in mounting boxes specially designed for outdoor use. The device is installed on a post above the soil surface, at the junction of the cable, where its ends are brought to the surface. Do not bury the box, as this will quickly damage the line.
At this point, the laying of cable lines in the ground ends and the stage of connecting underground electrical communications to the general power supply networks and input into buildings located on the site begins. Each stage of work, both when laying the cable and connecting it, has its own nuances, which will be highlighted below. We will begin this description with the choice of cable for underground routes.
Cable protection on top
When laying a cable in the ground, there is always a high probability that it may be damaged during any excavation work. Therefore, the PUE provides for the presence of protection above the route. For powerful cables - 1 kV (1000 Volts) and above - protection is required with concrete slabs or solid bricks. For low-power lines, which usually power our homes, it is allowed to lay the cable in the ground with signal plastic tapes. This method of protection is permitted if there are no more than two conductors in the trench.
Laying the cable in the ground must be accompanied by laying protective plastic tape
Signal tapes are laid along the cables at a distance of 250 mm from their outer cover. If there is only one power line, the tape is placed above it; if there are two or more, two or more tapes are placed. Their edges should protrude beyond the cable by at least 50 mm, and adjacent tapes should be laid with an overlap of 50 mm.
Which cable is suitable for laying in the ground?
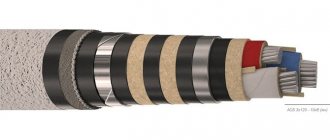
The answer to this question is clear! It is best to use a cable of the highest protection class, preferably with a tough sheath. Such a product can be buried without protective cases, with the exception of parking areas and vehicle entry. The following brands of electrical cables correspond to these characteristics: AVBShv, VVB (moisture-resistant armored), VVBbG (armored with waterproofing), VBBShv (armored in a polyethylene hose). It should be noted that this is an expensive product and it is advisable to use it to supply electricity from a utility pole to the main building on the site.
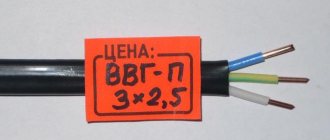
When selecting armor, you should take into account the acidity of the soil and the presence of foreign bodies in it. Depending on these indicators, cables with aluminum, lead or steel armor are selected. Underground wiring around the site can be done using cheaper products. NYM and SIP wire brands enclosed in polyethylene pipes may also be suitable for these purposes. It is undesirable to use VVG, since their service life underground is unlikely to exceed 2 years. In terms of long-term savings, it's best to use expensive cables. Large initial investments will be compensated by a long service life!
Important! Before laying a purchased cable in a trench, it is advisable to measure the resistance of the insulating layer. This operation is performed using a megger. If you could not find such a device, then you need to at least check the product for breakdown between the wires, which can be done using a regular tester.
How to serve input
The very first thing that needs to be done after installation is to test the resistance of the insulating layer, as well as the zero-phase loop. If the tests give a satisfactory result, then the main switchboard and input can be allowed to operate. Six months after installation, it is imperative to tighten absolutely all screw connections - start from the circuit breaker, which is installed before the meter, and end with the clamps on the ASU.
Once every five years it is necessary to reupholster, and if oxidation is detected, cleaning must be carried out. At approximately the same frequency, you need to inspect the wires to identify damage. The input can last about 30 years. After this period, it is necessary to conduct a thorough examination of the cable. If there is melting on the insulating layer, drying out, or crunching in the cable, this indicates that the conductors are not coping well with the load that is placed on them. Therefore, it is recommended to replace the input with a more powerful one.
These are approximate inspection times. If you notice damage early, it is recommended to check the condition of the entire cable and, if necessary, replace it. The best way out of the situation would be to calculate and install a new input. Moreover, you need to make a power reserve of about 25-30% so that the wires can cope with any peak loads.
Protection of underground electrical lines
To protect the cable, you can use a special corrugated plastic protective sheath, asbestos-cement or PET water pipes. Sewer pipes should not be used, as they have thin walls that cannot provide protection from heavy loads. It is also not recommended to lay the cable in steel pipes. To ensure reliability, when the ground moves, they must be welded along the entire length, otherwise the sharp edges may fray the wire. It should be said that armored products do not need such protection, but many consumers use protective cases for such products.
If pipe cases are used on an underground cable route, the joints must be properly sealed to prevent water and soil from entering the internal cavity. For these purposes, you can use masonry mortar, rags soaked in cement milk, or special sealants. Who likes what! You just need to remember that the cable in the case must have a certain slack, that is, it should not be pulled. That's about all there is to say about cable sheaths.
In addition, underground electrical lines must be shielded from above. Such protection eliminates the possibility of damage to communications during various construction and earthworks. For lines with voltages up to 380 V, plastic signal tapes or a brick row are used. Lay the protection to a depth of 25 cm from the soil surface. For high-voltage underground cable lines, concrete slabs are used, laid using appropriate technology on special supporting structures.
Important! The method of laying a cable electric line underground in a protective sheath has one significant advantage: if the cable fails, there is no need to dig a trench; it is easiest to tighten it into a protective case. A new cable is tied to the faulty one and pulled out, thereby replacing it with a working product. But this is only possible if the integrity of the protective case is not compromised!
Types of HDPE technical pipes for cables
The installation of any utilities related to electrical wiring requires impeccable implementation and strictly prescribed norms and rules. Typically, a technical HDPE pipe for a cable is selected exclusively for certain operating conditions. Failure to comply with requirements can have serious consequences.
Such main channels are divided into technical and electrical. These types differ in scope, purpose, as well as technical indicators.
Smooth HDPE technical pipes for cable
Smooth HDPE pipes for electrical installation work are manufactured using recycled materials, which significantly reduces production costs and also minimizes the harmful impact on the environment. As a negative factor, this technology changes the characteristics and color of the final product, however, this has a slight effect on performance.
The scope of application of this type of pipe is quite specific - they are usually used for distributing communications along the walls or floors of rooms.
In practice, it looks something like this: a smooth electrical HDPE pipe is mounted in a wall groove or the base of a floor screed. Next, the ends of the main line are brought into place, after which the gate is closed. This creates a free channel for wires and communications. The final stage is drawing the power cores, cutting off excess edges, and installing control plugs that serve to seal the terminals.
Electrical pipes
The second common type is often used as an underground pipeline, laying power and communication cables. The main application lies in the use of cables up to 1 kW.
The special, corrugated design allows the HDPE pipe to withstand heavy loads, which is an indispensable factor in such work.
Remarkable. Each shell has its own purpose - the outer shell is a reinforced shell and serves as a solid basis for maintaining the shape of the product. The inner part is made of a different type of material. It is smooth and acts as a sliding layer to facilitate wire pulling.
The design also involves division into pipes with or without a probe. The probe itself is designed to make it easier to pull wires through the pipe; it usually looks like a steel core to which the wire is attached. Then, by pulling out the flock, it is replaced with a wire.
Important! Despite the significant resistance to mechanical loads, it is not recommended to lay SIP type wire in a HDPE pipe. This can cause a decrease in its service life and also lead to an accident.
Entering the cable into the house and connecting to the pole
Entering an underground electrical line into a building can be done in various ways, but the PUE prohibits laying it directly through the foundation, without the use of additional structural elements. The following methods are available for connecting indoor wiring to underground cable.
- In a building with a basement, a hole is punched in the foundation and a piece of metal pipe of the appropriate diameter is walled into it. The length of the pipe should be slightly greater than the thickness of the foundation. The cable is pulled through it, and the internal space of the structure is filled with a sealing substance: cement mortar, polyurethane foam, and so on.
- At the entry point, a metal pipe is installed, bent in two places with the appropriate dimensions. An electrical cable is passed through this structure and brought into the house through the external wall at the required height. The bending radius of the pipe must be at least 10 of its outer diameters, which is necessary to avoid damage to the conductor.
- A shallow foundation can be bypassed by laying a line under it at a depth of 50 cm from the bottom edge, after laying a metal pipe and passing a cable through it. Entry is through the floor of the building. With a pile foundation everything is much simpler. A trench is laid to the entry point, a hole is punched in the ceiling and the line is brought into the house.
Connecting underground cable lines to a power pole will not cause any difficulties. Power engineers do not have any special requirements for this stage of underground cable laying. The upper part of the connection area, from the electrical wires to the equipment panel, should be enclosed in a corrugated plastic pipe, and the lower part is at the discretion of the user. Of course, it is advisable to pass it through a curved metal pipe to prevent accidental damage, but according to the PUE standards this is not a mandatory requirement.
Important characteristics when choosing a wire
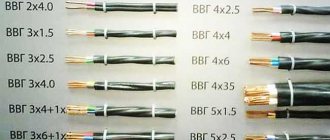
It is necessary to take into account the number of cores. In houses where a grounding loop is installed, a 3-wire is used, and where not, a 2-wire is used. Most often, wiring is reconstructed when replacing it in old houses. There is no point in using expensive material there
Pay attention to the type of cable cores, which can consist of 1 conductor or several twisted wires
A solid core has less resistance than a multi-wire one, but it is difficult to install wiring for lighting in an apartment with such a cable. The other type is flexible and can be easily installed in the voids of concrete floors or other hard-to-reach places.
Having greater resistance, the wire heats up, and as the load increases, the insulation melts or ignites. Therefore, a flexible cable with a non-flammable coating is used.
Device and material
According to the requirements of SP 31-110-2003 “Electrical installations of residential and public buildings”, internal electrical wiring must be installed with wires and cables with copper conductors and not support combustion. Despite the fact that aluminum is a metal with low resistance, it is a chemically active element that quickly oxidizes in air. The resulting film has poor conductivity, and the wires at the contact point will heat up as the load increases.
Connecting conductors made of different materials (copper and aluminum) leads to loss of contact and broken circuit. During operation, structural changes occur in the metal, as a result of which strength is lost. With aluminum this happens faster and more strongly than with copper.
By design, cable products are:
- single-core (single-wire);
- stranded (multi-wire).
Cable laying for lighting has its own specifics due to increased fire safety requirements.
Single-core wires are stiffer and difficult to bend if they have a large cross-section. Multiwire cables are flexible, they can be used both in external wiring and laid under plaster. But single-core conductors are rarely used for arranging lighting networks in residential premises. For internal installation in apartment buildings and private buildings, 3-core single-wire cables are used. Multi-wire products are prohibited for these purposes due to their high fire hazard.
Cable cross-section
The value is measured in mm² and serves as an indicator of the conductor’s ability to pass electric current. A copper conductor with a cross-section of 1 mm² can withstand a load of 10 A without heating above the permissible limit. For wiring installation, the cable should be selected with a power reserve, because a layer of plaster reduces heat transfer, which can result in damage to the insulation. The cross-section of the wire is determined by the formula for calculating the area of a circle. In a stranded conductor, this value must be multiplied by the number of wires.
Insulation and sheath thickness
Each conductor in a multi-core wiring cable has an insulating coating. It is made of PVC-based materials and serves to protect the core from damage. At the same time it creates a dielectric layer in a bundle of conductors. The thickness of the coating is standardized and should not be less than 0.44 mm. For cables with a cross section of 1.5-2.5 mm², this value is 0.6 mm.
The selection and installation of cables must be trusted to professionals.
The sheath serves to accommodate the cores, fix them and protect them from mechanical damage. It is made of the same material as the conductor insulation, but has a greater thickness: for single-core cables - 1.4 mm, and for multi-core cables - 1.6 mm. For indoor wiring, double insulation is a mandatory requirement. This protects the wire from damage and ensures the safety of residents.
Cable marking
It is applied to the cable sheath along the entire length at short intervals. It should be easy to read and contain the following information:
- wire brand;
- name of the manufacturer;
- release date;
- number of cores and their cross-section;
- voltage value.
Knowing the product designation, you can choose the right product for the job. Knowing the product designation, you can select the right equipment.
Vein colors
The coloring of the conductor insulation is necessary for ease of installation. Wires in the same sheath have different colors, which are the same along the entire length. Depending on the manufacturer, they may vary, but the ground wire does not change color. In a 3-core cable, most often the phase wire is red or brown, the neutral wire is blue or black, and the ground wire is yellow-green.
The colors of wires in electrical wiring are regulated by regulatory documents.
Choosing a cable route
There are two ways to connect objects with electrical wires:
- Air. A series of supports are used, to which a wire is sequentially attached from the source to the entry point into the room.
- Underground. The cable is laid in a trench and covered with soil.
The first method is much simpler. As a rule, the area of a summer cottage is small; the distance from the energy source (house or external electrical panel) does not require the installation of poles. Usually, brackets are attached to the walls of buildings and that is all. However, the integrity of the cable with this installation method is always at risk. A strong gust of wind, falling trees, or repair work can cause the cable to break or become disconnected from the panel. This may pose a serious threat to people or animals.
In addition, it is necessary to take into account the specifics of aerial installation of wires. You have to work at heights, often alone. Not all dacha owners can afford this, since the procedure is quite dangerous, fraught with injury or more serious consequences.
Installation work at heightSource alppromm.ru
Underground wiring eliminates these problems. The only problems with this method are a lot of labor costs and a lack of understanding of how to lay a cable underground without errors. The general procedure seems quite simple, but along the way, users often encounter difficulties. Oddly enough, the most questions arise from people who have some technical training. They understand that it is necessary to follow certain rules, maintain distances, gaps, and comply with regulatory requirements.
The main difficulty that arises when laying cables underground is excavation work. If there are landscaping elements, buildings, or plantings on the site, you will have to choose the most convenient route for the route. It is necessary to combine two requirements:
- Ensure minimum trench length to reduce labor costs.
- Keep plants and landscaping elements intact.
It is impossible to change the location of buildings, so you have to build a trench between them. The area of the plot is most often occupied by plants, so one or two beds are usually sacrificed.
Layout diagram on the siteSource elektroznatok.ru
After the problem with the routing has been solved, the next question arises - to what depth should the electrical cable be buried so as not to damage other types of wires or communications. For areas located in areas of floods, flooding or with high groundwater levels, this issue is very important. It is impossible to lay the cable in water, so you need to know exactly the depth of the aquifers.
Another important issue is the method of digging the trench. It is preferable to use machinery, however, the area may not have room for a tractor to pass through. In such conditions you have to dig manually. This is difficult, but you can invite assistants or, as a last resort, hire a couple of workers and make the task easier for yourself.
The main reason for choosing underground cable laying is reliability and comparative cheapness. Installing poles requires considerable costs, both from a financial point of view and in terms of the amount of work. Even if your own supports are not required, sagging and wind load will sooner or later create conditions for cable breakage. It's good if it comes off from the source side. Otherwise, undesirable consequences may occur.
If the soil is sandy, work moves fasterSource yandex.ru
Entry into the accounting cabinet
The main question when installing on a facade is where and how to connect SIP? You can, of course, enter the wire directly into the distribution cabinet, but then a headache arises with laying SIP along the facade and, most importantly, with connecting the aluminum conductor to the input circuit breaker.
SIP is a multi-core wire, and according to GOST, such contact connections require the mandatory use of a tip. Without it, in a year you will see a picture like this.
Read how this problem is solved in a separate article.
Spoiler: the simplest and most convenient option in this case is crimping the SIP core with aluminum pin lugs NShA 16-14. Or even better NSHAL (tinned aluminum pin tip).
EKF has these in stock.
Error No. 14 Do not insert aluminum SIP conductors directly into the meter.
In a year or two, the terminals on it will burn out and you will need a new meter.
Moreover, the PUE says that a switching device must be installed in front of the meter.
Many people mount a distribution box high on the facade, in which the wires are actually disconnected and the transition to a copper cable occurs. However, it all looks cumbersome and ugly.
In addition, it is advisable to place a metal box on a wooden base rather than a plastic one. Over the years, plastic dries out and falls apart.
But metal is not a gift at all. Over time, it begins to rust and dirty streaks from it spread across the facade.
Obtaining permission for underground input
An example of a cable entry project into a house
First you need to complete the project. It should be developed by a specialist. Technical documentation, plans and drawings must comply with all rules and regulations. The designer determines the brand of cable and calculates the cross-section of the conductors.
To receive a project, a number of technical conditions must be met. To connect a house to a common power line, you will need appropriate permission. For example, an agreement for excavation work is drawn up by the service responsible for facilities and communications.
Then the land plot is traced. If there are any communications in the immediate vicinity of the cable being laid, it is necessary to invite their representative to coordinate the position of the trench and control the work being carried out.
Required safety standards
To ensure the electrical safety of installed wiring in a country house, the use of elements such as protective grounding, RCDs and automatic circuit breakers should be provided in advance.
Protective grounding
As mentioned earlier, in most cases, old four-wire power lines are used to power country houses. This means that a combined neutral and ground wire is used. If it breaks, life-threatening voltage may appear on the equipment housing. The machine will not turn off due to the rated current flowing through it. To eliminate such situations, it is necessary to install an additional grounding circuit on the site.
Design of a protective grounding loop
Note! To install a grounding system in a dacha, it is recommended to use factory-made modular-pin circuits. They can be installed in any type of soil without loss of performance characteristics
RCD
Installing a residual current device allows you to ensure the safety of a person from electric shock, as well as prevent the development of a fire. The RCD reacts to leakage currents that are formed when the insulating coating of the cores is damaged or when the neutral wire breaks. It is recommended to mount the RCD directly at the power input.
The shutdown setting is selected taking into account the calculated leakage currents of all electrical equipment used in the country. The resulting value must be increased three times. RCDs with the following rated differential currents are available for sale: 10, 30, 100, 300 mA.
Connection diagram for RCDs and circuit breakers
Automatic circuit breakers
To protect cable lines from overload currents and short circuits, circuit breakers should be used. They are established for each individual consumer group. Selection is carried out in accordance with the calculated current consumption. As a rule, individual machines are mounted on lighting and socket networks.