11/17/2016 master
Decorating the house for the New Year holidays is always a favorite pastime for families with children. At such moments, the whole family gets together and transforms their home and, if possible, the garden into a small island of a fairy tale. And the best way to cheer up your loved ones, and even save significant money, is to create decorations with your own hands. Today, LED three-dimensional figures are actively gaining popularity, which are installed on the streets, in courtyards in front of private houses and in store windows for the New Year.
Such jewelry, of course, is quite expensive. It will be doubly pleasant to make LED figures for the New Year with your own hands. Our article today will tell you why such three-dimensional figures are needed and how to make them with your own hands.
Making Christmas tree decorations from LED strips / Sudo Null IT News
Somehow before the New Year I was left without a Christmas tree and without Christmas tree decorations (since it was in the middle of the ocean). But my soul demanded a holiday... I somehow imitated the Christmas tree, but I had to think about the toys. It was then that the remains of multi-colored LED strips came to hand. Next, I’ll start by chewing and then briefly describe how to make original LED Christmas tree decorations. And at the same time we will consider connection options. To do this, we take LED strips of different colors, not in silicone.
The first one will be round, let's chew it
Further it would be correct to describe how and what to connect this joy to, but that will be later, but now I want to consider what other options there are.
Other options with a larger number of segments
Square
Then, in increasing numbers of segments, there is a square of four segments. I won’t chew it anymore, I think you can understand the principle from the photo. Just wanted to pay attention to the top two wires, they are both needed for a complete circuit. It’s not visible in the photo, but I made the top wire in the form of a loop.
Star
The star, naturally, already consists of five segments. The peculiarity here is that there are practically no wires, and the pieces of tape are attached to each other by soldering two contact pads to each other (do not forget to observe polarity!).
six pointed star
Consists of six segments. Or rather, these are two intertwined triangles, and I made them from different ribbons (different colors).
Ball
I also tried to make something three-dimensional and it turned out to be a ball like this. But I didn’t really like it and I stopped there.
More segments
You can go further by extending sections of ribbon, but, IMHO, this is already too much, then just glue it onto some kind of base and make snowflake appliqués.
In progress
This is what it looks like when lit:
Connection
Option 1: simply 12V
The easiest way is to simply turn everything on to 12 volts and the multi-colored toys will shine steadily.
We simply solder the connector that hangs on each reel with 5-meter tapes and plug in a regular 12-volt power supply, which is sold in the same place where the tapes are sold. We solder the toys sequentially one after another.
Option 2: RGB controller
A more interesting option is to connect it to an RGB controller, which are currently more than affordable, with a large selection of both functions and powers. If you connect toys of the same color in rows to the corresponding output of the controller (a row of red ones to pin R, green to G, blue to B), we get a MoodLamp-style Christmas tree - with a customizable color as desired. Please note that on such controllers control is carried out via “ground” (as a rule), i.e. Common to all channels is the “plus” wire.
Option 3: Microcontroller
This is the most fun option, although it is also the most difficult and time-consuming.
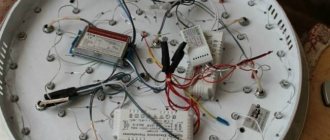
Those. It’s optimal to take some Arduino and a shield with a TLC5940, connect LED toys for 16 channels, connect a sound sensor and get a disco tree. This is exactly what I did last year: Here is a short New Year’s video report:
PS Who needs the sketch from this video, it's here
Thank you
I hope my little idea will be useful and someone with its help will be able to make the New Year even more fun and colorful.
Thank you to everyone who took the time to review my article. I look forward to your feedback and comments. habr.com
Making a garland of LEDs
With LEDs connected in series, you can create a flickering garland. Its creation will take a minimum of time, and almost anyone with basic electrical knowledge can cope with the task. The most important thing in this case is to strictly follow the instructions.
To assemble an LED garland yourself, you need to follow the steps in the following order:
- Decide on the desired distance between adjacent sources (diodes).
- After unwinding the wire, use a marker of any color to make the appropriate marks on the places where the LEDs will presumably be installed. Ideally, the distance between them should be 200-250 mm.
- At those points where marks were left, remove the insulation from the wire, creating “bare islands” 20-30 mm long. You need to act carefully so as not to damage the cable itself. This will simplify the process of future diode mounting.
- To such areas you need to apply rosin and solder.
- Attach the LEDs to the resulting nodules by connecting their legs to the wire with a soldering iron. Please note that this fastening option will be less reliable, so you will have to use reinforcing clamps, which will also cover the exposed parts of the garland.
- Cut the narrow tape into different pieces 30-40 mm long, then use it as insulation for diodes. As a result of these steps, each LED should be located in a “pocket” that holds it firmly to the cable. You need to wrap all the light sources on the wire.
- Then you need to ensure the top of the “pocket” is sealed. For this purpose, silicone sealant is suitable, which not only increases the strength of the structure, but also improves the glow.
- All that remains is to connect the resistor and power supply to the circuit, and then test the operation of the homemade equipment.
Note! This type of garland is not afraid of the cold, so it can be used in external illumination systems. In this case, it is recommended to use 8-12 V power supplies. To check the performance of the product, you can use a smartphone battery or a power supply from charging the phone.
Preparing to create a battery-powered LED garland
An LED garland connected to batteries looks no less beautiful. In addition, such a product will be as safe as possible for children. This type of illumination is used as an external light source. When moving in the air, a bright multi-colored trail will remain, which designers often use to create various patterns in space. The product must be protected from wind, precipitation and low temperature.
To produce a battery-powered garland you will need:
- LEDs with a diameter of 10 mm of different colors with a scattering effect;
- magnets with a diameter of 1.3 and a thickness of no more than 30 mm;
- electrical tape or narrow tape;
- lithium battery (for example, CR2032 3V);
- epoxy adhesive.
The process of making a garland using lithium batteries
To create a bright shimmering garland you will need to perform high-quality soldering. There is no need to rush while completing the work. Be patient, be careful and attentive, follow the steps:
- Test the LEDs to see their light levels. Connect the components to the lithium battery one by one (connect one longer leg to the “plus”, the other short leg to the “minus”).
- Fix the position of the diodes, then wrap each element along with the battery with adhesive tape or electrical tape in 2 layers.
- Align the magnet with the positive contact of the battery, fixing it.
- Each part of the structure must be installed on a thin wire. Check the functionality of the product!
Using resistors in pairs
In this case, you can reduce the cost of the product by making it more economical, but remember: it is much better from the point of view of electrical safety and equipment durability to connect each LED with its own resistor. Plus, the latest components are cheap.
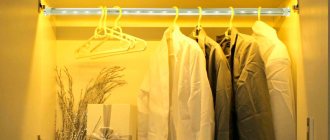
DIY LED strip lamps
Quite often you can see lighting with LEDs in rooms. This is due to the fact that LEDs have excellent lighting characteristics and are also energy-saving of their kind. Currently, DIY LED strip lamps are very popular. The cost of such devices in finished form is quite high, so some consumers want to make such a product themselves.
In this article:
LED strip
The LED strip looks like a rubberized board. At the same time, it is quite flexible. This is where the LEDs are located. Thanks to the convenient design, it will not be difficult to make a lamp from an LED strip with your own hands. Then you can install the finished product anywhere.
The tape is designed in such a way that it is possible to divide it into pieces of the required size. In addition, the strip has a self-adhesive layer, due to which it can be installed anywhere.
Manufacturers offer various options for installing LEDs; they will differ in the direction and power of the luminous flux.
A homemade LED strip lamp can be made from different formats. It is only important to follow the assembly recommendations, taking into account the features of the tape.
You should know that such lamps, as a rule, act as additional sources of lighting. As the main one, a slightly different format of the chandelier is needed. LEDs are perfect for illuminating cabinets, desks and similar furniture items.
Strips of LEDs with different characteristics can be used almost anywhere where there is a need for artificial lighting. A lot can be said about the advantages of LEDs over a conventional lamp. First of all, it is necessary to highlight the main characteristics:
- efficiency;
- long period of operation;
- variety in color combinations;
- raw materials are available to consumers.
Materials for the lamp
The tape has quite high flexibility, due to this the product can be made in a wide variety of formats. But there will be general principles in the assembly for lamps of any model.
First of all, you will need to prepare all the materials that will be involved in the assembly. This is a necessary condition for the end result to be of high quality and to please the owners of the home.
You will need to prepare the following materials:
- directly LED strip with the necessary LED parameters;
- screws;
- aluminum corner, which can be replaced with a plastic box;
- switch.
It is also worth taking care of the tools:
- drills;
- pencil with ruler;
- electric jigsaw;
- pliers.
When all the required materials and tools are ready, you can begin to assemble the future product.
Installation process
There are a considerable number of variations on how you can make a lamp using LED strip.
The specific option will be determined only by what kind of device you want to see in the end. They are presented in the following varieties:
- horizontal;
- vertical;
- with legs.
Most of the steps required during the assembly process will not be affected by variations in the final device. This is why they will be the same.
Assembly will occur in stages:
- First of all, you will need to measure the length of the angle;
- then the required hole is drilled in it, thanks to which the product will be fixed to the selected surface with screws;
- the corner must be secured in the selected area;
- in the place where the hole is made, you will need to install a switch, and in the place where there is a cut, you need to solder the wires;
- the tape should be treated with acetone so that its surface becomes grease-free;
- The tape itself is attached directly to the corner.
To do everything smoothly, it is better to glue it lightly at first, and only after making sure that everything is done smoothly, level it over the entire surface.
- after this you will need to connect all the wires; as a rule, the power for such devices is chosen at 12 V.
Thus, the output will be a lighting device that can be installed horizontally. A great option to install lighting on a work surface in the kitchen. In addition, such lamps are in demand in other rooms, for example, in the nursery. It is very convenient to place them on dedicated shelves.
As an additional light source, the option with an LED lamp is optimal. Because it can be used as a backlight and will not irritate the eyes. Moreover, doing it on your own will not be difficult.
cdelct.ru
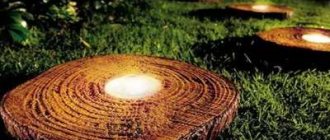
Why use glowing figures
The growing popularity of LED figures, especially in shopping malls and entertainment centers, is explained by the following positive aspects:
- creating a festive atmosphere;
- attracting customers with bright illumination;
LED volumetric figures in a shopping center
- decorative lighting for shop windows or thematic compositions;
- as an advertisement for products sold in a shopping center that are dedicated to the New Year celebration.
As you can see, such decorative elements will come in handy in the interior of shopping and entertainment centers. After all, they are usually placed in a façade or shop window, which makes them clearly visible from the street. But even at home, using such figures will be a great way to increase the festive atmosphere in the house and lift the mood of the whole family. It is worth noting that by making LED three-dimensional figures for the New Year, you can make them with your own hands exactly the way you want. After all, you can:
- Determine your figure size yourself. It is not always possible to select a street deer of the right size in the store;
- choose its type. For example, you can make a figurine of a Christmas tree, deer, snowman or any other fairy-tale character that your child likes, for example;
LED Shape Options
- select backlight light. Most often, New Year's purchased figures are illuminated with white or blue light. You will be free to make them the color you like best.
As a result, you can not only save significant money on purchasing ready-made decorative jewelry, but also make it fully meet your requirements. After all, it often happens that there is an offer, but nothing works for you. It is also worth noting that New Year's glowing street figures can serve as a kind of antidepressant. Looking at their light, your mood improves and your sorrows go away.
How to make an LED strip with your own hands - Very Skillful Hands
We needed LED lighting behind the backrest in the steam room, since the wall adjacent to it turned out to be insufficiently lit. Many will ask why it was impossible to use a standard LED strip. Not every LED strip is suitable for such purposes: due to temperature changes, the service life of the silicone coating on the LED strip is reduced, the LEDs on the strips often burn, and dark gaps are obtained. Of course, there are LED strips on sale that are specifically designed to work in such difficult conditions, but their price is quite high. By making an LED strip with your own hands, you can save money, and if it breaks, you can easily repair it.
MATERIALS FOR MANUFACTURING LED STRIPS
- LEDs with an operating voltage of 3 Volts and an illumination angle of 20-30 degrees
- getinax leaf
- green plastic bottle
- clear heat shrink tube
- enameled wire
- rosin
- solder
HOW TO MAKE AN LED STRIP WITH YOUR OWN HANDS
1. Cut leaf getinax into strips 10mm wide.
2. Cut strips from a plastic bottle the same width as the getinax. We drill holes in the getinax for LEDs with a diameter of 5mm. 16 holes were drilled in our 0.5 m long strip.
3. We insert the LEDs into the holes and solder 4 LEDs into one circuit rated for 12 V.
4. Solder 4 chains into a common parallel circuit using enameled wire.
5. Before putting the heat-shrinkable tube on the made strip, we check the functionality of the LEDs with a 12-volt voltage.
6. Put on the heat shrink tube.
7. Use a hair dryer to gently heat the tube until it shrinks.
8. The LED strip is ready for use.
delomastera.info
Features of installing a garland with your own hands
First, let's figure out how the garlands are arranged and what are the main differences. The main fundamental difference is the scheme used, depending on which the garlands are divided into several types:
- classic garland-thread;
- net;
- a curtain;
- icicle;
- duralight (a type of LED strip);
- keeplight;
- Strobe light with unique flickering.
Important! You should pay attention to the power of the LED diodes used. Products used outside have a higher efficiency, since almost all the energy is converted into glow, and not heat, as happens with conventional garlands, and is most clearly noticeable when using an incandescent lamp.
These devices are protected from various negative factors, including precipitation, extremely low or high temperatures, strong gusts of wind, and moisture.
How to make a lamp from LED strip
Today you can find LED lighting in many homes. This is due to the fact that LEDs are the most preferred among the variety of lighting devices available. LEDs have excellent lighting characteristics and also save significant amounts of energy. That's why they are so in demand today. Today, LED strip is the most popular as the main element of a lighting fixture.
It should be noted that the cost of such a product will be somewhat more expensive. Therefore, not every person can purchase it, but it’s easy to do it yourself. Our article will help you in this endeavor.
LED Strip Light
The LED strip is a flexible rubberized “printed circuit board”. It contains current-limiting resistors and unpackaged LEDs. This convenient design allows you to make your own lamp and install it anywhere. At the same time, the device of the tape allows you to make cuts on it and divide it into pieces of the required size.
Note! To avoid breaking the contact between the LEDs, it is necessary to cut the tape only in specially designated places. They are marked with a white line.
After the cut, the contacts in its place must be soldered to the supply wire.
LED Strip Light
Also, the structure of the LED strip has a self-adhesive layer, allowing it to be installed anywhere. Today, these products have various options in terms of installing LEDs, differing in the characteristics of the luminous flux. The most popular tape models today are products with 12V power.
You can make a lamp from an LED strip with your own hands from any of its formats (single or multi-color type). The main thing is to follow the assembly instructions, and also take into account the structural features of the tape itself. Such a homemade lighting device is most often used not as the main light source, but as an additional one. For example, it can be installed on a desktop, under the bottom of a wall cabinet, etc.
What you will need
Since the LED strip is quite flexible, the format of the lighting device made from it can be very diverse. But the basic principles of assembly remain the same in any situation. To make a lamp from such a strip, you must have all the necessary tools and materials at hand. Otherwise, the process may be delayed or not completed efficiently. In this situation, you should have the following materials on hand:
Plastic electrical box
- directly LED strip with the necessary LED parameters. It is best to use a strip 8 mm wide;
- screws;
- aluminum corner. It should be 10x10 mm in size and 1.5 m long). The corner can be replaced with a plastic electrical box. This will not in any way affect the quality of the manufactured lighting device;
- small switch.
The tools you will need are:
- drill;
- pencil with ruler;
- electric jigsaw;
- pliers.
Once you have ensured that you have all the necessary materials and tools, you can proceed to the main stage of work - assembly.
Build process
Today, there are a large number of options for how to make a lamp using LED strip. The assembly method will depend on what type of lighting fixture you ultimately want:
- horizontal;
- vertical;
- on legs.
Making holes
Let's look at some of them in more detail. Half of the steps that need to be completed during the assembly process do not depend on the luminaire version. Therefore they will match. The LED strip product is assembled as follows:
- first measure the length of the corner required for assembly;
- We drill holes in it, with the help of which the device will be attached to the surface. Screws should be used as fastening elements here;
Note! It is also necessary to cut out a place in the corner to place the microswitch in it.
- we fix the corner in the place we need;
- we install the switch in the sawn place and solder the wires to the tape at the place where it is cut into separate pieces;
- degrease the LED strip with acetone;
Connection diagram
- then we attach the LED strip to the installed corner. In order for it to stick evenly, it needs to be attached lightly to the surface and then leveled. After this, you can run your hand along the tape, finally securing it in the chosen place;
- Next, we connect the wires to an adapter or power supply that has the power we need. Typically the power is 12V.
Note! Only with the help of an adapter/power supply will it be possible to connect the lamp to a standard power line, which has a power of 220V.
As can be seen from the assembly instructions, the final result should be a lighting device with a horizontal installation method. It can be effectively used in the kitchen to illuminate the cooking area, countertop or hob. Also, such a lamp will be relevant in a children’s room. Here it would be appropriate to place it above the desk under a hanging shelf or cabinet. But remember that the maximum lighting efficiency of such a device is achieved at a height of 70-80 cm above the working surface. At the same time, the light will not dazzle or irritate your eyes.
Second option
Cut parts
In addition to this type of lamp, you can make a more complex and original lighting device from an LED strip. Here, unlike the first option, you will need an LED strip 3 m long and an RGB controller with a remote control. In addition, the lamp structure will contain a nickel-plated pipe or furniture legs, as well as slats, chipboard, and plywood. In this situation, it is necessary to perform the following manipulations:
- cut 6 rings with different diameters from a piece of plywood with a jigsaw: 2 large, 2 small and the same number of medium ones;
- We cut out one circle from chipboard. It will be the basis of the future lamp;
- cut 6 holes in the plywood. This will be the top part of the model;
- we make holes for screws in the slats;
- paint all the cut out parts in the desired color;
Note! Painting should be done in an open space (outside) or in a well-ventilated area.
- We fix nickel-plated pipes on circles made of chipboard and plywood. They will connect the entire structure together;
- We attach an LED strip in the middle of the lamp device. We pre-cut it according to the dimensions of the inner diameter of the rings. Don’t forget to attach wires to each piece of tape;
- next we attach the rings (small diameter) to the slats;
- after that we attach medium and large rings to them in turn;
- then we put the top of the lamp on this entire structure.
All wires must be hidden in a special cable, which must also be painted in the appropriate color. Don't forget to connect the wires to the RGB controller, with which you will be able to switch lighting modes. This is very easy to do using the remote control.
Connection diagram with RGB controller
Of course, this is a much more complex design option, but it has a more presentable appearance.
General assembly points
When assembling any lighting device from an LED strip, there are some points that are identical for all designs:
- the presence of a power supply, base or profile, as well as the LED strip itself. The profile can be a corner, chrome crossbar, etc.;
- the principle of cutting the tape itself into pieces of the required size;
- gluing the tape either to the inner surface of the lighting fixture or to the surface of the corner.
You can choose any materials as decorative elements. The main thing is that they fit the existing interior and you like them. Following the advice in our article, you can build a lamp of any complexity, be it vertical, horizontal or on legs. A lamp made from an LED strip with your own hands will definitely be a useful thing in the house and will help you illuminate the desired work area.
1posvetu.ru
Design features of figures
LED volumetric figures have two main components:
- frame, which is often made of metal elements that hold their shape well and can withstand various mechanical stress;
Structure of decoration
- luminous element (light source). As a rule, such New Year's decorations have an LED light source - duralight. It is a cord, inside of which LED elements are placed at equal distances from each other.
Note! The LED garland is placed throughout the frame, thus ensuring its uniform illumination.
Duralight
This design allows you to get a truly beautiful and completely safe decoration. Long-term and safe operation is ensured by the following:
- the use of metal elements that are resistant to adverse environmental factors (wind, icing, snowfall, etc.). At the same time, it will be quite difficult to damage such decoration;
- the use of a low-voltage light source minimizes the risk of electric shock if the integrity of the protective shells is violated. All LED products, including duralight, are characterized by high efficiency, long service life, as well as a wide operating temperature range (from – 40 to + 40 degrees). In order for the figures to work properly outdoors, you need to choose products that have a high class of moisture resistance;
Waterproof model
- the design turns out to be quite light, so you can not only place it on the ground or in a display case, but also hang it from the ceiling without the risk of it unexpectedly falling on your head.
It should be noted here that duralights used to create LED New Year’s figures can operate in two main modes:
- fixing Such cords glow continuously;
- chasing. Allows you to create various lighting effects.
You need to know about this nuance in advance if you decide to create similar New Year’s decorations for your garden or home with your own hands.
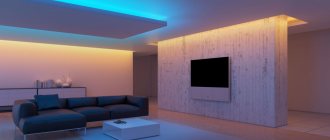
DIY LED lighting - various manufacturing options
The position of diode lighting in the electrical equipment market is becoming stronger and stronger. And this is no coincidence, because today it is the most energy-saving and environmentally friendly type of lighting. In addition, such elements on crystals give a great scope of imagination in interior design due to the assortment presented on the shelves, both in varieties of LED devices and in colors.
How to make LED lighting with your own hands? Or will you still have to seek help from a specialist to resolve this issue? You need to try to figure this out.
The main savings when making repairs is precisely not to overpay hired workers, but to try to do the work that is possible yourself.
So, before making the backlight, you need to understand how LED lighting devices are divided and what types there are.
Types of LED lighting devices
Devices made on the basis of LEDs can be either in the form of a familiar table lamp or an ordinary light bulb, or in the form of a luminous flexible strip or a transparent colored tube, inside of which there is a chain of elements. This tube is called “duralight” and has few differences from the LED strip. It would be advisable to dwell on each of the options for their implementation.
Types of LEDs
- Conventional LEDs have an elongated cylindrical shape and are marked as DIP. This is the first commercially available element based on a semiconductor. The rounded edge of the epoxy body acts as a lens, serving as a light-directing part. There can be from one to three crystals in such a device, while a similar LED, as well as its other types, can glow in one color, two or three, respectively.
- LED strip is a more high-tech product, which is based on surface-mounted elements - SMD. They are smaller in size and, unlike leg-mounted DIP components, are mounted on the outside of the PCB, allowing for double-sided circuit assembly. Using a phosphor layer, the LED can be given the desired color.
- Duralight is a flexible tube, inside of which serial chains of LEDs are connected in parallel. Most often, such lighting is used when lighting shop windows, as garlands, but it can also be used in the design of multi-level ceilings.
An aluminum base can also serve as the basis for the crystals. Such LEDs are labeled as CHIP (Chip-On-Board) and are the latest achievement in this area. Due to the design features of such chips, the light is distributed more evenly.
Existing LED designs
The basis for the operation of all LEDs, regardless of their type, is the principle of radiation produced by the element. Electricity, passing through a crystal consisting of different types of semiconductors, is converted into a visible light flux. The glow is essentially created due to the difference in the direction of conductivity of semiconductors.
For the same reason, the LED operates only in one polarity position of the supplied voltage. And if an incandescent lamp can be connected by applying power “phase-zero” in any position, then when a positive charge is applied to the “-” of the chip there will be no glow. The LED component simply won't work.
Installation of LED lighting
Having understood the types of LEDs and decided which one is most suitable for illumination, you can proceed directly to the installation. For ordinary apartments and private houses, the optimal choice would be an LED strip, since it is quite easy to install and at the same time meets all the requirements for multi-level lighting.
If the room has a large area, then the length of one piece of tape should not exceed 15 m. If the size is larger, the base may not withstand the heating temperature of the connecting wires as a result of excess power consumption. In general, the best option would be to prepare 10-meter pieces of LED strip, which will subsequently be connected to a dimmer or controller (when using a multicolor version) in parallel.
Marking the location for possible cutting of the LED strip
The main thing is that the light strip cannot be cut wherever necessary. On its canvas there are marked places where such an action can be performed.
The LED strip can have an adhesive surface, then for installation you only need to peel off the protective film and press the strip to the desired surface. If you purchased a product without such a fastening element, then you must use double-sided tape.
Also, such strips can be different in the degree of moisture protection (with and without silicone coating), in the strength of the luminous flux (it depends on the color temperature and power), as well as in density (30, 60, or 120 units per meter).
Most often, DIY LED lighting comes in the form of contour lighting, although there are no restrictions on its use. With the help of such a product, it is possible not only to advantageously delimit rooms into light zones, but also to emphasize the color scheme of the room.
It is possible to apply light patterns on the ceiling or create a starry sky above your head. In addition, when two children live in the same room, it will be interesting to differentiate the nursery into two zones in different tones, according to the colors that one or the other child likes.
For operation, a multicolor LED strip requires not only a stabilizing device, but also an RGB controller, which acts as a “brain” that controls the color of the glow.
Connecting RGB strip
When connecting an LED strip, it does not matter whether it is single-color or multi-color, it follows the same principle. The only difference between an RGB strip is the presence of a controller and sometimes an amplifier in its power circuit. It’s worth dwelling on these devices in more detail.
When connecting the power supply to the controller, there is no difference in the actions with single-color tapes - the contacts are connected according to the polarity markings. The connection between the controller and the strip is a little more complicated. Three wires here are responsible for colors, and the fourth is for power:
- B – blue shades;
- R – red;
- G – green;
- V+ – power supply.
In general, the connection will look like this:
Connecting an RGB controller
Just as when installing a single-color LED strip, when doing work such as installing LED backlighting yourself, you will need to divide the strip into segments. Only in the case of an RGB strip, you need to understand that the LEDs in it consume a lot of electricity, and therefore it is necessary to include a signal amplifier in the circuit, which regulates the strength of the luminous flux and allows the chips to glow evenly.
This device is connected to each additional section of the strip, and power is supplied from the unit, and it is better to install a separate stabilizing transformer on the amplifier, since the power reserve of the main power supply may not be enough.
Advantages and disadvantages of backlighting
Of course, such lighting has many advantages. It is more economical in terms of energy consumption than other existing types of lighting, has a much longer service life, good heat transfer and efficiency. In addition, it is quite simple to install, which does not require special skills and great knowledge, and at the same time it can be repaired if one or more chips burn out.
But still, some complain about the high cost of LEDs for lighting and equipment for them. Although, if you think about it, the amount paid upon purchase will be fully recouped in a short period of use, and the lighting itself will please the eye, bring comfort to the room and make it extraordinary.
lampagid.ru
Decorative items
Radio amateur crafts in this area take a wide variety of forms.
A handful of red LEDs and a simple scheme of running lights - here you have a touching flickering heart for Valentine's Day. As you know, the best gift is one made by yourself!
You can do something more complicated if skill and patience allow. For example, here's a watch:
LED homemade products on New Year's Eve will help you decorate your apartment in an original way. A DIY Christmas tree garland can become the envy of your guests.
Craftsmen-radio amateurs create various souvenir crafts from LEDs in such variety and splendor that even full-time art workers will envy them. Now who has enough imagination for what...
How to make a huge LED
Have you ever held a huge LED in your hands, the size of a human fist? Of course not, because they don't exist. I'll show you how to make such an original thing with your own hands. This LED will be exactly like its smaller brother, except that its brightness will be many times greater.
Will need
- Plastic bottle.
- The board is textolite, foil-coated.
- Thick wire.
- A piece of LED strip.
- Resistor 5-10 Ohm.
- Epoxy resin with hardener.
Making a large LED
So, let’s first figure out what an LED consists of. The first is two pins that go into the body of the LED. Next you can see two pads, one smaller is the anode, and the other larger is the cathode. On the cathode there is a platform with a reflector and a semiconductor crystal. Above all this there is a lens, which is a monolith with an LED body.
First, let's make an imitation of a large semiconductor crystal with a reflector. We take the LED strip and solder the chip elements from it. If you don’t have a hairdryer, heat it up with a soldering iron.
Let's cut out such a board from a piece of foil PCB.
We tin it and solder the LED chip onto it.
We also solder the contact and the current-extinguishing resistor.
Let's check the power supply. The crystal is ready.
For greater visual similarity, we will cut out the cathode and anode from PCB.
The elements are located at the bottom of the body. We take a thick wire and make contacts from it. We solder them to the pads.
Next, we coat the light module with hot glue and glue it perpendicularly to the largest area - the cathode.
Solder the pins to the board.
Next we need to prepare a mold for pouring epoxy resin. A plastic bottle will serve us for this purpose.
Let's cut it in the middle and put the top part on the bottom.
There is an empty area in the lid area where the epoxy will be poured. In order not to waste extra material, we fill the voids of the neck with foil. Strictly according to the instructions, mix the hardener with the resin and mix well.
We fix the insides with office clips so that they float in the air. Pour the composition into the mold.
We are waiting 24 hours. After drying, cut the bottle with a scalpel and remove parts of the bottle from the surface.
This is what happened: Using a mechanical tool, we cut off the foil and polish the surface irregularities.
It's time to polish. Polishing paste can be obtained from motorists. In extreme cases, toothpaste will do. Apply the paste and polish with a soft cloth until transparent.
Very similar to the original.
Checking
We serve food.
It shines great!
Shines in complete darkness.
Now you can surprise your friends.
Types and parameters
To make your own LED lamp, you need to thoroughly study the wide range of diodes, represented by both budget and luxury analogues.
The most popular are inexpensive diode designs of the following series:
- SMD 3528 - diodes are located closely to each other, while there can be either 60 or 240 pieces per linear meter. Their number affects the power of the device (5–16 W) and luminous flux (5–9 lm).
- SMD 2835 Premium is one of the best budget tapes, characterized by higher brightness compared to other types. There are 60–120 LED diodes per linear meter, and the segments can be cut 5 cm long (about three diodes). An ideal solution for decorating and illuminating small interior items or creating spot lighting. The luminous flux is 20–23 lm.
- SMD 3014 is similar to the previous model. One linear meter can contain from 60 to 120 semiconductors. Depending on their number, the power is 36/72 W, the luminous flux is 6/11 lm.
Among the LED strips equipped with more powerful semiconductors, we highlight the following models:
- SMD 5050 - 30–120 LEDs per linear meter. Power varies from 7.2 to 25 W, luminous flux - 50–60 lm.
- SMD 5630 and SMD 5730 are similar series, characterized by increased power, long-term operation and a brightness of 50–60 lm. Most often used in LED lamps.
In addition to classic models, more modern and extraordinary designs have already been invented:
- high-voltage flexible board designed for direct connection to a 220 V network;
- low-voltage solutions for 12 or 24 V, in the electrical circuit of which a rectifier is connected;
- models with a waterproof housing.
LED strip is sold in coils of 5–10 m, but if necessary, it can be cut into pieces of the required length using ordinary scissors. If there is a need to install the tape on a large surface, then remember the general rule for everyone: for every 15 linear meters. We need to install one power supply.
High-voltage boards do not have any restrictions on footage and are sold in coils of 100 m. Typically, cutting is carried out to a length of 50 or 100 cm.
Instances with increased moisture protection are structurally identical to conventional boards. The difference is due to the presence of a protective silicone coating, which provides certain protection against the penetration of dust and moisture:
- IP44 - good protection against dust and dirt;
- IP65 - protection from dust and moisture while maintaining high elasticity at low temperatures;
- IP67 - the protective coating is made in the form of a durable silicone tube;
- IP68 - increased protection in the form of a two-layer silicone tube with a special filler.
Products with protection class IP67 and IP68 are used for high-quality lighting of aquariums, swimming pools and other artificial reservoirs. In this case, the immersion depth should not exceed 1 m. If the IP33 class is indicated on the packaging, then such a device is produced without silicone protection.
What are controllers and power supplies for?
When making homemade lighting devices based on LEDs, it is necessary to install a special adapter (rectifier, power supply), which will convert 220 V alternating electricity into 12/24 V direct current in accordance with the power of the semiconductors used.
To make the right choice and buy a suitable power supply, count the number of diodes per linear meter, then first multiply it by the power of one LED diode, and then by the number of linear meters. At the end, you should definitely give a small margin - about 10-15%.
For example, if you use SMD 5050 type diodes, install approximately 60 pieces per linear meter and the length of the board is 5 m, then (based on the table above) the total load will be 15 * 5 = 75 W. Increase the value by 15% and get the required adapter power - 86–87 W. When assembling a flexible board with adjustable brightness levels and light switching, the electrical circuit must be supplemented with a controller and remote control.