Today, purchasing a landscape lantern is quite simple; the market is saturated with offers and amazes with the uniqueness of their shapes and sizes.
But economical, highly reliable lighting devices have a fairly high cost and therefore not every owner is able to purchase the required quantity on the market to illuminate the entire local area.
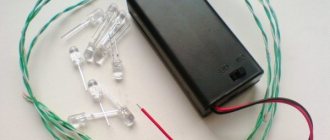
Therefore, many home craftsmen make LED lighting with their own hands. How to choose the right design for self-production, purchase consumables and assemble an electrical circuit, all about this in this article.
Is it possible to make a park lantern yourself?
A garden lamp is not structurally complex; it can be made with your own hands , either from scrap materials or from parts purchased in a retail chain. To do this, you will need a schematic and electrical diagram of the device, experience with the tool and knowledge of simple electrical circuits.
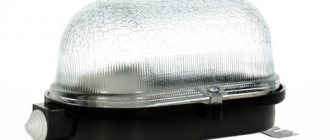
Lamps for landscape lighting work outdoors throughout the year, in hot weather, in cold weather, and in rain and snow. Therefore, it must be made with protection from moisture and dust of at least IP 64 -65, especially at the junction of electrical contacts, so that the electrical wiring does not short out in a humid environment.
Before starting work on the production of landscape lighting on the site on your own, you will need to evaluate the following parameters :
- Select the type of lamp: LED, halogen or regular incandescent lamp.
- Develop a power supply diagram for lanterns.
- Draw a plan for the location of lamps, determine their number.
- Choose a structure that will hold the lamps.
- Select the power type: 220 or 12 V, from the electrical network or battery.
What types of outdoor lamps are available for manufacturing?
At home, you can make quite a few types of landscape lamps, from the simplest in the form of an incandescent light bulb and a lampshade to LED automatic lamps with a long range, operating automatically from motion and light sensors.
The preferred options for making your own landscape lamp are:
The light source is an LED lamp, the most modern energy-saving model, which provides a high level of luminous flux and saves electricity, since it consumes 2-3 times less than halogen lamps.- Functionality – automatic switching on based on a signal from a motion or light sensor.
- Power options are non-volatile from solar panels and batteries and energy-dependent from a 220 V household network.
- Technical lighting – for illuminating roads, gates, stairs and parking lots.
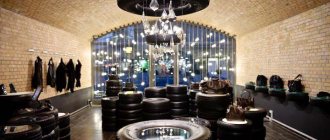
- Decorative – for illuminating bushes, gazebos, pools or ponds.
- Accented – illumination of the facade of the house.
- Accompanying lighting and running lights along the path, luminaires react to movement with built-in motion sensors.
- Mechanical protection – high-strength glass and metal case.
- Mounting method - support, bracket and wall type.
- The type of lantern is landscape, floor lamp or façade.
- LED lighting power is 5-50 W, depending on the lighting area.
Materials that can be used to create chandeliers
What can a chandelier be made from? The answer to this question is: “Yes, from anything.” You can make a pendant lamp from:
- paper;
- thread;
- CDs;
- plastic bottles"
- cardboard;
- natural materials;
- kebab sticks, etc.
Your imagination will help you choose the material. She will also help you choose the right model. To create a chandelier, you can use techniques such as origami, carving, and embossing. In addition, it is appropriate to use knitting and weaving techniques.
Lamp made from kebab sticks
Let's look at step-by-step instructions on how to make an original chandelier using ordinary kebab sticks.
You will need:
- kebab sticks;
- organza ribbons;
- glue.
It is quite easy to make such a design:
We lay out the sticks so that they form a square and connect them with glue. The height of the chandelier depends on your preferences. But remember that you need to take into account the total amount of material available and the height of the ceiling.
We seal the top of the lamp with cut sticks. They can be laid parallel to each other or crosswise. Do not forget to leave a hole of the appropriate diameter for the cartridge in the central part.
After the glue has dried, we begin to decorate the chandelier. For this purpose, we tie colored organza ribbons at the protruding ends of the sticks. The more of them there are, the more beautiful the lamp will turn out.
We hang the resulting structure on a hook in the ceiling. This can be done using the same ribbons. Next, we fix the cartridge in it. The chandelier is ready!
Bottle chandelier
One of the original ideas for homemade chandeliers is a bottle chandelier. You will need:
- frame of an old chandelier;
- plastic bottles (the color palette can be very different);
- thick steel wire.
- Creation instructions:
Cut the bottles. Cut out flowers, animals or geometric shapes from them. Which one to choose depends on your desire.
Attach the cut pieces to the frame of the old ceiling lamp and attach the steel wire. You need to make a “hedgehog” out of it.
The last stage is connecting the chandelier to the ceiling. It's not that difficult to do it yourself. This lamp would be appropriate in the hallway or kitchen.
Wooden chandelier
To make a beautiful LED chandelier from wood with your own hands, you need to prepare the following things:
- Wooden planks – 12 pcs. Door frames will fit. It is optimal if they have a length of 0.3 - 0.45 m.
- Glass jars with a volume of 1 l – 6 pcs. They will be used as lampshades.
- Wood paint.
- Self-tapping screws.
- A machine for seaming homemade canned goods.
- White paint.
- Sandpaper.
Creating a wooden chandelier will require the following steps:
- You need to sand the planks using sandpaper.
- Make groove holes for the wire.
- Drill holes for mounting lampshades. To do this, take three planks and make a hole on each side.
- Cover the workpieces with paint that imitates natural wood.
- Assemble the planks using self-tapping screws into a single hexagonal structure.
- Make holes for the cartridge in the central part of the screw caps. Install sockets with LED bulbs.
- Roll up the cans.
- Paint the lids with tone paint, and the jars with light shades of paint. All that remains is to fix the structure to the ceiling.
Cardboard product
A chandelier made of ordinary cardboard can become a very unusual interior decoration. Here is a small master class:
- Using a stencil, cut out two identical pieces. Don't forget to make slots to secure them in the center. Connect the cut out parts.
- If necessary, paint the resulting structure.
- To give greater strength, sew all joints with strong thread or wire.
- Attaching to the ceiling occurs on a chain. The wire runs through them. It is optimal if they are painted to match the lighting fixture.
- You can use a variety of things as decoration - glitter varnish, beads, sequins, lace, rhinestones, artificial flower arrangements, beads.
A plastic chandelier is made in the same way. This product will be more durable. But scissors will not be the best option for making it. It is preferable to use a jigsaw instead.
Today, the popularity of hand-made interior parts is only growing. A handmade chandelier is a reflection of your personality. It will give the whole atmosphere originality and uniqueness.
On the Internet you can easily find not only many different variations of homemade lamps, but also detailed instructions for repairing do-it-yourself chandeliers.
Materials for landscape lighting in the country
These outdoor lights can be made from a wide variety of materials, many of which can be found around the home. The most popular materials at hand that are used to make landscape lamps with your own hands:
- Glass and plastic products: bottles, jars and other glass vessels, any are suitable. With this type, it is very important to choose a special light bulb with a high level of light dispersion. An unusual design for a glass lantern will be to cover its walls with patterns of special luminescent paint.
The coating will accumulate solar energy throughout the day and create a very attractive glow in the evening. Advantages: low costs and a wide variety of shapes. Disadvantages: low dispersion and high fragility.
- Tin cans with patterns over the entire area, it is better to paint the inner surface with a white background, and the outer surface is covered in a tone that matches the landscape design. Advantages: low costs, high design characteristics, variety of shapes. Disadvantages: low strength and durability, low anti-corrosion characteristics.
- Lanterns made of wood or wooden rods, which are assembled into a certain shape, such as a ball. Advantages: simple production, special appearance, you can use scrap materials, low costs. Disadvantages: massive structure, they are afraid of a humid environment, require special antiseptic treatment.
- Silumin is an aluminum alloy, molded and powder coated. Advantages: light weight, various shapes, low cost. Disadvantages: high fragility in the cold and a tendency to damage in an aggressive environment, for example, when salt and fertilizers come into contact with them.
- Metal the most reliable material for street lamps, especially for poles, fasteners and lamp housings. It is better to use for these purposes: cast iron, copper, steel and brass. The techniques used to process metals are welding, bending, forging and cutting.
Advantages: durability, many different shapes, resistance to mechanical damage and climatic influences. Disadvantages: high price, heavy weight, need for a foundation, susceptibility to corrosion if the external coating is damaged.
What can you make your own lamp from?
Very often, homemade street lamps are made of plastic , but this solution is not the best, since the plastic product is easily damaged and broken. It is best to make a metal lantern with your own hands:
- brass;
- copper;
- bronze
It is worth noting that the steel model will be maximally resistant to precipitation and other external influences, but its appearance leaves much to be desired.
But copper lamps will harmoniously complement the retro-style exterior, but do not forget that over time, copper on the street oxidizes and acquires an unsightly greenish tint. A bronze lamp tends to darken, so it will have to be cleaned regularly.
The most optimal material for a lamp is brass, which is durable and visually attractive.
Rules for choosing lamps for the garden
The quality and cost of lighting depend on the type of lamps that will be installed in landscape lamps. Acceptable modifications of lamps that can be used for this type of street lamps:
Regular incandescent lamps. Advantages: low purchase price, availability in retail chains, continuous emission spectrum, “warm” color tones.
Disadvantages: low level of color rendering, high costs of electricity for lamp operation, high heat transfer rate.- Halogen light bulbs . Advantages: more economical, longer service life, stable luminous flux, smaller external dimensions, high thermal and mechanical resistance characteristics, high power, lower power consumption to operate the lamp. Disadvantages: you need a transformer for operation, sensitivity to voltage changes, strong heating, which requires the use of heat-resistant materials for the lamp and housing.
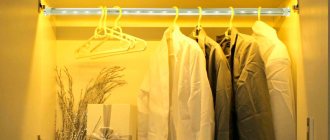
- LED lamps – the most popular devices for landscape lighting. Advantages: very economical, do not contain harmful substances, high level of color rendering, can be used for lamps made of any materials, even paper, long service life up to 100,000 hours, belong to low-voltage equipment, and therefore have an increased degree of safety.
Disadvantages: susceptible to power surges, high price, emit uneven light.
According to all characteristics, the best option for street lighting of the local area is LED lamps.
Light sources for street lamps
For country lamps, different light sources , for example:
- classic incandescent lamps. They are inexpensive, but as outdoor lighting they are not always economical, since they consume a lot of energy and are too bright;
- halogen lamps. Such light sources are more economical and will last much longer than conventional ones. They also differ from incandescent lamps in their reasonable light intensity. Their disadvantage is strong heating and sensitivity to sudden changes in voltage and dirt on the bulb;
- LED bulbs. They will save up to one hundred percent of electricity compared to previous options. Such lamps are not cheap, but they will last as long as possible. In addition, they do not contain mercury or other harmful components. And the durable body of such a lamp is almost impossible to break;
- solar panels. Lanterns based on them can be installed even where it is not possible to lay electrical wiring. They operate using a battery that absorbs natural energy. When fully charged, the lamp will operate continuously for 12 hours. However, they can only be installed where the sun provides maximum heat during most of the daylight hours.
Selecting a Power Source
For landscape lighting, a 220 V household power supply is used, autonomously powered by rechargeable batteries or solar panels. Unlike a traditional incandescent lamp, an LED lamp can only be powered by direct current.
To operate them, you will need a special current source that produces a constant voltage at the output. All power supplies differ in the type of assembly and voltage conversion option.
They are divided into the following groups:
- Transformer .
The composition includes: transformer, filter, rectifier and stabilizer. Advantages: simple installation, withstand idle function. Disadvantages are vulnerable to overload and carry a lot of weight. - Pulse . Advantages: light weight, compact and able to work with increased impulses. Disadvantages: they do not tolerate idling and overload conditions well.
- Driver . Rectifies stabilized current, capable of operating at frequencies of 30-50 Hz. Wide range of output parameters adjustment.
There are 3 options for connecting the LED lamp to a 220 V household network :
- Consistently. When all the lamps are connected with one wire, a phase is applied to the beginning, and zero is applied to its end. The advantage is low installation costs. The disadvantage is that if one lamp fails, the entire lighting line will not work.
- Parallel. Each lamp is connected to a phase and a neutral or grounding. The advantage is the high efficiency of the circuit, even if one or more lamps fail. The disadvantage is the high consumption of wires for connection.
- A beam circuit is a particular type of parallel system, when the sources are installed around the perimeter, 2 or 3 grounded wires are supplied to each lamp.
Thus, for LED lighting in the local area, the best effective constant current source is considered to be a 220 V household network, with a parallel circuit for connecting lamps, with the installation of a driver for rectifying the current.
To illuminate objects on the site, non-volatile LED lamps powered by solar batteries or batteries can also be used.
Types of street lamps
Street lamps that you plan to install on the territory of a country house or cottage must perform the following functions:
- illuminate the local area so that residents are not afraid to move around it at night;
- fit into the overall design concept of the yard and home.
Lamps for outdoor dachas are divided into the following types:
- wall lanterns. They are best suited as lighting fixtures at the entrance to the house and on the platform in front of it. As an option - lighting next to the gate or wicket. They can be different in shape and design; most often they choose “antique”;
- floor lamps - they are installed directly on the ground or on the veranda. A classic floor lamp is a flat stand with a round ball at the top, but there are more modernized models that differ from each other in height, shape and number of shades;
- ground lamps - they are mounted directly into the ground, and they can serve as illumination for green spaces, as well as illuminate pedestrian alleys in a summer cottage. In addition, they complement swings, summer pavilions and other buildings on the site well. Lanterns of this type most often have a rectangular or round shape;
- hanging lanterns - they are attached on verandas to ceiling beams or even to trees, if this does not impede the connection to the network. As a rule, they are a long and strong chain that ends in a lampshade.
In the photo you can see some types of country lamps, which can be purchased ready-made, or you can make them yourself.
Diagram and photo of the design
Before making a landscape lamp, you will need to develop a design diagram of the garden lamp itself, an electrical circuit for powering the lamps and a plan for installing devices on the territory.
The composition of the latest documents will depend on the area that needs to be illuminated and the landscape project. These indicators determine the type of lamps, their power and quantity, as well as the volume of consumables :
- wires;
- cable;
- switching equipment;
- automatic start sensors;
- automatic protection of power lines from voltage overload in the network.
The first document, a design diagram of a garden lamp, determines the appearance of the lighting device, the specification of its parts and the assembly procedure.
For example, to produce a metal lantern in an antique style, the design diagram will look like this:
In order to make such a lantern with your own hands according to the diagram, you need to make 4 side walls, a top cover and a bottom, cut out glass for the sides, preferably with matte patterns. Decorative finishing of metal parts can be painted with regular paint or with imitation of antiquity.
The assembly of metal parts is carried out by cold welding. Next, the side windows and cartridge are inserted. After assembling the housing, begin connecting the power supply.
The assembly of the electrical power supply circuit from a 220 V household network must be carried out by a specialist with the appropriate electrical safety clearance group, so if the home craftsman does not have such qualifications, you need to invite an electrician for this work.
To lay the power line, it is better to choose an underground option, then hanging wires around the site will not spoil the landscape project.
You will first need to purchase a two-core copper electrical cable VVG with 1.5 mm2 conductors along the length of the laying determined according to the power supply diagram for lighting fixtures on the site, a corrugated pipe or metal hose D from 18 to 25 mm to protect the cable from rodents and terminal blocks with drain load 5 -10 A to ensure reliable electrical connections.
With an underground power supply circuit for landscape lighting, the owner of the house must save the executive circuit for future construction and excavation work on the local area.
To lay the cable, dig a trench at least 70 cm deep , with a distance from objects on the site of at least 60 cm. For floor lamps, you will need to install supports, which can be steel pipes, including used ones. In this option, they are thoroughly cleaned of corrosion products and treated with protective compounds.
Then a cable with leads sufficient to connect a 10-15 cm lamp is pulled through them. After this, the cable is placed in a corrugated sleeve with a 15 cm exit to the outside. The second piece of cable from the trench in the corrugated pipe is connected to the cable in the support using terminals.
If the lantern is of a wall type, then the connection is made through junction boxes. All contacts must be securely soldered, insulated and hidden in the box.
Assemble the connection diagram for the lighting device in such a way as to exclude the possibility of electric shock.
The connection point can be a simple protected outlet or terminals on an electrical panel .
After assembling the power supply circuit, it is checked for functionality and the wires are covered. If the circuit is assembled incorrectly, the LED lamp will not light up or will “blink”.
Glass bottle lantern
If you have beautiful glass bottles or jars, you can make a lamp for a summer house or gazebo near the house. There are several options, the simplest of which are:
- A garland with bright white light bulbs is placed inside; its size is selected according to the capacity of the bottle.
It is advisable to close the neck or seal it with sealant to prevent moisture from getting inside. A garland inside a bottle is a stylish solution for decorative lighting. - If the bottle has a neck wide enough to fit a light bulb inside, you can use it as a lamp. The main thing here is to think about how to secure the cartridge in the upper part so that the elements hold securely.
- You can use a bottle cutter or traditional methods to separate the bottom. In this case, making a lamp from several blanks will not be difficult. A piece of board or wooden beam is used as a base.
It is much more convenient to use glass jars, since the cartridge can be fixed directly in the lid, which will allow you to get a lamp in literally 10 minutes. The main thing is to seal all the cracks around the perimeter with weatherproof sealant.
Step-by-step instructions for creating
To select the type and materials for making landscape lamps, you can use DIY projects , which are presented on the pages of online publications and have detailed instructions. Most often, such crafts are made from ready-made wooden, metal or plastic objects. For example, you can use ordinary wooden hangers for this.
Made of wood
A very stylish lantern can be made from pieces of edged board . To do this, it is sawn into five identical parts, 20 cm long. A rhombus is cut out in the center of all the boards. Using a drill and a drill bit D = 8 mm, cut out 4 holes at the same distance from each other. For the base you will need a circle and an equilateral pentagon.
In order to give a beautiful appearance to a wooden lantern, the outer surface is fired with a gas burner and then brushed on the annealed surface with a metal brush. As a result, all defects and irregularities are removed from the wooden surface, and the lamp acquires a warm brown color.
The manufactured parts of the landscape lantern are assembled, the circle is fixed on the pentagon, the side parts are attached to it with small nails, these parts are tied with a rope “crosswise”, so that the knots remain inside.
A hole for an 8 mm cable is drilled through the center of the circle and pentagon.
To attach the flashlight handle, drill two holes from the end of the circle with a 4 mm drill. The handle is made from a piece of rigid wire , giving it an elegant shape, the socket and lamp are installed, the body and electrical circuit are assembled, and the operation of the finished product is tested.
For such a lamp design, it is necessary to decorate the cable so that it does not spoil the “antique” look of the lamp with its modern look; for this, the cable is wrapped with twine and secured with a glue gun. The lamp is powered from a 220 V home network from a separate circuit breaker in the electrical panel.
LED Strip Light
You can easily make an unusual landscape lamp in the form of a flowing light stream from an old teapot yourself using an LED strip.
This lamp is energy efficient and
consumes little electrical energy, so it can be powered by solar panels and made portable for installation in any part of the garden or recreation area in the local area.
To form a jet, the ICE cord is folded in half, and a bundle of such cords is secured inside the kettle. To do this, insert a metal washer into the spout and thread a cord through it. They assemble a circuit powered by a solar battery, which can be bought in a retail chain or taken from a faulty lamp.
A drop
If you install a glass flask, which is used for watering flowers, on an old water tap, you can get a unique lamp in the shape of an amazing drop of light.
In order for the flask to be filled with uniform light,
the LED strip is wrapped around the wire and filled with a glass vessel .
The tape can be purchased with a control panel and a unit, which will allow you to choose colors and shades of lighting, creating an extravaganza of color, bringing a unique style and novelty to the landscape design of the site. The lamp can be powered from a 220 V network, batteries, solar or conventional batteries.
Made of plastic
This outdoor LED lamp is made from ordinary disposable white plastic spoons. For the base, a 5-liter plastic container with the bottom cut off was used.
The handles are broken off from the spoon, and the remaining parts are fixed to the base with an imitation of pineapple peel using a glue gun.
For this model of a homemade lamp, only a low-temperature LED bulb is suitable . The lamp can have either an independent power supply from batteries or be connected to a 220 V power supply with a special electrical circuit with a choke.
What can be used to make lamps
There are a lot of options; it’s important not to limit your imagination and take into account the design of the site. The most commonly used solutions are:
- Steel products or blanks. This can be either a ready-made container with slots or holes, or forged products or options assembled on your own using rivets or welding.
- Lamps made of wooden slats or natural materials - twigs, branches, etc. They are good for their ease of processing and accessibility.
The simplest lamps are often made from wood. - Aluminum and copper also work well, but finding suitable containers or blanks can be difficult. Metals are easy to work with and are not afraid of heat.
- Plastic is good for its durability, weather resistance and availability. You can select containers of the appropriate size without much difficulty, but only lamps that do not heat up very much can be installed in such lamps.
- Glass containers are a convenient solution that protects the light bulb well and at the same time looks stylish. The main thing is to choose options of the appropriate size and shape.
You can experiment with different materials, since it is impossible to determine the quality of light before production.
Possible difficulties and errors
Technically, making the lantern itself for landscape lighting does not seem difficult; for this it is permissible to use both new parts from the store and those that can be found in any household. To do this you just need to use your imagination.
Difficulties with landscape lighting are caused by power supply schemes, choice of power and number of lighting devices. All 220 V power lines are classified as dangerous, the calculation and installation of which can only be carried out by specialists.
The main mistakes that users make when installing landscape lighting:
- The power, type and number of lamps are incorrectly selected. The installation does not perform its lighting functions or is energy-consuming to operate.
- Violation of underground cable laying standards.
- The cable characteristics do not correspond to the connection power of lighting devices.
- There is no protective grounding and no automatic safety system in the electrical network.
- The connection of lighting devices is made using twists without the use of terminal blocks.
- The cable is laid in the ground without metal hoses.
- The incandescent lamp is hermetically sealed in the lamp; there is no ventilation to cool it.
Materials for production
We will consider the question of how to make a street lamp of the following type:
You can find similar options in regular stores, but their cost is always quite high, so you should think about assembling them yourself. Plus we will tell you how it can be forged without special skills.
So, the street lamp assembly diagram looks like this:
Look carefully at all sizes to avoid mistakes.
To assemble the structure we will need:
- Side walls (4 pieces).
- Top cover.
- Bottom.
- Decorative finishing, but here you can take the initiative yourself. For example, you can use any paint that you like best.
During assembly, it is necessary to use cold welding, since this is how you can easily connect all the structural elements together. All materials must be prepared initially; you can even try to assemble everything without welding.
As a rule, many people try to use ordinary welding. Of course, if you can do everything with it and not damage the glass, try. Cold in this regard is considered simpler and safer.
Pros and cons of homemade decorative light
For those who are planning to make landscape lighting with their own hands from scrap and store-bought consumables, the main advantage of the finished project will be its low cost, which can be either zero or several times less than that of a new landscape lamp.
In addition, a homemade economical lamp gives its owner the following advantages :
- lighting of the local area, gazebo or recreation area;
- realization of creative potential;
- creating a colorful landscape in the local area.
The disadvantages of this type of landscape lighting include the low protection of home-made structures from atmospheric and mechanical influences, since they are mostly made of wood, plastics and old metal forms.
To create more reliable waterproof metal lamps, you will need metalworking experience and special welding equipment.
Forged partitions
Simple zoning of any room in a home can be done using metal partitions. The intertwining patterns of the individual parts of the divider do not “load” the space. Filigree decor is suitable for conditionally highlighting a relaxation or work area. They are used to divide the dining room area into two parts: for cooking and eating. The metal of the partitions can be painted. The most unusual are the models covered with gold or silver colors. The antique effect emphasizes the originality of their design. The shapes of the partitions can be any: trapezoid, rectangle, crescent. They can be installed in wooden frames or mounted without additions. Ceiling partitions are a separate type. They are mounted above the thresholds. Non-standard dividers do not take up room space. Ideal for creating oriental decoration.
Average expenses
They can be zero, since to create them you can use improvised materials that are at the disposal of the home craftsman. In this case, the main costs may be for underground cable laying and hiring electrical installation personnel.
Average costs for creating a 4-arm landscape lantern “grater”, with laying an underground two-core copper cable 1.5 mm2 10 m long:
The cost of a 10 m cable is 75x10=750 rubles.- Corrugated pipe 10 m – 14x10=140 rub.
- Cable laying 10 m (without excavation work) – 120x10=1200 rub.
- Connection to a house panel with a protection system – 1,500 rubles.
- LED lamps E27 4 pcs. - 4x96=384 rub.
- Lamp sockets 4 pcs. – 4x62=248 rub.
- Wooden base (waste) – 0 rub.
- Graters 4 pcs. – 130 rub. x 4 = 520 rub.
- Fasteners – 50 rub.
- Household electric circuit breaker – 480 rubles.
- Total: 5272 rubles, including underground installation and in-house power supply circuit - 4120 rubles, lamp - 1152 rubles.
Overview of options for homemade lamps
Building material lamp
In this case, the specialist should have some cement on hand, as well as plaster. To create a street lamp, you need a couple of plastic bottles, one two-liter should be wide, and the second with a capacity of 0.5 liters. Two containers must have lids. If you have bottles, then 50% of the job is done and there is very little left:
- For a larger jar, it is worth cutting off the lower half, retreating from the bottom by approximately 1/3, and then screw the lid onto the neck.
- A smaller bottle is inserted into a larger container, which is also closed, and the neck should rest against the neck of the larger container.
- The sides of two bottles are fastened with 2-4 nails, which should ensure the immobility of a kind of “sheathing”.
- Prepare the solution, and then pour it into the resulting space, and then wait until it hardens completely.
- Remove the sheathing, and then insert the lamp into the lampshade.
This lantern can be left in its original form, or you can decorate it as you wish. The main advantages of the product are uniqueness, no need to buy material and an unusual approach to classic building materials.
"Bottle" street lamp
Under the lampshade you can take any glass bottle or an unusually shaped jar in a non-standard color, and the work itself will not foretell problems.
For this you should prepare:
- Thin multi-colored wire.
- Pliers.
- Wires, socket and lamp.
- Knife.
- Screwdriver-shaped indicator.
- Insulating tape.
- Decorative elements such as glass and beads.
- Jar (bottle).
The operation itself goes like this:
- First, you should start assembling the electrics - the socket is connected to the wires, and then the lamp is screwed in.
- Decor is placed in the container, which is intended for the lampshade, - small objects that can reflect light.
- A thin wire is wound around a finger to form a spiral. This element is also placed in a container.
- The socket with the lamp is lowered into a do-it-yourself lampshade, and then secured with silicone.
If the jar is opaque, then the inside is decorated with luminescent paints - drawings are applied or covered with solid material. This material provides an unusual glow, and it is completely safe and non-toxic.
Lamp made from tin cans
It is not difficult to make a street lamp from scrap materials with your own hands.
Even small drinks cans are suitable for creating such an item, but huge lantern containers will look original and at the same time impressive. In this case, the tools you need are a hammer and also nails of different sizes. A rounded beam acts as a work table, which is best clamped in a vice for fixation. The method for obtaining an exclusive is quite simple:
- First, draw your favorite pattern on the jar, which comes in varying degrees of complexity.
- Then you need to make holes with different diameters along the lines using nails and a hammer.
- A socket with a lamp is inserted into the jar, and then the product is hung or installed in the chosen place.
The degree of originality of a particular lantern will depend solely on the imagination of the author. The finished product can be painted or painted. This invention and technique makes it possible to quite simply create real works of art.
Ball-shaped lantern made of wood
This option is quite simple and there are no complex manipulations. To make a ball, you need to collect a bunch of small branches and rods, find or purchase an inflatable ball/balloon and PVA glue. The process itself is simple and straightforward:
- Wooden blanks are broken in such a way as to create short sticks.
- After inflating the ball, stick random twigs and twigs on it.
- The master will determine the number of rods himself, but it is worth leaving space for placing the lamp socket.
- The finished product is removed for a day or two to dry.
- Next, puncture or deflate the ball, and place the lamp socket in the lampshade.
This outdoor lantern can be hung on a chain or placed on a stand made of metal. There are many methods to get what you want, because a street lamp can be made with your own hands from all materials (with the exception of paper). For this reason, there is no shortage of ideas, and one potential option is presented in the video.
Installation and connection
To connect lamps, a cable is usually used, which is buried in the ground. Procedure:
- dig a trench from the walls of the house (near the panel or entry point) to the place where the lantern is installed;
- The cable, prepared for underground installation, is pulled into a corrugated tube. It will protect it from external influences and contact with moisture;
- lay the wire and dig a trench. The cable exit from the ground is made right under the lamp, so as not to create the possibility of accidental damage;
- connect the lamp socket;
- the second end of the cable is connected to the starting device - a switch, a circuit breaker on the panel or a power supply (if low-voltage lamps are used).
The method of installing a street lamp depends on its design and other features. As a rule, installing lamps does not pose any special problems - either mounting on a supporting structure, wall or bracket, or hanging installation is used. The main task is to ensure that the capabilities of the power supply match the needs of the luminaires so that unwanted and dangerous overloads do not occur.
Street lighting installation methods
Three main methods of installing street lighting have become widespread:
- laying a cable line (CL) in a trench;
- tension of the overhead line (OL) along lighting supports;
- combined type - cable-overhead line (OCL).
Installation purely by an overhead line is extremely rare. The rules establish that the output of the supply line from the power source, entry into the building and intersection points are carried out by a cable line. In this case, the line is considered a cable-overhead line.
The cost of overhead lines is significantly less than cable lines. And if there is damage, you can find its location by inspecting the line.
At the same time, when installing overhead lines, it is worth taking into account the expanded security zone and its low resistance to weather conditions, especially during thunderstorms. Laying a line using the “open” method is not safe for humans and animals and has a negative impact on the environment.
Today, installation of street lighting in populated areas (city, town) is permitted exclusively by cable line, because:
- not a large security zone (1 m);
- high stability and protection from adverse weather conditions;
- many installation methods depending on external conditions (in pipes, trays, tunnels, supports, channels, etc.);
- The closedness of the cable line from outsiders allows it to be laid in places with heavy traffic or crowds of people.
The disadvantages of this method include:
- difficulty in finding the location of damage;
- the influence of soil subsidence on the performance characteristics of cable lines;
- the possibility of mechanical damage from special equipment (during unauthorized work in the security zone).
Installation of street lighting
It is important to know that all installation work is carried out exclusively by qualified personnel who have access to work in electrical installations. Installation work begins only after receiving a building permit
Installation of street lighting with a cable line involves laying the cable in a trench. To protect it, choose an armored cable. This method is carried out in the following sequence:
- According to the design documentation, flags or pegs are installed at the installation sites of lighting supports. The route starts from the street lighting cabinet (SHUNO).
- Special equipment is used to dig a trench 0.8 m deep. At intersections of roads and squares - 1 m.
The width of the trench depends on the number of cable lines being laid. For laying one cable, the trench width is 0.2 m; for two or more cables, the distance between cables is 0.1 m (clause 2.3.84 PUE 7).
- The bottom of the trench is covered with sand to a height of 0.1 - 0.15 m.
- To protect the cable line from mechanical damage, a polyethylene (HDPE) pipe is laid. For armored cable - at intersections with roads, parking lots, squares; for cross-linked polyethylene cable - along the entire length of the route.
- A cable line is laid in the trench. In a pipe this is done by using a cable to pull it out. At the places where the supports are installed, the ends of the cable in the pipe are brought out for their connection. Subsequently, they are inserted into a distribution box installed in the technological window of the lighting support.
- Cover with a layer of fine earth free of slag, stones and construction waste (clause 2.3.82 PUE 7). The thickness of the earth layer is 0.2 m.
- Clay bricks are laid in one layer. In areas of passage under asphalt roads, laying bricks is not necessary.
- Laying mesh or film of blue or yellow color, or warning tape at a depth of approximately 0.3 m. The tape is not laid at intersections with utility lines.
Laying a cable line for street lighting
Installation of street lighting poles is carried out in the following sequence:
- Compact the sand layer.
- In the place where the support is installed, a square (1m x 1m) hole with a depth of 1.2m is dug.
- A metal structure (mortgage) is installed in the hole, through the center of which a pipe with cable lines is led out.
- The hole is filled with cement mortar.
- After the cement has hardened, the lighting support structure is attached to the embed.
Installation of street lighting poles
Installation of street lighting by overhead line. A special set of linear fittings is mounted on the supports, onto which the overhead line (SIP) is suspended. At the next stage, the lamps are connected to the overhead line.
Sectional view of SIP wire
The connection point of the line from the control cabinet to the lighting support and the rise to it is carried out by cable.
Connecting the lamp to the overhead line
Types of street lamps
Street lamps that you plan to install on the territory of a country house or cottage must perform the following functions:
- illuminate the local area so that residents are not afraid to move around it at night;
- fit into the overall design concept of the yard and home.
Lamps for outdoor dachas are divided into the following types:
- wall lanterns. They are best suited as lighting fixtures at the entrance to the house and on the platform in front of it. As an option - lighting next to the gate or wicket. They can be different in shape and design; most often they choose “antique”;
- floor lamps - they are installed directly on the ground or on the veranda. A classic floor lamp is a flat stand with a round ball at the top, but there are more modernized models that differ from each other in height, shape and number of shades;
- ground lamps - they are mounted directly into the ground, and they can serve as illumination for green spaces, as well as illuminate pedestrian alleys in a summer cottage. In addition, they complement swings, summer pavilions and other buildings on the site well. Lanterns of this type most often have a rectangular or round shape;
- hanging lanterns - they are attached on verandas to ceiling beams or even to trees, if this does not impede the connection to the network. As a rule, they are a long and strong chain that ends in a lampshade.
In the photo you can see some types of country lamps, which can be purchased ready-made, or you can make them yourself.