You have to deal with replacing a switch or connecting an outlet quite often in everyday life, so everyone should have at least minimal skills in servicing the home electrical system.
We will try to figure out how to install electrical wiring with our own hands, focusing on the PUE standards and observing safety precautions. Also in this article we will look at the features of drawing up a project, the rules for introducing electricity into the house and the subtleties of reliable connection of wires.
What is required for home wiring?
First of all, you should understand the structure of the electrical network. It consists of electrical points connected to each other and to the power line by various kinds of cables and wires, protective devices and circuit breakers, and a grounding loop.
Do not confuse wires and cables. The first are conductors for internal wiring, which can be single- or multi-core, the second are made up of several wires united by a common protective sheath.
When installing electrical wiring yourself, you need a huge amount of knowledge and skills: from calculating the cross-section of the wire to the skills of twisting wires and installing wiring boxes
Cables can be installed in the ground, under water, in concrete structures; They are also used to install a home electrical network if connecting powerful devices or special protection is required.
The color of the wires is not random, it is determined by the PUE standards. Not everyone follows the recommendations for correct connection, but as a result, it greatly facilitates future repair work.
Wire strands are made of metals that conduct electricity well: copper and aluminum.
Copper is considered a more valuable material for a number of reasons:
- has a high current density;
- is characterized by wear resistance and fracture toughness;
- has less resistance to oxidation;
- does not compress like aluminum, so does not form gaps in joints.
For internal fixed wiring, it is recommended to use single-core copper wires, which are stronger and more reliable than multi-core analogues.
Twisting copper wire with aluminum is an unforgivable mistake. These materials have different characteristics, so contact between them will never be strong and safe. If necessary, you should use adapters - steel terminals
Types of cables and wires for electrical installation work:
- VVG (from 1.5 mm² to 10 mm²) and its analogue NYM are both multifunctional;
- PVA – for connecting lamps;
- PV1 – for electrical panels;
- PV3 (6 mm²) – for installation of SUP.
Varieties of VVG may also be useful: VVG-P (flat), VVGng(A) , VVGng(A)-LS , etc.
In addition to selecting wires or cables, it is important to understand grounding systems that ensure the safe use of electrical appliances. In a private house, installation of a grounding loop is required; in city apartments, the bathtub and household appliances are usually grounded.
There are several strict rules: for example, you cannot connect grounding wires to metal communications or carry out independent work in the electrical panel.
It is best to entrust the installation of RCDs and circuit breakers, as well as any installation work in the electrical panel, to qualified electricians with permits. They will be able to correctly determine the load and select a circuit breaker.
What determines the choice of installation method for lamps?
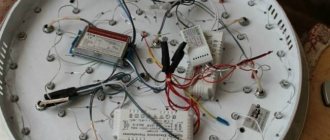
Installation of a ceiling chandelier
Installation of lighting devices is a simple process. Even a person who has never worked with electricity can figure out the basics and get the job done. The main thing is to carefully and carefully follow all the steps and follow safety precautions.
Lighting devices vary in different ways. They can be mounted on different surfaces (walls, ceilings, placed on a table or floor), built-in or external. The complexity of the process depends on all these points.
The easiest products to install are wall-mounted overhead lamps. They are securely attached to the walls using fasteners (usually dowels). When installing, it is important to consider the wire size. Its length should be such that the lighting device can be powered from the nearest outlet.
Ceiling products are somewhat more difficult to install. Before installing a ceiling lamp on the ceiling, you need to hang a special fastening element. For hanging models, this is a hook that is placed in the mounting box. Metal platforms on which the chandelier is attached are also actively used.
If built-in lamps are used, you need to make a hole in the canvas in advance to fix them.
Recommendations for drawing up a wiring diagram
Drawing up a project for intra-apartment or intra-house wiring is a responsible and complex matter that requires qualifications. There are many principles and standards for installing wires, switches and sockets.
Here are just a few of them:
- It is better to divide the wiring into groups - sockets, lighting, etc., allocating separate lines for powerful electrical equipment;
- in the drawing it is necessary to indicate power points and installation locations of powerful energy consumers (oven, air conditioner, washing machine);
- location of sockets - from 0.3 m to 1 m from the floor;
- the optimal installation height for switches is 0.8-1 m from the floor;
- It’s better to have more sockets - no extension cords are required;
- a separate project - for a low-current system (to protect against interference, the wires are pulled separately from the power lines, with a distance of at least 0.5 m);
- bathroom switches lead to the corridor, etc.
It is very important to correctly lay the wiring itself - internal or external (open/closed type). We recommend that you familiarize yourself with the rules for designing electrical wiring in a private home.
Electrical wiring installation diagram: wires should not intersect with various engineering systems, and should be laid only horizontally and vertically. The safest place to install lines is under the ceiling, from where the vertical lines go down to sockets and switches
The wiring diagram must be kept; it will definitely come in handy during repair work.
If you have doubts about your own experience or skills, it is better to contact specialists - qualified electricians. They are familiar with many small but important nuances that a simple layman cannot take into account due to his inexperience.
An experienced designer will competently draw up a wiring diagram, take into account the standards and requirements of the PUE, make calculations, select equipment of the appropriate rating and, in the end, take full responsibility. When designing and installing independently, the homeowner will have to be responsible for errors.
Examples of installation of lighting fixtures
Depending on the type of lighting, there are several ways to install lamps and other devices. Replacing lighting fixtures The procedure for replacing lighting fixtures should be as follows:
- disconnect the circuit and check the circuit with a voltage tester for insurance to ensure that the circuit is de-energized;
- remove the fasteners;
- disconnect the wires. To do this, remove the insulating cap, disconnect the wires, and unwind the twist. You may need help fixing the device;
- if the device comes with screws, screw them in;
- When installing a lighting fixture in the center, you should screw it onto the tube, then screw it to the box.
- twist the wires and put them on. At this point, you may also need the help of a partner who will hold the device;
- hang the lighting fixture. In this case, the wires must be hidden in a box, and the ceiling lining must be pressed against the ceiling as tightly as possible;
- Tighten the screws and press the trim tightly to the ceiling.
The nuances of installing new lighting fixtures First, you need to install the box, connect the wires to it, then connect the device to the power supply and switch. When connecting a new device in a block with an old one, you can use an existing switch for it. A typical installation procedure for a new light fixture with a switch might be as follows:
- connect the wires to the lighting box installed on the ceiling beam;
- install a lighting fixture;
- connect the wires to the switch;
- Connect the wires in the switch and with the wiring.
Installing a fluorescent lamp These lamps, as mentioned earlier, consume less energy than conventional incandescent lamps, so they are often used to illuminate an apartment. Depending on your goals and purpose, as well as your desire, you can choose one or another lamp shape. When choosing fluorescent lighting, you should take into account that a device with an open lamp is not decorative, so it looks unattractive even in an ordinary environment. In addition, its light irritates the eyesight. Therefore, for aesthetic satisfaction and eye health, it is better to give preference to lighting devices. Typically, all fluorescent lamps are equipped with wires brought out to the outside, which must be connected when connecting to the wiring. There are fluorescent lighting devices with preheating. These devices consist of a starter and a round element. Installation of built-in spotlights For apartment lighting, luminaires with the following markings are usually used: R39, R50, R63, R80. The procedure for fastening and installing spotlights in a plasterboard ceiling is as follows:
- cut a round hole in the drywall;
- insert a lamp into the hole;
- connect the wires to the contacts;
- When the lamp goes in to a sufficient depth, remove your fingers. The paws will press the lamp into place and secure it.
If the installation of recessed spotlights is carried out on an Armstrong-type ceiling, then the task will be significantly simplified. In this case, all that remains is to insert the lamps there and connect their wires to the contacts. Installation of halogen lamps Recently, halogen lamps have been used quite often to save energy and ensure safe operation of electrical appliances. This is required, for example, in rooms where the voltage is below the nominal voltage. In this case, 6.12 and 24V halogen lamps can be used. These low-voltage halogen lamps provide enough light, but consume little energy. Another advantage in the use of these lamps is that the low voltage during their operation guarantees human safety. Also, halogen lamps are often mounted in built-in lamps when installing suspended ceilings. Installation of this type of lighting requires the additional connection of a step-down transformer. Modern electronic transformers have become so compact that they can be mounted on a suspended ceiling frame and in any other place without overloading the overall appearance of the environment. It is necessary to select a transformer depending on the number of lamps that will be used and their total power. You should add another 10-15% to this amount on top to be on the safe side. Let’s assume that six lamps, 12 V each, will be used to illuminate the room. To calculate the required power of the transformer, you need to multiply 12 by 16, you get 196 W. By rounding the number to 200 W, we find out the power rating of the required transformer. You should also know that during operation such a transformer can become very hot, so you should not purchase a device with a greatly increased power unless absolutely necessary. The transformer must operate at full load. For example, a device is designed for 300 W, and several light bulbs with a total power of 250 W will be connected to it in the network. It is better to add two more 24 V lamps, then the desired digital value will be obtained, and the transformer will work fully. When mounting a transformer on the ceiling, it is necessary to build special hatches in this place so that in the event of a breakdown or for adjustment, you can quickly reach the device. If you plan to equip several lighting zones with halogen lamps, then it is better to install slightly weaker ones, distributing them among zones. This will be cheaper and easier to install and operate. In the apartment panel, for the lighting group connected to the transformer, it is necessary to install a separate circuit breaker that controls overload, since transformers cannot withstand voltage surges. When choosing a switch for low-voltage halogen lamps, you should not use a dimmer because the devices do not work well together, the lighting is not well controlled, and the life of the bulbs is significantly reduced. Examples of installation of designer lighting Using relatively inexpensive equipment, you can create in a room something like a home planetarium, when the ceiling is mounted in the form of a starry sky. This is one of the options for modern ceiling lighting installation. Before starting work, you need to draw up a diagram for installing lamps on the ceiling. You can choose a specific constellation to your taste and, depending on the location of its stars, drill holes with a diameter of 1.5-2 mm in the ceiling using a paper template. To illuminate these star dots, you need to purchase special equipment from a lighting store. A device designed for mounting a “starry sky”. The LED projector is equipped with a special controller - a device that controls the glow of individual fibers. A halogen projector is equipped with a light filter that changes the color of the glow of different ends of the fibers. So the stars will glow different colors with more or less brightness. In this case, the installation of the ceiling must be done sectionally, that is, each sheet must be attached separately. First, one, from the inside of which you need to insert the ends of the fibers, lubricated with glue, into the holes, then the other, etc. The projector and controller should be located on the ceiling, they can be attached directly to the sheets or to the frame. The projector should be connected with one wire to the distribution box and to the switch, just like a regular lamp. If the projector does not have a controller, then the brightness of an individual point can be set by the number of fibers routed into a particular hole. The ends of the fibers should be located evenly over the entire surface of the ceiling: 50-70 fibers per 1 m2. There are quite expensive projectors equipped with a controller that can reproduce a moving picture of the starry sky on the ceiling: the fall of meteors, the flight of comets, etc. But this will depend on the material wealth and desire of the apartment owners. To make the ceiling look like the night sky, you can use more economical means, for example, paint the surface blue or purple, and install the lamps according to a pre-made template. On such a ceiling, even the chaotic arrangement of lamps looks interesting. So it is not necessary to mount them in the form of any constellation - you can arrange the light sources in the form of stripes, wavy lines or circles. Sometimes lighting is mounted into plasterboard cornices, causing the fixtures to remain hidden. This lighting design is called "indirect lighting". To perform such a complex installation, special skills in working with drywall are required, but the electrical installation part of the work is quite simple. First you need to build a plasterboard frame, which can, for example, serve as a border around the perimeter of the room under the ceiling. Then, recessed spotlights should be inserted inside this cornice (according to the same scheme as when installing recessed spotlights). In this case, the light will be directed to the wall of the frame, and from the side of the room this frame will glow evenly along its entire length. This method can be used for incomplete illumination of the room, since it will not provide great brightness, but will only beautifully outline the environment with soft light. With this lighting method, you can use lamps of different colors. It is also recommended to connect the lighting to a dimmer, which will regulate the light intensity. You can determine the position of the lamps inside the frame and set the desired direction of light at your own discretion. For more original purposes, for example, to illuminate a designer room, a plasterboard structure is used that serves as a column or any other figure. The base of such a figure should be attached from below to the floor and from above to the ceiling. Lighting is installed inside the column. This can be a bright beam of light obtained by installing halogen or xenon spotlights equipped with narrowly directed reflectors. For decorative lighting of an apartment and as an additional light source, it is recommended to use various LED or fluorescent cables. With their help, you can create inscriptions or simply edge the walls. But this is probably a job for qualified specialists. It is not easy for a home handyman to cope with such a task.
Is power consumption important?
In addition to design, it is necessary to take into account such a point as power consumption in the house.
In a multi-storey apartment building, they are usually standardized, but in a separate cottage, before approving the documents, you will need to know exactly what allocated power to request from the electricity supplier.
This table will help you determine the total power consumption. It shows average indicators for various household electrical appliances and power tools; more accurate data can be found in the equipment data sheets
It is a mistake to assume that the total power consumption is the sum of the individual powers. The simultaneous inclusion of all devices in the network actually does not occur, therefore, in calculations it is necessary to use such a value as the simultaneity coefficient.
For sockets, it is a maximum of 0.2, that is, no more than 20% of power points are usually used at the same time.
Features of installation of facade and street lighting
If previously streets were illuminated using standard lanterns with lamps, today the choice of outdoor electric lighting is much wider. LED lighting fixtures have become very popular. They allow you to save on energy consumption, are not afraid of voltage surges in the network and are much more durable than classic lamps. Therefore, they are less likely to have to be replaced after a burnout.
Specialists will install the following types of outdoor lighting equipment:
- lamps on lamp posts;
- decorative lighting, used to highlight the architectural features of buildings, monuments, sculptures or fountains;
- illuminated advertising, including diode panels;
- façade lighting of any type;
- light garlands.
Modern lighting equipment creates directional or diffuse light. It can be additionally equipped with an automatic on/off system. For this, photocells that can respond to changes in light levels, time-programmable timers, and motion sensors that are triggered when a person or vehicle is in the coverage area are used. Automation and proper adjustment of electric lighting can significantly reduce energy consumption, because the backlight will turn on only when it is needed.
Rules for introducing electricity into the house
For private households, such an issue as introducing electricity into the house is important. Usually it is carried out using a self-supporting SIP wire.
If the power line support is located less than 25 m from the house, additional poles for support will not be required.
The wire usually extends to an electrical panel with an RCD, circuit breakers and a connection to the ground loop located in it. The transition to home cable (for example, VVGng) usually occurs in another panel - with metering devices
Input requirements:
- when the wire length is more than 25 m, additional supports are required (you can install a shield on the pole closest to the house, and bury the ground loop in the ground nearby);
- the height of the wire stretched between the supports is at least 2 m above the ground;
- if the wire crosses building structures, it is mounted in a protective pipe;
- the minimum distance from the ground for the building connection point is 2.75 m;
- if the wire from the control panel to the house is planned to be laid underground, then it must be placed in a protective sheath and then in a ditch at least 0.7 m deep.
It is clear that when choosing an underground installation, the entry directly into the building must be provided during the construction process.
Preparatory work
Installation work on installing lamps is carried out before wallpapering begins.
Most electrical installation work is carried out even before wallpapering and decorative plaster are laid. The master must do the following manipulations:
- Select a lighting device in advance. It is important to consider the microclimate of the room and its purpose. You should buy devices that are protected from moisture for the bathroom; ordinary lamps and chandeliers are suitable for the living room and bedroom. At the same stage, the types of lighting devices are selected. These can be incandescent, halogen, LED or fluorescent lamps.
- Select a location for installing the lighting device. It depends on the purpose of the lamp, its size, type of room, ability to connect to a power point and other indicators.
- Cut channels for laying cables to the installation site.
You should also make a calculation in advance of the number of lamps for the room. It depends on the area of the room, its purpose and other parameters.
Safety precautions when installing electrical wiring
To protect yourself and those who may happen to be nearby, the following rules must be observed during electrical installation work:
- Use only serviceable equipment – power tools, carriers, extension cords.
- Before starting work, be sure to turn off the power supply using automatic devices and RCDs. To avoid accidentally turning on the voltage on the site, you can hang a sign or warn your neighbors.
- For insurance, use testers and indicator screwdrivers.
- Make sure that the insulation on the tool handles is in order.
- Try not to work alone - you may always need help with work or medical assistance.
Separate rules apply to working with a hammer drill, wall chaser or powerful drill. In addition to protective clothing, gloves (with an insulated palm) and a mask (respirator) are required. Shoes should fit snugly and not slip.
Laying electrical wiring under the ceiling must be done only from a platform: chairs or tables are absolutely not suitable.
Every professional electrician is familiar with the rules of first aid in case of electric shock, but ordinary people, unfortunately, do not always act competently.
The main mistake people make when trying to help is trying to pull the victim away from the source of the injury. Under no circumstances should this be done. The first step is to relieve the voltage - turn off the switch
Ideally, in any room where electrical work is being done, you should have a fire extinguisher on hand. Dousing sparking or flaming wires with water is strictly prohibited.
Where can interior lighting be used?
Today, devices that create artificial light are found in all rooms where people may be. Lack of light creates discomfort and can negatively affect vision, so organizing effective indoor lighting has become a necessity. We can distinguish the main types of premises in which increased requirements for the quality of lighting are imposed.
- Residential premises - lighting in the rooms of apartments and houses is designed taking into account their functions. For each type of space, there are different lighting requirements, which create optimal conditions for a comfortable stay in the kitchen, bedroom, hallway, and bathroom.
- Workspaces with constant presence of people. These include offices, workshops, workshops, and production facilities. These types of premises are subject to strict requirements for the quality of lighting, which affects the performance and psychological state of staff.
- Medical institutions, sanatoriums, kindergartens - the lighting of such premises should be comfortable, not irritate the eyes and not cause fatigue.
- In places of leisure and recreation, such as cafes, restaurants, canteens, cinema halls, light performs an atmosphere-forming function and is designed taking into account the characteristics of a particular establishment.
- Shops, shopping malls, supermarkets, sports facilities - artificial lighting is developed with the aim of bringing it closer to the indicators of natural light.