Frequent breakdowns
In practice, various types of breakdowns often occur:
- the LED lighting device does not work at all, neither from the remote control nor through the switch;
- Switching on via the remote control does not work;
- some commands sent from the remote control are not executed;
- a weak or dim glow is visible;
- blinking is observed;
- Clicking noises are heard when switching.
If these or similar breakdowns occur, you should try to figure out the cause of the breakdown and try to repair the LED chandelier with your own hands. Craftsmen who understand electricity can handle LED lighting.
Solving driver problems
Driver problems are a fairly common problem with LED lamps. Most often, a resistor or capacitor burns in the driver.
Using the measuring instruments available to the home craftsman, it is quite problematic to determine the level of performance of this element. Therefore, it is recommended to simply replace it with a working one with similar parameters.
The reasons why a capacitor fails may be an initial manufacturing defect or regular overheating of the module as a result of poor-quality heat dissipation.
It is not always possible to find a suitable part in lighting stores. It is better to immediately go to the radio market or to a place where radio electronics are sold and try to find the thing you need there.
When it is purchased, you will need to dismantle the faulty unit and put a working element in its place.
To correctly disassemble and repair LED light bulbs, you do not need complex, expensive equipment. A minimal set of simple tools will help you troubleshoot problems.
A multimeter will allow you to check the presence of voltage in the circuit, make it possible to detect the presence of breaks and show how efficient the remaining parts of the circuit are.
A multimeter is a universal device designed to measure the main basic parameters of various electronic products. With its help you can find out what condition the LEDs of any LED product are in.
A soldering device with rosin and solder will be required to repair breaks found in the circuit and subsequently replace damaged parts and elements.
The heating temperature at the time of soldering should not exceed 2600. A simple soldering iron heats up more, so a piece of copper wire with a cross-section of no more than 4 mm must be wound onto its tip in a tight spiral. The more you can lengthen the tip, the lower its operating temperature will be.
With a small screwdriver you can carefully separate the control elements from the lamp body, and with a thin, durable stationery knife you can delicately detach the parts from the circuit board.
The repair itself
Let's look at the repair of LED devices using the example of a chandelier. It is easiest to carry out work in a situation where there is a simple chandelier that is not equipped with a control panel. All such devices, as we have already found out earlier, are assembled according to the same principle. The circuit diagram of such devices always contains the following elements:
- LEDs. They can be combined into a compact bridge;
- capacitors (electrolytes);
- several resistors (resistance);
- coil with winding.
Let us remind you that this is the simplest operating diagram of an LED chandelier. The repair in this situation will look like this:
- remove the lamp from the ceiling;
- we disassemble it;
Disassembled LED chandelier
- Now you need to carefully examine the device board for visible defects in the driver, broken wires and other components of the electrical circuit. If there are no such defects, then this is considered a good sign;
- Now we remove the lampshade and study the appearance of the LED lamp or LEDs placed in the housing. The presence of burnt spots on the lamp base or the diodes themselves indicates their malfunction;
- If obvious signs of damage are detected (burnout of the driver, LED, broken wires, etc.), repairs involve either replacing the damaged element or soldering broken contacts.
Also in this situation, you can carry out preventive work: tighten all the screws, repack all the terminal blocks, etc.
LED continuity
In addition, if the cause of the breakdown is not identified, then it is necessary to check the functionality of the LED circuit. To do this, carry out the following manipulations (the easiest way):
- fix the lamps;
- we supply power to it. It is best to use a separate power supply for 12 or 24 volt devices;
- You need to ring all the LEDs. For testing, you can use ordinary tweezers when connecting the lamp to the power supply. To do this, you need to alternately close the contacts on each diode using tweezers;
- the lamp will light up when a burnt-out LED is detected;
- Now all that remains is to replace the burnt out diode and return the chandelier to its place.
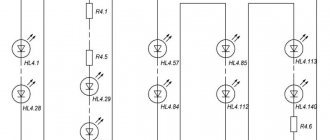
Block LEDs
Remember that replacing LEDs with a jumper is only possible if their number in the overall circuit is at least 10. Otherwise, the capacitor will be overloaded. In such a block type situation, the LEDs will simply burn out.
Replacing the LED strip in a lamp with your own hands
LED strips
It’s easy to replace an LED strip at home with your own hands
It is important to know how it works, study the instructions and how it works. You also need to have minimal knowledge and skills in electrical engineering.
The best way to help with this is educational videos.
Typically, you can replace the tape by following these steps:
- Remove and disassemble the lamp.
- Inspect the structure from the inside for defects.
- Replace damaged elements or solder broken contacts.
Additionally, to repair and repair the device, you may need to tighten all the screws and repack the terminal blocks.
How to unsolder an LED from the pad
To unsolder the LED from the pad, you need to take thermal tweezers, a razor blade and a soldering station. First you need to attach the LED strip to the table. Double-sided tape is suitable for this. Next follow these steps:
- Heat up the soldering iron and prepare half of the blade.
- Start melting the tin on any LED lead by sliding the blade between the lead and the print pad.
- Carefully clear the soldering area for the heat-sinking substrate, without touching the body with the soldering iron tip.
- Cut the tin and check the result by ringing all the tracks using a tester.
It is important to prevent damage to the track due to the loss of the topology of the pattern and possible damage to the entire product. You can also cut without heating the soldering iron
Driver circuits for LEDs from a 220V network
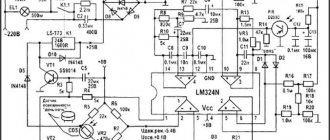
The simplest diagram for connecting an LED strip to a 220 Volt network includes the values of Itot, I led and I vd. The resistance with the power of the resistor depends on the LED current. It is calculated according to Ohm's law. The dissipation power is calculated from the same formula.
In the second circuit, the current through the resistor includes the values L, VD, LED, N. The current flows two times less, which means four times less power is released. However, for this circuit you will need a diode with reverse voltage, for example, 1N4007 (KD258).
LED lamp driver repair
If the driver contains small SMD components, for repair you need to take a soldering iron and copper wire, and then identify the burnt-out diode and unsolder it according to the electrical circuit. If there is no damage, you should unsolder all the elements and test them with a tester. Having eliminated the unusable element, install a new one.
How 220 V LED lamps work
It is known that LEDs cannot operate directly from a 220 V network. To do this, they need additional equipment, which, most often, fails. We'll talk about it today. Let's consider the LED driver circuit, without which the lighting device cannot operate. At the same time, we will conduct an educational program for those who do not understand anything about radio electronics.
The driver in the LED lamp does the main jobgauss 12w driver
The 220 V LED lamp driver circuit consists of:
- diode bridge;
- resistance;
- resistors.
The diode bridge serves to rectify the current (converts it from alternating to direct). On the graph it looks like cutting off a half-wave of a sine wave. Resistors limit the current, and capacitors store energy, increasing the frequency. Let's look at the operating principle of a 220 V LED lamp.
How repaired LED light bulbs work - reviews from those who repaired them
Reviews confirm that fixing an LED lamp is really easy if you have a soldering iron at home. Another question is how long does it last after repair?
From the reviews it becomes clear that:
- Alexander: “If you solder a burnt-out LED, the lamp will not work for long. The Chinese already supply more voltage to the diodes than necessary. After repairs, you also increase it. If the light bulb continues to work after a week, consider yourself lucky, it was made by a reputable manufacturer. In my practice, instead of the norm of 2.8 volts, they make 3.4 volts and higher so that the light is brighter.”
- Seryoga: “It’s good if the matrix has only one broken diode. But sometimes there are only 3-5 live diodes. This lamp should only be scrapped. If 1 of 15 diodes is broken, then the only correct solution is to solder it to another of the same kind. Otherwise, the diodes will burn one after another due to overload.”
- Andrey: “I fixed the light bulb, but the next day it burned out again. A pointless activity. I buy light bulbs from Leroy Merlin with a 3-year warranty. If they burn out earlier, they replace them with a new one.”
- Alexey: “In 10 minutes I repaired 3 light bulbs. Six months have passed, everything is working. I regret that I didn't think of this earlier. So many light bulbs went into the trash. But as a child, I repaired Christmas tree garlands with my own hands. As a schoolboy, he put a ball of foil into the socket of a burnt-out light bulb. With each New Year, the lights became fewer and fewer, the remaining ones glowed brighter and burned out more and more often. But the lamps, pah-pah, are still working.”
- Zhenya: “I advise you to take a look right away, if the lamp has 10 LEDs or even less, you don’t even have to waste time on it. The voltage will rise so much that the lamp will not last very long. A breakdown of another LED is possible immediately after switching on. Unless the lamp contains a semiconductor driver with current feedback. Then, after installing the jumper, the current through the LEDs will not change. However, I have never come across such lamps. More often you come across cheap ones with primitive wiring.”
Features of the structure of controlled lamps
LED lamps, which can be controlled using a remote control, have appeared relatively recently. To make this possible, devices of this type received additional elements of their design.
Chandelier controlled by remote control
As we found out, a standard LED lamp (for example, a ceiling chandelier) consists of a driver, a regulator unit and a housing. The driver has terminal clamps (terminals). Power is supplied to them. From the regulator block in a simple chandelier, wires run to the lamps. The number of such wires, depending on the design of the device, can be from 1 to 12. In models of LED lamps operating from a control panel, an additional antenna is built into the design, as well as voltage regulators and units that automatically adjust the glow of the product. At the same time, several drivers, as well as various types of LEDs, can be located in raster lamp models. Remember that DIY inspection and repair of LED lamps depends entirely on their type.
220 V LED light bulb design
Repairing an LED light bulb yourself is only possible if you understand what parts it consists of and how it all works. This will allow you to look for faults yourself. The design of an LED light bulb is not too complicated. When viewed from the outside, three parts can be distinguished:
- plastic or glass light diffuser,
- metal, plastic or ceramic radiator for heat removal,
- base of one of the standards.
To repair an LED light bulb with your own hands, you will need to get to the insides - all the problems are concentrated here.
What parts does an LED lamp consist of?
If we disassemble the LED lamp, we will find an electrical part inside, where we will look for damage. This:
- Voltage converter/stabilizer or driver. It is located half in the base and half in the heat sink.
- Board with LEDs.
As you can see, it’s not too difficult, although there are a lot of variations. For example, in some models the driver is soldered on the same board where the LEDs are mounted. This is an “economy” solution and is usually found in cheap light bulbs. In others there is only one LED. These, on the contrary, are expensive models, since one large and powerful LED costs significantly more than a bunch of small ones with the same (or greater) glow power.
Types of breakdowns and their causes
To repair LED ceiling lights with your own hands, you need to study the main types of breakdowns and the factors that cause them.
If the remote control does not respond to touches far/near and it is not the batteries at all, the following reasons for the malfunction are possible: failure of the remote control due to clogged contacts that need to be cleaned with alcohol; dysfunction of a low-quality Chinese device, requiring its complete replacement; poor operation of the device relay.
If the remote control works on the third or fifth attempt, and responds to touches only close, then the problem is a bad relay that needs to be replaced, an interruption in the LED loop as a result of missing contact or its melting. The reason may also be a breakdown of the lamp control unit. Often, repairing chandeliers with a remote control is limited to installing better batteries.
A stationary switch fails as a result of oxidation of wires, malfunction of the transformer, incorrectly selected electrical circuit, regular surges in the network, overheating and overvoltage. Often the cause of the phenomenon is a poor-quality switch and improper operation of the device.
LEDs with light bulbs do not light up due to a failure or failure of the power supply, the LEDs and lamps themselves, or burnout. Also sometimes the problem is network failure, high voltage, overheating of the device and poor-quality lighting fixtures. In any of the above cases, a complete replacement is required.
The LED chandelier does not turn on due to a poor connection, poor-quality wiring, or a failure at the level of the device itself or near the switch. Another problem is the lack of checking the operation of the lamp before purchase - a manufacturing defect is possible. Sometimes the reason lies in problems with the remote control.
Features of corn lamp repair
“Corn” is one of the varieties of LED lamps, named because of its shape and arrangement of semiconductors.
Servicing such products is as easy as shelling pears! The LEDs are located on top and are not protected by anything, so when replacing them it is not necessary to disassemble the device and get into its filling.
Ring each element separately and replace the faulty ones. The faulty component can be replaced with a regular jumper. The presence of such slightly reduces the service life of the “corn”, but does not in any way affect the stability and reliability of the device. This is only relevant for lamps of this type!
Types of malfunctions and their causes
To successfully repair a chandelier with a remote control, you must first study the types of faults and what caused them.
Most common breakdowns
Typical troubles due to which you have to repair a chandelier with a remote control include:
- complete or partial lack of lighting;
- spontaneous shutdown of the lamp;
- short blinking;
- device failure.
A breakdown can be caused by a temperature exceeding 50°, rupture of the contact - either the thread, or the holder, or its detachment. Diode burnout occurs due to overvoltage in the network, burnout (breakdown) of the capacitor. These breakdowns are typical for inexpensive boards. Other potential causes:
- short circuit;
- incorrect connection to the circuit;
- incorrectly implemented device connection diagram.
Breakdowns and factors causing them
Since any malfunction has certain causes, the connection must be established first.
- The remote control does not respond to touch. In addition to battery malfunction, an unpleasant situation can be caused by clogged contacts that need cleaning, poor operation of a radio relay due to poor quality, and gradual degradation of the capacitor. This defect requires replacement.
- The remote control starts working only on the second or third (fifth) attempt, or reacts only close. This malfunction can be caused by low-quality batteries or a faulty relay, interruption of the diode loop due to poor contact, its melting.
- Fixed switch failures. In this case, the culprit is oxidation of the wires, incorrectly selected electrical circuit, constant voltage surges, and overheating. The problem is often caused by a malfunction of the transformer, a bad switch, or improper operation.
Failure of light bulbs and/or LEDs to work is the most “popular” surprise. This breakdown is provoked by a network failure or failure of the power supply, burnout of elements due to their low quality, or overheating of the device. In any of these cases, replacement of lamps or inspection of the unit is required. If the light intensity of the devices in the line differs, it is also recommended to completely replace them.
If an LED chandelier does not turn on, it is possible that the culprit is a poor connection or poor-quality wiring anywhere in the electrical circuit. To avoid such a problem, it is imperative to check the device before purchase, including the operation of the remote control.
Common causes of malfunction
There are many reasons why a light bulb can burn out. The list below will highlight the most common of them:
- The electrolytic smoothing capacitor is damaged. This can happen if parts are used without a reserve for the voltage rating.
- If the LED lamp has bad solder connections. Due to the fact that the temperature rises and falls as the lamp is turned on and off, poorly soldered connections simply collapse.
- Poor heat dissipation. Sometimes manufacturers simply skimp on thermal paste or parts. For example, instead of a metal radiator, a simple plastic fake will be installed. Of course, in such conditions the lamp will not last long.
- Voltage fluctuations. This reason is the most common.
- Failure of the current-limiting resistor. The lamp begins to flicker intensely, which irritates the eyes.
- Disruption of the basic crystal structure. This happens after prolonged use.
If any of these breakdowns occurred with an LED lamp, it means that everything is not so bad. All this can be easily fixed.
Lamp design
The reasons for the burnout of fluorescent lamps depend on the ballast
Incandescent and fluorescent lamps are connected in different ways, but any, even the highest quality, light sources can burn out. There are many reasons why fluorescent lamps do not work. To identify them, you need to briefly familiarize yourself with the design and operation.
The operating principle of fluorescent lamps is an electrical discharge that occurs in mercury vapor. The emitted ultraviolet light is converted into visible light by a special substance - phosphor, which is applied to the inner surface of the lamp bulb.
For a gas discharge to occur, a high voltage is required, which is created when the lamp is turned on through the use of ballasts.
There are two fundamentally different types of ballasts:
- electromagnetic, which uses a throttle and starter;
- electronic, assembled using radio-electronic components.
The lamp does not turn on from the remote control: what to do?
If the chandelier stops turning on from the remote control:
- Check the voltage on the battery (video example here). If it is discharged, replace it with a new one. Check if the chandelier has started working;
- If the battery is fine and the remote control still does not give a command, check the buttons. Look at the remote control light through the phone's camera while pressing each button alternately. If the button is working, then you will see the light blinking on the phone display (you will not see anything with the naked eye). If there is no blinking when you press one or more buttons, they need to be repaired. You can buy a new remote control. But it is paired with a receiver, and replacing it is a troublesome task;
- If the battery and buttons are working properly, but the lamp still does not turn on from the remote control, then the failure lies in the radio signal receiver. Then you will have to replace it, and the remote control too.
The remote control buttons usually stop working when the contacts become clogged. There are two ways to fix this:
- Clean the contacts from dirt and factory grease. Apply a drop of superglue and apply graphite crushed with a file onto it. Assemble the remote control;
- Instead of graphite, try a piece of foil (without a paper backing, which will not transmit the electrical signal).
And to replace the receiver you need to buy a new control unit with a remote control. The devices must be set to the same frequency. Then:
- Turn off the power to the apartment;
- Remove the chandelier and open its box;
- Remove the old receiver by cutting the wires;
- Get a new power supply. Study it carefully. It has several multi-colored wires, exactly the same ones in the chandelier (you cut them);
- Now place the unit on double-sided tape in the box in the same place where the old receiver was located;
- Strip, connect and insulate wires of the same colors;
- Close the box and hang the chandelier in place.
There is another option for the development of events. Think about it, do you really need remote control of the chandelier? If not, then remove the broken receiver from the chandelier box by connecting the controller directly to the two-key switch. When switching, the first key will change the modes of bright, moderately bright and dim lighting, the second will switch the backlight operating modes.
DIY LED lamp repair: step-by-step instructions
Let's look at a simple LED lamp repair as an example:
| Illustration | Action to be performed |
| After removing the diffuser cover, carefully inspect the LEDs. If such a black dot is noticed, the element has burned out. | |
| LED elements can be soldered from the strip, but it is more convenient to purchase them separately. This is how they are sold. The size of the light diode may vary, but the characteristics should be suitable. | |
| We unsolder the burnt element, clean the contacts and apply a special paste. The element is glued to it, making soldering easier. | |
| The ground corner of the element shows where the negative terminal is located. If the polarity is reversed, the light bulb will not work. | |
| We warm up the light diode with a soldering (or industrial) hair dryer and press it a little with tweezers. | |
| All that remains is to check the light device. In our case, the test is carried out without a diffuser. You shouldn't do this with him, because... dangerous. |
As you can understand, repairing a 220 V LED lamp with your own hands is not so difficult. If there are no new parts, you can use burnt out light bulbs by removing the elements from them. One working light device is assembled from 2-3 old ones.
How to fix a burnt out LED light bulb - step by step guide
The idea of repairing a burnt out LED light bulb is to restore the circuit using a jumper. The LEDs are connected in series. At the point where one element burns out, a break occurs and the entire lamp stops glowing. You need to remove the burnt diode and bridge the contacts on the board with each other.
Required set of tools:
- stationery knife;
- soldering iron;
- a little solder.
Step-by-step instruction:
- Disassemble the light bulb. For a quick repair, just remove the matte hemisphere from the case.
- Identify a burnt out LED. It is usually marked with a black dot in the center.
- Remove the faulty element with a knife.
- Solder this place with tin (leave a drop).
- Place the light-diffusing cap in place.
After some simple manipulations, in 95% of cases the light bulb becomes operational again. How to repair a 220V LED lamp is clearly shown in the video:
Next, let's talk about the nuances of repair.
How to disassemble?
The first step is to remove the matte cap. In some cases, it is enough to pull it sharply to the side (open it at a break), or simply unscrew it. If the cap does not budge, it is most likely stuck on with glue.
You need to take a utility knife or something similar, insert the blade into the junction of the lamp body and the cap, and go around the perimeter twice. The adhesive sealant in lamps is usually soft and easy to cut. Next you need to pick up the cap.
The lamp is disassembled. Approximately the following picture will appear before your eyes:
On top there is a board with LEDs. As a rule, it is screwed to the radiator.
Advice. If you can’t insert the blade between the body and the cap, you can make a small hole with a metal file (file the edge).
How to find a burnt out LED?
A faulty element is often visible to the naked eye. A black dot appears on a burnt-out diode. It can be large and clearly visible or small and faded. Examples in the photo:
We recommend that you take a good look at each diode in bright light. You can use a magnifying glass and a flashlight. Burnt-out LEDs with a faded dot should be marked with a marker so as not to lose sight.
It happens that there are no dots on the LEDs, and outwardly they all look fine. Then you need to carry out diagnostics with a multimeter:
- Turn on the device and select a measurement threshold of 200 volts. Connect the lamp to the network. Measure the voltage at the driver output and find out whether the matrix is receiving power. If there is voltage, then the driver is working and the problem is a faulty diode(s).
- Switch the multimeter to diode or circuit testing mode. Unscrew the lamp from the network. Consistently connect the probes to + and - on each diode on the lamp. A working LED will glow dimly. Thus, you need to identify all defective elements and mark them with a marker.
In this way you can find non-working 3 W diodes. If the diodes are 9 W, you won’t be able to ring them due to insufficient voltage on the probes. You should connect the lamp to the power supply, select the voltage measurement mode of 200 volts, and sequentially pass the probes through all the diodes. When it comes into contact with a degraded diode, part of the circuit will begin to glow.
How to repair?
After the light bulb is disassembled and the defective element is found, the repair itself begins. It is performed in two steps:
- Removing the burnt out element (or elements). You can simply remove a faulty diode by picking it up with a knife or squeezing it with small pliers. When using pliers, removal is more accurate. Clean contacts remain in place, which is convenient for bridging with solder and for more complex repairs of the LED lamp.
We recommend: How and why to test water in an aquarium
- Soldering the jumper. The soldering iron must be turned on. After it heats up, you should drop flux (soldering acid, rosin) onto the cleaned contacts, pick up a little solder and apply it on top - make a conductive bridge. The main thing is that the drop closes two contacts.
The integrity of the circuit will be restored and the lamp will work again. All that remains is to collect it.
How to assemble?
It is clear that LED lamps are structurally somewhat different. Assembly is carried out according to the type of housing. The screw cap is simply screwed on. If it was “torn off” with a click, you should pay attention to the location of the locking slots. When assembling, it is necessary that they coincide with the stopper on the body. Then the cap snaps on. In some cases you need to scroll it a little.
It happens that it is impossible to carefully disassemble the lamp, and the diffuser breaks off. In this case, it can be glued with any glue for plastic. If the sealant is removed, the diffuser may fall off and not hold on tightly. In this case, you should apply a little sanitary sealant along the edges of the case, press the lid, and leave it to “set” for 20 minutes.
Problem with lamps or LEDs
The control controller is the only source of the problem when all LED lighting devices do not turn on. If only some of them refuse to work, then there are two options: either failure of the elements themselves, or failure of one of the two transformers feeding the LED lines.
Since they are connected in series, if one electrical appliance fails, the others will also not be able to work. In this case, the burnt element is found and replaced with a new one. If halogen lamps do not light, then repairing a chandelier with a remote control consists of checking the transformers, as well as the lamps themselves, connected in parallel. They are called, then the faulty elements are replaced.
When all the LED backlights do not light up, the first thing to check is the ballast capacitor. It is connected to a multimeter. If the voltage is normal, then the entire circuit of lamps is often replaced. If the voltage is minimal or completely absent, then the capacitor is replaced with a new device. When all the halogen elements do not light up at once, it is possible that the electronic transformer is the problem. It is also tested, and the faulty one is replaced.
The most common breakdowns
If the lighting device does not turn on either from the switching equipment or through the control panel, the reasons for this may lie in a malfunction of the controller. You can check this assumption by removing this element from the diagram.
Design of LED ceiling lamp with PU
In this case, you need to connect the LED and halogen units directly to a 220 V network. If the light is on and each of the bulbs is working, the problem is in the controller. You will have to disassemble it and check all the elements of the board.
If this solution does not help and the chandelier with the control panel still does not work, you need to check the power supplies of LED and halogen light sources. It is easy to verify this if you test the filaments of light bulbs.
If each of the units works (diode, halogen), but when connected through step-down transformers the light still does not turn on, the cause of the malfunction lies precisely in the power supply elements.
But before you start dismantling the lighting fixture, you need to check the batteries in the remote control and also check whether power is supplied. These are the most common reasons explaining why a chandelier does not work. A multimeter is used to check the circuit elements.
Malfunctions of chandeliers with PU and their elimination
So, most often the LED chandelier with a remote control simply does not turn on. What could be the reasons?
- The remote control itself does not work. You need to check the batteries, they may simply be dead. Replacing them with new ones can immediately solve this problem.
- If the first reason is excluded, and the chandelier still does not light, then you need to deal with the controller. This is the name of the receiver that receives signals from the control panel.
- Since our chandelier is an LED lamp, the light sources themselves cannot operate directly from a 220-volt network. An additional power supply must be installed in the chandelier design. This is a step-down transformer. Repairing such a malfunction consists of replacing the faulty device with a new one.
It should be noted that combined type chandeliers are halogens as the main type of lighting and LEDs used as backlight. So, you always need to pay attention to which halogen lamps should be installed in the lighting device. This refers to their power. If lamps of higher power were installed by mistake, then either the step-down transformer or the lamp sockets will definitely burn out. By the way, repairing cartridges in such chandeliers is the most difficult.
How to change the controller
Let’s immediately make a reservation that changing the controller to a new one is not a cheap pleasure. Such a device costs half the price of the LED lamp itself, so it’s worth first understanding the faults, and only after that deciding the issue of purchase and installation.
If the controller does not work completely, then the entire chandelier will not light. If some of the light sources are on, then you need to deal with groups of light bulbs separately. By the way, sometimes there are situations when the repair issue is solved by replacing the remote control.
So, let's consider the situation with the inability to turn on part of the chandelier. How to correct the situation, what repairs will be needed?
- To do this, first the controller is disconnected from the circuit;
- then each light group must be connected separately (in turn) to a voltage of 220 volts;
- if one of them does not light up, then you will have to deal with its power supply;
- if, on the contrary, all groups light up normally, then the whole problem is in the controller.
In the first case, you don’t need to think much, just install a unit from the neighboring group in place of the power supply. If in this case the light bulbs light up, you will have to buy a new device and install it in the lamp circuit.
In the second case, you will have to change the controller itself. If you do not have the opportunity to purchase it, then you can exclude the device from the connection diagram and transfer the switching on and off of the LED chandelier from a regular switch. This is not difficult to do, because the controller itself in the electrical circuit of the chandelier is connected by two wires: phase and zero. From it, the zero circuit is supplied to the zero contacts of the power supplies, phase to phase.
Replacing the controller is just as easy. Four contacts are disconnected: two input, two output. The device is dismantled, a new one is installed, and the connection is made according to the old circuit through four contacts. By the way, the connection diagram is usually indicated on the device itself (on the body), which is quite easy to understand.
In principle, it is possible to repair the controller itself. But you must first check it for serviceability, for which you use a multimeter set to check the voltage. The 220 V mode is set and testing is carried out. If the measuring device shows that 220 volts passes through the controller circuit, then the device is working; if not, then there is some kind of defect in it. As practice shows, most often all faults are in the board, other elements are normal. If you are not a specialist in this matter, then do not try to carry out repairs yourself. Because it is very difficult to find a defect, sometimes even experienced craftsmen, not finding it, simply change the plateau.
Sometimes the cause of the malfunction is capacitors, which can also be checked using a multimeter. Typically their capacity is at least one microfarad. If the meter readings are less than this value, then such a capacitor should be replaced.
Preliminary device diagnostics
The LED module usually does not light up due to breaks in the general wiring, malfunctions in the switch system, lack of contact in the socket, or problems with the lamp itself.
To understand the issue, you need to conduct a preliminary diagnosis and understand where the problem is located.
When the lamp does not light up when the switch is activated, you need to unscrew it from the socket and screw in another one, not necessarily a diode one.
If the situation has changed and the light appears, then the lamp itself is faulty. No light coming in means there is a problem with the wiring.
The next step is to use a multimeter to find out whether there is voltage in the electrical circuit.
To do this, just lean the device against the cartridge part with the switch activated and look at the indicators. They should be at the level of 220 V. If the numbers are different, then a fault zone has been detected.
When the presence of the correct voltage is confirmed, but the lamp still does not light, you should check whether there is contact between the base and the socket antennae. If disturbances occur in this area, an arc occurs and carbon deposits form on the antenna elements.
With intensive use, constant overheating or insufficient initial thickness, the central and side contacts in the socket can become unusable and cause regular burnout of LED lamps
To remove it, you need to turn off the voltage, clean off the incorrect formations, and carefully bend the antennae themselves. After all these steps, you can screw the work lamp into the socket and check the result.
If there is no voltage at the contacts of the cartridge, it must be removed and checked to see if there is a phase on the wiring itself. If it is present when the switch is activated, the cartridge must be replaced.
When it is not there, you should pay close attention to the switch and look for the problem there. If all the above-described elements, components and parts have confirmed their serviceability as a result of the test, it becomes absolutely clear that the problem is in the LED lamp
If all the above-described elements, components and parts have confirmed their serviceability as a result of the test, it becomes absolutely clear that the problem is in the LED lamp.
Beauty and versatility
New power line chandeliers look very beautiful and are designed to perform various operations such as switching the brightness of lighting, changing color, turning on the lighting when a person enters, and playing music. The designer endowed the new lighting fixtures with beauty, versatility and operation from a switch and control panel. Typically, incandescent lamps and LEDs should function harmoniously in them, performing any operating modes that the owner desires:
- execution of a command to illuminate only all or half of the incandescent lamps;
- the combined glow of half of the incandescent lamps with a separate level of LEDs;
- lighting of all incandescent lamps and all LEDs;
- operation of LED lamps only;
- other lighting options, color changes, depending on the number of levels and capabilities.
The lighting device must properly perform all these functions through the control panel (sometimes there are 2 remote controls) and perform basic actions through the switch.
The easiest way to check a lamp's LED circuit
First we try to disassemble the lamp itself. There are collapsible models, but sometimes you will need to heat them with a hairdryer or trim the body. First, of course, a visual inspection. As a rule, a burnt-out LED is different in color or has a burnt leg and the LED solder pads are burnt or peeled off.
Method 1.
It is better to supply power with a separate power supply to the lamp. Typically 3.7 volts is supplied to each LED, but there are other ratings. Please note that the voltage changes depending on the number of LEDs. To quickly check the LED elements of an ice lamp using improvised methods, you can use any 3-volt battery and paper clips by connecting the contacts. Just observe the polarity of the connection.
Having connected the contacts to the paper clip and observing the polarity, we check the LEDs one by one
We also use a similar testing device when checking the built-in lighting of a lamp.
Checking all backlight LEDs for functionality
The failure of one LED will result in all of them being turned off!
Method 2.
The device needs to ring all undamaged LEDs in the circuit. But there is an easier way: connect the lamp to the power supply and carry out simple manipulations
- Close (throw a jumper) the contacts of each LED one by one with tweezers or a wire with stripped and tinned contacts.
- The lamp will light up when you find (close the contacts) on the burnt out LED. If this does not happen, look further down the chain.
- Check the board for the cause of burnouts, swelling of capacitors, carefully check the tracks on the regulator board itself. Solder the broken contacts.
You cannot replace an LED with a jumper when there are less than 10 of them in the overall circuit; the capacitors will be overloaded; block LEDs will burn out when there are 3 of them in one case. They can be identified by three dark dots inside a yellow or white crystal.
LED lamp repair
It is important to know that the LED has polarity and when replacing it, you need to install it correctly on the board. All LEDs are printed soldered, that is, immersed in tin.
Typically, a soldering gun is used to seal the LED. At home, although it is difficult, it is possible to apply more tin with a soldering iron.
To install, just install it on a printed circuit board and heat its ends with contact pads with a soldering iron. With powerful soldering, you will have to additionally heat the board from the bottom with a soldering iron. It is important not to overheat the LED element when soldering!
Video:
A possible way to repair LED lamps using conductive paste.
Video:
Minor faults
A chandelier with a remote control may not turn on for other reasons that are minor.
- Broken wiring or poor quality contacts.
- The LEDs themselves do not work.
Therefore, before the chandelier is installed on the ceiling, we recommend that you carry out a small check on the floor or table. To do this, it is connected to the network through an outlet using a plug.
It is checked whether there is voltage at the input contacts of the controller, then at the output contacts. Then you need to make sure that electrical current is supplied to the power supplies. Then the voltage is measured after the power supplies (it must be reduced and correspond to the rating indicated on the device body). Be sure to check the wires connecting the power supplies to the light sources. And lastly, the groups of LEDs themselves are checked. In principle, nothing complicated, but sometimes this will determine whether the chandelier is on or not.
The principle of operation of the driver in an LED lamp
| View on the diagram | Operating procedure |
| A voltage of 220 V is supplied to the driver and passes through a smoothing capacitor and a current-limiting resistor. This is necessary in order to protect the diode bridge. | |
| Voltage is supplied to a diode bridge, consisting of four differently directed diodes, which cut off the half-wave of the sine wave. The output current is constant. | |
| Now, by means of a resistance and a capacitor, the current is again limited and the desired frequency is set. | |
| Voltage with the necessary parameters is supplied to unidirectional light diodes, which also serve as a current limiter. Those. when one of them burns out, the voltage increases, which leads to failure of the capacitor if it is not powerful enough. This happens in Chinese products. High-quality devices are protected from this. |
Having understood the principle of operation and the driver circuit, the decision on how to repair a 220V LED lamp will no longer seem difficult. If we talk about high-quality lighting devices, then you shouldn’t expect any troubles from them. They work for the entire prescribed period and do not fade, although there are “diseases” to which they are also susceptible. Let's talk about how to deal with them now.
Common types of breakdowns
LED lighting devices, due to their rather complex design, can have a wide variety of malfunctions, the type of which will determine the repair actions you carry out yourself. But the most common typical breakdowns include the following:
- complete or partial lack of lighting;
- the appearance of short-term blinking;
- spontaneous switching off of the light during operation of the device;
- failure of a light bulb or LED.
Light
A variety of reasons can lead to the breakdown of a lamp of this type. The most common causes of breakdowns of LED lighting devices are the following:
- incorrect operating conditions. When purchasing a lamp, be sure to find out what operating conditions will be considered optimal for it. If a chandelier or wall sconce operates in unsuitable conditions, then there is a high probability of breakdown;
- overheat. Problems with an LED lamp can begin when the temperature of the diodes exceeds 50 degrees. Due to such a high temperature, the contacts of the thread or the holder itself may break, as well as peeling on the contact board;
- LED burnout. It can occur in whole or in part. The reason for this is network overvoltage or capacitor breakdown (burnout);
These are the main reasons that can lead to a malfunction of the LED device. But besides these, there are additional reasons, which include the following points:
- incorrect connection of the product to the network;
- a short circuit that appears in the circuit;
- improper installation of the device;
LED chandelier on the ceiling
- non-compliance with its connection diagram;
- originally purchased low-quality product. For example, this may be poor soldering of the circuit contacts, as well as LEDs and other elements of the lamp device (for example, the driver). Usually such moments are called “manufacturing defect”.
As you can see, a variety of reasons can lead to malfunction of this type of lighting fixture. Therefore, in order to make repairs yourself, you must first find the cause of the breakdown.
Blinking and eliminating their causes in an LED light bulb
The main reason why LED bulbs flicker is the use of a weak capacitor or lack of one. The problem can be solved quite simply - by installing a more powerful component. If the capacitor voltage is 102 V, and the LEDs are 180 V, the value of the first should be increased by 1.5 - 2 times.
Install a similar capacitor, but with a larger capacity. Simply resolder the old capacitor, replacing it with a new one. Another option is to connect a second capacitor in parallel to increase the total capacitance and power.
How to repair a fluorescent lamp
The optimal repair method is to replace the faulty element
In most cases, the easiest solution is to replace the faulty elements. You can check by installing a known-good element. Complete repair of a fluorescent lamp involves a number of difficulties and requires certain qualifications and experience. Before disassembling the fluorescent lamp, you need to make sure that it is disconnected from the network and that electricity is not supplied to it.
The easiest way is to find a replacement for a faulty starter. You can force the lamp to turn on by installing a button instead. This method is dangerous because holding the button for more than the required time can cause the filaments of the electrodes to burn out.
It is more difficult to use lamps without a choke. Several workable options for such inclusion have been developed. Most circuits use the principle of multiplying the mains voltage for stable starting. These circuits use rectifier diodes and capacitor banks, which causes an increase in the size of homemade ballasts. A powerful resistor or an incandescent lamp of 25-40 W is used as a choke to limit the current, depending on the power of the fluorescent lamp.
The advantage of resistors is their small size, but the problem is the high heat generation on it during operation. Incandescent lamps provide additional light output, but because they operate at a reduced voltage, their lifespan is virtually unlimited.
Preparing for repairs and what is required for this
You need to prepare everything you need for work. Some items may be on hand, others will have to be purchased, but this will not cost much. List of tools and accessories:
- A small soldering iron with a small tip. The contacts in the lamps are small, so the standard option will not work. It is best to buy a special model with different types of tips (flat and point). We must not forget about the materials for soldering - solder, rosin, etc.
- Set of tweezers. The tool store sells sets of tweezers for small jobs; they have devices of suitable shapes and sizes.
- Holder for a lamp or other unit (the so-called “third hand”). A good solution is a device with a magnifying glass to simplify the work. You can adapt available elements - cut off a plastic bottle or pick up something else.
- Small gas burner. Models from tobacco kiosks that are used to light cigars are suitable. If you can’t find such a device, buy a so-called “turbo lighter” that does not go out from the wind.
- A set of screwdrivers of different sizes to remove and disassemble the lamp. Most often, Phillips-head screws are used as fasteners.
Set of tools for repair.
Some fixtures use hex head screws, so you may also need a set of wrenches. Repairing LED lamps is a scrupulous job, since the products contain many small parts, and if handled carelessly, they can be damaged.
Design and basic operation
LED lamp design
LED lamps are an electric arc ignited in a vacuum at the boundary of a pn junction. By controlling the voltage, you can regulate the arc light. The design of the chandelier includes a mounting unit with a control unit, a radio receiver, a lighting segment, a remote control, and decor. In addition, music systems with speakers and strip lighting are often built into the devices.
The fastening unit includes a bar with a cross, the control unit includes controllers with printed circuit boards and wires, and the lighting segment includes sockets with sockets for LEDs.
Internals and operating principle of a chandelier with remote control
Before you start repairing a faulty chandelier, familiarize yourself with its design, which includes three groups of electronics:
- LED lamp (backlight);
- Halogen lamp (main and additional lighting, sometimes also LED);
- Relay with receiver of the signal supplied by the remote control.
An LED lamp contains dozens of small diode multi-colored bulbs that are used to switch lighting modes. They receive electricity from a capacitor included in the LED design. It also lowers the voltage level to the level required for the diodes to operate. The light bulbs are connected in series, so if one of them breaks, the others immediately go out. Finding a burnt-out diode is difficult; it’s easier to replace everything.
The halogen unit is powered by several transformers that pulse the supplied voltage. If the halogen lights stop lighting, there can be two reasons: a malfunction of the bulbs or a breakdown in one or more transformers.
The relay that receives and processes the radio signal includes several electromagnetic relays that switch current of certain power values. It is powered by a quenching capacitor. The resulting excess electricity goes into a capacitor, which plays the role of ballast. The more hours the chandelier has burned out, the higher the risk that the relay will become detached from the board. The place where they connect is the weakest in the structure.
Each chandelier requires a remote control, which usually has only 4 buttons. Its electronic circuit is simple and very reliable. Therefore, if the chandelier does not turn on from the remote control, but works properly if you give commands using the switch, simply replace the batteries.
LED lamp blinks when turned on
Immediately after switching on, the lamp lights up for a short time and then goes out. In most such cases, the cause is a faulty trigger mechanism, which is unable to fully convert and supply current and cannot accelerate the entire system. This problem can be solved by simply replacing the starter.
Read also: Rolling mill for sheet metal
The switched on lamp does not turn off, but begins to blink periodically. This can happen due to low voltage in the supply network, malfunctions in the starting system, or sudden surges and drops in voltage. In such cases, the resources required to regulate stable operation of the lamp are reduced. A decrease in the supply current is allowed within 5%. It is necessary to measure the current strength in the supply network and in case of any deviations, contact the service organization. Such power surges have a negative impact not only on the operation of the LED lamp, but also on all existing household appliances. The service life of lighting fixtures in this mode can be reduced by more than 20%.
Flickering often occurs due to a malfunction of the trigger system installed in the lamp housing. It is very difficult to replace, and in some cases it is impossible to replace. This condition most often occurs at the end of its service life, which indicates that the lamp is unsuitable for further use. Voltage surges and surges in the network often occur as a result of the use of high-power equipment. As a rule, these are welding machines that consume large amounts of electricity.