LED lamps have found wide application in everyday life - they are equipped in residential and utility rooms, greenhouses, gazebos and local areas. However, in order for the lighting in any place to be bright, economical and durable, we will look at how to connect an LED lamp, on what principle it works and what are its main features, what basic methods and connection diagrams exist for 220 and 12 volt light bulbs, as well as how replace fluorescent lamps with new LED tubes and what are the advantages of this approach.
An LED lamp is more energy efficient, economical and durable compared to standard light bulbs Source lifehacker.ru
LED lamp - what it is, how it works, features
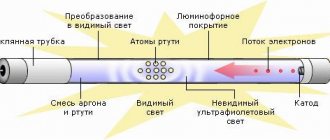
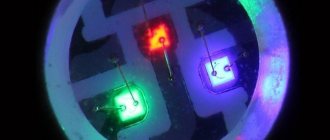
The basis of any LED lamp is a semiconductor crystal. When an electric current passes through it, the material is transformed at the internal level - the energy state of the electrons changes. As a result of these processes, light radiation is released. In addition to the ice element that directly produces light, the LED includes the following main parts:
- Driver – rectifies and transforms electric current to the required parameters to power the crystal.
- Optical diffuser – forms the optimal light flux at a given angle. Also performs the function of protecting the LED matrix.
- Radiator - collects and removes thermal energy generated by the radiation of the ice crystal.
The lamp is designed in a housing and is equipped with a socket of a certain standard for connection - depending on the purpose and type of device. This can be a standard light bulb or a specialized lighting device.
Main components of an LED lamp and their purpose Source electricalschool.info
LED lamps are often installed not only instead of conventional incandescent lamps, but also rather energy-efficient fluorescent lamps - since their connection at the household level is justified due to the following advantages:
- Service life from 10 thousand hours.
- Minimum power consumption with the same luminous flux in a number of analogues.
- Lighting indicators that are harmless to vision.
- No toxic components in the equipment.
- Resistance to shock, dampness, temperature changes.
- No maintenance required throughout the entire period of operation.
- Variety in color temperature and intensity.
The only drawback of ice lamps is their high cost. However, in the long term, over their entire service life, taking into account the above advantages, LED lighting devices turn out to be much more profitable than their analogues.
Ceiling lamp based on ice elements Source arlight.su
Electrical wiring diagram for spotlights
Before installing a suspended ceiling, after choosing the type of light bulbs, calculating their power, the number of lamps and their installation points, an electrical wiring diagram is developed. When developing an electrical circuit, it is necessary to take into account the points and methods of connecting the wires to each other and to the lamps.
Since wires were already coming out of the wall, to which the wall lamp had previously been connected, it was decided to connect the ceiling lamps to these wires. It was planned to install a suspended stretch ceiling made of PVC, and the wires came out above the level of the stretch ceiling, and, therefore, there would be no access to the connection points of the wires after installing the ceiling. Therefore, it was decided to make all wire connections in the most reliable way, twisting followed by soldering with tin-lead solder. The soldering points were marked on the electrical diagram.
When choosing a place to install lamps and chandeliers in rooms where there is a TV or computer, you must not forget that the angle of incidence of the light beam is equal to the angle of reflection. Taking into account this rule, lamps must be installed in places that exclude their reflection on the monitor screen, therefore, to select installation points for lamps, it is necessary to think about how the furniture will be arranged, in what place the TV or computer monitor will be installed.
When choosing light bulbs for a supply voltage of 220 V, installation of additional devices is not required. In the case of using light bulbs with a supply voltage of 12 V, it is necessary to provide a place for installing transformers or adapters, taking into account their overall dimensions and possible access to them for maintenance or repair.
Attention! Before connecting spotlights, to avoid electric shock, it is necessary to de-energize the electrical wiring. To do this, turn off the corresponding circuit breaker in the distribution panel and check the reliability of the shutdown using the phase indicator.
Methods for connecting 220 V lamps
Modern manufacturers produce two types of ice lamps - 220 and 12 volts. The former have become more widespread in everyday life - as they are convenient and familiar to use. To include them in the circuit, simply mount them in the standard way. Thus, in the version of a standard light bulb, the lamp is screwed with the base into the corresponding socket. Moreover, no additional equipment is required for its operation.
There are 3 main ways to connect an LED lamp to 220 V - these are:
- Consistent.
The method is used when there is a need to save conductor. In this case, the condition must be met that there will be no more than 6 light bulbs in the circuit. The disadvantage is that if one lamp fails, the others will also stop working. To find a problem you will have to check each one.
To connect using this method, a phase wire from the switch is supplied to the 1st device. Then a conductor is led from the 1st to the 2nd, etc. - according to a sequential circuit. Finally, the zero conductor from the junction box is routed to the final lamp in the circuit.
An example of a diagram of serial, parallel and erroneous connection of ice bulbs Source svetilov.ru
See also: Catalog of companies that specialize in electrical work of any complexity
- Parallel.
Standard and most applicable connection method. All bulbs produce luminosity that meets the manufacturer's warranty. However, with this method, the consumption of conductors is significantly higher than in the one described above.
When connecting according to this diagram, a cable is pulled from the distribution box through the switch. In this case, the lighting devices are connected one by one. Thus, both phase and zero are suitable for each of them. If one lamp breaks down, the others will continue to operate normally.
- Ray.
The method is an alternative to parallel. It is used when it is necessary to save on the conductor, but at the same time maintain the principle of parallelism of the electrical circuit. Its essence is that a cable from the switchboard is supplied to a position centrally located in relation to the connected lamps.
Next, neutral and phase conductors are connected separately to each lighting device. In this case, the connection of all wires at one point is carried out by twisting or a special terminal box.
Distribution terminal box for wiring connection Source ytimg.com
On a note! Connecting and operating 220 V LED lamps in a domestic environment is dangerous, so modern manufacturers include a grounding conductor in their design: to connect them in accordance with the designer’s plans, you must use a cable with three wires - for phase, neutral and ground.
Features of industrial lighting installation
In laboratories, workshops, light should evenly illuminate the entire work space. For this purpose, large fluorescent lamps are often used, which are distributed in rows at a certain height.
The method of their attachment may be different. It is more convenient to attach single devices directly to the ceiling surface. However, the large height and the need to place a large number of such light sources creates certain difficulties during installation and subsequent maintenance.
Therefore, a cable system or fastening to a metal tray is most often used. Manufacturers even produce special designs of cable cables and wires for such lighting installations.
Location of lamps in production workshops
This method creates an additional load on the walls into which fasteners are installed. Buildings made of concrete slabs and metal frames usually have an increased margin of safety and can withstand the forces applied to them well.
Wall masonry made of foam blocks or bricks has its own characteristics. They must be tested for their ability to withstand the forces of a tensioned cable. In general, if possible, it is better to use load-bearing columns for these purposes.
One of the options for attaching the cable system is shown in the picture below.
Option for attaching a cable under the ceiling for installing lamps
There is a mounting plate to the wall and a tension device with a hook on which the cable is put. It is advisable to choose a larger area of the embed on the wall to distribute the load. Sometimes a metal corner is installed on the plane of the wall instead of a mortgage.
Another option for mounting lamps
As you have already noticed, the metal tray serves not only as a rigid base for attaching lamps, but also as a cable route.
Specifics of connecting 12 volt light bulbs
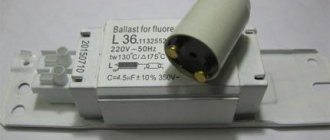
The main feature of 12-volt ice lamps is the need to use a transformer. The device not only reduces the voltage, but also rectifies it - turns it from alternating to constant. When choosing it, the total power of the connected luminaires + the required buffer should be taken into account.
For example, if the circuit includes 10 light bulbs of 4 W, then the total will be 10 * 4 = 40 W. A safety margin = 40 * 0.2 = 8 W is added to this value. In total, the transformer should have a power = 40 + 8 = 48 or approximately 50 W.
The technology for connecting 12 volt lamps is made using the 3 methods above. A significant difference in the circuit is the mandatory presence of a transformer after the junction box. A cable is pulled from it to power the circuit.
Connecting 12 volt ice bulbs should only be done through a step-down transformer Source asutpp.ru
What is the driver for?
The peculiarity of LEDs is that as they warm up, the current passing through them increases. This can lead to failure soon after operation begins. A driver is required to monitor and regulate the voltage level during operation.
The choice of power depends on the minimum and maximum values of the LEDs. If you select a driver with too low minimum values to connect LED lamps, the dimmer will not be able to lower the voltage to the required values and the lamps will burn out. Conversely, when limiting the upper voltage, if more current power is required, the devices simply will not be able to ignite.
You can connect as many lamps as you like to the power source through one driver, since the current of the same strength will flow through them.
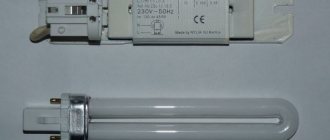
LED T8 lamps instead of fluorescent tubes
Another common and affordable way to quickly and inexpensively connect an LED lamp at home is to replace it with a fluorescent tube lamp in fluorescent lamps. For this purpose, T8 ice tubes with a G13 base system are used. Their dimensions, shape and connection devices are similar to their luminescent counterparts.
Rework involves dismantling fluorescent tubes, replacing, removing some components or upgrading the circuit, as well as selecting and installing ice tubes. There are two options for upgrading lighting devices in this case:
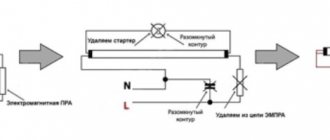
- Based on ballast starting and control automation (old models). Be sure to remove the starter (to prevent a short circuit when turning on after installing the ice tube), select and install the LED tube according to size.
Connection diagrams
Before moving on to upgrading the lamp by replacing T8 fluorescent lamps with LED lamps, you first need to properly understand the circuits. All fluorescent lamps are connected in one of two ways:
Read also: Solder resistivity pos. 61
In raster ceiling lamps, 4 fluorescent tubes are connected to 2 electronic ballasts, each of which provides operation of two lamps, or to a combined ballast, including 4 starters, 2 chokes and 1 capacitor.
The connection diagram for the T8 LED lamp does not contain any additional elements (Fig. 3). A stabilized power supply (driver) for LEDs is already built inside the case. Along with it, under a glass or plastic diffuser, there is a printed circuit board with LEDs, mounted on an aluminum radiator. The 220V supply voltage can be supplied to the driver through the pins of the base, either on one side (usually on Ukrainian-made products) or on both sides. In the first case, the pins located on the other side serve as fasteners. In the second case, 1 or 2 pins can be used on each side. Therefore, before modifying the lamp, you need to carefully study the connection diagram shown on the LED lamp body or in its documentation. The most common are T8 LED lamps with phase and neutral connections from different sides, so alteration of the lamp will be considered based on this option.
Briefly about the main thing
The LED lamp is based on a semiconductor crystal. When current passes through it, light radiation is released. The main components of the device also include a driver, a radiator and a diffuser. The main advantages of an ice lamp are a long service life, economical energy consumption, harmlessness, durability, unpretentiousness, and a variety of lighting parameters. The disadvantage is the high price.
In the standard version, LED lamps are available in ratings of 220 and 12 volts; they can be connected either directly instead of conventional incandescent light bulbs or with fluorescent lamps according to the following schemes:
- Consistently.
- Parallel.
- Luchev.
In addition, there is a way to replace fluorescent lamps with ice tubes in the housing of old ballast models or new electronic analogues. Each case has its own characteristics and technical nuances.
Basket
Placing an order
- home
- catalogue of articles
- Features of installing LED lamps in different headlights
In this article we will talk about where it is better to use LED lamps and where it is better not to use them.
Let's start our conversation with where it is better to install LED lamps, and where they will give the maximum increase in road illumination. Installation of diode lamps in a headlight with H4 socket
Installing diode lamps in a headlight with an H4 base in 99% of cases will give a significant increase in illumination, usually by 2-3 times. That is, H4 and LED lamps are a must have! The whole problem is that the LED itself is made competently and with high quality, that is, it falls into focus and has chips with a small area, and not a large one, like cheap LED lamps. If these conditions are met, you will receive an unprecedented increase in light on the road. Why is the H4 base the most significant in terms of increase in illumination? This is due to the fact that the H4 halogen lamp itself was designed quite a long time ago and its design is not optimal. Therefore, it turns out that the efficiency of the lamp is small. But, since the efficiency of a halogen lamp is small, LEDs, correcting the shortcomings of this design, very well replace the halogen lamp in this base and you, as a user, get at least a 2-3 times improvement in lighting on the road. In addition, the H4 LED lamp, due to its largest dimensions, is the least heat-loaded. This, as you understand, also has a positive effect on the characteristics of LEDs.
Installation of diode lamps in a headlight with H7, HB4, H11 socket
The next type of headlight in terms of efficiency of LED lamps are the so-called “monocoles” in reflector headlights. Mono-bases are bases H7, HB4, H11, that is, separate light, a separate section of low beam. LED lamps in them also shine quite well, but the increase is somewhat less. What is this connected with? First of all, with the fact that the design of the halogen lamp itself was developed after the H4 lamp, and in this design the disadvantages of the H4 lamp were already taken into account, and the efficiency of the incandescent lamp itself, that is, the halogen lamp, became much higher. The halogen lamp began to shine brighter, and that is why this standard replaced the more outdated standard of the H4 lamp. Therefore, LEDs in these sockets are more difficult to compete with halogen. But we can still improve illumination by 1.5-2 times using good, high-quality lamps with a well-thought-out heat dissipation system and correct focusing.
A special subgroup are headlights whose bases are not installed vertically, but at a certain angle. The bottom line is that in such headlights, where the seat is installed at an angle, even high-quality LED lamps can shine completely incorrectly. This is due to the fact that the halogen lamp itself, installed in the headlight, shines 360 degrees, regardless of whether the base is placed straight or at an angle. LED lamps have not yet learned to shine 360 degrees, so when we place an LED lamp in a headlight with a seat located at an angle, we can get an incorrect, distorted cut-off line. For such headlights, it is better to use LED lamps that allow the base to rotate relative to the lamp itself, or modify LED lamps where there is no rotation.
Installing diode lamps in a headlight with a lens
One of the most difficult areas for installing LED headlights is lensed optics and lensed headlights. If you have a lens installed in your headlight, then the increase from using LED headlights will be minimal. This is due to the fact that the reflector of such headlights is the smallest, and even half of this reflector is covered by a curtain, which forms a cut-off line. The quality of the cut-off line of such headlights will always be ideal; even by installing LED lamps in them, you will not worsen this indicator in any way. But, often, there is a tendency that after installing LED lamps, the illumination in front of the car remains the same as that of incandescent lamps. However, it is worth noting that at the edges it increases significantly due to the light distribution characteristics of LED lamps
Installation of diode lamps in a headlight with H1 and H3 sockets
Well, the most difficult option for LED lamps are sockets H1 and H3. Why are the plinths H1 and H3? Yes, because those who have seen the H1 and H3 light bulbs understand that it is the smallest of all incandescent filament lamps. For LEDs this is extremely important because heat dissipation is important for them. It is one thing to remove heat from chips on a board with a width of, for example, 1-1.5 cm, and another thing on a board about 5 mm wide. Accordingly, the higher the temperature of the chips, the worse they shine, and their service life is also shorter. Therefore, it is extremely difficult for manufacturers to make a well-luminous, high-quality and long-lasting LED lamp. Chip manufacturers are certainly working on increasing the operating temperature of chips and their service life, but work in this area is not progressing as quickly as we would like.
Installing LED lenses instead of standard ones
For owners of cars with lensed headlights, installing LED lenses is much more effective than installing LED lamps in existing lenses. Thus, we will immediately receive a significant increase in illumination (from 3 to 10 times). Moreover, over the past six months they have decreased by 40-50%, that is, this is no longer the huge money that it was last year. We strongly recommend that if you have lenses that no longer shine, you spend the available funds on replacing the lenses, and you will get the maximum result that will completely satisfy you.
Basket
Placing an order
- home
- catalogue of articles
- Features of installing LED lamps in different headlights
In this article we will talk about where it is better to use LED lamps and where it is better not to use them. Let's start our conversation with where it is better to install LED lamps, and where they will give the maximum increase in road illumination.
Installation of diode lamps in a headlight with H4 socket
Installing diode lamps in a headlight with an H4 base in 99% of cases will give a significant increase in illumination, usually by 2-3 times. That is, H4 and LED lamps are a must have! The whole problem is that the LED itself is made competently and with high quality, that is, it falls into focus and has chips with a small area, and not a large one, like cheap LED lamps. If these conditions are met, you will receive an unprecedented increase in light on the road. Why is the H4 base the most significant in terms of increase in illumination? This is due to the fact that the H4 halogen lamp itself was designed quite a long time ago and its design is not optimal. Therefore, it turns out that the efficiency of the lamp is small. But, since the efficiency of a halogen lamp is small, LEDs, correcting the shortcomings of this design, very well replace the halogen lamp in this base and you, as a user, get at least a 2-3 times improvement in lighting on the road. In addition, the H4 LED lamp, due to its largest dimensions, is the least heat-loaded. This, as you understand, also has a positive effect on the characteristics of LEDs.
Installation of diode lamps in a headlight with H7, HB4, H11 socket
The next type of headlight in terms of efficiency of LED lamps are the so-called “monocoles” in reflector headlights. Mono-bases are bases H7, HB4, H11, that is, separate light, a separate section of low beam. LED lamps in them also shine quite well, but the increase is somewhat less. What is this connected with? First of all, with the fact that the design of the halogen lamp itself was developed after the H4 lamp, and in this design the disadvantages of the H4 lamp were already taken into account, and the efficiency of the incandescent lamp itself, that is, the halogen lamp, became much higher. The halogen lamp began to shine brighter, and that is why this standard replaced the more outdated standard of the H4 lamp. Therefore, LEDs in these sockets are more difficult to compete with halogen. But we can still improve illumination by 1.5-2 times using good, high-quality lamps with a well-thought-out heat dissipation system and correct focusing.
A special subgroup are headlights whose bases are not installed vertically, but at a certain angle. The bottom line is that in such headlights, where the seat is installed at an angle, even high-quality LED lamps can shine completely incorrectly. This is due to the fact that the halogen lamp itself, installed in the headlight, shines 360 degrees, regardless of whether the base is placed straight or at an angle. LED lamps have not yet learned to shine 360 degrees, so when we place an LED lamp in a headlight with a seat located at an angle, we can get an incorrect, distorted cut-off line. For such headlights, it is better to use LED lamps that allow the base to rotate relative to the lamp itself, or modify LED lamps where there is no rotation.
Installing diode lamps in a headlight with a lens
One of the most difficult areas for installing LED headlights is lensed optics and lensed headlights. If you have a lens installed in your headlight, then the increase from using LED headlights will be minimal. This is due to the fact that the reflector of such headlights is the smallest, and even half of this reflector is covered by a curtain, which forms a cut-off line. The quality of the cut-off line of such headlights will always be ideal; even by installing LED lamps in them, you will not worsen this indicator in any way. But, often, there is a tendency that after installing LED lamps, the illumination in front of the car remains the same as that of incandescent lamps. However, it is worth noting that at the edges it increases significantly due to the light distribution characteristics of LED lamps
Installation of diode lamps in a headlight with H1 and H3 sockets
Well, the most difficult option for LED lamps are sockets H1 and H3. Why are the plinths H1 and H3? Yes, because those who have seen the H1 and H3 light bulbs understand that it is the smallest of all incandescent filament lamps. For LEDs this is extremely important because heat dissipation is important for them. It is one thing to remove heat from chips on a board with a width of, for example, 1-1.5 cm, and another thing on a board about 5 mm wide. Accordingly, the higher the temperature of the chips, the worse they shine, and their service life is also shorter. Therefore, it is extremely difficult for manufacturers to make a well-luminous, high-quality and long-lasting LED lamp. Chip manufacturers are certainly working on increasing the operating temperature of chips and their service life, but work in this area is not progressing as quickly as we would like.
Installing LED lenses instead of standard ones
For owners of cars with lensed headlights, installing LED lenses is much more effective than installing LED lamps in existing lenses. Thus, we will immediately receive a significant increase in illumination (from 3 to 10 times). Moreover, over the past six months they have decreased by 40-50%, that is, this is no longer the huge money that it was last year. We strongly recommend that if you have lenses that no longer shine, you spend the available funds on replacing the lenses, and you will get the maximum result that will completely satisfy you.
The issue of lighting their own homes always worries owners of apartments and private houses. Energy prices are constantly rising, traditional lighting methods have a negative impact on the environment, and traditional lamps themselves are not very convenient and efficient. All these factors contribute to the increasing popularity of LED lighting, which is easy to install and operate, as well as environmentally friendly and cost-effective. This article will discuss LED lamps and the technology for their installation.