One of the most popular sources of artificial lighting is fluorescent lamps. They consume 5-6 times less energy than standard incandescent lamps, but still shine with the same brightness. LED lamps with drivers are more economical, but due to their high cost, they have not been able to displace fluorescent lamps (FLL) from the market. With prolonged use, fluorescent lamps may lose their functionality. It is possible to fix such problems, but to do this you need to know how to check a fluorescent lamp, including using a multimeter.
Design and principle of operation of fluorescent lamps
Many of the advantages of LDS are due to the fact that they are gas-discharge devices in which ultraviolet radiation is generated due to electrical discharges in mercury vapor.
There is only one peculiarity here - visible illumination from the lamp occurs only after the ultraviolet radiation is modified. Such a transformation is possible only when using those compounds that contain calcium halophosphate or other compounds with the presence of phosphors.
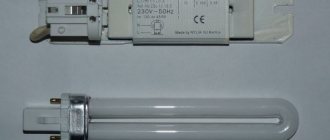
Based on the principle of operation, LDS can be equated to gas-discharge lighting sources. An inert gas is placed in a glass flask, after the air has been pumped out of it, and then 30 mg of mercury is added to the gas. Spiral-shaped electrodes, similar to an incandescent filament, are installed at both edges of the vessel. They are soldered on each side to 2 contact legs, which are placed in dielectric-type plates. The inner surface of the tube is covered with a layer of phosphor.
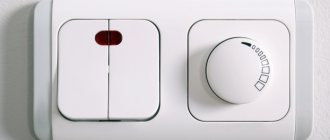
The daylight is turned on using a ballast - electromagnetic or electronic type. The electromagnetic device includes a main element - a choke. This is a ballast type resistance in the form of an inductive coil with a metal core, which is connected in series with a fluorescent lamp.
The choke is necessary to maintain uniformity of discharge and adjust the current if necessary. When the light bulb turns on, the inductor suppresses the starting current until the spiral filaments heat up, and then produces the maximum voltage from self-induction, as a result of which the LDS ignites.
Checking the infrared diode
Indeed, almost every home has such an LED. They have found wide application in remote controls. Let's imagine a situation where the remote control has stopped switching channels, you have already cleaned all the keyboard contacts and replaced the batteries, but it still does not work. So you need to look at the diode. How to test IR LED?
The human eye does not see the infrared radiation in which the remote control transmits information to the TV, but your phone's camera does. Such LEDs are used in night illumination of video surveillance cameras. Turn on the phone's camera and press any button on the remote control - if it is working, you should see flickering.
The methods for checking an IR LED and a regular one with a multimeter are the same. Another way to check if an infrared LED is working is to solder a red LED parallel to it. It will serve as a visual indicator of the operation of the IR diode. If it flickers, it means signals are being sent to the diode and the IR diode needs to be replaced. If the red does not flicker, then the signal is not being received and the problem is in the remote control itself, and not in the diode.
In the remote control circuit there is another important element that receives radiation - a photocell. How to check a photocell with a multimeter? Turn on resistance measurement mode. When light hits a photocell, its conductivity state changes, then its resistance also changes downward. Observe this effect and make sure it is working or broken.
Reasons for burnout of fluorescent lamps
Often the LDS burns out, which makes it similar to a traditional incandescent lamp. When turned on, an arc of electricity is formed in the bulb, as a result of which the spiral-shaped tungsten electrodes become very hot. High temperature surges lead to destruction and burnout of the threads.
To extend the service life, a layer of active alkali metal is applied to the tungsten filament. The discharge between the electrodes is stabilized and the temperature decreases, thanks to which the thread lasts much longer.
Frequent switching on/off of the lamp entails the destruction of the protective layer, it simply falls off. The discharge passing through the bare filaments heats the spiral at weak points, resulting in burnout.
Main reasons for failure
All fluorescent lamps are manufactured in the form of a glass bulb of various configurations. On the inside it is coated with a phosphor that converts ultraviolet waves into visible daylight. During operation, fragile quartz glass becomes less transparent and loses its qualities.
Due to external mechanical influences, microcracks form on the surface of the flask and in its internal structure, through which air can enter the sealed cavity. An orange glow appears at the ends of the tube, and the device itself stops working. This is one of the main reasons for burnt-out fluorescent lamps.
The glow process is ensured by a glow discharge inside the flask. These discharges are created on the cathodes of the lamp, made in the form of spiral tungsten filaments, heated by the action of electric current.
To increase service life and stabilize the glow discharge, they are coated with an active alkali metal, which crumbles over time with constant switching on and off. As a result, the cathode overheats and quickly fails. Its emission is noticeably reduced, that is, the number of electrons emitted from the surface decreases. They can no longer maintain the operating level of the glow discharge.
Sometimes malfunctions lead to the appearance of an electric arc and strong heating of the tungsten electrodes. Under the influence of high temperature, burnout and destruction of the threads occurs. As a result, darkened phosphor becomes visible on the glass. This means that the fluorescent lamp has burned out.
Malfunctions of fluorescent lamps externally represent the inability to turn on, short-term flickering before turning on, prolonged flickering without subsequent turning on. A faulty lamp begins to hum and flicker during normal operation or simply does not light up.
Often, performance is disrupted due to poor-quality interaction between the lamp pins and the socket contacts. This occurs due to gradual wear and oxidation of the holders. For cleaning, it is recommended to use fine sandpaper, an eraser or an alcohol-containing liquid. If necessary, the contact plates are bent or completely changed.
Checking with a digital tester
Digital Voltage Tester
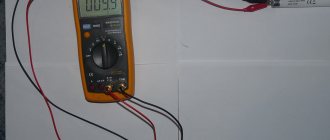
Using a digital voltage tester, you can check the integrity of the filaments. This can be done both in the dialing mode and in the resistance testing mode. It is necessary to set the multimeter to the desired mode and check the spiral at both ends of the tube.
In the dialing mode, if the spiral is working properly, the tester will produce a characteristic sound - a buzzer.
In the resistance test mode, if the spiral is working properly, the multimeter indicator will display a value of 5-10 Ohms.
Burnout of heating filaments is the most common failure of fluorescent lamps, which can be easily detected using a digital tester.
Incandescent lamp
The first step in checking a 12 volt or 220 volt incandescent lamp or any other voltage is a visual inspection. If it is clearly visible that the tungsten filament inside the lamp is broken, then no further inspection steps are required.
If the filament is intact, the incandescent lamp must undergo tests to determine its suitability.
Method 1. Screw the lamp being tested into another lighting fixture with a similar base. The lamp is on, which means there is a problem with the lamp itself. Doesn't light up doesn't mean it's faulty. It happens that in a seemingly similar socket, when screwing in the lamp, the contacts do not close. If there are no more places where the light bulb test can be done, then another method is needed.
Method 2. Use a special tool. When visiting large hypermarkets or hardware stores, you have probably seen a device for checking light bulbs. The buyer or seller himself applies the lamp base to the corresponding connector of the tester, and a sound signal occurs. This indicates that the lamp is working properly. Typically, such testers are equipped with connectors not only for conventional lamps, but also for fluorescent and halogen lamps.
It makes no sense to purchase such a device at home for rare testing cases, but you can use the proposed principle. To do this you will need an indicator screwdriver. The multifunctional indicator screwdriver (hereinafter referred to as the MIO) runs on a regular coin cell battery, which is located inside the case.
Using MIO, verification is carried out as follows:
- take the light bulb in your hand, touching the thread on the base;
- take the MIO in the other hand;
- touch the central contact of the lamp with the MIO rod;
- the thumb of the hand with the MIO touches its end.
As a result, the circuit is closed. When the light bulb is working properly, the LED inside the MIO lights up. The entire check takes a matter of seconds. However, if the lamp being tested is low-power and the coil resistance is high enough, the LED may not light up. Then method number 3 will help you.
Method 3. Call with a multimeter.
What is a multimeter?
This is a compact portable device with which electrical measurements are made. The device is convenient for identifying damage in the network, electrical appliances and tools, checking the charge level of a battery of any power (from a regular battery to a car battery), and determining the network voltage level.
There are two main types of multimeter: analog and digital. If electricity is not related to your professional activity, then for household needs it is enough to purchase the simplest version of a multimeter.
The existing switch knob on the device allows you to select the measurement mode. Our case is called the “continuity” mode, and is often combined with the resistance measurement mode.
Test sequence
So how to check a light bulb with a multimeter?
- Switch the device to the “dialing” mode;
- Check the integrity of the device circuit by short-circuiting the probes to each other;
- Place the light bulb next to the device on the surface;
- Take any of the probes of the device and touch it to the central contact of the light bulb;
- Take another probe and apply it to the side contact of the light bulb.
The device will beep when the lamp is working properly. But here are the same features as in the previous method: the sound signal may not work. Then all that remains is to check the light bulb by measuring the resistance.
Check by measuring resistance
This need also arises when factory markings are erased. To check with a tester, the device is switched to “resistance” mode. The sequence of actions is similar to the previous check. Only in the end result there is no signal.
We are interested in the indicators reflected on the display (digital) or indicated by the arrow of the (analog) device. There is a clear correspondence between the data and the power of a light bulb with an E14, E27 base.
| Resistance, Ohm | 25-28 | 35-40 | 45-50 | 60-65 | 90-100 | 150 |
| Power, W | 150 | 100 | 75 | 60 | 40 | 25 |
As we can see, the lower the resistance, the greater the power. If the resistance approaches infinity, then the lamp is faulty.
Troubleshooting and Troubleshooting
Electrode testing with an
LDS multimeter is faulty in the following cases:
- does not turn on;
- flickers temporarily before turning on;
- flickers for a long time, but does not turn on;
- buzzes;
- flickers when burning.
Integrity of spiral electrodes
You can test the spiral electrode for the presence of resistance using a multimeter. The device is set to resistance measurement mode, and after that the probes are applied to the legs of the flask on both sides.
If the spiral is faulty, the multimeter will show zero resistance - the thread is broken. A whole spiral always shows a small resistance - up to 10 ohms. If at least one of the spirals is faulty, the lamp must be replaced. It cannot be restored.
Faults in the electronic ballast
To check the serviceability of the electronic ballast, it must be replaced with a working one. If the lamp lights up, it means that it was the cause of the breakdown. You can fix a broken ballast yourself. First you need to replace the fuse with a similar model with the same characteristics. If the threads glow weakly, it means there is a breakdown in the capacitor between them. It is also replaced by a similar one, but with an operating voltage of 2 kV. weak models will burn out quickly.
Transistors may burn out due to voltage surges. They need to be changed. You can take new ones from old ballasts. After replacement, you need to check the fluorescent lamp using a 40 W lamp.
How to check the choke of a fluorescent lamp
Checking the choke without a multimeter
Before checking the choke of a fluorescent lamp with a multimeter, you need to familiarize yourself with the main signs of its failure:
- hum of a lighting fixture;
- the lamp turns on and goes out after a while, getting dark around the edges;
- LDS overheats;
- “snakes” appear inside the tube;
- The lamp flickers a lot.
To check the choke for operability, you need to remove the starter from the lamp, and then close the contacts in its socket. Then the lamp is removed and the contacts in both sockets are also short-circuited. The multimeter is set to measure resistance, after which its probes are connected to the contacts in the lamp socket. If there is a break, the device will show endless resistance. If there is an interturn short circuit, the device will show a zero value.
How to check the starter
If the lamp begins to flicker immediately after switching on, but does not light up, the starter has failed. It will not be possible to test it separately from the LDS, since without voltage its contacts are open.
Checking the serviceability of the starter is possible using another method - by connecting it in series with an incandescent lamp to a standard electrical network.
The main reason for failure is that the bimetallic plate wears out greatly.
How to check the capacitance of a capacitor with a tester
If the LDS capacitor is faulty, its efficiency indicator decreases to 35-40%. For lighting devices with a power of no more than 40 W, a capacitor with a capacity of 4.5 μF is sufficient. If it is less than this norm, the efficiency will be reduced; if it is more, the lighting will blink.
To carry out the measurement, the capacitor must be ringed with a multimeter. When the probes touch the outputs of a part, the device demonstrates endless resistance. When this indicator is less than 2 MΩ, this is a symptom of significant current leakage.
Throttle testing
In the case where the previous check did not produce a result, the choke is checked, which is one of the most stable elements of the lamp. It breaks much less often than other parts, but its possible malfunction cannot be completely ruled out.
The inductor of a fluorescent lamp is essentially an ordinary inductor coil, inside of which there is a ferromagnetic core with high magnetic permeability. It is part of the electronic ballast and when the lamp is turned on, just like the starter, it participates in heating the cathodes and creating a high-voltage pulse. Due to the self-induction emf, a glow discharge is created inside the flask.
After the starter is turned off, the inductor, due to its inductive resistance, maintains the discharge current at the required level, ensuring stable ionization of the mixture of gas and mercury. Due to inductance and resistance, the inductor protects the electrodes from overheating and burnout under the influence of alternating current.
The main malfunctions of this element can be a break or burnout of the winding, as well as violations of the interturn insulation. Both failures are detected using a multimeter connected to the inductor terminals and configured to measure resistance. If the infinity sign is displayed on the display, then the winding is broken or burned out. A harbinger of burnout is most often an unpleasant odor that appears during throttle operation.
If the resistance is small, then in most cases the insulation of the conductors is damaged, which in turn leads to an interturn short circuit or short circuit of the winding with the core.
Turning on a fluorescent lamp without a choke
A burnt-out fluorescent lamp can be returned to work if it is connected to the circuit using constant voltage, excluding the starter and throttle element. Using a full-wave rectifier with voltage doubling will help here. If after some time the brightness of the lamp decreases, it must be turned over in the lamp, as a result of which the connection poles will change.
This scheme involves the use of radioelements with a voltage value of no more than 900 V. This is the value that the LDS reaches at startup.
Checking capacitor capacity
A decrease in efficiency by more than 30-40% indicates problems in the operation of the capacitor. The average capacity at a power of 35-40 W is 4.5 µF. Decreasing it leads to a decrease in brightness, and increasing it leads to the appearance of a flickering effect.
You can check the performance of this component of a fluorescent lamp with a tester. If, when the leads come into contact with the probes, a value of less than 2 MOhm appears on the screen, this is direct evidence of a significant current leakage.
Connection diagram for burnt out lamps
Fluorescent lamps often become unusable due to filament burnout. You can restore a second life to such a lamp using an unconventional starting scheme, repeatedly tested by folk craftsmen.
From the table you can find out the nominal values of radioelements for LDS with different powers. Limiting resistors R1 must be made of wire.
You can repair LDS at home if you follow the diagrams and follow certain instructions. Such knowledge makes it possible to extend the operational period of the lighting device.
Preparing the multimeter for use
How to check the UPS for functionality
First of all, let's take our multimeter out of the package and examine it carefully. There should be no damage to the case, and the battery compartment should close tightly. We check the quality and integrity of the probes and the wires going to them. If there is no insulation, use electrical tape. Heat-shrink tubing will also do the job well. If there are chips on the probes, we also wrap them.
We set the mode switch to work with ohms, opposite the 200 Ohm division. We connect the black cable to the Com socket. We connect the red cable to the socket where there are symbols of the quantities that we are going to measure.
The device should display the number “1” on its screen. If it's missing or something else is displayed, it's time to repair it. We cross the probes with each other. The one changes to a zero. If this is exactly what happens, then work is proceeding as usual. If the numbers are flickering on the screen, they are pale, you need to try changing the batteries. If the attempt fails, the device must be repaired. To start testing the lamp, set the break search mode on the toggle switch. This mode is indicated by a diode icon.
Is it worth repairing energy-saving lamps?
The decision of whether or not to repair a lamp largely depends on the number of faulty light sources. If we are talking about a single burnt out light bulb, you should not bother with the labor-intensive repair process. When there are a lot of lamps, repairs make economic sense. From parts of several lamps, it is possible to assemble one that will be operational. It is known from practice that to assemble one light bulb you will need parts from 3-4 damaged light sources.
When deciding to repair a lamp, you should think about the upcoming costs. You will have to spend money on buying parts (if they cannot be taken from light bulbs that have burned out), on a trip to the store or to the market. In addition, the process of searching for reasons is quite labor-intensive, so time should also be taken into account.
Table of main faults
The main types of malfunctions that occur in chokes in practice are summarized in the table.
| Type of malfunction | What does it lead to? | External manifestation |
| Broken coil winding or internal wiring | Electrical circuit break | The lamp does not light (not even blinking) |
| Interturn closure | Loss of inductance, decrease in reactance | Burnout of lamp spirals (including repeated burnout after replacement), blinking without stable ignition |
| Short to body | Creates a ground fault in a network with a protective conductor | If a PE conductor is connected, it causes overcurrent and tripping of the protective device. If there is no protective grounding in the network, it may not manifest itself, but the mains voltage is present on the device body. |
| Loss of ferromagnetic properties of the coil core (as a result of overheating, etc.) | Loss of inductance, decrease in reactance | Burnout of lamp spirals (including repeated burnout after replacement), blinking without stable ignition |
Integrity of spiral electrodes
When problems occur, there are often reasons that are not always visible to the naked eye. In this case, you need to ring the product with a multimeter or check it with an indicator. Its switch must be set to the position that measures resistance. The range is the smallest of all possible. The probes touch the pins and look at the display. If the spiral is torn or burnt, the display shows 0, if it is intact, the numbers 3-16 Ohm. Torn or burnt nichrome thread cannot be restored; the product must be replaced.
Checking the lamp
During its operation, a fluorescent lamp may fail. At the same time, you can check its component elements of the electrical circuit and fix the breakdown yourself. To do this you will need to use a multimeter or tester. To correctly check the starter of a fluorescent lamp, you must first know the version of the electrical circuit used for it.
In addition, it is necessary to dismantle or simply remove the fluorescent lamp from the ceiling or wall. After this, you can check all the important elements of the electrical circuit.
Two options
Let's consider both options for checking the electrical circuits given above. In this case, the verification method in both cases will be identical.
Note! In order to check the functionality of the starter for a fluorescent lamp, you can use any measuring instrument (tester, multimeter, etc.).
The following measuring instruments are most often used for checking:
- oometer It must be set to the position for the required resistance range to be measured;
- string type tester;
Tester for verification
- multimeter
Many experts recommend using a more advanced and versatile measuring device - a multimeter. In this case, diagnostics of the lamp (choke, etc.) should be carried out exclusively in a passive way. This means that the lighting installation cannot be connected to an external voltage source. To check a fluorescent lamp, you must carry out the following manipulations:
- put the lighting fixture on the table;
- we connect two probes of the measuring device to the wire terminals;
- measure the total resistance.
Checking a fluorescent lamp with a multimeter
But if there is a starter in the circuit, it will be impossible to check the total resistance in this way, since it will break the electrical circuit. In this regard, in both options it is necessary to do the following:
- remove the starter from its electric cartridge;
- We close the contacts of the starter and the electric cartridge.
Only after this can you check the lamp for the total resistance parameter. Please remember that when switched off, this part has open electrodes. Due to this, it is impossible to check its functionality. It can only be replaced with a backup one, which will have the same power. Note! A faulty starter, just like other broken parts, cannot be repaired. They need to be thrown away immediately and replaced with working ones.
Features of checking the starter
Before starting the test, you must remember that it is impossible to check for resistance here. This is due to the structure of the part. The starter light bulb consists of 2 soldered electrodes placed between the electrodes. As a result, a gap is formed between them. When it has been determined that a part is faulty, it is necessary to select a replacement taking into account the power of the existing fluorescent lamp. All replacement work should be carried out only with special dielectric gloves. This will prevent your unprotected hands from coming into contact with the exposed contact connections of the lighting fixture.
How does a fluorescent lamp work?
A sealed glass tube made of thin transparent glass, on the inside of which a phosphor is applied with a thin layer. It is filled with a mixture of inert gas with a small amount of mercury vapor. Small heating coils are placed at the ends of the flask inside the balloon. Heating the filament with current will cause a glowing gas discharge of the mixture, accompanied by a glow of the gas in the ultraviolet spectrum, invisible to the eye. This glow causes the phosphor layer to emit light in the visible spectrum. The chemical composition of the phosphor determines the color of the light received from the fluorescent source.
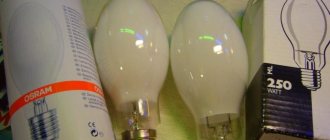
In addition to the glow discharge, an arc discharge can be used in daylight sources. The mercury arc lamp has a very high light output. The luminescence spectrum is not pleasing to the eye, so DRLs are mainly used in street lighting.
Luminescents: how the device works
All daytime luminescent products are divided according to shades and brightness levels into:
Yellowish ones are suitable for home use. They soothe and do not cause irritation. For the office they choose warm ones - they are suitable for painstaking work. For industrial and public institutions - cold, stimulating the organs of vision, stimulating the nerve endings.
The “cold” lamp stimulates and irritates, installed, for example, in hospitals
Structurally, the product consists of a glass bulb of different shapes (round, oval, shaped).
The flask is coated with phosphor - this is a chemical solution that increases light output.
During installation, you may need a hidden wiring detector.
- electric current, using a choke, acts on the spiral electrodes;
- the electrodes heat up quickly (in 2-3 seconds);
- the electrodes heat the mercury, which begins to evaporate;
- mercury gas (vapor) is formed inside the flask;
- the gas stimulates the phosphor;
- the fluorescent light bulb “lights up”.
In order for the current to act on the electrodes with the required force, a choke element is required. It promotes the “ignition” of the spiral electrodes. Looks like an induction coil with a core.
Current affects the part. Voltage accumulates there and is transmitted to the spiral electrodes.
To prevent the fluorescent lamp from overheating, there is a starter inside. It is a neon light bulb. It is necessary to open the circuit and turn off the flow of current when the spiral-electrodes have become sufficiently hot. The process happens automatically.
The fluorescent lamp starter ensures timely opening of the electrical circuit
Any daytime fluorescent structure must be certified and licensed. This is indicated on the packaging. Before purchasing, it is advisable to ask the seller about the availability of documentation for the device. They indicate the type, expiration date, information about the permission to use the product.
Malfunctions of lamps with electronic ballasts
Here, repairing a fluorescent lamp comes down to only checking the lamps, the integrity of the wiring and holder holders. If they are in order, you will simply have to replace the electronic ballast.
Of course, if a person knows how to check electronic ballast elements for serviceability, and also has even a little knowledge of radio electronics, then repairing electronic ballast will not be difficult.
Repair of electronic ballast of fluorescent lamps
Burnt-out electronic ballast
Most often, if the electronic ballast (ballast) fails, then the burnout of the transistor is to blame, which can sometimes be seen with the naked eye. If it is impossible to determine this visually, you will have to remove the transistors from the circuit and test them with a multimeter.
If they are working properly, then their resistance will be 400–700 Ohms. If one of the transistors burns out, the 30 Ohm resistor may also burn out automatically.
There is also another weak point in the circuit - a low-impedance fuse of 2-5 ohms. Very rarely, the cause may be burnt elements of the diode bridge. These are all possible reasons; after they are eliminated, the ballast repair will be completed, that is, the restoration of the burnt electronic ballast.
Is it possible to check with a multimeter at home?
The easiest way to check is to use a similar lamp, install a fluorescent lamp in it and then connect it to the network. But there is not always a device with the same type of cartridge for replacement. In addition, the screw threads of the base and the socket may not match, and as a result, the electrical contacts simply will not close.
In this case, a very common measuring device, a multimeter, comes in handy at home. Among its modes you can find a “continuity test”, which easily determines the integrity of the electrical circuit.
- the appropriate mode is selected;
- the first probe is placed on the central contact, and the second on the side;
- readings are taken from the device.
The second mode often used for diagnostics is “resistance”. During the test, probes are also used and the initial values are compared with those detected by the multimeter. A small error in measurements may occur due to weak contact with the probes.
Preparatory work
No special skills in handling electrical measuring instruments are required. In addition to a multimeter, the only thing you may need to successfully test light bulbs is gloves. Some models of electric light sources must not be handled with bare hands, otherwise the grease marks left on the surface of the lamp can lead to rapid failure of the product. You may also need rubbing alcohol and an old toothbrush to clean the contacts. If the light bulb has been used in a humid environment, a fairly strong oxide film can form on its metal elements, which often causes a false conclusion that the electric light source is faulty. You can also use universal WD-40 for this purpose.
Before performing a diagnostic operation, you should also make sure that the measuring device is in working order. For this purpose, it is enough to switch the device to the “ringing” mode and connect the positive and negative probes. By the sound signal you can determine the serviceability of the multimeter. If it is not possible to check the multimeter in this way, the device should be switched to resistance measurement mode. The serviceability of the tester can also be established by connecting the contacts, but, in this case, a numerical display of resistance (about 1 Ohm) should appear on the indicator.
The safety of performing the diagnostic operation is paramount, therefore, if you are not sure that the phase wire is connected to the lamp through the switch, it is recommended to turn off the safety circuit breakers in the electrical panel before removing it from the socket.
How to check the starter
The LDS does not light up, but flickers - this happens when the starter is faulty. To check its performance, it is impossible to test with a multimeter, since the starter contacts are open when the voltage is turned off.
You can check this part with a 40 W incandescent lamp, which is connected in series through the starter to the network. When the starter is working properly, the lamp lights up and goes out momentarily at certain intervals. The process is accompanied by clicks of contacts. If the starter is faulty, the LDS does not light up or glows dimly without blinking.
Designation and marking
The markings of domestic and foreign manufacturers differ from each other. According to GOST current in the Russian Federation, the numbers (letters) of the marking correspond to:
- 1st – 60/90/120 – power of the connected lamp;
- 2nd – “C” – informs that this is a “starter”;
- 3rd – 220/127 – lamp supply voltage.
For foreign analogues, for lamps with a power from 4.0 to 80.0 W and a voltage of 220 V, the designations used are S10, FS-U, ST111, and for lamps with a voltage of 127 V and a power of up to 22 W – S2, FS-2, ST151.
Faults in the electronic ballast
Some luminaires with LDS work only with the connection of electronic ballast electronic ballasts (ballast control equipment). It also needs to be checked for serviceability. First, it is advisable to replace the ballast with a working one and turn on the lamp. The lamp glows as evidence of a ballast malfunction. You can fix faulty equipment yourself at home.
The repair begins with replacing the fuse. If after this the threads begin to glow faintly, this will be a sign of a breakdown of the capacitor. It is replaced with another one, designed for a voltage of 2 kV. Standard ones are sometimes set at 250-400 V; they burn out during operation.
The next part of the ballast that often fails is the transistor. It burns out due to power surges in the network. These surges can be caused by the operation of welding machines connected to the general electrical network. The burnt-out transistor is replaced with one selected from radio components or removed from a similar ballast. After all repair operations are completed, a 40 W LDS is inserted into the lamp and connected to the network.