troubleshooting
Cracks in the socket may appear due to mechanical action (shocks, falls, vibrations) on the lamp.
Elements need to be changed. To do this, turn off the electricity, remove the lamp and socket. The wires need to be cleaned a little and inserted into the terminals of the new cartridge. When working, it is important not to mix up the wires
The ballast in the lamp may break. It regulates the amount of voltage supplied. If the failure is related to the ballast, it will be cheaper to buy a new lamp. The malfunction can be determined by the hum of the device.
A broken fuse or power supply is recognized by flickering. If the light blinks, you need to reset the power by turning the switch on and off. If this does not help, you will have to change the block.
Rework procedure
The order of connection depends on what needs to be redone. You can do the work yourself if you follow the plan - a detailed diagram of connecting an LED lamp instead of fluorescent lamps will help even an inexperienced electrician figure it out.
- Disable automatic protection, remove the mains voltage, make sure there is none.
- Remove the protective cover to gain access to the working components of the circuit. Remove the capacitor, starter, and inductor from the circuit.
- Separate the wires next to the cartridge terminals, connect them to the phase and neutral wires directly, insulate or remove the rest.
- Insert the T8 G13 light bulb and perform a test run.
The procedure is not difficult. The contacts with pins on the sockets are marked with the letters “L” and “N”. Reconfiguring luminaires with electronic ballast is even simpler. How to remake a fluorescent lamp in this case:
- Solder or use wire cutters to separate the wires entering the ballast part and then leaving it.
- Connect the zero and phase wires to the wires of both cartridges.
- Insulate joints and connections, insert LEDs, turn on the network. If everything was done correctly, light will appear.
The final steps are to isolate the connection points, insert a new source, and apply voltage. Connecting LED lamps on average takes no more than 10 minutes.
Lamps with G23 socket
Bases of subtypes G23, 2G11 and GX23 are most often used for local lighting - in table and wall lamps. The sockets differ in size and shape, but the principle of contact between the light bulb and the socket is the same everywhere.
The lamp is replaced in the following order:
We buy a light bulb. Turn off the electricity. Unscrew the lamp from the socket
Carefully pull it by the edge of the bulb towards the lampshade. The movement must be a bending motion to remove the light bulb from the retaining clip.
This must be done carefully, without damaging the retaining bracket. When the light bulb is released from the clamp, pull it out, slightly swinging it in the direction opposite to the socket. Installing the light bulb into the lamp is done in the reverse order. You need to insert the lamp into the socket and press the end of the bulb to push it inside. The successful installation is indicated by the click of the locking mechanism. The movements must be confident, but careful. It is important not to damage the plastic retainer, since it gradually wears out and breaks easily.
Replacing a fluorescent lamp is a simple operation that even a novice home craftsman can handle. To complete the task, you only need attentiveness and accuracy.
Replacing the LED lamp
First, turn off the power supply to the apartment network. To complete the work you will need a chair or stepladder.
When working with suspended ceilings, you must be careful not to damage the material.
Replacing the lamp is carried out as follows:
- Unlock the lamp from its mounts (the light bulb is secured with a special ring).
- Slowly unscrew the old light source. Then install a new lamp in its place.
- To insert a new light bulb, perform the above steps in reverse order. When the lamp is installed, the retaining ring must be returned to its original place.
Lamps with G5 and G13 base
The most popular light bulbs in ceiling luminaires are equipped with G5 and G13 sockets. These sockets are especially often used for lamps in kitchens, bathrooms, and local lighting (for example, mirrors).
Replacement instructions:
We purchase a lamp of the required size and power. If difficulties arise in determining the characteristics of a lamp, we take it with us to the store. This will help the seller choose the right light bulb. Turn off the electrical appliance. To ensure safety, it is recommended to completely de-energize the room by turning off the electricity in the panel. We dismantle the lampshade (lighting fixture grille). The ceiling lamp is attached to the lamp body using latches or screws. Sometimes the lampshade is held on by the lamp itself. To dismantle the lampshade, simply pull on any of its edges. Unscrew the light bulb. We grasp the lamp with both hands (closer to the edges of the bulb) and rotate it along the axis 90 degrees.
We pull out the light bulb carefully, but with little force, so that the contact pins come out of the guides of the socket.
We mount the lamp in the lamp. We insert it into the cartridge until it stops, and then turn it around its axis 90 degrees. The direction of screwing does not matter. We check the operation of the lamp. If everything is done correctly, return the lampshade to its place. If the light does not appear, turn off the lighting and carefully move the light bulb (turn it slightly)
If these attempts are unsuccessful, pay attention to the throttle or starter - most likely the problem is in them. Replacing the throttle and starter is a rather complex operation, and it is better to entrust it to a specialist
In this case, it is recommended to install a new lamp, since the cost of repair work will exceed the cost of purchasing a new lighting device.
What is needed for replacement
Before you start replacing the device, you need to understand what exactly has burned out: the starter, the inductor or the lamp itself. The first 2 elements are externally deformed and smell of burnt wiring. But the darkened edges indicate the failure of the light bulb.
You can start work only after the room has been de-energized. Compliance with safety precautions when replacing elements in a fluorescent lamp should come first. Also, to prevent hand injuries from sharp edges of devices, all operations must be carried out wearing protective gloves.
Important! Before starting work, it is necessary to prepare a working lamp, throttle or starter, depending on which element requires replacement. A screwdriver and stepladder may be additionally required if the lamp is located on the ceiling.
Replacing lamps with G5 and G13 sockets
Lamps of this type are most often inserted into ceiling lights. They effectively illuminate bathroom mirrors, kitchen countertops and other places. Over time, the lamp exhausts its life and has to be replaced.
Replacement is carried out in the following order:
- The lamp must be de-energized using the circuit breaker in the electrical panel.
- The grille or lampshade is removed. Most often, fastenings are made using screws or latches, which are unscrewed with a screwdriver or simply released from the clamps. In single-lamp designs, the lampshade can be attached to the lamp itself. To remove it, you need to pull on any of the edges, after which access to the lamp will be gained.
- The next step will be to remove the lamp. With both hands you need to grasp the edges of the glass cylinder and rotate it 90 degrees around its axis. At this moment, the contacts come out of the holes in the cartridge with little force.
- The new lamp must have the same characteristics as the old one.
- Installing a new lamp into the luminaire is performed in the reverse order. Its ends are carefully inserted into the cartridge, after which the structure is rotated around its axis by 90 degrees. The direction of rotation does not matter. In some cases, fixing the light bulb in its place is accompanied by a slight click.
- Next, the performance of the lamp is checked, for which it is connected to the network. After making sure that it is working properly, you can put the decorative grille or lampshade in place. If for some reason the lamp does not light up, you need to turn off the lamp, move or twist the lamp in place, or completely remove it and reinsert it back into place.
When repeated attempts do not produce results, you need to pay attention to the components of the lamp itself. In most cases, the cause is a burnt-out starter or throttle.
If you do not have experience working with these parts, it is recommended to invite a qualified specialist.
How to install a new one
Installation is usually the exact opposite of removal in technology.
- Threaded versions are screwed into the cartridge clockwise until it reaches a sensitive stop. Do not screw too hard to avoid breaking the light bulb or cracking the socket. Halogen lamps are also replaced.
- Long lamps are inserted with contacts into the slots from which the old lamp was removed. After this, the lamp is rotated by hand along its axis 90 degrees until a characteristic click is heard.
- Light bulbs in ceiling and other built-in lamps are usually simply inserted back until the spring clicks; you do not need to press any levers for this. Using similar mechanisms, spotlights are replaced.
- After installation, make sure that the lamp is securely fastened in its socket and does not dangle in it; this is especially important when replacing it in a spotlight.
- Try turning on an LED or other installed lamp - be sure to turn away from it, and give the command “light” to everyone present so that they do not look either. Take care of your eyes when turning on new lamps - there have been cases when they, defective, burst the first time they were turned on.
Useful tips
Fluorescent lamps contain harmful chemical components that are hazardous to health - for example, mercury
Therefore, it is especially important to carry out all work carefully, trying not to break the flask. If the flask does break, you need to open the windows in the apartment for ventilation and collect the fragments in an airtight container
When installing a new light source, the surfaces of the lamp should be cleaned of dust. This will increase the operating life of the units and elements of the device.
Fluorescent lamps are suitable for daytime lighting. They are economical, provide bright light, and are used in surface-mounted and built-in lamps and Armstrong-type devices. But, despite its long service life, the light bulb can break and burn out. You need to change the light bulb carefully, carefully and in compliance with safety precautions.
How to repair fluorescent lamps yourself
Fluorescent lamps are now used in various fields. The proliferation of LED lamps has not been able to remove them from the market. They have many advantages among other lighting devices. However, sometimes problems occur due to various factors. It is better to study the problems and repair methods of various lamps in advance.
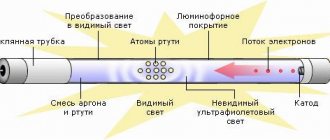
Operating principle of a fluorescent lamp
The operating principle of a fluorescent lamp is simple. Voltage is applied to the contacts inside the tube, and electrons are emitted in the inert gas and mercury vapor in the tube. Radiation appears in the ultraviolet range. The human eye cannot see such a glow.
Diagram of a fluorescent lighting device
To produce visible light, the inside of the tube is coated with a phosphor. The hue and temperature of the glow depend on its composition.
The functions are controlled by an electronic unit, which includes a ballast.
List of faults
The main control element of any fluorescent lamp is the ballast. It can be electromagnetic or electronic. In the first case, the device includes a throttle and a starter; in the second, control occurs by other components.
In most cases, lamp failure is associated with a malfunction of the electronic circuit, aging of elements or burnout. Any repair begins with identifying the cause.
Thematic video: Options for checking a fluorescent lamp.
Lamp with choke
To check a lamp with a choke, you can connect a test light to the circuit. If:
- the device does not light up - there is a break in the ballast, the throttle is faulty;
- burns brightly - interturn short circuit in the ballast;
- the lamp blinks or does not shine brightly enough - the throttle is working.
The inductor itself may have a break, short circuit of different windings, short circuit of turns in one winding, or a malfunction of the magnetic circuit. Separately, a breakdown is identified on the housing.
Lamp with electronic ballast
In such a lamp, the lamp itself, the integrity of the wiring, and the serviceability of the socket holders are checked. If each element is in good condition, the ballast itself must be replaced.
Often it is he who fails when the transistor burns out, which is visible to the naked eye. If there are no visual problems, test the contacts with a multimeter.
The weak point in the circuit is also considered to be the low-impedance fuse. Sometimes the cause of the malfunction lies in damage or burnout of the diode bridge. In this case, the lamp does not turn on.
We recommend viewing: Repair of a fluorescent lamp with electronic ballasts
Lamp flashing
Traditional incandescent light bulbs burn out instantly and unexpectedly. Fluorescent lamps wear out differently. First, the device begins to blink when turned on, which indicates a change in the chemical composition of the gas inside the flask. Blinking causes the electrodes to burn out.
Darkened area on the flask
The cause of blinking is a malfunction of the electronic ballast or electronic ballast. To check, connect a new lighting fixture.
In some cases, blinking is explained by a drop in network voltage. In working devices, this phenomenon should not occur, since the ballast stabilizes the voltage.
Disassembling a fluorescent lamp
To repair, you need to disassemble the electrical appliance. It is necessary to disassemble the fluorescent lamp in the place where the inscription with the name of the device and its technical characteristics is written. You need to pry off the housing with a regular flat-head screwdriver.
Disassembled fluorescent lamp
If darkening is noticeable at the ends of the flask, it is better to throw it away. Typically, flasks fail in about 2 years.
Next, the contacts of the bulb are tested with an ohmmeter. The resistance should be several ohms and decrease with increasing power.
If the elements are in order, you need to inspect the electronic ballast board. In most cases, the burnout of any element on it is visible immediately. This is especially true for burnt resistors.
How to replace a fluorescent lamp
Repair process for fluorescent lamps
Repair consists of several steps:
- Checking the network voltage and contact quality.
- Replacing the light bulb with a previously working bulb.
- If the blinking persists, it is worth replacing the starter and checking the throttle, or completely replacing the ballast.
For repairs you will need a soldering iron, multimeter and screwdrivers. It is advisable to have an understanding of the operation of electronic circuits and safety precautions.
Electromagnetic ballast
Repairing a device with ballast includes:
- Checking capacitors. Capacitors reduce electromagnetic interference and compensate for reactive power deficiencies. Often there is a current leak in them. It is best to check such a malfunction first to eliminate unnecessary costs for expensive capacitors.
- Check the ballast for breakdown. It is advisable to use a multimeter with the ability to measure inductance. If a breakdown is detected, change the ballast or install an electronic equivalent. Both a new component from a store and a working one from another lamp will do.
Electromagnetic ballast How to repair an energy-saving light bulb
Electronic ballast
Electronic ballasts may have different designs, but the operating principle remains the same. Filaments with certain inductance values are used, which feed the oscillatory circuit. There are capacitors, coils and an inverter with transistor switches.
An oscilloscope or frequency generator is used for diagnostics. The repair begins with inspecting the board and looking for a burnt-out component. First, the fuse is checked, which often becomes the cause of the malfunction.
Electronic ballast
Any ballast components can fail. Therefore, it is worth sequentially checking capacitors, resistors, transistors, diodes, chokes and transformers with a multimeter.
When checking, it may be necessary to desolder the components, since without desoldering, reliable indicators can only be obtained by checking for breakdown.
Faulty elements are replaced with new ones. Soldering is carried out carefully, since the components are sensitive to overheating.
Homemade electronic ballast
Experienced electricians and radio amateurs are switching from standard electronic ballasts to self-made electronic ballasts. In this case, the repair is practically no different from repairing a purchased electronic ballast.
Homemade electronic ballast
How to extend the life of a fluorescent lamp
Many radio amateurs have learned to extend the life of burnt-out fluorescent lamps by launching them by increasing the voltage supplied to the electrodes.
This helps to obtain a voltage peak when turned on that exceeds 1000 V. The value is enough to start the process of cold ionization of mercury vapor and create the necessary discharge in a gaseous environment. The result is a stable glow even with a burnt-out coil.
You can limit the current using a resistor or an incandescent lamp. This approach allows you to avoid rapid burnout of the fluorescent lamp during operation. You can wind the resistor yourself using nichrome wire.
Base G9 and G4
These miniature light bulbs are similar in design, they differ in size, but their installation principle is the same. Due to their low weight, they are attached only to the socket with the base. Additional fastenings are usually not provided. Let's look at how to replace such a light bulb in a spotlight.
- De-energize the lamp by turning off the mains power;
- if there is a decorative light diffuser, remove it;
- We take the body of the light bulb and pull it out with a slight force;
- install a new one by inserting the pins into the socket. If you have a halogen, when installing, handle it only with gloves or a cloth.
Replacing light in furniture lighting
Any spotlights on furniture and kitchen equipment are replaced in 99% of cases using one of the above methods. The whole difficulty of replacement lies in dismantling the decorative lamp diffuser.
Strict requirements for the appearance of the lamp force designers to hide the fastenings as much as possible and you need to use your imagination to understand how to remove this or that lamp.
Conversion of a lamp with electronic ballast
If the illuminator model is more modern - an electronic ballast choke and no starter - you will have to make an effort and change the connection diagram of the LED tubes. Components of the lamp before replacement:
- throttle;
- wires;
- cartridge pads located on both sides of the body.
We get rid of the throttle first, because... without this element the design will become lighter. Unscrew the fastening and disconnect the power wires. Use a narrow-tipped screwdriver or pliers for this.
The main thing is to connect 220 V to the ends of the tube: apply phase to one end, and zero to the other.
LEDs have a peculiarity - 2 contacts on the base in the form of pins are rigidly connected to each other. And in fluorescent tubes, the contacts are connected by a filament, which, when heated, ignites mercury vapor.
Lighting devices with electronic ballasts do not use a filament, and a voltage pulse breaks through between the contacts.
It is not so easy to supply 220 V between contacts with a hard connection.
To make sure the voltage is correct, use a multimeter. Set the device to resistance measurement mode, touch the two contacts with the measuring probes and take measurements. The multimeter display should show a zero value or close to it.
LED lamps have a filament between the output contacts, which has its own resistance. After applying voltage through it, the filament heats up and causes the lamp to work. Further connection of the LED lamp is recommended to be done using 2 methods:
- without dismantling cartridges;
- with dismantling and installing jumpers between the contacts.
Lamps with G5 and G13 base
The most popular light bulbs in ceiling luminaires are equipped with G5 and G13 sockets. These sockets are especially often used for lamps in kitchens, bathrooms, and local lighting (for example, mirrors).
Replacement instructions:
We purchase a lamp of the required size and power. If difficulties arise in determining the characteristics of a lamp, we take it with us to the store. This will help the seller choose the right light bulb. Turn off the electrical appliance. To ensure safety, it is recommended to completely de-energize the room by turning off the electricity in the panel. We dismantle the lampshade (lighting fixture grille). The ceiling lamp is attached to the lamp body using latches or screws. Sometimes the lampshade is held on by the lamp itself. To dismantle the lampshade, simply pull on any of its edges. Unscrew the light bulb. We grasp the lamp with both hands (closer to the edges of the bulb) and rotate it along the axis 90 degrees.
We pull out the light bulb carefully, but with little force, so that the contact pins come out of the guides of the socket.
We mount the lamp in the lamp. We insert it into the cartridge until it stops, and then turn it around its axis 90 degrees. The direction of screwing does not matter. We check the operation of the lamp. If everything is done correctly, return the lampshade to its place. If the light does not appear, turn off the lighting and carefully move the light bulb (turn it slightly)
If these attempts are unsuccessful, pay attention to the throttle or starter - most likely the problem is in them. Replacing the throttle and starter is a rather complex operation, and it is better to entrust it to a specialist
In this case, it is recommended to install a new lamp, since the cost of repair work will exceed the cost of purchasing a new lighting device.
Types of socles
An integral component of a lighting device is the base. This part is used to secure the light bulb in the socket and supply electricity to it.
The following types of cartridges are used in fluorescent light sources:
- E14. These threaded cartridges are called minions.
- E27. Medium-sized threaded plinths. They differ from E14 only in size.
- Pin base G. There are several types of sockets (they differ in the distance between the contacts) - G5, G13, G53. Also, the name sometimes contains a second letter indicating a specific model (for example, GU10).
Advice from professionals
If a spotlight is supposed to use a halogen light bulb, then its power should be no more than 30 W. Rule for placing a lamp with halogen incandescent lamps: the distance from the lamp body to the ceiling must not be less than ten centimeters. LED lamps are absolutely safe for suspended ceilings. Pay attention to the coating material. If the ceiling is strict, matte, then the lighting can be chosen in a traditional style
But if the ceiling is glossy, then you should remember that the lamps in it, like in a mirror, will be reflected, they will appear twice as large, and, accordingly, there will be more light.
It is better not to use chandeliers with a large horizontal plane for suspended ceilings.
- It is better not to install a xenon bulb, however, options with a heating temperature of no more than 60 degrees are allowed.
- When installing the ceiling, you should immediately think about how many lamps you want to install, because then it will no longer be possible to do this. Opt for several lamps; this composition looks very beautiful on stretch ceilings, so feel free to embody all your most interesting ideas.
- It is undesirable to use chandeliers, the heat from which can greatly heat the ceiling. This applies primarily to incandescent lamps and halogen sources. Ceiling lights with metal housings can simply melt the ceiling if the mentioned lamps are installed in them. If you want to use them, then you should step back at least 10-15 cm from the ceiling. The best choice would be diode lamps or energy-saving ones, since they hardly heat up.
- It will not be possible to add lamps to an already finished ceiling, since each of them requires a special part - an embedded part, which is installed at the stage of ceiling installation.
- If the room is not light enough, you can review the power of the lamps used and replace them with stronger ones. Or use additional floor lamps and sconces.
- It can be very difficult to replace one lamp with another in an already installed ceiling. The lamp is attached using a mortgage, most likely wooden. It is made exactly in the sizes and shapes needed for a particular lamp. Next, where the chandelier is attached, the film is cut out to guide the wiring for the chandelier through this hole.
For each lamp there is a hole in the ceiling into which only a specific lamp can be installed, so changing the size of the lamps along the way will not work. You will have to either buy exactly the same or almost the same, so that it is attached in exactly the same way and is the same size. But it may well be of a different color or with other decorative elements.
Also a good choice for a stretch ceiling is LED strip. It practically does not heat up and is very economical in terms of energy consumption. Has good performance. It looks very stylish, especially if you have a multi-level ceiling.
With the help of light, the ceiling can be visually made higher or lower. If you place the lamps around the perimeter on the walls and point them at the ceiling, it will appear higher. If the lamps located on the ceiling are directed towards the walls, the ceiling will appear lower.
To make the room seem longer, place the lamps one behind the other. Concentrating light on just one wall will make the room appear wider.
Spot lighting and LED strips are very convenient for dividing a room into zones. This allows you to save a lot of energy, since you can turn on the lights only in the area in which you are currently located.
To get a light bulb in a spot and change it, you must first unscrew the tablet. This way you can quickly remove the soffit.
To learn how to change a light bulb in a suspended ceiling, see the following video.
How to change a halogen or LED light bulb
In suspended ceilings, spot lighting is usually based on the use of halogen or LED lamps. In order to correctly replace such a lamp without being struck, you need to know some nuances.
First you need to unlock the light bulb in the lamp housing. To do this, carefully remove the special round-shaped ring. After the lock is removed, you can unscrew the lamp. Usually this is not difficult.
When replacing the light bulb, hold all parts with your hands, since the retaining ring has the appearance of a spring that can slip out of your hands.
If you previously had yellow lamps, but there was not enough lighting in the room, you can purchase a new lamp of the same color, but white. It will give more light, and the amount of energy will be spent the same as the yellow one.
If you are faced with the issue of adding more to your room, it is worth considering that you will need the same light bulbs as the ones you already have.
The thing is that different lamps not only have different features, but also appearance, so it is advisable to use lamps from the same manufacturer in the same room when it comes to spot lighting.
And the most important thing about halogen lamps is that they should not be touched with bare hands. All actions should be carried out only with gloves, because this will help protect the lamp from premature damage.
By the way, if you do touch the light bulb, don’t be upset, you can gently wipe it with a cotton swab with a little alcohol on it.
Useful tips
Fluorescent lamps contain harmful chemical components that are hazardous to health - for example, mercury
Therefore, it is especially important to carry out all work carefully, trying not to break the flask. If the flask does break, you need to open the windows in the apartment for ventilation and collect the fragments in an airtight container
When installing a new light source, the surfaces of the lamp should be cleaned of dust. This will increase the operating life of the units and elements of the device.
Fluorescent lamps are suitable for daytime lighting. They are economical, provide bright light, and are used in surface-mounted and built-in lamps and Armstrong-type devices. But, despite its long service life, the light bulb can break and burn out. You need to change the light bulb carefully, carefully and in compliance with safety precautions.
Step-by-step instructions for replacing a fluorescent lamp
To update the luminaire, first determine the cause of the malfunction. The set of necessary tools for repair depends on this. One of the reasons could be:
- burnt out bulb - a dark ring forms at the end;
- throttle malfunction;
- starter failure.
More information on troubleshooting fluorescent lamps.
To replace a fluorescent light source you will need:
- screwdriver;
- current indicator;
- work gloves to protect hands from damage.
Expert opinion Izosimov Vladimir Nikolaevich Electrician of the highest category. Lighting specialist. Ask a question to an expert Do not work under voltage. This is life-threatening. First disconnect the lighting from the power source.
Step-by-step instructions on how to replace a fluorescent lamp in a ceiling light
To change a burnt-out fluorescent lamp in a ceiling light:
- Relieve the voltage from the lamp. To be safe, turn off the power supply at the panel.
- Provide access to the lamp by removing the shade or reflective grille. The lampshades are attached to the light source with screws or latches. Unscrew the screws and release the latch lock. Remove the lampshade or reflective grille.
How to remove, insert and assemble lamps with G5 and G13 sockets
Fluorescent light sources with G5 and G13 sockets are used in the kitchen, bathroom, and for illuminating mirrors. They are installed in ceiling lamps. Burnout is confirmed by a dark ring at the end of the flask. The cause of the malfunction may be a failure of the starter (ballast) or throttle. To replace the fluorescent source:
- Relieve the voltage from the lamp. To be safe, turn off the power supply at the panel.
- Disassemble the lamp. Provide access to the bulb by removing the lampshade or reflective grille. The lampshades are attached to the light source with screws and latches. Unscrew the screws with a screwdriver or release the latch lock. Remove the lampshade or reflective grille.
- In single-lamp lamps, the shade is attached to the lamp itself. In this case, pull it and release the burnt out light source.
- To remove the flask, grab it with both hands and turn it around its axis 900 in any direction. The pins of the base will come out of the guide sockets in the socket.
- Pull the light source away from the fixture and out of the socket.
- Buy a new lamp. Its characteristics and dimensions must be the same as those of the burnt-out source.
- To install a new light source, place its ends into the socket until it stops, turn it at an angle of 900 in any direction until it clicks slightly. Lock the position. Apply power to the lamp and check its operation. If the light is normal, replace the lampshade or grille. If the lamp does not light, turn it off and move the bulb in different directions for better contact with the cartridge. If there is no light, remove it and reinstall it.
If the measures taken do not lead to positive results, the starter or throttle may be faulty.
Expert opinion Izosimov Vladimir Nikolaevich Electrician of the highest category. Lighting specialist. Ask a question to an expert When working with a lamp, wipe off dust, clean the device from dirt and cobwebs. This will increase its reliability and service life.
How to unscrew in luminaires with modern types of bases G23, GX23
Fluorescent light sources with G23, GX23 sockets are used in table lamps.
They differ in the shape and size of the pins.
The mounting of the base and socket is the same as in other types, so the procedure for replacing a burnt-out lamp does not change.
- Turn off the power to the lamp by unplugging the cord from the outlet.
- Release the flask from the lampshade using the clamp. To remove, pull the edge of the bulb in the opposite direction from the lampshade and remove it from the lock. While shaking, pull away from the cartridge and pull it out.
- Go to the store with the old lamp and buy the same new one.
- Install the bulb into the lamp in the reverse order, inserting the base into the socket. Press the flask against the cartridge until it clicks.
Expert opinion Izosimov Vladimir Nikolaevich Electrician of the highest category.
Lighting specialist. Ask a question to an expert The latch breaks over time, but this does not affect the operation of the lamp. A fluorescent lamp contains up to 5 mg of mercury. When replacing a damaged light source with a new lamp, it should not be thrown away with household waste, but must be disposed of properly. There are special organizations for this.
Types of bases and features of replacing light bulbs with them
The base is an important element, necessary not only for mounting in the socket, but also for supplying current to the electrodes of the device. There are 3 types of bases used in fluorescent lamps:
- E14 – minions with screw thread;
- E27 - medium-sized threaded, slightly larger in size than E14;
- G (5, 13, 23) – pin.
Subspecies of the latter differ in the distance between contacts.
G5 and G13
Fluorescent lamps of this type are most often used for local lighting, for example, mirrors in the bathroom or ceiling lights in the kitchen. The G5 and G13 sockets differ from each other only in size. The algorithm for installing and dismantling lamps equipped with them will be the same.
First, you need to purchase a replacement fluorescent lamp of the appropriate model. If the exact characteristics cannot be determined independently, then you can take the device with you to the store, where the seller will select its analogue.
Then you can begin dismantling, turning off the electricity in advance. To do this you will need to remove the lampshade. If it is made in the form of a grid, like most office fluorescent lamps, then simply unscrew the screws or remove the latch and then gently pull it down.
Next, the light bulb is unscrewed by rotating it around its axis by 90°. For convenience, you should take the flask with both hands closer to its edges. Using little force, it is easy to pull the lamp out of the socket.
Replacement is carried out by inserting the new device into the chuck until it stops and then turning it the same 90° around its axis. Then you need to check the operation of the fluorescent light bulb by turning it on and off.
If the device does not work, then you should check the throttle and starter; there may be a problem with these components. However, in this case, experts recommend replacing the entire lamp at once, since repair work will cost about the same as a new lighting fixture.
G23
This subspecies is most often used when equipping wall lamps. Replacement in this case occurs as follows:
- electricity goes out;
- the lamp is unscrewed by pulling it towards the lampshade and removing it from the fixing clamp (requires care in order to avoid damage to the retaining bracket);
- a new lamp is installed by pressing the end of the bulb and inserting it into the retainer.
Afterwards, you need to check the operation of the daylight device in the lamp by turning it on and off.
Replacement procedure
1.
Before removing a fluorescent lamp with a G23 socket from the lamp, it is necessary to turn off the lamp, i.e. unplug the power cord from the outlet.
2.
Place the lamp on the table and turn the shade up so that it is convenient for you to remove the lamp. Most often, the free end of the lamp is attached to the lampshade using a special plastic clamp.
In order to remove the light bulb from the socket, first gently pull it by the edge of the bulb in the direction from the lampshade, as if bending it, thereby removing it from the retaining bracket. If this bracket is already broken off (a fairly common occurrence), then skip this point.
Take the lamp with your hand (grab it with your fingers) by the bulb and simply pull it, shaking it slightly, in the direction from the socket hidden in the lamp body. The lamp should, with slight resistance, jump out of the socket.
3.
Buy a new lamp. If you cannot unambiguously determine the size of the lamp and the type of base, then take the burnt-out fluorescent lamp with you to the store or market when you go to look for a replacement. This way, the seller can easily select the new lamp you need.
4.
Install the lamp in the lamp. Once you have mastered the procedure for removing the lamp, it will not be difficult for you to do the reverse. Insert the new light bulb with the base into the socket and press the end of the bulb, pushing the light bulb into the socket. It should go into the cartridge all the way with a barely noticeable click.
Be careful when inserting the bulb back into the plastic retainer. Over time, the plastic of the retainer becomes extremely brittle and can easily break. At the same time, do not be too upset if this happens - this will not affect the operation of the lamp in any way.
IMPORTANT:
A fluorescent lamp contains 3 to 5 mg of mercury, a very toxic metal. You should absolutely not throw away used lamps with household or construction waste. As a result of damage to the bulb of such a lamp, mercury will be released into the environment. Please ensure safe disposal of the fluorescent lamp.
By clicking on the image below, you can watch a short video on how to replace a fluorescent fluorescent lamp. The video will open in a separate window.
Press the ↓↓↓ button
and share with your friends if you find this article useful!
How to change a lamp in a ceiling light
Removing a light bulb from a spotlight is quite simple. As a rule, most ceiling lamps include shades, which can be open or closed. If the lampshade is a closed type, you will have to first remove it, and only then unscrew it and change the light fixture. There is no need to remove open lampshades.
How to remove a shade from a ceiling light
Removing the lampshade is as easy as changing a halogen lamp. During the work process, it is recommended to adhere to the following algorithm:
- Electrical power to the room is turned off.
- The lampshade is turned clockwise.
- Carefully remove the lampshade.
- If necessary, replace the illuminator.
- The lampshade is cleaned from dirt using detergents.
- Allow to dry completely.
- Carefully insert into the base and turn clockwise.
It is not recommended to use a lot of force, as in the future it will be quite difficult to remove the lampshade without damaging it.
How to change an incandescent lamp
Before replacing an incandescent lamp, it is recommended to first remove the frame and lampshade. The light bulb must be unscrewed counterclockwise while holding the socket.
If the element is cracked, then it must be wrapped in cloth and unscrewed as carefully as possible. It is not recommended to look up while working, as there is a high probability that fragments will get into your eyes. To change the lamp, you should not put a lot of effort, as you can damage it.
How to change a halogen light bulb
Before replacing halogen lamps, it is important to remember that you should not touch the surface with your bare hands. This is due to the fact that the body has a high temperature regime, and a thin layer of fat remaining after touching can lead to local overheating, which significantly affects the service life
That is why it is recommended to use cotton gloves while working.
Replacement is carried out in the same way as for any other models. After the faulty emitter is removed, a new one is inserted in its place. After the halogen lamp is installed, it is necessary to put the spring brackets in place, after squeezing them with your fingers.
How to change an LED light bulb
In order to change the LED light bulb in a spotlight, you must first remove the wire ring spring, then release and remove the reflector housing. As a result of these manipulations, the structure should hang on the wire.
To remove the LED lamp, it is recommended to unscrew the 2 screws located on the contact chips, install a new bulb, and secure the fasteners. Only after all this work has been done can the spotlight be returned to its original place. The final stage is the installation of the decorative rim and springs.
How to convert a fluorescent lamp into an LED one - 2 easy ways.
• When the lamp becomes noticeably dim, it must be replaced. To do this, first of all, you need to turn off the switch, i.e. de-energize it. • Next, you need to turn the burnt out lamp clockwise by hand, and then pull it out.
• Insert the new lamp in place of the old one and turn it in the opposite direction. • Turn on the light to check how the new lamp lights up.
Don't forget about the burnt out lamp
It must be handled very carefully and with care as it contains mercury. It is advisable to put it in the same cardboard packaging in which you bought the new lamp
Although, according to the rules, you should pack a fluorescent lamp in a special container. You should not give it to children, and when throwing away a box with a lamp, you should ensure that it does not fall into the hands of anyone.
The popularity of fluorescent lamps is growing rapidly. This is explained by the fact that such lamps are characterized by high luminous efficiency, while consuming a very small amount of electricity. This feature attracts Russian buyers, since electricity becomes more expensive from year to year and the issue of saving becomes extremely pressing. And a fluorescent lamp requires only a fifth of the energy that an ordinary incandescent lamp consumes.
Pros and cons of replacement
Converting a lamp to use an LED lamp instead of a fluorescent lamp has features that are best taken into account at the preparation stage.
The benefits include:
The remodeling process takes minimal time. LED lamps do not require maintenance. It is enough to clean the lampshade from dust from time to time and occasionally replace the tubes. Compared to fluorescent lamps, LEDs consume 60% less electricity. Impressive savings that will quickly pay for the cost of the device. LEDs have an increased resource, which can reach 40,000 hours. When using LED tubes, there is no unpleasant flickering or pulsation that has a negative impact on the eyesight
This is especially important when organizing lighting in schools. There are no harmful substances inside the LED lamp and it does not require disposal after breakdown. The device is absolutely safe for humans and the environment. Even with significant voltage drops in the network (up to 110 V), the lamp will continue to function as if it were 220 V. A wide range of color temperatures is available, which makes it easy to create suitable lighting.
The most obvious advantage is energy savings
At the same time, it is worth considering the disadvantages of LEDs:
- Compared to other lamps, they are the most expensive.
- Over time, the luminous flux characteristics of LEDs decrease due to crystal degradation.
- LED lamps operate in a narrow direction, which is not always convenient. Instead of one fluorescent one, several LED devices may be required.
- Color temperature is not always at the desired level. Often the light is not enough for comfort.
- LEDs get quite hot during operation. The lamp design must have a heat sink, which not only complicates the design, but also affects the price.
Recommended reading: Which is better - LED or energy-saving lamp
Almost all of these disadvantages can be mitigated by using a high-quality scheme. It is still recommended to convert the lamp to LED lamps, since the benefits from such a solution will be greater.
Benefits of remodeling
In this case you will receive:
energy savings (2 times)
greater illumination
lower losses (almost half of the useful energy in fluorescent lamps can be lost in the choke)
absence of vibration and unpleasant rattling sound from the ballast throttle
True, more modern models already use electronic ballast. They have increased efficiency (90% or more), noise has disappeared, but energy consumption and luminous flux have remained at the same level.
For example, new models of such LPO and LVO are often used for Armstrong ceilings. Here is a rough comparison of their effectiveness:
Another advantage of LEDs is that there are models designed for supply voltages from 85V to 265V. For fluorescent you need 220V or close to it.
For such LEDs, even if your network voltage is low or too high, they will start and shine without any complaints.
Which lamps are best to choose as replacements?
It is recommended to use a standard principle that has been repeatedly tested by the personal experience of many users. The first recommendation is to choose devices from the range of well-known manufacturers that guarantee high quality products. Such devices are usually expensive, but quickly pay for themselves due to economical energy consumption.
The second selection principle is the number of LED elements per unit area of the working surface of the lamp. The more LED elements placed on the surface, the higher the dissipative ability of the lamp. Therefore, if you need to illuminate a large area of the room, you should choose products with the maximum possible number of LEDs.
This LED lamp, where the placement of working elements is marked in a three-row design, is close to fluorescent devices in terms of light dispersion
Out of habit, a potential buyer chooses light fixtures with an eye to the power parameter. In this case, the power is determined slightly differently - taking into account the ratio of 1 to 10, when compared with a conventional direct incandescent lamp. For example, if the power of a conventional device is 100 W, then the LED analogue will correspond to 10 watts.
It is also important to focus on the color temperature of the lighting fixture. We wrote more about this parameter in the next article.
Based on the operating conditions, lamps are selected according to the protection class. For domestic use, IP40 is usually a satisfactory option. For rooms with higher requirements - protection class 50 and higher. We talked in more detail about the protection class and decoding of values here.
High protection parameters are necessary for luminaires installed in special rooms with an explosive environment.
How to connect
Fluorescent lamps have two connection schemes:
- with ballasts (automatic start-up control) including a choke, starter, capacitor (1);
- based on electronic ballasts, the ballast includes a converter operating at high frequencies (2).
The raster lamps contain the following elements:
- 4 fluorescent tubes are connected to 2 electronic ballasts. Each electronic ballast is responsible for the operation of a pair of lamps;
- or to a combined type ballast (the set includes 4 starters, a pair of chokes, capacitors).
The connection diagram for the T8 LED lamp does not involve the use of ballasts or electronic ballasts.
The illustrations clearly show how to change the connection diagram of a fluorescent lamp to an LED one.
A stabilized circuit breaker is built into the housing. With it, under a diffuser made of plastic or glass, there is a printed circuit board with LED elements, which is mounted on an aluminum radiator. Voltage from the network is supplied through the base pins to the driver on one or both sides. If there is only one feed side, the pins will act as fasteners.
Replacement algorithm
- Turn off the light and electricity.
- Disconnect the lampshade or grille. In models with one lamp, the shade can be fixed to the lamp itself. To remove it, you need to gently pull it.
- Get the lamp. You need to grab it with both hands on both sides and rotate it around the axis 90 degrees in any direction. Then you need to carefully pull it away from the lamp and pull it out.
- Install a new lamp with the same dimensions and power. Both ends must be inserted into the chuck and rotated 90 degrees around the axis in any direction. The fixation can be judged by a slight click.
- Check functionality.
Replacing a light bulb in recessed luminaires (with type E socket):
- Turn off the electricity supply.
- Use a screwdriver to pry off the insulating ring.
- Pull out the lighting fixture.
- Remove the protective housing and change the light bulb.
Replace the light source with G23 socket:
- Turn off the power at the panel.
- Place the lamp on the table, turn the shade towards the top and remove it.
- Remove the light bulb by carefully pulling it away from the lampshade by the edge of the bulb.
- Place the new light bulb with the base in the socket and press the end of the bulb until it stops completely.
Sequence of actions when replacing lamps
The replacement algorithm may depend not only on the type of base, but also on the design of the device.
Recessed luminaires
Recessed luminaires are often mounted in a suspended ceiling. They do not protrude above its surface and are easily and securely attached. Reflectors allow you to adjust the radiation spectrum. Fluorescent lamps are often used to illuminate plants in greenhouses, thereby stimulating their rapid growth and development.
Recessed luminaires most often use bulbs with type E sockets. To replace them, the luminaire itself must be dismantled. The algorithm is simple:
- Turn off the electricity.
- Carefully pry off the insulating ring with a screwdriver.
- Pull the lamp out.
- Remove the housing and replace the lamp.
How does a fluorescent lamp work?
These light sources got their name because of the phosphor coating applied to the inside of the glass tube. The main component of this substance is phosphorus, which gives the material special properties. As a result, the phosphor is able to significantly increase the luminous flux power compared to conventional incandescent light bulbs, with the same energy consumption. Thus, significant energy savings can be achieved.
Depending on the purpose, manufacturers create lamps with different color effects by adding certain components to the phosphor. Standard ceiling light products are available in tubes of varying lengths to fit all luminaires. More modern lamps have a straight or spiral ring shape. In the first case, it is an ordinary glass cylinder, along the edges of which there are metal bases. The second option involves conditionally dividing the lamp into two components - a socket and a glass bulb of various configurations. They are called compact and are equipped with threaded or pin-shaped sockets.
Threaded sockets are easily screwed into standard sockets, so they are often used instead of conventional incandescent lamps. Pin bases require luminaires with special connecting devices.
The internal volume of the tube is filled with inert gases and mercury vapor. Due to the presence of mercury, the operation of such lamps requires additional safety measures, especially when they are replaced.
Types of socles
LLs have a threaded or pin base. In the first case, the lamp fits into a standard socket without any problems.
Types of socles
A pin socket can have two or four pins. When connecting four-pin sockets, you will definitely need a choke or other stabilizer. Two-pin models are connected only through a choke.
In some models, the bases already include a built-in ballast. The thread in this case can be of two standard diameters.
Is it possible to change the chandelier on a suspended ceiling?
A distinctive feature of suspended structures is the fact that, if necessary, you can install the lamp anywhere. To do this, it will be enough to secure a special ring, then make a hole of the appropriate size and hang the chandelier. During operation, electrical appliances tend to break down, resulting in the need to replace the lamp or the entire appliance. Removing a chandelier is not difficult if you have an idea of exactly how to do it.
How to remove a chandelier from a suspended ceiling
Before removing the chandelier from the PVC sheet, it is worth considering that it can be installed on a hook or on a special strip. If the chandelier is fixed on a hook, the work algorithm will look like this:
- First of all, it is recommended to turn off the power to the lamp, then take a tester or a screwdriver with a special indicator and check that there is no voltage.
- If there is a decorative cap, it should be lowered, which will provide unobstructed access to the hook.
- Through the hole that appears, it is recommended to remove the chandelier from the hook and remove it along with the terminals.
After the chandelier is removed, you will need to disconnect the terminals.
Advice! All work should be performed strictly according to the attached step-by-step algorithm and only with the voltage turned off.
How to change a chandelier on a suspended ceiling
Replacing a chandelier on a suspended ceiling is not as difficult as it might seem at first glance. As a result, you can perform such work yourself, without resorting to the help of specialists. As practice shows, when replacing an old chandelier, choose a device of a similar design. All that is required is to assemble the chandelier according to the attached instructions, and then hang it on a special hook left in the surface from the old lighting fixture.
How to change the lamp yourself
Surely every home owner has had the question of how to remove the shade from a lamp or chandelier. You have to remove it during general cleaning to remove the layer of dust and rinse it to give the room more light. And also, when you need to replace a burnt out light bulb, sometimes it is impossible to get to it without removing the lampshade. There are also pleasant moments - buying a new chandelier, moving to a new home.
There are many different models of chandeliers and lamps; accordingly, there are different types of shades and options for their mounting. Let's look at the most common types of installation and methods of dismantling these fragile products.
Basic rules for removing lampshades
It is important to remember that the lampshade is one of the parts of an electrical appliance. Therefore, the rules for working with them must be appropriate.
- Prepare all the tools, materials and equipment necessary for dismantling - a screwdriver with a current indicator, pliers, electrical tape, gloves, a stepladder (chair, table).
- Check the lighting device for integrity, reliability of its fastening, damage, cracks, etc.
- Before proceeding with dismantling, you need to turn off the power supply. It is not enough to turn off one lamp; you need to completely turn off the electricity at the input panel.
- Wait until all parts of the chandelier or lamp have cooled completely.
- Check with the switch that there is no voltage in the network.
- A stepladder is used to access ceiling fixtures. As a last resort - a hard, stable table. Multi-tiered structures should be avoided - a chair on a table, a stool on a chair, etc.
- Hands must be completely dry when working with electrical appliances.
- Keep all tools dry and their handles must be insulated.
- The washed product can be attached back only after it has completely dried.
Before working with electrical appliances, turn off the power supply at the panel.
When not to remove fasteners for electrical appliances
In many homes it has become prestigious to install various designs of suspended or suspended ceiling coverings. Lighting fixtures on such coatings are mounted using special disposable butterfly-type clamps. They can serve for a long time, however, provided that they are not disconnected from the ceiling.
Such a lock can be disconnected only by breaking its structure. Therefore, it will no longer be possible to attach it to the ceiling a second time; you will have to buy a new one. So it’s better not to remove the disposable fastener unless necessary - it will withstand one replacement of lamps.
“Butterfly” clamp for mounting luminaires on suspended ceilings.
Types of lampshades and methods for removing them
In order to properly dismantle and change the lampshade without damaging it, you need to know how it is attached to the lighting fixture.
The most commonly used fastening methods are:
- screw;
- bolted;
- on spring plates, antennae;
- on a plastic ring.
Screw shades
Screw models have an external or internal thread at the base, through which they are screwed over or into the body with the lamp socket. They need to be dismantled in the reverse order - with light pressure, simply unscrew the screw lamp along the thread.
Screw fastening.
You should not screw the lamp too tightly, otherwise it will be difficult to unscrew it later. In such cases, the threaded connections are tightly compressed together, and when unscrewed, the product may collapse.
Closed screw samples are often installed in bathrooms, showers and bathtubs - where there is high humidity. They are usually round in shape, screwed into the lamp body and close the socket with the light bulb, ensuring their sealing from moisture. They can be easily removed without any tools - just twist them out of the body with your hands.
How to replace a fluorescent lamp
Bolt-on mounting
These lampshades have a smooth base, which is inserted into a housing with a socket. They are fixed with decorative bolts - they are screwed through the frame of the body and rest against the base of the lampshade. To remove, proceed in the reverse order - you need to unscrew the bolts one by one, supporting the lampshade with your hand, and then remove it from the housing holder.
The bolts should be screwed in carefully and very carefully so as not to overpress the fragile material of the product, which may crack.
Lamp lamps on spring plates and antennae
In older models of lamps, a widespread system for attaching lampshades consists of two springy plates mounted under a cartridge. They press and fix the cap in the housing socket. To remove it, the light bulb is unscrewed, the plates are pressed against the socket, and the lampshade is easily removed.
In ceiling models, lampshades are often mounted on clamps in the form of springy tendrils. This design is considered the easiest to dismantle - the antennae are simply squeezed and the cap is immediately released. You just need to hold it in time so as not to drop it.
Antenna mount.
Installation on a plastic ring
Most often, in modern pendant models, the lampshade is attached to the body of chandeliers and lamps using a plastic ring. Essentially, this is a wide plastic nut that screws onto the external thread of the cartridge. With this nut the lampshade is pressed against the chandelier horn.
Fixing lamp shades on rings.
It is not difficult to disassemble such a lamp, but you need to act carefully. First you need to remove the light bulb, and then unscrew the fixing plastic nut. Often, the insulating part of the cartridge with internal thread begins to unscrew along with the nut. It should be held and not allowed to unscrew, so as not to open and accidentally damage the plate contacts of the cartridge.
Features of replacing a light bulb in a spotlight
Safety precautions when dismantling lampshades
Whenever there is a need to unscrew and disassemble the lampshade, you must remember and be sure to follow the safety rules when working with electrical appliances:
- Do not allow any work when the power supply is turned on in the room. Check during operation that there is no voltage on the wires.
- Do not touch exposed wires.
- Wear insulating gloves.
- Do not twist the wires together; use special terminals for this.
- Particular attention to unmarked wires - an error in connection will lead to a short circuit and possible failure of the entire electrical distribution system in the house.
Removing any lampshade is not difficult if you know how it is attached. If it sits on a thread, we unscrew it, on bolts, we loosen the bolts, on antennae, we compress them. The main thing is to remember safety precautions, act confidently, but carefully and accurately.
Useful tips
Fluorescent lamps contain harmful chemical components that are hazardous to health - for example, mercury
Therefore, it is especially important to carry out all work carefully, trying not to break the flask. If the flask does break, you need to open the windows in the apartment for ventilation and collect the fragments in an airtight container
When installing a new light source, the surfaces of the lamp should be cleaned of dust. This will increase the operating life of the units and elements of the device.
Fluorescent lamps are suitable for daytime lighting. They are economical, provide bright light, and are used in surface-mounted and built-in lamps and Armstrong-type devices. But, despite its long service life, the light bulb can break and burn out. You need to change the light bulb carefully, carefully and in compliance with safety precautions.
Main conclusions
Even a beginner can cope with replacing a fluorescent lamp, since the work algorithm is simple and does not require special skills.
- Lamps of this type are most often used in office, warehouse and industrial premises.
- They are used in both surface-mounted and built-in luminaires.
- The replacement algorithm may depend on the type of base and type of lamp.
- Before work, safety precautions require turning off the electricity.
- All used lamps must be disposed of by contacting special organizations.
When replacing, precision and accuracy are required, then the service life of the lamp and the lamp itself will be the same as in the stated technical characteristics.
Previous
Lamps and lampsTypes and main technical characteristics of incandescent lamps
Next
Lamps and lampsSpot lamp - what is it and how can it be used in organizing lighting
How to replace any light bulb: basic principles
08.08.2017
Light bulbs are consumables that, depending on the quality of production and operating conditions, have a certain “lifetime”. This “life” ends the moment when, after turning on the lamp again, you are still standing in a dark or partially lit room. Sometimes you come across lamps that are so complex in design that replacing them becomes a whole undertaking. This is especially true for built-in LED and halogen devices with non-standard models.
In this article we will look at the types of sockets found in everyday life, as well as ways to remove various light bulbs from any lamp and replace them with new ones. Separately, it is worth considering the issue of replacing them in a suspended ceiling. We will also find out how to change a halogen lamp.
Types of socles
A socket is a thread or other type of connector with which a light bulb is attached to a socket or lamp. The base contains contacts that, when interacting with the contacts of the lamp, conduct current.
The device of a classic light bulb
The following types of bases are found in everyday life:
- E27 is the most common type; it is screwed into almost all chandeliers and floor lamps. It has the form of a thread with a diameter of 27 mm.
- E14 is the second most common base, thread with a diameter of 14 mm. It is available in low-power models that are installed in floor lamps, bedside lamps, and wall decorative lamps.
- The picture below in the second row shows the bases of tubular fluorescent lamps found in long ceiling and wall lamps.
- In the third row you can see the bases of the light bulbs that are built into the ceiling lamp.
Common types of bases
How to unscrew a light bulb with your own hands
Each type of fixture and lamp has its own replacement instructions, but the first steps are the same for all cases.
- Completely de-energize your home at the panel or meter. In this case, there is no need to worry about electric shock.
- To access tall chandeliers and spot lights on a suspended ceiling, find a stable stepladder or stool. When working with such fragile parts, you need to be sure of where you stand.
- We carefully stand on a stool (or remain on the floor if the light bulb can be reached without effort), working only with the switch off with dry hands.
- Further steps to replace lamps depend on their type. If these are threaded sockets, then with one hand we grasp the light bulb itself (attention, it may still be hot), and with the other we hold on to the socket. Using gentle movements, we begin to unscrew it counterclockwise. Do not squeeze the glass too hard - remember, it is thin. When unscrewing a halogen lamp, remove it only with clean and soft gloves.
- If the light bulb cannot be unscrewed, you need to try to loosen it, then it will give in.
- If it burns out because it burst, then unscrewing it will be quite difficult. How to change a broken light bulb in this case? There is nothing to grab hold of - only sharp shards of glass stick out from the cartridge. A regular potato will help you. Cut it in half, carefully place the cut on the protruding fragments, and then unscrew the remaining light bulb with gentle counterclockwise movements.