Change or repair
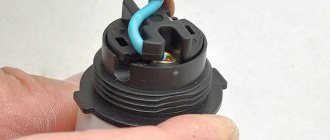
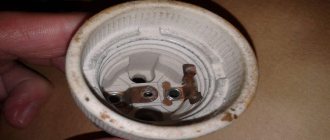
If one or more light bulbs in a lamp do not light after replacement, this is most often caused by a faulty socket. The cause of the problem may be oxidation of the junction of the contacts with the light bulb base. You can check this without disassembling the entire lamp:
- De-energize the network by turning off the packager.
- Unscrew the light bulb.
- Using a flashlight, shine it into the cartridge.
- Inspect the ends of the terminals for the presence of carbon deposits, rust, and oxidation products.
- Clean the ends of the contacts with a fine file or screwdriver.
- The metal terminals may be loose and bent against the walls, so tighten them all the way and bend them back with a screwdriver.
All these procedures can be performed without removing the lampshade and dismantling its parts. If, during a visual inspection, it turns out that the contacts have fallen off, the wires have burned out, the holder body is cracked, partially broken off, or after all the above steps a working light bulb does not light up, you will need to completely replace the old socket in the lamp with a new one.
The main reasons for replacing the cartridge
It is necessary to replace the socket in a chandelier not only due to manufacturing defects, but also due to design features. If the lamp is closed, the temperature inside the bulb increases greatly. Sometimes this leads to melted wiring.
In old sockets, contact with the lamp deteriorates over time. This can cause frequent breakdowns of the latter. After incandescent lamps burn out, sometimes fumes form on the terminals, which leads to poor contact. Simple cleaning rarely brings positive results, so the holders are replaced.
Another reason for replacement is the desire of people to switch to energy-efficient LED lamps. Since they are produced with a smaller base, there is a need to change the seat in the lamp. All holders have an identical design. They differ only in the diameter of the thread.
How does a standard cartridge work?
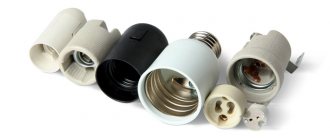
A standard cartridge consists of the following main parts:
- Frame.
- Wires (zero wire and phase).
- Threaded sleeve for screwing the light bulb.
- Contacts/terminals.
- Central contact plate.
- Mounting screws.
- Porcelain insert.
In the manufacture of the holder body, various materials are used - metal, ceramics, plastic, carbolite and others. At the same time, plastic models are most widespread. Their designs are divided mainly according to the method of fastening into three categories - suspended (nipple), with straight and inclined flanges.
Attention! If, when replacing a light bulb, it happens that the base is burnt and the bulb is disconnected, you need to take pliers and, firmly hooking the edges of the remaining lamp, unscrew it from the socket.
Design options for cartridges, their features
Types of products by design:
- screw;
- pin.
Their main difference is in the technology of fixing the light source. Filament lamps are usually equipped with a screw base. Accordingly, they are suitable for lighting equipment with screw sockets.
Expert opinion
Ivan Zaitsev
Lighting specialist, consultant in the building materials department of a large chain of stores
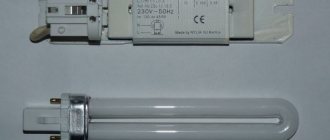
For your information! Modern energy-saving light sources (halogen, fluorescent, LED lamps) are produced with both screw and pin bases.
Step-by-step replacement instructions
Let's look at how to quickly and safely replace a failed cartridge in a lamp with a new one with your own hands. To do this, turn off the lights, disconnect the wires, remove and disassemble the chandelier. Then the cartridge is replaced and the reverse steps are carried out.
Turning off the lights
Naturally, all work on household electrical appliances can only be done when the network is de-energized to avoid electric shock. When repairing, replacing and inspecting a chandelier and its parts, it is not enough to simply turn off the switch or unplug the plug from the socket - you must necessarily turn the switch/switch of your apartment or house to the “off” position.
Making lampshades on a frame
There are enough options for how to make a lampshade cover:
- Sew from fabric.
- To tie. Crochet or knit.
You can knit a lampshade cover with knitting needles or crochet - Braid with threads, twine, ropes.
- Decorate with ribbons.
From tapes
The easiest and fastest way to transform an old lampshade for a floor lamp or table lamp is to use ribbons. You need a frame or lampshade in the form of a cylinder. It can be “naked” or covered with fabric. If you use a “bare” frame, light will shine through the cracks, which will create interesting lighting effects, but the lighting will be uneven. It is uncomfortable to read in this light - this is an interior solution. If you need even lighting, first cover the frame with fabric. It can be the same color as the ribbons, a couple of shades darker or lighter, or it can be contrasting. It all depends on your desire. And remember that the darker the fabric, the less light the lampshade lets in.
We take a ribbon 1-2.5 cm wide. We fix it on the wrong side of the lampshade using PVA glue, additionally securing it with a pin. If you took a wire frame without fabric, attach it to the upper or lower rim (you can sew it on by hand, you can use glue). Then we begin to wrap the entire frame, from top to bottom, placing the turns of tape close to each other, but without overlapping.
How to make a lampshade from ribbons with your own hands
Having completed the circle, turn the tape 90°. We fix it in this position (with a needle and thread or PVA glue, glue from a gun, temporarily fixing it with a pin, pressing it with a clothespin). Then we pass the tape under the first tape, pull it out, lay it on top of the second, then pull it down again, pull it up through one tape. So, gradually, we create an interlacing, filling the entire lampshade.
Alternatively, you can pass two vertical ribbons at a time. But then you need to make sure that each next row moves one crossbar. Then you get a different type of weave. This type of lampshade is ideal for floor lamps, since the light will be directed downwards and the dispersion through the walls will be small.
This technique is very flexible and allows you to get different results.
In this version, the ribbons can be the same, they can be the same color but of different textures, they can differ by a couple of tones or be contrasting. The tapes can be passed in a circle in a continuous stream, or at some distance. If you find a wide tape and apply it with an overlap, then you won’t need horizontal ones at all. And if you use a braided or twisted cord (in the lower photo on the right), we will get a completely different-looking lampshade. So this lampshade finishing technique alone gives you a lot of options.
Interesting options
Let's briefly present the ideas. There are many options for how you can design standard frames for lampshades in a non-standard way. The first method has already been announced: you can knit or crochet a cover for a lampshade. Several options in the photo.
Crochet lampshade for bedside lamp
We knit separately fragments that we attach to the frames
Several types of knitted lampshades
Not everyone knows how to knit. It is easier to work with beads, especially if you glue them. You can decorate old fabric using beads, sequins, beads of different shapes and sizes. You can make this “new-old” lampshade with your own hands in a couple of hours. Select decorations that match the color, coat the fabric with PVA glue, and stick on the decorations. To complete the look, you can assemble pendants from beads and beads that are attached to the lower rim, but this is already painstaking work. The effect is interesting though.
You can update the lampshade using beads, beads, sequins
You can sew a new lampshade from fabric. But it doesn’t have to be an updated copy of the old one. You should use your imagination! If a lamp or floor lamp is in the girls' room, a new cover for the lampshade can be made in the form of a skirt. You choose the style of the skirt yourself. They look interesting when folded. With and without ruffles.
Dress a table lamp in a skirt)))
You can use an old geographical map in the boy's room. They are on thick paper. If the paper is not thick enough, you first need to glue the card onto the cardboard, and then glue the lampshade from such a blank.
You can use geographic maps
Original lampshades are obtained if the finished frame is woven with threads or ropes. Ropes can be natural. In this case they are gray, brown and beige. You can find thin synthetic colored cords. They will make products that are more “cheerful” in color. The situation is even simpler with knitting threads. They are thin, thick, textured, with smoothly changing colors. In general, there are a lot of options.
We take the frame and braid it according to a certain pattern. You can start with the racks. Braid each stand with a braid (the length of the threads should be 3 times the height of the stand). When this work is completed, we begin to stretch the threads/ropes between the posts. They will need to be passed through the braids, so with threads it is more convenient to do this with a needle, but ropes can be inserted this way.
Several ways to braid a frame with threads
The second option is to first entangle the entire frame horizontally, and then braid the racks. The braid won't work here, you just need to secure the turns to the stand using inclined stitches with a certain slope. This option is somewhat simpler in execution, but the “braids” look more decorative.
How to disassemble and repair a cartridge
Unlike an LED spotlight, a lamp chandelier can be repaired with your own hands. To do this, you will need to disassemble its main part - the cartridge. Reasons why a cartridge stops functioning, but can still be restored:
- The contacts of the wires inside the chandelier were burnt. Restoration requires dismantling the chandelier and disconnecting the wiring, disassembling the socket - according to the algorithm described above. The wires connecting the cartridge to the network wires are changed.
- The screws at the junction of the contacts were unscrewed and loosened. The problem can be fixed by disassembling the unit, disconnecting it from the main wiring and disassembling the chandelier. Having released the socket, you need to use a screwdriver to tighten the screws securing the conductors of the lamp to the contacts.
- The center contact tongue has carbon deposits. To restore function, you need to clean the surface with fine sandpaper or a file. It will be necessary to dismantle the chamber using the above method.
- Recession of the contact tongue. If the bulb is screwed in too tightly and the elasticity of the central contact of the base is poor, it may sink. The base will not reach it and the lamp will not light. To fix it, you need to bend it with a slightly thin screwdriver in the opposite direction.
Selecting a cartridge for a ceiling chandelier
The design of the product must correspond exactly to the factory one installed on the lighting fixture. Otherwise, there may be problems with its fixation.
What else you need to pay attention to when purchasing:
- labeling;
- dimensions;
- power;
- voltage.
Recommendations:
- It is better to buy products with a ceramic body. They have a much longer service life.
- It is worth choosing products from well-known manufacturers on the market.
For your information! Products E27, E14 are of the same quality.
Main conclusions
Anyone can repair or replace a socket in a lamp. To do this, it is necessary to comply with all the rules for the safe handling of electrical appliances (disconnect the power supply before starting work), and comply with the requirements for the technology for disassembling, assembling and installing them. Particular attention should be paid to the quality of conductor connections at all stages of work.
Previous
Sockets and sockets Electric lamps with GX53 socket: characteristics, applications, advantages and disadvantages
Next
Sockets and sockets How to properly connect a light bulb socket to the wires on the ceiling
Required tools and materials
The list of materials and tools depends on the design of a particular lamp. The minimum set includes:
- screwdriver;
- pliers;
- stationery knife;
- insulating tape.
For more professional work, a screwdriver with replaceable bits or even a screwdriver, a soldering iron with solder and flux, heat-shrinkable tubes, and terminal blocks will be useful.
To seal the lampshade, you may need sealant or gel adhesive.
Homemade lampshades without frame
Many materials are rigid enough to hold their shape on their own, but at the same time they are flexible enough to make something interesting out of them. There are a lot of such homemade lampshades. And almost all of them are worth your attention. We will present here only part, the other part will go in the section with photos (see below).
From knitted lace doilies
Many people have crocheted napkins and they lie in “stashes”, because it’s a pity to throw them away and they don’t know how to use them. There is a very interesting idea - to make a lampshade from them for a hanging chandelier. In addition to napkins, you will need a large balloon or inflatable ball, glue for heavy wallpaper (vinyl, silk-screen printing, etc.), and a brush.
This beauty can be made from lace napkins
Soak the glue according to the instructions and wait until it swells. We inflate a balloon or take a ball and hang it up. When the glue is ready, lay out a napkin on some clean surface, coat it with glue, and place it on the ball.
Operating procedure
It must be laid out in such a way that there will be a hole in the center for the cartridge. We glue the napkins one by one. They need to be laid out so that the edges overlap slightly. When all the napkins are laid out, coat them with glue again and leave until dry. When the glue has dried, deflate the ball or ball (the ball can be pierced, if you don’t mind) and take it out through the hole. That's all, the lace lampshade is ready.
Final stages
In some cases, problems arise with how to hang the finished lampshade on the socket. The problem can be solved simply - take a transparent plastic bottle, cut off its neck, if necessary, expand the hole to the required size (so that it fits tightly onto the cartridge), then cut the plastic so that you get a ring 5-7 cm wide. Coat this ring with PVA glue , and glue it to the lampshade from the inside of the ball.
Round lampshades made of threads
Almost the same technology can be used to produce round and semicircular stylish lampshades. Choose threads of a suitable color. Their composition is absolutely unimportant - what matters is color, thickness and texture. They can be shaggy, smooth, twisted, thinner and thicker. The appearance depends on this. It is most convenient to work with cotton threads of medium thickness. They absorb glue well and then, after drying, keep their shape perfectly.
Need a ball, glue and thread
You will also need a ball or ball. This will be the base of the lampshade, which gives the shape. You can choose the dimensions of the base as desired. The threads will need to be glued together; for this you will need PVA glue. It is poured into a container and diluted with water in a 1:1 ratio.
You can use other glue. It is important that it becomes transparent after drying. This is WB-29 from TYTAN Professional and D2 glue for carpentry. If you use any of these types of glue, read the instructions.
On the ball or sphere we will draw a circle, which will be slightly smaller in size than the lamp socket. On the opposite side, draw a larger circle - this will be the lower edge of the lampshade. Now everything is ready, we can start.
We wind the thread soaked in glue, leaving holes
We coat the threads with glue and wind them around the ball in a chaotic manner. It’s more convenient to do this if the glue is poured into a container - you can put the whole skein in there and just pull the thread slowly. With glue in a tube, everything is not so comfortable: you have to coat sections up to a meter long, wrap it around, and coat it again. It takes much longer. This is if you do not use PVA. But the products turn out to be more rigid and do not sag or change shape over time, as can happen with PVA thread lampshades.
When winding threads around the ball, carefully go around the drawn circles. If you accidentally climbed into the “forbidden territory”, simply move the threads, forming a smooth (more or less smooth) edge. When the threads run out or you decide that the density is enough, the process can be stopped. We tuck the edge of the thread between the others. All. Next, coat the ball with wound threads again with glue (PVA can be poured over) and leave to dry (at least 2 days). To prevent the ball from rolling, we find a bowl or pan and use it as a stand.
Depending on the threads, we get lampshades for pendant lamps of different styles
The last stage is to deflate the ball or ball. If the ball has a nipple, press it with a thin wire, releasing the air. We take out the deflated ball. That's all, you can thread the lamp inside and test the lampshade.
The technology is the same, but the appearance is very different...
Using the technology described above, you can make not only round lampshades. Rectangular, triangular, trapezoidal. Choose a base that is easy to remove, wind threads soaked in glue, braid, even sticks, newspaper tubes, etc. After drying, remove the base and voila, you have made a lampshade with your own hands. A couple of examples in the photo below.
If you take a cord, coat it with glue, fold it into a snake and wait until it dries, you will get a completely different type of lampshade/shade.
From thin plastic or cardboard wrapped in cling film we make a cylindrical lampshade from threads
You can also use chopsticks... Just wrap the ball with cling film and use transparent carpentry glue rather than PVA glue
This is a paste-like polymer clay in a tube, which was applied to a milk carton, then dried and the bag was removed...
Creative homemade shades for lamps, floor lamps and chandeliers
It’s simply amazing what people don’t make beautiful and unusual things out of. A lampshade made from a cup, a grater, a bottle, a beer or glass jar, metal parts and rings from beer cans... It seems that everything can be used...
Ideal for loft style
Lampshade made from an old sieve... stylish
Do you have old slides and cameras? Make a unique lamp for a photographer!
You can't imagine anything better: shades for a kitchen chandelier made from cups
Candlesticks turn into lamps... without lampshades
Just saw off the bottoms and the exclusive shades for a stylish ceiling lamp are ready
It would never have occurred to me that beer cans and bottles could be used as lampshades
Another option for a loft
Cute and extraordinary
Make shaped holes in thin plastic - a beautiful lampshade for a night light is ready. If you get bored, you can make another one
You can't tell in real life, but these lampshades are made from hooks used to open metal drink cans and canned goods... if you paint them, it will be even more interesting
Rolling paper tubes and making a lampshade out of them is a cool idea
Are there any colored glass jars? Make shades for the chandelier in the kitchen
Who would have thought it would look like this
Don't know what to do with grandma's crystal? Make lampshades out of it...
Varieties by type of base
The choice of base depends on the light bulbs used:
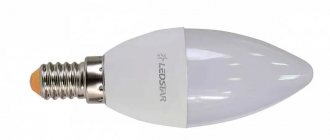
- For almost all housekeepers, fluorescent and conventional lamps, type E27 with a traditional threaded connection is used. The socket is suitable for household LED appliances and a range of halogen lamps.
- Small light bulbs can be used with E14 type sockets (minions). The number in the marking indicates the diameter - in this case 14 mm.
- G-chucks are products that use pin fastening. Suitable for housekeepers and halogen lamps with the same design.
Turn off the voltage and check its absence
Before you begin any repair work, you must turn off the power to the chandelier. This can be done in the electrical panel located in the apartment itself or on the landing.
If the machines that we turn off have access to strangers, then we hang a sign on the turned off machine that says “Do not turn it on, people are working!”, or even better, post an observer. We must not forget that we are surrounded by complete “electricians” who do not know the basic rule “you didn’t turn it off, it’s not yours to turn it on.” With such people it’s easy to get electrocuted.
Important! You can turn off the voltage to the chandelier only using a machine, but in no case with an ordinary switch that controls the chandelier!
Now we need a voltage indicator or, as it is called in everyday life, an indicator screwdriver. In principle, it should be in every home where they independently repair electrical appliances and electrical equipment.
Voltage indicator
We stand on a chair and, using the pointer, check that there is no voltage on both contacts of the cartridges IN ALL HORNES. This check must be done in both switch positions. If the indicator does not light, then to be sure, we check that there is no voltage in the nearest outlet, and we can assume that it is safe to work with the chandelier. Why in all the horns? The fact is that a faulty cartridge can “deceive”, but the voltage remains on the power cable of the chandelier.
Advantages and disadvantages
Advantages of this cartridge:
- ease of disassembly and assembly
- time-tested reliability
- contact pads are fixed with screws
Firstly, if necessary (burnout, melting), they can be replaced. Or simply tighten it when the contacts loosen and the connection heats up.
By the way, these screws need to be tightened initially, even before directly connecting the wires. This will extend the life of the socket and light bulb significantly.
In 90% of cases, the light bulb stops shining because the central contact heats up and its plate-shaped area begins to bend, gradually moving away from the lamp base.
Flaws:
- inconvenient connection to screw terminals
To ensure good contact, you will have to unscrew them entirely from their seat.
Moreover, if you have a non-Wera screwdriver with a bunch of additional “chips,” then this screw often falls out and rolls into the most inappropriate places.
Although experienced electricians do without completely unscrewing the screws and bending the neat rings on the copper conductors. The entire connection is made much easier.
The veins are stripped a little more than usual (2-3 centimeters), and the screws are only loosened. Next, place the vein under the washer with the screw and make a turn strictly in the direction of tightening the thread.
This is necessary so that when tightening the screw, the ring does not unbend, but rather tightens even better.
After this, bite off all the excess protruding behind the bolt with side cutters. You should end up with some kind of half ring.
All that remains is to squeeze it with platypuses to a full ring.
It is not yet possible to tighten such a connection. It should “play” in its seat.
Take the second wire and do the same procedure with it. Only then can the screws be tightened as far as possible. As a result of such a connection, there is no need to unscrew anything, make some rings in advance, guessing the diameter of the bolts.
All this is adjusted directly on the cartridge itself. Saving time and labor costs is obvious.
The only disadvantage of this method is that the wire consumption will be a couple of centimeters more than usual.
How to unscrew a light bulb if the bulb has exploded
Situations often occur when the bulb bursts during operation of a lighting device. The causes of this problem are poor quality of the light source, sudden changes in electrical voltage, prolonged use of the device, external influences and other factors.
Plastic bottle
If you don’t have a set of tools at hand, you can use improvised means to solve the problem. One suitable option is a plastic bottle. The instructions for unscrewing the light source are as follows:
- remove all fragments, as they will interfere and can lead to injury;
- take a plastic bottle of any size with a standard neck;
- remove the lid and heat the neck until the material melts;
- the neck is placed in the base and wait for the plastic to cool;
- gently pull the bottle to remove the base along with it.
Pliers
A more convenient way is to use pliers, which can be used to grab small components. To remove the base, pick it up with a tool and twist it outward. To prevent the lampshade from coming off, you need to hold it with your hands. When performing manipulations, it is important not to violate the integrity of the cartridge circumference.
See also
Options for the design and arrangement of a country toilet with your own hands, layout and interior decoration
If the base is firmly in place and cannot be rotated, you can try bending the sides inward and then continue unscrewing. When removing, the base may become deformed, but this will only simplify the work. The main thing is to make sure that the base does not damage the cartridge.
In a situation where it is not possible to conveniently grasp the part by the edges, you should place the pliers inside the base and push the ends as far apart as possible so that they rest against the side walls. Then the pliers are rotated counterclockwise.
Labeling of factory products
Professional electricians are not content with one size and a quick visual inspection of the product; they carefully read the markings printed in indelible ink or embossed on the visible part of the socket.
Typically, the labeling includes technical characteristics or conditions of use that are of fundamental importance when choosing light sources
The most responsible manufacturers apply the markings and attach short manuals to the products listing important characteristics.
The list of parameters that can be found on the cartridge is not always complete. Usually any of the following characteristics are reflected:
- type (e.g. threaded, pin);
- size;
- temperature;
- load current;
- power;
- voltage;
- manufacturer's trademark;
- level of protection;
- presence of contact for grounding.
Before purchasing cartridges, study the manufacturer’s website, where detailed technical information and a diagram with dimensions are usually posted.
In addition to reviewing the technical characteristics and conditions of use of the product, it is necessary to clarify exactly how the cartridge is attached and what holes/latches are provided for fixing
When choosing, it is also worth considering that ceramics are stronger than plastic and can withstand higher temperatures. If the cost of a product is questionably low, there is a chance that it is a fake.
It’s better to play it safe and buy a more expensive, but high-quality electric cartridge from a reputable brand.
G13 cartridges
They are used for fluorescent and LED lamps with diameters of 26 mm and 38 mm (now this type of lamp with a bulb diameter of 38 mm is practically no longer used). They are the most common lamps used in most lighting fixtures.
G5 and G13 chucks can be either rotary or slip-on (non-rotating).
Rotary and snap-on sockets for fluorescent lamps G5 and G13:
Figure 7. G13 cartridges
On the left in the figure there is a snap-on socket, which is simply put on the pins of the lamp, on the right - a rotating socket with a holder, with which the socket can be mounted on a wall or lamp.
The fluorescent lamps used in G5 and G13 electric sockets are double-ended. Consequently, one lamp requires two sockets, which must be located from each other at a distance equal to the length of the lamp.
The current supply wires to the electric sockets G5 and G13 are inserted into special holes with contact clamps, where they are fixed. It is best to use rigid single-core wire; stranded wires need to be tinned. Due to the specific nature of ignition of fluorescent lamps, which requires the use of either a starter or electronic ballast, dual sockets with a starter holder are also used.
Figure 8. Cartridge with starter holder