Such a seemingly simple and uncomplicated procedure as connecting a light bulb socket has its own nuances that are not always familiar to people far from electricity.
What can I say, sometimes the electricians themselves do it wrong. What could this mean for you in future use?
For example, the fact that the next time you replace a burnt paw, you will simply get under voltage and get an electric shock. To avoid this, let's look at all the possible mistakes when doing this work.
Connecting old-style carbolite
Let's start with carbolite ones. This cartridge is collapsible and consists of three parts:
- cylindrical body with thread
- bottom
- ceramic insert with contacts
Most often in our apartments we use cartridges marked:
- E27
- E14
The value in numbers indicates the diameter of the lamp base in millimeters that is suitable for this socket.
The letter “E” indicates that it belongs to the screw series with Edison threads.
There are also pin type, G series and some others presented below.
Such products are designed for a current of no more than 4A. That is, in a 220V network you can connect a load of up to 900W to them.
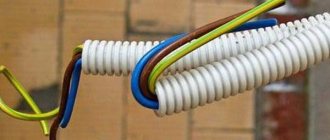
Connecting wires - phase and zero
The cable is connected in the following sequence.
First of all, before starting work, you need to find out which of the wires in the cable is a phase. This is the main point responsible for the safety of all further assembly.
This is done using an ordinary indicator screwdriver.
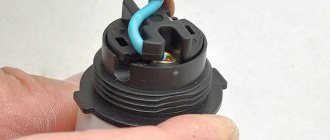
The phase in the cartridge should arrive only at the lower central part of the base, and nowhere else.
The connection contact is shown in the photo below.
Why is this so important? The point is that you should never have a live threaded part in a chuck. Not many people know, but when a light switch (one-key, two-key) is turned off, only one of the conductors is broken.
The second one continues to go directly to the cartridge. Now imagine that an electrician accidentally mixed up a phase with a zero and sent a neutral wire through the switch.
As a result, at one fine moment, the light bulb in the chandelier may not just burn out, but burst, destroying the glass bulb.
You will turn off the light to replace it, and with such a replacement, you will have to come into contact with the base anyway.
And if a phase comes to it, and not zero, then you are guaranteed to come under voltage.
There are generally lamps entirely with metal socket housings. If you mix up the connection of the wires here, and in an emergency, the entire lamp will be energized.
You can also often observe a situation where, when you wrap a light bulb in a socket, for some reason it does not light up. The reason here lies in the bending of the central contact. It just doesn't reach the base patch.
To correct this defect, it is enough to bend it back. Many people do this with non-insulated screwdrivers or a knife.
As a result of careless actions, you will definitely touch the side contacts, and they will be energized.
As a result, you are guaranteed an electric shock. In this case, experienced electricians advise not to use screwdrivers or foreign tools at all, but to use the cartridge itself.
Unscrew the cylindrical threaded body and insert its side edge between the two contact pads.
Next, grab the central patch with the edge and bend it towards the top. In this case, you will not create any short circuits, and you yourself will not come under voltage.
And it doesn’t matter whether this cartridge is on the wall or on the ceiling. Everything is done in the same way in both cases.
Therefore, remember - the neutral conductor should always come only to the threaded part of the base.
The basic elements of any table lamp.
First, let's look at what elements the lamp includes.
- The support element (the “leg” of the lamp) provides support for the light source.
- Electromechanical elements - cartridge, wires and their fasteners.
- Lighting part – reflector, lampshade, light source.
The electrical part is usually hidden, so decoration issues do not apply to it. But the other two parts are quite amenable to flights of fancy and can be made from a variety of materials.
But electrical elements are key in terms of safety. Remember that working with electricity requires a certain set of knowledge (at least minimal) and experience. Otherwise, you should not experiment with devices that are hazardous to health.
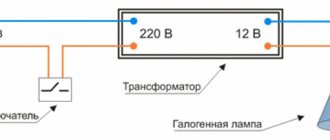
Connecting the lamp
Diagram of a simple table lamp
So, the electrical circuit of the lamp is simple. To assemble it you will need: a cartridge, a cable, a plug and a switch. If you want a lamp with adjustable power, then a dimmer is included in the circuit.
The most common cartridge is threaded E27. It is simple, reliable, and easy to buy. "Minion" E14 is also a good option. The main thing is to connect the cartridge to the wire correctly . The phase wire must come to the central contact of the light bulb base. With such a connection, the likelihood of a person being exposed to current is minimal.
The phase wire comes to the central contact of the base, the zero is in contact with the screw thread. You can secure the wires in the socket with a soldering iron (non-separable method), screws, terminals or clamps.
Screw connection.
Terminal connection.
Connection with clamps.
The screws are tightened sufficiently to ensure a secure connection. In the event of a breakdown, such a cartridge can be disassembled and repaired. Terminals speed up and simplify the process. It is enough to insert the wire into the clamps with a little force: the internal springs will fix it and create reliable contact. The fastening of the wire in the socket must be reliable.
The wires for a homemade lamp must also be electrically safe. The simplest option is a round cable with a core cross-section of at least 0.35 m2 and double-layer insulation. (A good option is SHVVP 3×0.5, approximate price is 15 rubles per sq.m.). Places of connections, twists, and areas with the possibility of dampness are additionally wrapped with electrical tape. Mount the cable so that it is not strained in any position of the luminaire.
The Europlug is connected to the cable as follows:
Connecting the Euro plug
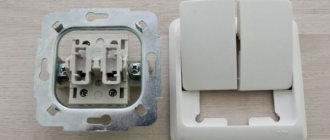
When connecting the switch , remember that the phase wire is broken.
Single-key switch connection diagram
How to connect a cable with three wires
Many people have a question: where to connect the ground wire if you have 3 wires in the cable? After all, there are no more free connectors on the contact insert.
This third wire must be connected to the body of the lamp itself. Usually on a chandelier or sconce, there is always a factory place where the “ground” should be connected.
Therefore, the third wire does not go directly into the cartridge itself. When stripping a cable, always make this yellow-green conductor longer, at least twice as long.
Although it should be noted that some types of ceramic bases have similar connectors.
1 of 2
They are a metal plate placed in the center of the product. If space allows, you can make a connection on it.
Advantages and disadvantages
Advantages of this cartridge:
- ease of disassembly and assembly
- time-tested reliability
- contact pads are fixed with screws
Firstly, if necessary (burnout, melting), they can be replaced. Or simply tighten it when the contacts loosen and the connection heats up.
By the way, these screws need to be tightened initially, even before directly connecting the wires. This will extend the life of the socket and light bulb significantly.
In 90% of cases, the light bulb stops shining because the central contact heats up and its plate-shaped area begins to bend, gradually moving away from the lamp base.
Flaws:
- inconvenient connection to screw terminals
To ensure good contact, you will have to unscrew them entirely from their seat.
Moreover, if you have a non-Wera screwdriver with a bunch of additional “chips,” then this screw often falls out and rolls into the most inappropriate places.
Although experienced electricians do without completely unscrewing the screws and bending the neat rings on the copper conductors. The entire connection is made much easier.
The veins are stripped a little more than usual (2-3 centimeters), and the screws are only loosened. Next, place the vein under the washer with the screw and make a turn strictly in the direction of tightening the thread.
This is necessary so that when tightening the screw, the ring does not unbend, but rather tightens even better.
After this, bite off all the excess protruding behind the bolt with side cutters. You should end up with some kind of half ring.
All that remains is to squeeze it with platypuses to a full ring.
It is not yet possible to tighten such a connection. It should “play” in its seat.
Take the second wire and do the same procedure with it. Only then can the screws be tightened as far as possible. As a result of such a connection, there is no need to unscrew anything, make some rings in advance, guessing the diameter of the bolts.
All this is adjusted directly on the cartridge itself. Saving time and labor costs is obvious.
The only disadvantage of this method is that the wire consumption will be a couple of centimeters more than usual.
Connecting a stranded wire
If you have multi-core wires, then there is no way to do this without first forming a ring and soldering it. Otherwise, 100% reliability and durability cannot be achieved from such a connection. The contact will simply be crushed by the screw head.
In this case, the veins are first divided in half and twisted.
After which a free ring is formed around the bolt.
It then needs to be soldered and then connected.
The extra tails after the ring are bitten off.
Before all these procedures, do not forget to first place the “butt” from the cartridge on the cable itself.
Otherwise, you won’t be able to assemble it after this and will have to twist the cartridge a second time.
The second disadvantage of carbolite products is connection time.
The entire process of disassembling and reassembling, unscrewing and tightening screws, takes from 5 to 10 minutes. Therefore, the procedure for “loading” a carbolite cartridge cannot be called quick.
How to change it yourself
So, we know the theory and how to unscrew the socket from the chandelier, the voltage is turned off, it’s time to figure out how to replace the socket in the chandelier. In principle, this is not difficult. We will proceed according to the following method:
- lower the top decorative cap of the chandelier and, having previously marked the wires so as not to confuse them in the future, disconnect the lighting fixture from the power supply. Before doing this, it wouldn’t hurt to check that there is no voltage on the disconnected wires;
- remove the chandelier from the hook or unscrew the screws securing it to the ceiling;
- We place the device on the table, remove all the lampshades, unscrewing the fixing nuts on the sockets, and put them out of harm’s way in a secluded place. If there are removable decorative elements made of glass, then we remove them too;
- unscrew the skirt of the faulty cartridge. With one hand we slowly pull out the insert, with the other we push the power wires of the chandelier inside - usually there is the necessary reserve for these purposes.
On a note. To dismantle the liner, do not use the voltage indicator as a screwdriver - it is absolutely not intended for this and will immediately fall apart right in your hands.
Let's look at the bottom. If it is in order, and we have the same replacement cartridge, then it does not need to be dismantled. If the bottom is destroyed or burnt, then remove it too. Depending on the type, it either unscrews, or is secured with screws, or with latches.
This device was fastened by screwing on the bottom and then fixing it with nuts
We install the new bottom in place, connect the power wires to the contact insert and install it in place, pulling the wires back to the base of the chandelier. We roll up the skirt.
On a note. Chucks that are secured with screws can usually be removed entirely without disassembling. The latched cartridges can also be removed without disassembling, but you still have to remove the latched bar separately.
At this point, the replacement of the chandelier socket can be considered complete. We wash and install the lampshades, securing them with a fixing ring, hang the lighting fixture on a hook, and connect the power wires. We screw in the bulbs, apply power and check the results of our work.
Connecting wires in a ceramic socket
The ceramic device is not a dismountable product, just like its contacts. This is where the main disadvantages arise.
These contacts are rolled and eventually weaken over time. As a result, heating occurs, followed by burnout or too frequent failure of the light bulbs themselves.
Such cartridges also have the sin of twisting the skirt itself along with the light bulb. After such a defect, it is better to replace it entirely.
Of course, you can initially solder the contacts in the folding areas or crimp the unscrewed skirt again, but the vast majority do not bother with this and simply buy a new one.
The main advantage of the ceramic cartridge is its simplified connection system. Everything happens much faster here.
Firstly, there is no need to disassemble the device itself into three parts. Secondly, completely unscrew the screws.
It is enough to loosen them slightly and insert the stripped wire core into the contact space.
Then tighten the screw with maximum force.
How to connect a chandelier to a two-key switch
A similar method is to use Vago terminal blocks. It is simple and quick to implement. You need to strip the wires and insert them into the sockets.
You can use another option - twist the wires, crimp with pliers and weld. The connection is permanent, but quite strong.
If you are knowledgeable about electrics, you can handle the installation of lamps yourself. If in doubt, contact electricians who will calculate the number of electrical appliances for your area, correctly mark the installation locations and carry out the installation.
Keyless chuck
Today, plastic quick-release chucks have also become widespread.
They work on the principle of the famous Wago clamps.
To disassemble such a cartridge, you need to carefully press the latches on both sides with a slotted screwdriver.
When you remove the cover, you will find that there are no screws inside at all where you could attach the wires. A person who is far from electrical installation work will not immediately understand such a design.
How to connect it? Everything is done very simply.
You need to strip the ends of the wires and push them into the small holes until they click. Moreover, most models have two pairs of contacts at once. And accordingly, not two, but four holes at once.
They are designed for convenient assembly of light bulbs into garlands. Insert the appropriate wire into one hole, and the one going to the next light bulb into the other.
Just don’t think about inserting phase and neutral into adjacent holes, otherwise you will create a short circuit!
Inside these contacts there are spring-loaded metal plates that provide the connection.
Here also do not forget about the correct connection of phase and zero.
The wires in such clamps are held quite securely, and even with a little force, they cannot be pulled out.
In order to still pull it out from there, you will have to turn the core in a circle while pulling.
Mounting methods
For the current-carrying wire
Attaching the cartridge to the current-carrying wire
It is forbidden to connect a screw cartridge directly to cables. Before this, it should be fixed in the lamp. A fixing screw is inserted into the plastic sleeve at the bottom. The wires are threaded into the hole. After connecting and assembling the socket, you can clamp the wires using a screw.
On the phone
This is the most common mounting method. Using this design, you can hang lampshades of different weights, dimensions and designs.
There is a nut on the metal tube, which is used to fasten fittings for chandeliers and shades. The wires are routed through the tube.
You can find cartridges in which the threads are applied to the outer part of the body. A lampshade ring is attached to it.
Bushing
Connecting wires to a screwless socket
There are lamps (wall, table) that are mounted on plastic and metal bushings. Using this method, you can expand the capabilities of the technology for creating a lamp. To do this, just drill a hole and secure the cartridge with a bushing.
With screwless terminals
The case in such models is secured to the bottom with two latches. For this reason, the mount differs from the classic one.
The bottom of the socket is screwed onto the threaded tube into the chandelier. Then the conductive wires are inserted into the cartridge. Finally, the housing is placed on the bottom and snapped into place. The most important advantage is the possibility of repair.
Errors during installation and operation
At the end, we will briefly summarize and make a selection of common mistakes that you should avoid when connecting and servicing a light bulb socket.
1Connecting the phase conductor to the threaded part of the base.
How it all ends was described in detail above.
2Do not forget to tighten the screws that secure the contact plates to the ceramic liner at the very beginning.
You can solder all the wires super securely, but if these screws are loose, then heating of the connection is still inevitable.
3Connecting multi-core wires without soldering or tinning. 4Connecting phase and zero to two adjacent contacts of the keyless chuck and creating a short circuit.
5 Squeeze-adjust the central plate in the carbolite cartridge when bending it, using a non-insulated tool.