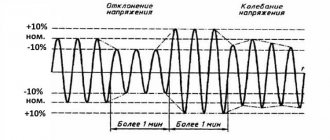
The electricity supplied to our apartments has its own standards. For example, for a 220 volt power supply network, the deviation should not exceed 10% of the nominal value. Such a difference in voltage does not always have a beneficial effect on the functioning of sensitive electrical devices for household use and lighting devices. Organizations that supply electricity use transformers for the power lines that carry electric current to homes.
When operating under load, the line produces a lower voltage limit. With a further increase in load, the standard limit decreases, since the power of the substation is exhausted. The 380 V network also functions. This explains the operating mode of the installations under normal conditions. In reality, the supply of electricity to homes in winter can be much worse.
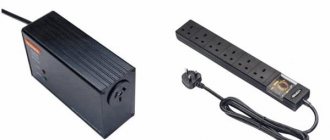
This situation can be corrected by using devices that stabilize the basic parameters of the electric current. Stabilizers are used in different places. The cost of such a device is small, and its installation and connection is quite simple, and allows you to do all the work yourself.
Determining the type of protection
Currently, there are stationary devices that stabilize voltage, which are installed throughout the entire house, as well as portable models that can serve only a few electrical devices. In addition, stationary stabilizers are three-phase or single-phase. It depends on the conditions of use. Connections to 1-phase and 3-phase networks have their differences.
In an apartment or your own house, it is better to connect a 1-phase stabilizer near the switchboard. This makes it possible to protect the entire network from the effects of overloads. Therefore, let's look at the installation instructions for a 1-phase device.
Choosing an installation location
When installing it yourself, all responsibility falls on you, since if installed incorrectly, the device may fail, a fire may occur, etc.
To connect a voltage stabilizer in an apartment with your own hands, you need to consider some tips:
- The room must be dry and ventilated, since the main cause of the malfunction is the presence of moisture in the device body.
- When installing in a niche, check how safe the finishing materials are for flammability.
- It is necessary to provide a gap between the walls and the stabilizer. It is necessary to retreat 10 cm.
- For wall mounting, check that the mount can support the weight of the wall stabilizer.
Advantages and disadvantages
In addition to being cheap, the advantages of Energy stabilizers and other models of the same design among owners of private houses include, first of all, the fact that the voltage in them is regulated without surges. However, such devices also have one significant drawback. Devices of this type regulate the voltage over time for quite a long time.
Also, a big disadvantage of stabilizers of this design is the not very high degree of fire safety. If there is a strong drop in voltage or a very high rise, the servo drive of such a device drives the brush to extreme positions, after which it simply jams. In this case, when the input voltage is restored to normal parameters, its output value can reach as much as 300 V. And this, in turn, can cause both a fire and failure of household appliances.
Network connection
Independent connection to the stabilizer network is not very difficult. On the back of the device there is a block with terminals for five connectors. Most often, the wires alternate like this: phase and zero, grounding, load phase and zero.
To connect, you just need to make the right choice of cable cross-section. Next, self-installation is carried out. Connection diagram for a 220 volt stabilizer:
Necessary materials
To connect, you will need the stabilizer itself. It must be selected in advance, taking into account which device will be connected to it. The following materials are also needed:
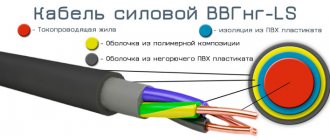
- Three-core cable VVG. Its cross-section must coincide with the cross-section of the input cable on the switch or input circuit breaker.
- Three-position switch to activate the stabilizer. It has 3 states - the first consumer is on, the second consumer is on and off. Instead, you can use a regular modular switch, but in this case, when disconnecting from the stabilizer, the entire room will be de-energized each time.
- PUGV wires of different colors.
The stabilizer must be mounted before the energy meter. Any other connection is prohibited. This is due to the fact that the stabilizer has its own idle speed and consumes electricity. It must be taken into account when paying bills.
It is also recommended to install an RCD or differential circuit breaker in the circuit before connecting the stabilizer.
Types of stabilizers
When you decide to install a stabilizer, you need to select and purchase a stabilizer model. In order not to get confused with choosing the optimal device option, you need to know that all devices perform a similar function, but have differences in the principle of operation. To obtain high-quality energy for your home, 2 types of devices are suitable:
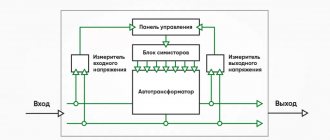
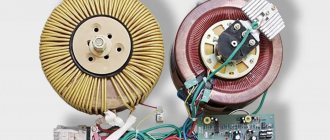
A servo drive device that has a comparison circuit that serves to control a small motor. It rotates in different directions and moves a slider that removes the current. As a result, the output produces a stable voltage value of 220 volts. The advantage of such a device is smooth regulation. This makes it possible to obtain voltage without drops.
The relay version of the stabilization device has its own differences in its operating principle. The device housing contains a transformer with terminals. The input voltage is multiplied by a factor and applied to each output. Electronic elements control the action of the relay unit, which switches the transformer outputs if necessary. Due to this, a voltage of 220 volts is obtained at the output of the stabilizer. A negative factor of such devices is the appearance of small voltage surges when stages are switched.
The third type of stabilizer is an electronic device. It is an expensive device, although its operating principle is not much different from a relay device. Instead of a relay, it has an electronic switch that switches the terminals of the transformer using thyristors.
Main varieties
In household networks of private houses, the following types of voltage stabilizers are currently used mainly:
- servo-driven;
- relay;
- triac.
All these types of devices are distinguished by their operating efficiency and are popular among consumers. Moreover, for all these voltage stabilizers, the connection diagrams in private homes are practically the same.
Stabilizer stages
All stabilizer options have several stages of operation. The quality of the output voltage depends on their number. To understand the operation of the stages, consider an example. When a voltage of 220 volts of normal value is applied, the device runs it according to the circuit without changes. When the voltage drops to the limit values, the electronic key or relay connects the 1st stage, and a stable voltage of 220 volts appears at the output.
The subsequent voltage drop forces the stabilizer to switch to other stages, which will allow it to provide the necessary 220 volts. When there are no longer enough steps, the stabilizer will not be able to increase the voltage. The greater the number of stages, the wider its voltage adjustment interval.
Tips for connecting a voltage stabilizer:
- Before installation, always turn off the mains power at the electrical panel.
- Connect auxiliary protection of the device in the form of a circuit breaker and residual current device. This extends its service life. It is advisable to install the automation behind the meter, but in front of the protection.
- The electrical network for domestic use must have a grounding loop. Installation of the stabilizer without grounding is prohibited according to electrical safety rules.
- Installation of a stabilizing device in the house before the meter is prohibited. The best option for installing the stabilizer would be to use it according to the above scheme.
- It is forbidden to connect the stabilizer immediately after bringing it into the apartment from the cold. Condensation accumulates inside the case, which can severely damage the device when turned on and shorten its service life. Its installation on the street is also prohibited.
- A low power stabilizer of up to 5 kilowatts is connected directly to the outlet. This method is acceptable for garage conditions, country houses. Sometimes a portable stabilizer is installed separately for digital equipment, for example, on a computer, TV, etc.
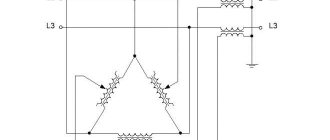
For a three-phase 380 volt network, the stabilizer is connected to one device per phase, connecting them with a star circuit. This method achieves savings on the purchase of devices, as well as on its maintenance and repair, since a 3-phase device is much more expensive.
- After installation, you need to check the correctness of the connections and installation. To do this, connect automatic input devices in the switchboard. Crackling, buzzing, and sparking are not allowed. If there are no such signs, then the voltage stabilizer is connected correctly.
- It is not allowed to connect the stabilizer to a load exceeding the power of the device. Its power reserve must be at least 30%.
- The correct installation diagram is most often depicted on the device body. First you need to focus on this diagram. If there is no such scheme, then these recommendations are the best option. Popular models of stabilizers are connected in this way.
Every year it is necessary to check the reliability of the wiring connections in the terminal blocks and, if necessary, tighten them.
Which device should I buy?
So what kind of stabilizer can you choose for a private house built in a remote village or in the suburbs? As we found out:
- servo-drive stabilizers are distinguished primarily by their low cost and quiet operation, but unfortunately, they do not reliably protect household appliances from breakdowns;
- relay devices are also inexpensive, can protect equipment reliably, but are noisy;
- triac stabilizers have all the advantages of relay stabilizers, but are not noisy, but are expensive and require the use of additional equipment.
Thus, for various types of outbuildings, owners of suburban real estate may want to purchase a cheap servo-drive stabilizer. After all, any expensive equipment is usually not installed in such buildings.
The best voltage stabilizer for a private home will most likely be a relay or triac device. When using such devices, the owners of a residential building will not have to worry about the safety of their washing machines, centrifugal pumps, computers, refrigerators, etc. If it is possible to install a stabilizer in a heated non-residential, well-soundproofed room, it is better, of course, to purchase an inexpensive relay device. If there is no such room in the house, its owners will most likely have to buy triac equipment. The clicking sound of relay stabilizers is actually very loud and annoying.
Connection diagrams
Open the terminal block cover of the stabilizer:
We connect the stabilizer according to the diagram.
The stabilizer is located behind the wall, so there is a hole through which four wires pass: phase for the stabilizer, zero for it, zero for the apartment, phase also to the apartment.
Once again, check that the connections are correct and turn on the power.
The display shows the output voltage and current.
What rules should you follow during installation?
Before installation, the purchased stabilizer must, among other things, be carefully inspected to check for mechanical damage. If the device was brought from the store in winter, before connecting it, it must also be kept for some time at room temperature before heating.
Immediately before installation, the home network, of course, needs to be de-energized. Next, the device is suspended in the location chosen for it on brackets. The input power circuits through which voltage is supplied, when connecting a stabilizer, must be carried out through a circuit breaker with a rated current corresponding to the load current. Such a device will subsequently provide protection against short circuits and overloads.