Why does the light bulb glow when it is turned off?
This happens because when the switch is in the off position, the electrical circuit does not completely open due to the backlight powered through a resistance. Since the circuit is not open, a small voltage is supplied to the lamp, and this voltage is enough to light the lamp at about 5% power.
The most common reason for a lamp to glow after being turned off is backlit switches. Inside such a switch there is an LED with a current-limiting resistor. The LED lamp glows dimly when the light is turned off, because even when the main contact is turned off, voltage continues to flow through them.
Operating principle of a fluorescent lamp
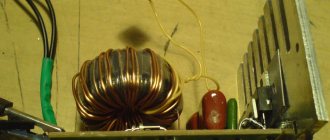
The use of conductors as a current limiter allows one to significantly reduce the dimensions of such a circuit. This is what the power supply for a 10-15 W diode lamp looks like.
Expert opinion
It-Technology, Electrical power and electronics specialist
Ask questions to the “Specialist for modernization of energy generation systems”
Bypassing LED lamps with a capacitor There are many more different classification parameters and design options, but their number is constantly increasing. Ask, I'm in touch!
Types of starters, their main parameters and markings.
Now there is a new type - electronic. This is already a new product. Structurally, they look exactly the same and are fully compatible with the “classics”. You can replace it without even thinking. Inside, instead of a capacitor and sealed bimetallic plates, there is an electronic circuit. It performs similar actions to starting a gas discharge lamp. There is no need to change the schema. The only disadvantage we can name is the price; it will be five times higher than the “classic”.
Starter design
Its advantages:
- The service life is much longer.
- When the components age, the starter will not work and the ballast device will not overheat.
- Wider temperature range.
- Built-in overcurrent protection.
- Electromagnetic interference is completely eliminated when starting the illuminator.
- Fixed heating time for the electrodes of the fluorescent lamp, therefore, increases the service life.
- The light source turns on immediately without flickering.
Now there are completely ready-made engineering solutions. These are the so-called electronic ballasts - electronic ballasts.
electronic ballasts
This type is a metal case that houses an electronic circuit; no additional elements are required. The input comes with supply voltage, the outputs are intended for connection to electrodes.
If necessary, it is easy to select a device for the required number of lamps. Installation and design are greatly simplified. The use of electronic ballasts significantly extends the service life due to “warm start”. The absence of moving bimetallic contacts ensures a silent start. The glow of the lamps will be even. Electronic ballasts provide stabilization of power parameters. Accordingly, the parameters of the electronic ballast and lamps must match.
This solution combines the advantages of electronic starters and the simplicity of the connection diagram. This is a completely turnkey solution. One device can be used for several lamps.
The downside is the price. Electronic components are more expensive than the combined price of the starter, capacitor and inductor. Conveniently, the connection diagram itself is usually depicted on the device itself, or in the instructions. Also, diagrams are always available on the websites of manufacturers.
The marking uniquely identifies the starter and is specified in GOST R IEC 60155-99 “Glow discharge starters for fluorescent lamps”.
Starter markings
Externally, starters for fluorescent lamps look like this:
Starter ST
Starter S2
Starter S10
Operating principle of a fluorescent lamp
How does a fluorescent lamp work? First, freely moving electrons are formed. This occurs when the AC power supply is turned on in the areas around the tungsten filaments inside the glass cylinder.
These filaments, by covering their surface with a layer of light metals, emit electrons as they heat up. The external supply voltage is not yet sufficient to create an electron flow. As they move, these free particles knock out electrons from the outer orbits of the inert gas atoms that fill the flask. They are included in the general movement.
At the next stage, as a result of the joint work of the starter and the electromagnetic choke, conditions are created for an increase in current strength and the formation of a glow gas discharge. Now comes the time to organize the light flux.
Why do you need a choke in a fluorescent lamp?
This device works from the moment of start and throughout the entire glow process. At different stages, the tasks performed by it are different and can be divided into:
When a constant glow is created, the choke acts as a limiting electromagnetic ballast for the low-resistance arc circuit. Its goal now is to stabilize operation to prevent an arc fault. This uses the high inductive reactance of the alternating current winding.
What kind of lighting do you prefer?
Built-in Chandelier
Operating principle of a fluorescent lamp starter
The device is designed to control the process of putting the lamp into operation. When the mains voltage is initially connected, it is completely applied to the two starter electrodes, between which there is a small gap. A glow discharge occurs between them, in which the temperature increases.
One of the contacts, made of bimetal, has the ability to change its size and bend under the influence of temperature. In this pair, it serves as a moving element. An increase in temperature leads to a rapid short circuit between the electrodes. Current begins to flow through the circuit, which leads to a decrease in temperature.
After a short period of time, the circuit breaks, which is a command for the self-induction EMF of the inductor to come into operation. The subsequent process was described above. The starter will only be needed the next time it is turned on.
What kind of capacitor is needed for an LED lamp? Best answers to questions
LED lamps look like regular incandescent lamps. They can easily replace old lamps in a familiar lamp. . So, when using LED lamps in conjunction with a backlit switch, a faint glow or flickering of the lamps in the lamp may be observed when it is off.
Expert opinion
It-Technology, Electrical power and electronics specialist
Ask questions to the “Specialist for modernization of energy generation systems”
Calculation of a capacitor for an LED (calculator) This occurs due to the fact that the lighting element, which is installed in the switching device, closes the circuit and, accordingly, passes a small current. Ask, I'm in touch!
Energy-saving lamps. Learning CFL Electronics (Part 1)
Ending. Previous materials: theoretical part, practical part, bench tests (part 1), bench tests (part 2).
Table of contents
- Introduction
- Electronic circuit
- Some characteristics of the main electronic components
- Resonant capacitor
- GamBiT
- Housekeeper
- Conclusion
Introduction
In the previous parts, links to which are given above, both general technical characteristics and the features of specific compact fluorescent lamps were considered. But the subjects leave the test randomly, and the properties of CFLs from different manufacturers are somewhat different, which involuntarily raises interest in the internal structure of the lamps and a detailed study of the technology of their operation. This material is intended for a trained reader, so I apologize for any difficulties in understanding the material.
Electronic circuit
Converters for powering CFLs can be built using various circuit designs, from vibration converters to... However, do not bother yourself with sophisticated words, almost all CFLs of the target range are made according to the same concept in 1900 - on a resonant half-bridge self-oscillator. Many controllers have been developed for fluorescent lamps, with various functions and extremely careful handling of the lamp, but none of this has caught on.
Cause? I don’t think it’s monetary; microcircuits quickly lose value when produced in large quantities. Then what is holding back progress? Most likely, conservatism of thinking (“the circuit works, and no one complains”), and a lack of interest in improving the quality and operating time of the device. I think you have already formed your own opinion on this issue, and therefore I modestly fall silent and move on to “our sheep.”
Most often, the converter is implemented according to the following topology:
announcements and advertising
RTX 3070 Ti Aorus at a non-Ti price
RTX 3080 for 288 tr in Citylink
RTX 3090 MSI for 539 TR
Earn money by participating in the content of our site
Another 3080 is even cheaper - see the price
Cool 3060 Ti Gigabyte Aorus fell in price 2 times
An incomplete circuit is presented here - there is no input filter that suppresses high-frequency interference, diodes to protect transistors from reverse voltage, and other little things. In normal CFLs these components are present, but we are talking about lamps in the budget segment, and because it is what it is. In addition, an excessive number of elements complicates the analysis of the circuit. Complete options for constructing converters are easily found through a search.
The diagram can be divided into the following parts:
- Input rectifier unit (brown block) - rectifies and smoothes the alternating voltage of the 220 volt network, generates a constant voltage of about 280 volts to power the converter.
- Starting circuit (blue block) – starts the autogenerator when the device is turned on.
- Power section (green block) – converts rectified mains voltage into high-frequency alternating voltage.
- Control transformer TV1.
- Bulb assembly (purple block, together with inductor L1) – matches the output of the power section with the fluorescent lamp bulb.
Now a little more detail. The scheme is really quite interesting, although it looks simple.
The mains voltage is rectified by a diode bridge and smoothed by an electrolytic capacitor (“C1” in the electrical diagram shown), the voltage from it ensures the operation of the power section. It is supplied to two switches (Q1 and Q2) on npn bipolar transistors, which convert it into alternating voltage and transmit it to the matching unit with the bulb.
The entire design of the electronic ballast is a self-oscillator. The device operates at a certain frequency, which depends on the individual characteristics of a number of components. I’m not going to lie, it’s really true - the operation of self-oscillator circuits depends on a lot of characteristics and is extremely unstable. In a normal scheme, a dedicated controller controls the power switches, and the resulting operating characteristics (frequency, duty cycle) are directly determined from the conditions for proper operation of the fluorescent lamp. Here we have a “dumb” self-generator that just works and that’s it. However, I got a little ahead of myself.
Let's forget about the lamp and the trigger circuit for now, that's a separate conversation. The power part consists of two switches on transistors Q1 and Q2, controlled by transformer TV1, the voltage shape of which is formed from the current passing through the bulb, the latter in turn depends on the frequency and voltage value from the output of key transistors Q1/Q2.
He loved her. She ate a piece of meat, He killed her. He buried it in a hole, and wrote the inscription that: The priest had a dog, and so on.
This is exactly how a self-generator works, “on its own,” and this vicious circle cannot be broken. Setting up such devices is easier to shoot yourself right away; they either work right away or... it’s good if they don’t explode. The only way to understand the issue is to separate the device into parts and analyze them independently. When debugging, this is what they do, the positive feedback circuit is turned off, and a signal from a separate generator is supplied to the control transformer. If you are lazy and take the simple route of “just turn it on,” then it will all end with a bang and the search for another pair of transistors. To reduce the risk, it is recommended to turn on the lamp through an incandescent lamp, which will act as a fuse in the event of an “excess” in the electronics. The reception is very good, but it doesn’t help from burnt transistors.
So, power transistors Q1 and Q2 open alternately, which is ensured by the polarity of the windings of the control transformer. If we assume that at some point a pulse of positive polarity is applied at the beginning of the windings (marked by a dot), then a positive voltage will be supplied to the input of transistor Q1, and a negative voltage to Q2. This means that transistor Q1 will be open, Q2 will be closed, and a voltage level will be formed at the output that is close to the supply voltage (slightly less by the amount of the collector-emitter saturation voltage of Q1). If the control voltage changes sign, then the state of the transistors will similarly change - Q1 will close, and Q2 will open, so the output level will be set to a low level, almost 0 volts.
This means that the output produces an alternating voltage with levels “zero” - “all power” and a period depending on the control signal, which is generated by transformer TV1. The load current serves as the setting input value for it. If we simplify the power part extremely, it will look like this:
Through the right winding of the transformer, a load consisting of inductor L1 and a lamp (with a pair of capacitors and a PTC thermistor) is connected to the output of the key stage on transistors Q1/Q2. This means that the current through the lamp is the quantity that determines the shape of the signal, which in turn turns on the transistors. I just want to add: “And the opening transistors form a voltage, which causes a current, which, which...”, the circle is closed.
In this “circle” there must be an element that determines the operating frequency of the entire device, otherwise stable operation will be impossible. For a self-oscillating CFL ballast, such a key element is a resonant circuit consisting of inductor L1, capacitor C4 and equivalent lamp resistance - a classic version of an RLC circuit.
The resonant frequency for this design depends not only on the values of the reactive components (L1 and C4), but also on the reduced active resistance of the lamp. The formula looks like this:
You can read more about a resonant circuit with series and parallel loads in WikipediA. I would like to note an important point - when the load resistance rating decreases, the resonant frequency of the system decreases.
Such a circuit design will ensure the operability of the lamp, but there can be no talk of any stabilization - the device will always try to operate at the resonant frequency with maximum efficiency. This is too bad, automatic adjustment must be introduced, but how? Install a current sensor, generate a reference voltage and process errors with an amplifier? A little more and you can reach a full PWM converter. This will be great, but stupid - microcircuits for converting fluorescent lamps have long been developed, duplicating them with transistors is an idiotic task. How to get out of the situation?
Complicating the scheme will lead to its inexpediency, and this despite the fact that such a construction is “almost satisfactory.” And a solution was found (and a very long time ago), it is successfully used in devices with a similar operating principle. The idea is that the control transformer is not made with a conventional core made of soft magnetic material (ferrite), but uses a material with a rectangular magnetization reversal hysteresis loop.
In order not to cast a shadow on the fence, we will immediately move on to the consequence of replacing the usual ferromagnetic material with a “special” one. The switching criterion is energy (which causes the magnetic field strength in the magnetic circuit). As soon as the energy exceeds the threshold, switching immediately follows. For this circuit, the measure of accumulation is the number of turns of the primary winding of the transformer and the current through it. These characteristics are the limiting factor that regulates the pulse frequency to maintain a constant lamp current.
Indirectly, the use of a special magnetic core material is indicated by the ratio of the number of turns - for normal operation of the “current transformer”, the control current of the transistors must be approximately ten times less than the output current; transistors cannot be driven into deep saturation. In this case, the primary winding consists of eight turns, and the “secondary” windings of three, which means a transformation ratio of 2.7 and clearly less than the previously announced figure. The characteristics of the converter are adjusted not only by the number of turns, but also by the values of resistors in the bases and emitters of the transistors.
Luckily, we won't have to calculate or optimize the converter block, so I'm happy to skip all this "dense forest". Let’s note the main thing - the scheme somehow works, and it’s definitely not worth getting into it, this is a design “in itself” and does not accept simple modernization.
Okay, we figured out a little about the converter, but this auto-oscillator can only work if it is “already” generating. If there are no pulses, then there is no current through the control transformer and, as a result, there are no signals to open the transistors, the system “sleeps”. To wake it up, a trigger circuit is used that generates a single pulse to open the lower transistor (Q2), which causes the auto-oscillator to start.
Let's return to the original scheme. The trigger block is highlighted in a blue rectangle; it consists of resistors R1 and R2, diodes D1 and D2, and capacitor C2. A relaxation generator is assembled on these elements; it works as follows: capacitor C2 is charged with a small current through resistor R1 to the breakdown voltage of dinistor D2, usually about 30 volts. When D2 opens, capacitor C2 discharges through the base of transistor Q2, which creates a trigger pulse for the CFL converter. After a very short time, the voltage on the capacitor decreases to a value at which the dinistor turns off and then the cycle repeats - the voltage on the capacitor will again slowly increase until the dinistor turns on.
There is a trigger pulse, why is diode D1 needed? The fact is that the relaxation generator will generate its impulses constantly. Although they are rare, they can coincide with the moment the upper transistor is open, which will lead to additional opening of the lower transistor. As a result, a large current pulse will occur through both open switches; such an incident can only end in one way - burning out the circuit. Thus, after the converter enters switching mode, the startup circuit must be blocked from repeated generation attempts, which is done using diode D1 - it discharges capacitor C2 at those moments when transistor Q2 is open.
The resistor R2 remains, and the point of using it is that it sets a non-zero voltage on the collector of transistor Q2 (more precisely, on capacitor C3). Well, judge for yourself what is the point of sending a trigger pulse to the base of the lower transistor if there is zero voltage at the collector and turning it on will in no way affect the state of other elements. Resistor R2 ensures that before startup there will be voltage on the collector, that is its meaning.
By the way, usually not one, but two such “fixing” resistors are installed: the first – as shown in the diagram, the second – from the Q2 collector to the “-” circuit of the power source. A very large initial pulse is harmful for a half-bridge circuit, and the use of a pair of resistors allows the amplitude to be reduced by half. However, these are minor things.
The next element that I would like to draw your attention to is the interface with the lamp. It consists of capacitors C3 and C4, resistor R7 and the lamp itself. Let's forget about PTC and capacitor C3 for a moment and consider a simplified diagram of the lamp unit.
“V1” here refers to the square-wave voltage (meander) that the converter assembly creates.
First, let's decide on a simple question - what is a lamp? This is a sealed container containing a small amount of mercury and filled with an inert gas. Two directly heated cathodes are installed at the two edges of the lamp. By the way, its heating is not a mandatory function; there are varieties of cold cathode fluorescent lamps (CCFL). After a discharge occurs, a current arises between the cathodes, which flows along the spiral of the filament, regardless of whether voltage is applied to the filament terminals. This means that even with the filament leads shorted, the filament will be hot. However, issues of cathode operation can be omitted for now; only two points regarding the steady-state operating mode are important:
- The filament is always hot, even if its terminals are short-circuited.
- The lamp current flows through the filament.
Let’s finish with the glow itself for now and turn our gaze to the lamp cylinder. It is usually made in the form of a thin tube, curled in a bizarre manner (“U” or “spiral”). A discharge is formed in its depths, which causes the glow that is so valuable to us. To obtain a discharge between the cathodes, a high voltage must be applied, which will cause a breakdown followed by a transition to a glow discharge. This mode is characterized by lower voltage and higher current. It is logical to assume that the lamp has two stable states - breakdown (high voltage, low current) and normal mode (lower voltage, relatively high current).
For now, let’s leave this sensible assumption with a question mark and continue the thought further - what will happen if the converter begins to increase the voltage on the lamp? More voltage means more current through it, what other options? Let's do a simple test - look at the current through the lamp. I do not show the picture because it is obvious - the shape of the current completely repeats the shape of the voltage supplied to the lamp. Well, so far everything is adding up. But “alas,” careful reading of the documentation brings some dissonance. Specifically in app. note #880 (THE L6569: A NEW HIGH VOLTAGE IC DRIVER FOR ELECTRONIC LAMP BALLAST) contains Figure 15, which is shown below so that you do not waste time studying the entire document.
From this graph it follows that as the current through the lamp increases, the voltage across it decreases. Hm. The dissonance intensifies. In a steady state at a high frequency of the converter, the shape of the current through the lamp is characterized by a purely active form, without reactive components, and in terms of long-term changes in modes, the average current value is very nonlinear. A decrease in voltage with an increase in current indicates a negative internal resistance of the lamp, which clearly implies its tendency to self-excite. However, the plasma in the lamp is already in some mode of volumetric oscillatory process - you probably noticed various floating sprites in its body. It is very annoying that the graph in the figure is limited to such a small range, 0.1-0.23 amperes.
I’ll try to assume that as the current decreases, the trend will continue, but the question is: will it be monotonic? Building your own converter with adjustable characteristics is a very long story; you can get by with a regular CFL with a self-oscillating converter, but with one addition - add a supply voltage regulator. The electronic circuit operates quite adequately from 70 volts of alternating voltage, which allows you to change the lamp power several times.
Changing the value of the alternating voltage is troublesome, thyristor regulators are generally not applicable, so I used a device for smooth voltage supply, which has been used in my room for a long time. Initially, the smooth voltage control unit was conceived to reduce the stress of turning on CFLs in the absence of preheating and to reduce the unpleasant effects of abruptly turning on the lights at night. The lamp switch-on phase was filmed (16 seconds, 452 KB), you can take a look. The tension rises quite quickly, so I had to defuse the footage a bit.
I don’t know how it will seem to you, but I observe several “jerks”. If you look at the brightness at several points in the frame and average it, it will change approximately as follows:
At the initial moment of time, a discharge occurs and the mercury vapor begins to glow, so the interval up to 200 ms is not interesting, and there is nothing unusual there. But after 230 ms there is a sharp increase in intensity with a slight stabilization, followed by a second sharp jump in brightness. The supply voltage increases monotonically and quite linearly; this was checked during the development of the unit, and therefore a sudden change in properties seems strange. There are two obvious “jumps” in this chart.
One could blame everything on the heating of the mercury and the formation of vapors, but turning on the same lamp at the rated supply voltage does not show any unusual phenomena. Wait, something similar has already been seen somewhere... In the first part of the article, the case of turning on a cold fluorescent lamp was considered and one strange thing was observed in the graph, which I could not explain then.
Notice the middle of the green graph. Don't you see anything similar?
The explanation for this phenomenon is simple, and I have already encountered it - plasma has several stable states. In ancient Soviet times, we were developing a small-sized pocket TV, and I was entrusted with the issue of backlighting. Complete data on the characteristics of that lamp have not been preserved, but I remember approximate figures - the breakdown voltage is 800 volts, the lamp is in this mode up to 0.8 mA. As the current increases above this threshold, the voltage drops sharply to about 200 volts, a state that persists until a current of 25 mA. With a further increase in current, the voltage drops to 45 V and then remains almost unchanged.
Thus, the backlight converter could be built at 45 volts, but with the obligatory provision of overshooting the “200 V” state. Or remain in the “200 V” combustion mode, but with the risk of falling into the low-voltage mode. The TV was powered by NKGTs-045 batteries, and therefore there was nowhere to get excess power, so we had to limit ourselves to a not particularly stable, but low-power option. By the way, they also tried a full-fledged version, with a flyback converter and energy storage in capacitors, but the design turned out to be inconvenient, and Soviet capacitors could not withstand operation at a rated but pulsed voltage. We installed a conventional resonant self-oscillator; now this solution is often used in CFLs powered by 12 volts. However, I digress, sorry.
The moral of this story is that the plasma in the flask has “stable” states that it can “occupy.” I’ll try to suggest that not only “borrow”, but also switch between them, since it has negative internal resistance.
Let's summarize this section - the equivalent resistance of a lamp in the burning mode can be represented as a resistor, only the value of this “resistor” can take on different values, depending on the amount of current through it.
Let's return to the electronic ballast circuit. Let's assume that the circuit works, but how is the brightness of the glow maintained? Previously, it was suggested that the stabilizing function is performed by a special design of the control transformer, which changes the duration of the open state of the transistors, that is, the operating frequency. But the converter generates a rectangular voltage (more precisely, a trapezoidal one), and a sinusoidal voltage comes to the lamp.
The fact is that between the lamp and the converter there is a resonant circuit formed by a series inductor and a parallel capacitor. These elements “absorb” the energy of the converter and form a sinusoidal voltage in the load (that is, the lamp), releasing energy into it. Therefore, the shape of the “exciting” voltage is not important; the output will always be “sine”. However, slight distortions of the shape are still present, the quality factor of the circuit is not too high.
Let's take some “averaged” parameters of the reactive elements for the tested lamps with a power of 15-25 W and do a simulation. In this case, the equivalent resistance of the lamp will be on the order of 1 KOhm, which will allow the use of a number of load resistors and 1-2-4-8 KOhm as a characteristic of the operation of the system in different combustion modes.
The top figure shows the voltage across the lamp, the bottom shows the current through the resonant capacitor.
The simulator shows results comparable to theoretical calculations - as the value of the load resistor decreases, the resonant frequency also decreases, the voltage decreases, and the “resonant” rise becomes smaller in magnitude (the quality factor of the circuit decreases). If we exaggerate too much, then the case with a small load (8 KOhm, red graph) can be equated to the initial phase of turning on the lamp, it is characterized by high voltage. However, pay attention to the current through the resonant capacitor (bottom picture). If the load is normal (1-2 KOhm, light green-blue graphs), then the current through it is relatively small. I did not mark the current through the load resistance, so as not to clutter the diagram. For these two cases, the current through the capacitor is less than through the load resistance. If the resistance value is increased, then a large current begins to flow through the capacitor. And if we take into account that at the same time the voltage on the same capacitor increases greatly, then the reactive power will be simply enormous.
According to the simulation, it comes out to 0.92 amperes and 1.1 kV, or 1 kV * A. The term “W” is not applicable in this case, the power is reactive, and therefore o. It is clear that a real CFL converter is not capable of generating such power, even for a short time, but stressful operating conditions are guaranteed. Such a case (small load) occurs at the moment the lamp is turned on, so it is not surprising that electronics “love” to explode at the very moment they are turned on. In solutions using microcircuits, this stressful state is mitigated by frequency control, not allowing the operating frequency to be set strictly at the resonance threshold (“warm-up” mode), which increases the service life of the entire device.
And here we note an extremely important point - if there is a high voltage on the lamp (at the moment the discharge occurs), then this means extremely large reactive power flowing through the resonant capacitor. It is clear that the same power circulates in the resonant inductor, but they do not “die like flies” in CFLs, which is so “typical” of resonant capacitors.
Previously, although a simplified, but quite functional version of electronic ballast was considered. However, there is an even “cheaper” version of the same circuit. The main nodes remain the same, the launch node is “simplified”. If in the first option a special element (dinistor) was responsible for the launch, the cost of which... I don’t know exactly how much one match costs? But when the instruction “save at any cost!” follows, then we, the buyers, reap the fruits of the creativity of “these comrades.” The scheme of such an implementation looks something like this:
At first glance, the circuit has become somewhat simpler; components have been removed from the central part.
The entire circuit is an amplifier with positive output-input feedback, and therefore it simply must generate, the only problem is starting. In the previously considered version of the circuit, the unit on the dinistor was responsible for this moment, but here it is absent. To start, the transistors are transferred from the switch mode to the low-current linear mode of operation. Namely, it turns out to be a “sort of” ordinary amplifier, which cannot but be excited. To switch the transistors into amplification mode, it is necessary to provide at least a small collector current at rest, which is done by installing resistor R1 between the collector and the base of transistor Q2.
The figure shows a “simplified” version of the circuit with auto-start, but there is also a more “complete” version with both transistors switched to amplification mode. However, it has a drawback - you have to install more parts, and therefore it is less common. Since the upper transistor (Q1) does not conduct current at rest, then a resistor must be added to the circuit to create such a current. In this implementation, this function is performed by resistor R2.
If we compare the first and second versions of the ballast, we can note that:
- The power components are the same, the difference only appears at the moment of startup.
- The version with a dinistor is characterized by a clear threshold for the converter turn-on voltage.
- The autorun option has not received any clear boundaries and, potentially, may never be enabled. There may be problems with starting at low or high temperatures, or aging of electronic ballast components. This method is less reliable - electrolytic capacitors have a clear tendency to “dry out” at high temperatures.
In short, the second option is clearly worse. And, interestingly, it is not necessarily cheaper - the dinistor is replaced by an electrolytic capacitor, and which of them costs less?
Circuits with auto-start are noted in products of the “GamBiT” trademark, so I talked about the existence of such a circuit solution, but it’s... unpleasant. As a hardware developer, I have an extremely negative attitude towards self-generating “things” - they either work or don’t work, “that’s all.” And a self-generator with auto-start is already the limit. By the way, a similar circuit design has already been used in series; remember AT computer power supplies (not to be confused with ATX!). In them, to start, both transistors in the half-bridge were switched to a weak active mode, which facilitated the occurrence of generation. One “but”, after startup, voltage was applied to the control chip, and it took over control of the switching of transistors. Here is a clean autogenerator. Well, the most budget-friendly solution, there’s nowhere else to go. And, of course, at the expense of quality.
Execution options
There is a wide variety of electroluminescent lamps, but they can all differ in:
The design can be the same as that of conventional fluorescent lamps - a linear tube or a tube in the shape of the Latin letter U. Compact options have been added to them, made to fit a familiar base using various spiral bulbs.
Ballast is a device that stabilizes the operation of the product. Electronic and electromagnetic types are the most common connection schemes.
The internal pressure determines the area of use of the products . Low-pressure lamps or energy-saving samples have been used for domestic purposes or public places. In industrial premises or places with reduced requirements for color rendering, high-pressure units are used.
To assess the ability of lighting, an indicator of the lamp power and its light output is used. Many more different classification parameters and design options can be given, but their number is constantly increasing.
Connection via modern electronic ballast
In luminaires that use electronic ballasts for operation, the connection diagram for fluorescent lamps is shown on the electronic ballast casing. To enable it correctly, you must follow the instructions exactly. This does not require any adjustment. A correctly assembled circuit with working elements begins to work immediately.
Fluorescent lamps allow the sequential connection of two lighting devices in one circuit under the following conditions:
The advantage of a series circuit is that only one heavy choke is used, but if there is a fault in one of the bulbs or the starter, the lamp is completely inoperable.
Modern electronic ballasts allow switching on only according to the diagram shown, but many designs are designed to switch on two lamps. At the same time, two independent voltage generation channels are organized in the circuit, so a double electronic ballast ensures the operation of one lamp in the event of a malfunction or absence of the neighboring one.
Expert opinion
It-Technology, Electrical power and electronics specialist
Ask questions to the “Specialist for modernization of energy generation systems”
Compact fluorescent lamps A high-quality ballast should light the lamp 0.5-1 second after it is turned on, that is, when the filaments have already warmed up. Ask, I'm in touch!
Connecting an LED to 220 volts, diagrams, examples (video, calculator)
When designing radio equipment, the question of power indication often arises. The age of incandescent lamps for indication has long passed; the modern and reliable radio indication element at the moment is the LED.
This article will propose a diagram for connecting an LED to 220 volts, that is, we will consider the possibility of powering the LED from a household AC network - an outlet that is found in any comfortable apartment. If you need to power several LEDs at the same time, we will also mention this in our article.
In fact, such circuits are used for LED garlands or lamps, this is a little different. In fact, here it is necessary to implement a so-called driver for LEDs. So, let's not lump everything together. Let's try to figure it out in order.
The principle of reducing the supply voltage for an LED
Two power paths can be selected to supply low voltage loads. The first is, so to speak, the classic version, when the power is reduced by a resistor. The second option, which is often used for chargers, is a quenching capacitor.
In this case, the voltage and current flow as if in pulses, and these same pulses must be precisely selected so that the LED and the load do not burn out. This requires a more detailed calculation than with a resistor. The third option is a combined power supply, when both methods of reducing voltage are used.
Well, now about all these options in order.
Connection diagram for LED to 220 volts (quenching capacitor)
The diagram for connecting an LED to 220 volts does not look complicated, the principle of its operation is simple. The algorithm is as follows. When voltage is applied, capacitor C1 begins to charge, while in fact, on one side it is charged directly, and on the other through a zener diode. The zener diode must match the LED voltage.
Thus, the capacitor is ultimately fully charged. Next comes the second half-wave, when the capacitor begins to discharge. In this case, the voltage also goes through the zener diode, which now operates in its normal mode and through the LED. As a result, a voltage equal to the stabilization voltage of the zener diode is supplied to the LED at this time.
Here it is important to choose a zener diode with the same rating as the LED.
Everything here seems to be simple and theoretically implemented normally. However, exact calculations are not so simple. After all, in fact, it is necessary to calculate the capacitance of the capacitor, which in this case will act as a damping one. This is done according to the formula.
Let's estimate: 3200*0.02/√(220*220-3*3)=0.29 mF. This is what the capacitor should be like if the LED voltage is 3 volts and the current is 0.02 A. You can substitute your values and calculate your option.
Connection without starter
Several options have been developed for turning on fluorescent lamps without a choke and starter. All use the principle of creating a high trigger voltage using a voltage multiplier.
Many of the circuits allow operation with burnt-out filaments, which allows the use of faulty lamps. Some solutions use DC power. This leads to a complete absence of flicker, but the electrodes wear unevenly. This can be seen by the presence of dark phosphor spots on one side of the bulb.
Some electricians install a separate start button instead of a starter, but this means controlling the inclusion of the lamp using a switch and a button, which is inconvenient and can damage the lamp if you press the button for too long due to overheating of the electrodes.
Schemes for switching on fluorescent lamps without using a starter, with the exception of electronic ballasts, are not produced by industry. This is due to their low reliability, negative impact on the service life of the lamps, and large dimensions due to the presence of large capacitors.
Useful tips Connection diagrams Principles of operation of devices Main concepts Meters from Energomer Precautions Incandescent lamps Video instructions for the master Testing with a multimeter
Starter device for LL (fluorescent lamp)
The starting device is a necessary element of the lighting circuit for this type of light source. This is the second most important element of the illuminator.
A classic starter is a thing sensitive to operating conditions; it is the most short-lived component of the system. If it fails, the lighting system cannot be started.
Connection diagram of the starter to fluorescent lamps
When examining the diagram, the functions performed by the starter become clear.
- Turns on when supply voltage is applied,
- At the moment of start, the cathodes are heated, since without their heating the emission of electrons is not possible.
- Opens the circuit after warming up.
The bimetallic starter circuit is always the same. There are various versions available.
Starter appearance
The case is often made of plastic, the contacts are placed on a PCB plate (other dielectric material can also be used). Some manufacturers provide starters with a transparent viewing window. USSR-era starters had aluminum housings. There are only two elements inside: a bulb with bimetallic contacts and a capacitor. They are connected in parallel. The starter capacitor is required to smooth out high currents, extinguishes the arc discharge between the electrodes, and is also necessary to open the electrodes. The capacitor reduces wear on the starter. If there is no capacitor, then the electrodes can be soldered during an arc discharge between them. How long the scheme will work after that is unpredictable. A choke (inductor) is needed to create a pulse.
The flask contains two electrodes; it itself is filled with an inert gas. Neon is usually used, less often a hydrogen-helium mixture. Bimetallic electrodes, movable. Two designs have been developed: either two moving contacts (symmetrical) or one (unsymmetrical). The first one is more common. It is cheaper to produce. Old-style starters worked stably with a supply voltage variation within 20 percent. If the deviation from the nominal value is greater, work is not guaranteed. The new ones don't have this problem.