Why remove the car's dome light?
In fact, there are many reasons for removing the ceiling light in a car; each person finds certain problems or they find it. The process of removing the lampshade is quite simple - it does not involve installing an LED strip in the headlight, which, by the way, can be useful to many car enthusiasts. So, there are the following reasons:
- Replace the lamp with a more powerful one or it has burned out.
- Replacement of the diffuser, which can be easily damaged.
- Checking all contacts in the car when installing the backlight.
- A simple replacement for another lamp if you want to install different lighting in your salon.
As a rule, people try to change such lamps only if they are too bright or dim. You can also install multi-colored lighting, it will always look beautiful. For example, you have a blue LED backlight installed, you can install such a lamp without any problems.
Replacing a car interior lamp in Moscow
The car interior lamp is replaced if the elements burn out. Note that this does not happen often, since these lighting devices are active quite rarely. They are usually activated when the central locking is unlocked, when the doors are opened or by pressing a button. Of course, like any other element of this type, the lamp cannot work forever. But we note that some motorists deliberately change lamps before their service life expires. These events are carried out as a small tuning of the interior. For example, instead of standard lampshades, LED panels can be installed. Or, lamps of a different color are placed. Lighting fixtures with a yellow tint are usually used as basic elements. Many car owners change them to white ones.
Interior lighting
Despite the presence of windows, there is not enough light inside the car to read or search for any items in bags. Of course, during daylight hours there is enough natural light, but at night it is not. Therefore, it is necessary to install additional elements. The standard set of such devices for a modern car includes lamps on the door pillars, above the center console, on the ceiling, and in the feet. This arrangement is optimal so that the driver and passengers can comfortably sit in the cabin when boarding.
Today, premium car models are equipped with so-called ambient lighting. Lighting elements are located on the door panels, center console and dashboard. Such devices create a special atmosphere in the car interior. Note that some models allow you to change the color at will through the settings in the on-board computer.
Execution of procedures
Before replacing the interior lamp, whatever the reason for this action, you must purchase a new element. In this case, you should give preference to products from well-known brands. The use of components whose price is the lowest on the market is not recommended due to their short service life.
Let's look at the stages:
- Dismantling the lampshade
- Removing the old lamp
- Installing a new element
- Installation of the lampshade
Before purchasing, pay attention to the type of lamp base you need. If you are not familiar with the specifications, you can bring a sample to the seller.
Where to go?
The optimal solution would be to entrust the replacement of the car interior lamp to professionals. Their experience and the availability of special tools will allow these procedures to be carried out in the shortest possible time. For example, in Moscow you can entrust such a task to the specialists of Tokyo Service. In this case, you can be sure that all activities will be completed efficiently and quickly.
How to remove a courtesy light in a car
It is worth noting that there are a large number of different car brands, almost all of which have different removal methods. But, there are tricks that can be safely applied to all cars. In this article we will not talk about how to remove the ceiling light in the interior of a domestic car, this includes: 2101, 2105, 2106,2199, etc. – if you have such a car, try to find another article. Find out what types of electrical circuits there are.
Initially, we recommend watching a video on how to remove the ceiling light in the cabin, after which we will tell you a few more tricks.
There are two main ways to remove the lampshade, we will talk about them separately.
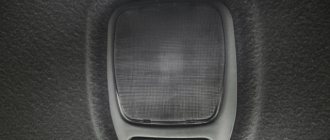
Nowadays the most popular products are attached to special flags with a spring clip. To open them, just pull the transparent cover towards you a little, this is how it looks in the photo.
The second option is when you need to pry a little with a screwdriver, you should notice a special hole. If it is not there, read on.
If you start trying to remove the lampshade using these methods, but nothing works, don’t try. Remember, the lampshade is always easy to remove; if nothing comes out, it means you are doing something wrong.
A very rare option is when you need to press the lampshade inward, loosen it a little and pull it out. This also happens, but it is very rare, so we do not place any emphasis on it.
After you have pulled out the lamp, be aware of the wires and turn off the power to the battery initially, it can short-circuit the wiring in the car. Sometimes, to change a light bulb, you just need to unscrew and insert a new one - this is an easy way. It can also be more difficult when all the wires are fastened with special terminal blocks, they need to be disconnected. Do this carefully, they are very easy to damage.
So we told you how to remove the ceiling light in the cabin and looked at the main methods. There is nothing complicated, but remember, if it doesn’t work, don’t touch it, you’ll only break it.
Related article: What to do if the power goes out.
Replacing the interior light bulb
Hi all! Recently, after going fishing, I discovered that the central interior lamp was not working. Having looked at the section “Self-help, car care” in the instructions, I was pleasantly surprised. There on page 201 it is written exactly how to deal with this problem. It turned out that it was enough to remove the entire diffuser and replace the lamp. But no matter how I tried to remove the diffuser, I couldn’t. The lampshade is fixed quite rigidly. And with increasing force, it seems that it may burst. Although the instructions are all easy and simple. Help with advice. Has anyone encountered this problem? Thanks in advance!
it must be removed so that it does not warp. You need to unclip all the latches at once, there seem to be 4 of them, and pull. Also, for convenience, I removed the lid with slots, the one closest to the glass, from there the latches are visible and you can get it with a screwdriver.
A screwdriver is cruel. Well, I thought that the instructions simplified everything too much! This means there are four fasteners, and not two as in the picture. Okay, thanks for the advice! Let's break!
The latches are located differently than in the pictures.. they are located a little further from the edges on the long side.. (displaced closer to each other).. I had sex with them for several minutes before I realized.. now I’ll take them off and put them on with a bang.. you can dive there)))
Added after 3 seconds:
Tanist
I think that you can do without a screwdriver, it all depends on desire and abilities, it’s not for nothing that they say: it doesn’t matter where your hands come from if they are golden
Those. There are only 4 latches: 2 each on the driver and passenger sides. And to pull it out, you need to take the panel somewhere in the middle on both sides, and then carefully pull it down. So? By the way, what is the standard size of the central lamp?
I don’t think it will be possible to drag it in the middle, it fits quite tightly, I dragged it a little from each corner so that it doesn’t warp. In my opinion, the lamp is in the glove compartment and trunk, you can just take them off and have a look.
standard size.. xs.. lamp with two contacts is cylindrical.. in the store they called it “finger”.. now I’ll attach a picture to explain where the latches are..
here... red is where the latches are, blue is where they are marked in the book)))
Added after 3 seconds:
F-ZerO
Oh thanks! I searched there, but only in the “lighting” section. But it was necessary to get into the “crickets”
Added after 5 minutes 59 seconds:
The lamp there is C10W.
I changed the lamp myself, using the information from https://astra-h.ru/noise_potolok.html. I bought a light bulb at BOSCH, for 2 light bulbs - 58 wooden ones.
Guys, I pull this lampshade as indicated in the manual, with the front edge down on both sides. The fingers are sore, the bastard crunches, it bends, but the latches are dead. Can you tell me the secret to removing this lampshade? He even gave me a plastic card. the bastard is tightly latched. I'm afraid to break it.
I soundproofed the ceiling and glued it with Madeleine as per the instructions. Behind the hill they probably also read Astra Fak)) maybe they increased the thickness of the plastic!) When snapping it, the antennae broke off. I had to order a new lampshade. On the new one (removed) I tried to latch it, in general, I opened the cover of the light bulbs (which is transparent) with the help of two screwdrivers, if it was already on the ceiling, I doubt I would have been able to open it without breaking it. The antennae that are attached to the hood are sitting dead, the rear ones are easily snapped off with your fingers.
I did it differently and easier. On the windshield side, the lamp is held on by 2 latches. There are 2 thin holes for them. I stuck a flat-head screwdriver into them, pushed it back a little and at the same time pulled the lampshade down. After releasing the two latches, the side facing the interior can be easily removed from its seats.
Well, this topic was created out of nothing))) I also became a necrophiliac)))
10W 12V 41mm length!! 10W finger 3 or 4 types of different lengths!!
Added after 10 minutes
:
Well, so the topic is not fully covered. But I sorted it out based on how the light bulb burned out 1.) I removed the cover closest to the glass, it simply comes off 2) I removed the farthest (large cover), it also does not threaten to break, it came off quite easily. 3) I removed the volume sensors, there are 4 latches, 2 in front and also opposite the front 2 in the back I felt with a plastic card, it was difficult to remove. 4) and now the glass of the lampshade, the front latches 2 pieces to the left and right of the buttons became deeply visible, carefully removed the front and then the rear ones.
A thin flat-head screwdriver is simply necessary to press the hidden latches, they are in the depths of the lampshade in particular and near the block with volume sensors. Well, warm up the interior in the winter so that the plastic is not too fragile, I also turned on the light bulbs for reading, they heated the lampshade from the inside
Without damage in general, and so on until you take it apart and you yourself don’t understand where to press with a thin screwdriver, you can’t disassemble it on the fly.
Last edited by vanis777; 02/05/2017 at 11:56 am.
Source: astraclub.ru
Why remove the car's dome light?
In fact, there are many reasons for removing the ceiling light in a car; each person finds certain problems or they find it. The process of removing the lampshade is quite simple - it does not involve installing an LED strip in the headlight, which, by the way, can be useful to many car enthusiasts. So, there are the following reasons:
- Replace the lamp with a more powerful one or it has burned out.
- Replacement of the diffuser, which can be easily damaged.
- Checking all contacts in the car when installing the backlight.
- A simple replacement for another lamp if you want to install different lighting in your salon.
As a rule, people try to change such lamps only if they are too bright or dim. You can also install multi-colored lighting, it will always look beautiful. For example, you have a blue LED backlight installed, you can install such a lamp without any problems.
Instructions on how to replace Kodiaq interior light bulbs with your own hands
The engineers have very well thought out the procedure for replacing interior lighting lamps and the only tools you need are a Torx T15 and a spatula for removing plastic parts. Without experience in car maintenance, replacing all lamps will take no more than 30 minutes.
Replacing lamps in the front lamp
Change by turning counterclockwise. To get to them, you will need to remove the lampshade. The fastening screws of which are located under the trim. To dismantle the decorative cover, use a spatula to pry it around the edges to disengage the latches.
Replacing lamps in the rear lamp
Changing the backlight bulb on a Kodiak in the rear lamp will be easier than doing this procedure in the front lamp, since there are no trim or mounting bolts. The lampshade can be removed by releasing the latches (the locations will be shown in the photo in the report). And then, just by turning it, you get the backlight bulb.
Replacing sun visor mirror light bulbs
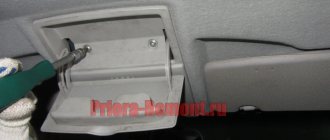
To replace the visor illumination bulbs on a Kodiak, you will need to tamper with the spring retainer of the canopy. After removing it, pull out the light bulb by hand.
How to remove a courtesy light in a car
It is worth noting that there are a large number of different car brands, almost all of which have different removal methods. But, there are tricks that can be safely applied to all cars. In this article we will not talk about how to remove the ceiling light in the interior of a domestic car, this includes: 2101, 2105, 2106,2199, etc. – if you have such a car, try to find another article. Find out what types of electrical circuits there are.
Initially, we recommend watching a video on how to remove the ceiling light in the cabin, after which we will tell you a few more tricks.
There are two main ways to remove the lampshade, we will talk about them separately.
Nowadays the most popular products are attached to special flags with a spring clip. To open them, just pull the transparent cover towards you a little, this is how it looks in the photo.
Reasons for replacing the interior courtesy lamp
As a rule, most drivers do not pay attention to the interior lamp as long as its operation completely suits them.
Therefore, the procedure for dismantling the lampshade may be due to the following reasons:
- The interior lighting has stopped lighting - this occurs both due to a burnt-out light bulb and due to a lack of contact at the input of the lamp itself.
- Insufficient lighting - in most cases is due to the fact that low-power or outdated devices are installed in the ceiling, producing a weak luminous flux. It can also occur due to the burnout of any part of the lighting devices in the ceiling.
- Flickering of the lamp - occurs due to poor contact or malfunction of the LED lamp driver. To diagnose the cause, it is necessary to remove the ceiling light.
- A broken lens glass or a cracked lamp housing is caused by careless actions of both the driver and passengers. It also occurs during the natural aging of plastic and the loss of its mechanical properties.
Regardless of what reason led to the need to dismantle the lampshade, you should take this procedure as carefully as possible, since careless actions can easily cause damage to both the lamp itself and the ceiling lining. Which will entail additional costs for their repair and restoration.
What kind of lamps are installed in the interior lamp?
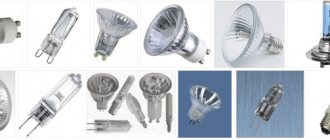
The lamp itself consists of 3 sections - a central one and two side ones for the driver and passenger. C5W lamp (AC12-5-1) is installed in the center . On the sides there is a T4W lamp (A12-4-1) with a power of 4V.
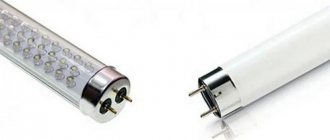
Instead of conventional incandescent lamps, you can install LED lamps with exactly the same bases. In addition to the usual lamp, you can install universal interior lighting in the center; we will talk about it below.
There should be no problems with the c5w lamp; there are a lot of LED analogues, which one you choose depends only on you. If you suddenly find yourself in a professional car lighting store, it is better to buy lamps with 5730 diodes, they will shine brighter than others.
In addition to a regular lamp, you can install universal interior lighting in the central lamp. It comes in different sizes, so you can choose it according to the size of the lampshade. The kit includes 3 different adapters for lamps: c5w, w5w and t4w.
or simple lamps with c5w socket
LED lamps have polarity, so when installing, pay attention to the + contact. If the lamp does not work during installation, simply turn it over.
The side lighting lamps have a different polarity. When installing LED lamps, they will not work and you will not be able to turn the lamp over. Therefore, you will have to remove the lampshade and rearrange the wires directly on the lampshade itself. Swap + and - places. Everything should work.
When choosing t4w LED lamps, pay attention to their size; the width of the lamp may not fit into some lampshades.
What should you pay attention to before removing the ceiling light?
Before working with the side or central lamp, be sure to remove the power terminal from the car battery, as this may result in a short circuit in the circuit. Which can lead to additional damage and a seemingly simple procedure will result in a number of unexpected costs.
Before removing the lampshade, you will need to inspect the outside where the diffuser is attached to the body. As a rule, these are small depressions into which you can insert a screwdriver or some other flat object.
Rice. 1. Lock on the lamp
In each car model they can differ radically. But the most common are mechanical clamps and spring latches. The mechanical clamp can be easily opened using a screwdriver or other flat object. The spring latch can also be opened by pressing on it with a screwdriver or other object that can penetrate the hole.
It should be noted that at this stage the movement of the diffuser should be as easy as possible. If, after disengaging the lock, you cannot easily separate the diffuser from the lamp body, then somewhere there is an unreleased fastening unit. Therefore, it is better to check the entire body again, it is quite possible that there is an unnoticed lock somewhere, perhaps it is covered by a casing or a sticker. There is also a possibility that while opening the lock on one side, the lock on the opposite side could return back into the groove.
Because with enough force, you can simply break the diffuser, damage the lamp housing, or tear it out of its place of fixation. Depending on the design features, the outer glass can be removed separately, leaving the lampshade itself in its socket, or the entire lamp can fall out completely.
To remove glass you can use:
- A screwdriver or a knife - selected in accordance with the characteristics of the lamp;
- A special spatula - as a rule, it comes with the lampshade or is sold in specialized stores;
- Manually - if the design allows, you can remove the diffuser with your hands by pressing on certain areas of the lampshade or on the latches.
It should be noted that the impact of a metal tool on plastic elements is fraught with the appearance of scratches and the subsequent loss of external aesthetics by the lampshade. To prevent such phenomena, you can place a plastic bag under the screwdriver so that it is located between the screwdriver and the body.
Rice. 2: Place the bag under the screwdriver
In order to figure out how to remove the interior lamp, consider this manipulation using a specific example.
Replacing an interior light bulb - where are the bulbs located?
As a rule, there is always a central lamp (it turns on when the door is opened and from a button). The front part is also equipped with additional lighting (operated by switching a switch or tied to the door switches).
Access to the central lamp is most often simple: use a thin screwdriver to pry up the diffuser and remove it. The front lamp is somewhat more complicated. If it is located in the area of the glasses compartment, remove the bolts connecting the shelf and the ceiling (in some designs the glasses case must be removed). After this, the interior lamps are replaced.
Similar manipulations are needed if the light elements have burned out. The second reason is insufficient lighting. Let's understand the range of these spare parts to install suitable light bulbs.
Step-by-step instructions for dismantling the lampshade
To do this, consider upgrading your interior lighting. The following example shows the replacement of a conventional incandescent light bulb in a lampshade with a more modern and efficient NIGHTON ML-6 LED board. This replacement will be relevant for the interior of Chevrolet Aveo, Daewoo Matiz, ZAZ VIDA with the same type of lampshades. This technology for dismantling the ceiling lamp will be relevant for other brands of cars. Carefully study the external design of the lamp.
How to remove the interior lamp yourself? We act step by step
The question of how to remove the interior lighting lamp becomes quite relevant for the driver when the bulbs in the lighting have burned out - or you are planning to change them to more fashionable diodes.
There is nothing complicated in this process - you don’t call an electrician when a light bulb burns out, for example, in the bathroom at home. Changing it in a car is easy even for a beginner. You just need to know a few nuances and learn how to correctly and without interference remove the parts that interfere with this procedure (in this case, the lampshade).
Content
How to remove the interior lamp? Where to start and how to end this process? It should be noted that the work itself depends little on what kind of car you have. In all cases, the lampshade is usually secured with clamps - one or more.
The brand only affects the number of lamps in the cabin. In any case, before proceeding with the replacement, you should disconnect the ground. It won’t jerk you too much, even if the battery is in working condition (especially with the engine turned off). But the feeling in this case, frankly speaking, is not pleasant. So, it’s better to remember about an unloaded gun, which, by definition, can fire once in a lifetime! Let's consider, as an example, replacing light bulbs in various places in the car interior, for which it is necessary to first remove the lampshades protecting them.
Main front lamp
You should take care of it first (in your own interests). In the evenings, this source is the driver’s best friend. Especially if you need to write something down or find something, and daylight is no longer enough. It's funny that this lamp is attached simply, with just one clip. True, on new cars there are as many as three light bulbs, so it is more convenient to change them by removing the entire structure.
The lampshade is pryed off with a screwdriver from the side opposite the windshield and smoothly pulled towards you by hand. As a result, you have a lighting fixture hanging on wires. The protective panel can be removed by hooking your fingers on both sides. The main light bulb is immediately visible, the side ones are located on the sides, in sockets that can be unscrewed by turning 45 degrees counterclockwise. The entire procedure of changing and pulling out followed by putting it in place takes a few minutes at most.
Cosmetic mirrors
Their lighting is not built into all models and is not available on all brands of cars. However, if there is an appropriate light bulb, it should work, and more stable than all other lighting devices. It is unlikely that your family life will remain cloudless if your precious “half” does not get the opportunity to make sure that she, as always, is on top.
Lighting from behind
New cars, even budget ones, usually have autonomous lighting for those sitting in the back. And if it doesn’t work, and you want to hear less whining from the children shoved onto the back sofa, it’s better to fix it before you leave - nerves are more expensive. It's a little more hassle than changing a light bulb on a vanity mirror.
The lampshades here are wider, so there are more latches on them: there are 3 of them on the side opposite the switch. Each one is pryed off with the same screwdriver. There are two latches next to the button - they also need to be released
. Now the lampshade gently pulls down - and you gain access to the burnt out light bulb.
Obviously, the removal procedure is simple and easily accessible. And you shouldn’t go to a service station with such small things, since probably even a schoolboy can remove the interior lamp.
Replacing the interior light bulb
Hi all! Recently, after going fishing, I discovered that the central interior lamp was not working. Having looked at the section “Self-help, car care” in the instructions, I was pleasantly surprised. There on page 201 it is written exactly how to deal with this problem. It turned out that it was enough to remove the entire diffuser and replace the lamp. But no matter how I tried to remove the diffuser, I couldn’t. The lampshade is fixed quite rigidly. And with increasing force, it seems that it may burst. Although the instructions are all easy and simple. Help with advice. Has anyone encountered this problem? Thanks in advance!
it must be removed so that it does not warp. You need to unclip all the latches at once, there seem to be 4 of them, and pull. Also, for convenience, I removed the lid with slots, the one closest to the glass, from there the latches are visible and you can get it with a screwdriver.
A screwdriver is cruel. Well, I thought that the instructions simplified everything too much! This means there are four fasteners, and not two as in the picture. Okay, thanks for the advice! Let's break!
The latches are located differently than in the pictures.. they are located a little further from the edges on the long side.. (displaced closer to each other).. I had sex with them for several minutes before I realized.. now I’ll take them off and put them on with a bang.. you can dive there)))
Added after 3 seconds:
Reasons for withdrawal
The main reasons for this event may be the following:
- replacing a damaged lens;
- replacing the light bulb with a more powerful one;
- checking contacts (if the light does not work);
- complete replacement of the lighting device.
To ensure that you do not damage the integrity of the mounts, diffuser, interior trim or the light bulb itself, you need to carefully dismantle it, which we will talk about later.
Correct dismantling
Depending on the make and class of the car, removing the interior lamp can be done in different ways. The reason for this is the different design of the diffuser mounts. Today, products secured with special flags and spring clips are popular. In the first case, you just need to pull the transparent cover towards you. In the second, using a thin minus screwdriver, you need to pry off the cover in specially designated areas (we have highlighted them in the photo).
Please note that dismantling must be carried out with extreme caution. It doesn't take much force to remove the diffuser, so if there is resistance, it means you're doing something wrong. It is better to re-examine all the joints; perhaps the hole for the screwdriver is hidden somewhere else.
It should also be noted that sometimes the lid is removed by itself, and sometimes along with the “internals”. This depends on the design features of the device. As soon as you remove the first obstacle, a new one will appear - a light bulb. Depending on the type of base, the lamps can turn off in different ways: if you press on the spring or simply disconnect the contacts.
Next, you need to remove the car interior lamp with your own hands. It is usually secured to the casing with several screws (2 to 4) or a mechanical latch. Here you need to be extremely careful, because the electrical wiring from the battery is connected to the housing. All you need to do is disconnect the contacts.
Another important tip is to mark the wires for yourself, because you will have to install the interior lamp in the old place after the repair work. To do this, you can use electrical tape of different colors or a marker.
Replacing the interior light bulb
Hi all! Recently, after going fishing, I discovered that the central interior lamp was not working. Having looked at the section “Self-help, car care” in the instructions, I was pleasantly surprised. There on page 201 it is written exactly how to deal with this problem. It turned out that it was enough to remove the entire diffuser and replace the lamp. But no matter how I tried to remove the diffuser, I couldn’t. The lampshade is fixed quite rigidly. And with increasing force, it seems that it may burst. Although the instructions are all easy and simple. Help with advice. Has anyone encountered this problem? Thanks in advance!
it must be removed so that it does not warp. You need to unclip all the latches at once, there seem to be 4 of them, and pull. Also, for convenience, I removed the lid with slots, the one closest to the glass, from there the latches are visible and you can get it with a screwdriver.
A screwdriver is cruel. Well, I thought that the instructions simplified everything too much! This means there are four fasteners, and not two as in the picture. Okay, thanks for the advice! Let's break!
The latches are located differently than in the pictures.. they are located a little further from the edges on the long side.. (displaced closer to each other).. I had sex with them for several minutes before I realized.. now I’ll take them off and put them on with a bang.. you can dive there)))
Added after 3 seconds:
Tanist
I think that you can do without a screwdriver, it all depends on desire and abilities, it’s not for nothing that they say: it doesn’t matter where your hands come from if they are golden
Those. There are only 4 latches: 2 each on the driver and passenger sides. And to pull it out, you need to take the panel somewhere in the middle on both sides, and then carefully pull it down. So? By the way, what is the standard size of the central lamp?
I don’t think it will be possible to drag it in the middle, it fits quite tightly, I dragged it a little from each corner so that it doesn’t warp. In my opinion, the lamp is in the glove compartment and trunk, you can just take them off and have a look.
standard size.. xs.. lamp with two contacts is cylindrical.. in the store they called it “finger”.. now I’ll attach a picture to explain where the latches are..